
Popular categories
Looking for a yarn?


Comments / Questions (99)
![]() Monique wrote:
Monique wrote:
Bonsoir , pourriez vous me dire quelle est la taille que le bébé porte sur la photo , car celà m'aide à avancée .Merci Cordialement
21.11.2025 - 23:04DROPS Design answered:
Bonjour Monique, choisissez la taille en fonction du schéma - retrouvez plus d'infos ici, et si vous avez des questions sur la réalisation, n'hésitez pas à nous les poser ici. Bon tricot!
24.11.2025 - 10:21
![]() Weronika wrote:
Weronika wrote:
Czy uwzględnione jest to jak włóczka rozciąga się po blokowaniu? Ostatnio robiąc z tej włóczki czapkę dla niemowlęcia / po blokowaniu pasowała na 5cio latke :(
02.11.2025 - 12:01DROPS Design answered:
Witaj Weroniko, jeżeli przerabiasz ścisło, to problemu nie powinno być. Jeśli luźno to faktycznie ubranie może się rozciągnąć. Ja robię dosyć ścisło, ale do merynosa i tak używam drutów o pół rozmiaru do 1 rozmiaru mniejszych. Pamiętaj, aby do prania nie stosować środków zmiękczających, oraz aby nie zostawiać mokrego ubrania w wodzie na zbyt długi czas. Przed wykonaniem ubrania koniecznie wykonaj próbkę, wypierz ją i wysusz. Następnie zmierz ile oczek wchodzi na 10 cm. Nie zajmie to dużo czasu, a zaoszczędzi rozczarowania :) Powodzenia!
02.11.2025 - 18:57
![]() Magdalena wrote:
Magdalena wrote:
Que puedo hacer para imprimir el patrón completo? Imprime solo las páginas 1,3 y 5. Gracias
28.10.2025 - 10:12DROPS Design answered:
Hi Magdalena, please check out your printer settings, I think that when you are printing there are only odd pages in settings, you have to choose all the pages. Happy knitting!
18.11.2025 - 11:10
![]() Laura wrote:
Laura wrote:
Buongiorno chiedo aiuto per lo sprone sto facendo 3/4 anni. 87 maglie al collo quando ho iniziato lo sprone mi avanzano 7 maglie calcolando le maglie sono 71 e non 87 dove sbaglio ? grazie saluti
27.10.2025 - 09:54DROPS Design answered:
Hi, Laura, have you made sure to knit the first row as explained for the size you are knitting? During the first row you increase 8 stitches and knit the A.1 4 times (5 stitches each time). Happy knitting!
28.10.2025 - 09:47
![]() Laura wrote:
Laura wrote:
Buongiorno chiedo aiuto per lo sprone sto facendo 3/4 anni. 87 maglie al colloca quando ho iniziato lo sprone mi avanzano 7 maglie calcolando le maglie sono 71 e non 87 dove sbaglio ? grazie saluti
27.10.2025 - 08:51
![]() Luisa wrote:
Luisa wrote:
Prima dello schema A1 devo fare un gettato; la prima maglia dello schema è un punto rovescio e non so come mettere il filo affinché non mi venga il buco! Come si fa? Avete un tutorial? Grazie
07.10.2025 - 22:36DROPS Design answered:
Buonasera Luisa, provi a vedere se questo video le può essere di aiuto per lavorare il gettato prima della maglia rovescio. Buon lavoro!
11.10.2025 - 19:31
![]() Sabine wrote:
Sabine wrote:
Hallo, ich stricke 12/18 Monate. Den Markierer beim Ärmel genau wo setzen? In der Mitte der 8 neu angeschlagen Maschen?
24.09.2025 - 16:46DROPS Design answered:
Hi, Sabine, yes, you insert the marker in the middle of the new stitches on the sleeves. Happy knitting!
24.10.2025 - 09:55
![]() Anna Palmqvist wrote:
Anna Palmqvist wrote:
Jag förstår inte hur jag ska sticka det 3e varvet på oket och de kommande 13 gångerna när jag ska sticka A1 och utöka. Hur många maskor har jag mellan varje A1 omgång? Borde inte detta vara olika för alla de 13 varven? Tyvärr kommer jag inte vidare
20.09.2025 - 17:36DROPS Design answered:
Hej Anna. När du ökar för raglan så kommer du få 8 maskor mer per varv, så antalet maskor på varvet kommer att ökas för varje gång du stickar raglan. Om du bara ser till att öka 1 maska på varje sida av A.1 till raglan på rätsidan så behöver du inte räkna de andra maskorna längre. Öka till raglan det antal gånger som uppges i din storlek och se till att du har det antal maskor som uppges efter det. Mvh DROPS Design
23.09.2025 - 07:43
![]() Elayne wrote:
Elayne wrote:
I want to start this sweater but not sure what band stitches refer to.
08.08.2025 - 17:31DROPS Design answered:
Dear Elayne, band stitches = stitches for the button band/ buttonhole band. As explained in the pattern, these stitches are worked always in garter stitch, which will differentiate them from the rest of the stitch-pattern. Remember to work the buttonholes over these stitches when necessary. Happy knitting!
10.08.2025 - 16:57
![]() Mona wrote:
Mona wrote:
Ich verstehe leider nicht ganz wie man den Cardigan beginnt- die Anleitungsvideos beziehen sich alle auf geschlossene Pullover, aber bei einem Cardigan muss man ja vorne offen gelassen werden. Wie geht das?
07.08.2025 - 15:52DROPS Design answered:
Liebe Mona, wir haben ja nur ein Video / eine Lektion für einen Pullover, der von oben nach unten gestrickt wird, für eine Jacke wird man ungefähr gleich stricken, nur in Hin- und Rückreihen aber die Idee ist die gleiche: es wird für den Raglan zugenommen, die Arbeit wird für Rumpfteil/Ärmel aufgeteilt und separat fertig gestrickt. Viel Spaß beim Stricken!
07.08.2025 - 16:06
|
|||||||
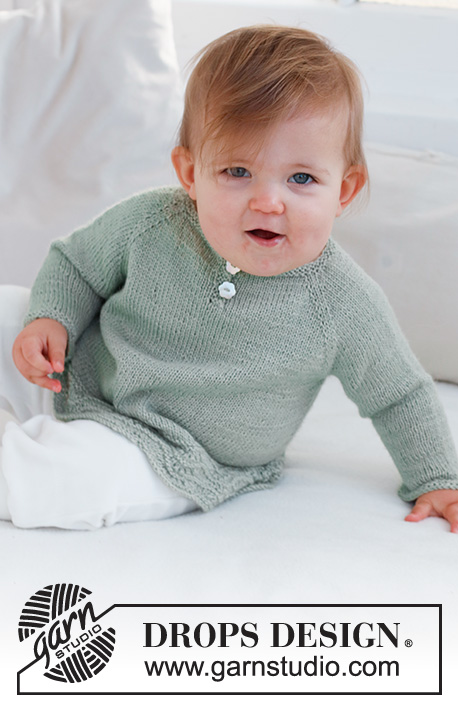
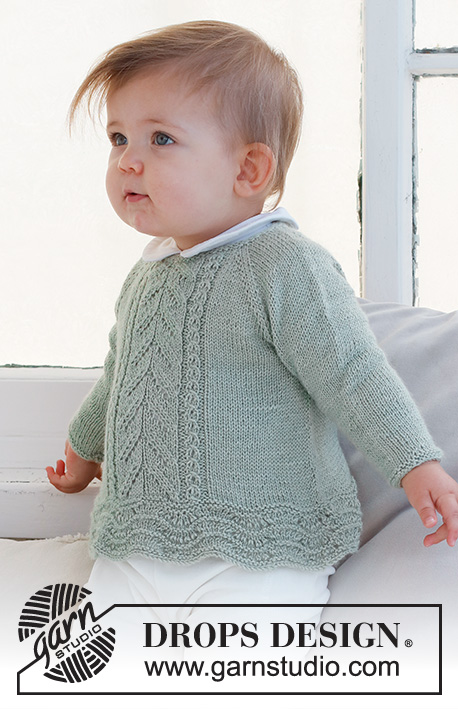
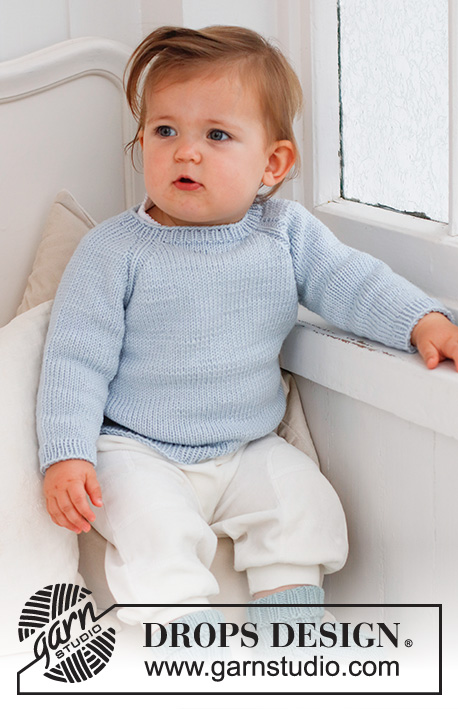
Dream in Blue Cardigan#dreaminbluecardigan |
|||||||
 |
 |
||||||
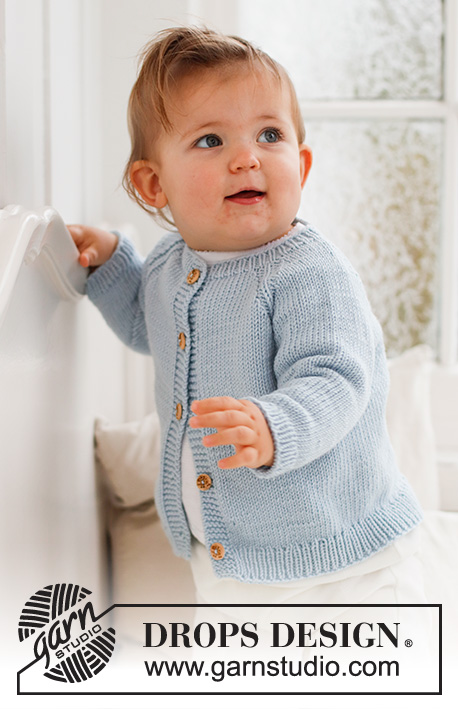
Knitted jacket for babies and children in DROPS Merino Extra Fine. The piece is worked top down with raglan. Sizes 0 - 4 years.
DROPS Baby 42-6 |
|||||||
|
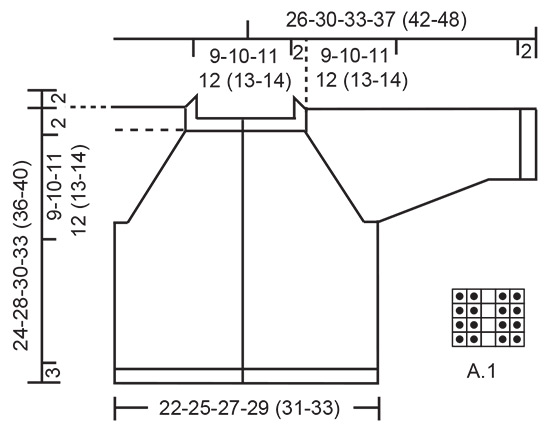
------------------------------------------------------- EXPLANATIONS FOR THE PATTERN: ------------------------------------------------------- RIDGE/GARTER STITCH (worked back and forth): Knit all rows. 1 ridge = knit 2 rows. PATTERN: See diagram A.1. The diagram shows all rows in the pattern from the right side. DECREASE TIP (sleeves): Decrease 1 stitch on either side of the marker as follows: Work until there are 3 stitches left before the marker, knit 2 together, knit 2 (marker sits between these 2 stitches), slip 1 stitch as if to knit, knit 1 and pass the slipped stitch over the knitted stitch. BUTTONHOLES: Work buttonholes on the right band (when the garment is worn). Work from the right side when there are 3 stitches left on the row as follows: Make 1 yarn over, knit 2 together and knit 1. On the next row, knit the yarn over to leave a hole. The first buttonhole is worked when the rib on the neck measures 1½-2 cm = ½"-¾". Then work the other 4-4-4-4 (5-5) buttonholes with approx. 5-6-6½-7 (6½-7) cm = 2"-2⅜"-2½"-2¾" (2½"-2¾") between each one. ------------------------------------------------------- START THE PIECE HERE: ------------------------------------------------------- JACKET – SHORT OVERVIEW OF THE PIECE: The neck and yoke are worked back and forth with circular needle. The yoke is divided for the body and sleeves and the body continued back and forth. The sleeves are worked in the round with double pointed needles. NECK: Cast on 65-69-73-77 (81-87) stitches with circular needle size 3 MM = US 2.5 and DROPS Merino Extra Fine. Purl 1 row from the wrong side with 5 band stitches in GARTER STITCH – read description above, on each side. Then work rib as follows: 5 band stitches in garter stitch, * knit 1, purl 1 *, work from *-* until there are 6 stitches left, knit 1 and 5 band stitches in garter stitch. Remember the BUTTONHOLES – read description above. When the rib measures 2 cm = ¾", change to circular needle size 4 MM = US 6. Insert 1 marker after the band at the beginning of the row; the yoke is measured from this marker! YOKE: Work the next row from the right side as follows: 5 band stitches in garter stitch, knit 5-6-7-8 (8-10), 1 yarn over, A.1, 1 yarn over, knit 6-6-6-6 (8-8), 1 yarn over, A.1, 1 yarn over, knit 13-15-17-19 (19-21), 1 yarn over, A.1, 1 yarn over, knit 6-6-6-6 (8-8), 1 yarn over, A.1, 1 yarn over, knit 5-6-7-8 (8-10) and 5 band stitches in garter stitch. You have increased 8 stitches for raglan. The yarn overs are purled twisted on the next row and continued in stockinette stitch. Continue the pattern and increase on each side of A.1 on each row from the right side a total of 11-13-14-15 (17-18) times = 153-173-185-197 (217-231) stitches. REMEMBER THE KNITTING GAUGE! When the piece measures 9-10-11-12 (13-14) cm = 3½"-4"-4⅜"-4¾" (5⅛"-5½") from the marker, divide the yoke for the body and sleeves as follows: 5 band stitches in garter stitch, work 19-22-24-26 (29-32) stitches in stockinette stitch, place the next 32-36-38-40 (44-46) stitches on a thread for the sleeve, cast on 6-6-8-8 (6-6) stitches, work 41-47-51-55 (61-65) stitches in stockinette stitch, place the next 32-36-38-40 (44-46) stitches on a thread for the sleeve, cast on 6-6-8-8 (6-6) stitches, work 19-22-24-26 (29-32) stitches in stockinette stitch and 5 band stitches in garter stitch. BODY: = 101-113-125-133 (141-151) stitches. Continue back and forth with stockinette stitch and 5 band stitches in garter stitch on each side until the body measures 10-13-14-16 (18-21) cm = 4"-5⅛"-5½"-6¼" (7"-8¼") from the division. Now increase 10-12-14-14 (16-16) stitches evenly spaced on the next row from the right side (do not increase over the bands) = 111-125-139-147 (157-167) stitches. Change to circular needle size 3 MM = US 2.5 and work rib, starting from the wrong side as follows: 5 band stitches in garter stitch, * purl 1, knit 1 *, work from *-* until there are 6 stitches left, purl 1 and 5 band stitches in garter stitch. Bind off when the rib measures 3 cm = 1⅛". The jacket measures approx. 24-28-30-33 (36-40) cm = 9½"-11"-11¾"-13" (14¼"-15¾") from the shoulder down. SLEEVES: Place the 32-36-38-40 (44-46) stitches from the thread on the one side of the piece on double pointed needles size 4 MM = US 6 and knit up 1 stitch in each of the 6-6-8-8 (6-6) stitches cast on under the sleeve = 38-42-46-48 (50-52) stitches. Insert a marker in the middle of the new stitches under the sleeve (= mid-under sleeve). Start at the marker and work stockinette stitch in the round. When the sleeve measures 2 cm = ¾" from the division, decrease 1 stitch on each side of the marker - read DECREASE TIP! Decrease like this every 3-3-2-2½ (3-4) cm = 1⅛"-1⅛"-¾"-1" (1⅛"-1½") a total of 2-3-5-5 (5-5) times = 34-36-36-38 (40-42) stitches. When the sleeve measures 8-11-12-15 (18-23) cm = 3⅛"-4⅜"-4¾"-6" (7"-9"), increase 4-4-4-4 (4-6) stitches evenly spaced = 38-40-40-42 (44-48) stitches. Change to double pointed needles size 3 MM = US 2.5 and work rib (knit 1, purl 1) for 2 cm = ¾". Bind off. The sleeve measures approx. 10-13-14-17 (20-25) cm = 4"-5⅛"-5½"-6¾" (8"-9¾"). Work the other sleeve in the same way. |
|||||||
Diagram explanations |
|||||||
|
|||||||
 |
|||||||
Have you finished this pattern?Tag your pictures with #dropspattern #dreaminbluecardigan or submit them to the #dropsfan gallery. Do you need help with this pattern?You'll find 27 tutorial videos, a Comments/Questions area and more by visiting the pattern on garnstudio.com. © 1982-2026 DROPS Design A/S. We reserve all rights. This document, including all its sub-sections, has copyrights. Read more about what you can do with our patterns at the bottom of each pattern on our site. |
|||||||


With over 40 years in knitting and crochet design, DROPS Design offers one of the most extensive collections of free patterns on the internet - translated to 17 languages. As of today we count 324 catalogs and 12290 patterns - 12280 of which are translated into English (US/in).
We work hard to bring you the best knitting and crochet have to offer, inspiration and advice as well as great quality yarns at incredible prices! Would you like to use our patterns for other than personal use? You can read what you are allowed to do in the Copyright text at the bottom of all our patterns. Happy crafting!
Post a comment to pattern DROPS Baby 42-6
We would love to hear what you have to say about this pattern!
If you want to leave a question, please make sure you select the correct category in the form below, to speed up the answering process. Required fields are marked *.