
Popular categories
Looking for a yarn?


Comments / Questions (28)
![]() Nghia Fulcher wrote:
Nghia Fulcher wrote:
Hello (size 7/8 years) I'm lost. After first round (Yoke) has been worked, first round of patterns A1, A2 and A3, I assume 2nd round is knitted? How are the next rows done? A1, A2, raglan increase and then stocking stitches for the sleeve, What about the front piece. Which patterns and over how many stitches? Thank you for your help
11.03.2023 - 08:03DROPS Design answered:
Dear Nghia, it's worked on the round so you work following the same exact sequence as before: A.1 over A.1, A.2 over A.2, stocking stitch over stocking stitch. The only thing you change is that you work the 2nd round of the charts and that the raglan increases/yarn overs from the previous round are worked twisted so that there are no holes. You have already established the pattern for the sleeves, front piece and back piece in the first round. Happy knitting!
12.03.2023 - 18:24
![]() Lena wrote:
Lena wrote:
Hej! Vackert mönster och roligt att sticka. Dock upptäcker jag att diagram A2 inte blir symmetriskt med A3 vid avslut på sista mönstervarvet. Visst saknas det ett omslag innan sista maskan. A2 och A3 ramar ju in A1 och bör ju vara symmetriska.
23.07.2022 - 09:48DROPS Design answered:
Hej Lena, vi forstår hvad du mener og det kan du naturligvis gøre, men antal masker stemmer med dem du har i diagrammet, så du bliver evt nødt til at lægge en ekstra maske til hvis du laver et ekstra omslag. God fornøjelse!
03.08.2022 - 15:42
![]() Kaidi wrote:
Kaidi wrote:
Jeg strikker str 2 år. Og er kommet til bolen men forstår ikke helt hva jeg skal gjør videre. Står at det skal strikkes A1 over alle maskene. Men i forrige omgangen har jeg strikket både A4, og A5. Og lagt til 11 maskene til i under arma. Kan du forklarer meg litt nærmere. Jeg får ikke mønsteret til å stemme overens.
21.07.2022 - 01:31
![]() Angela wrote:
Angela wrote:
Hallo liebes Drops Team, nach einigen Versuchen dieses Muster zu stricken, bin ich gescheitert. Bis Runde 11 mit dem Versetzen ist alles in Odnung. Danach habe ich Probleme bei A.2 und A.3. Nach der Musterrunde 11 , A.2 - Abstricken mit rechten Maschen, es sind 8 Maschen gestrickt auf der Nadel und aber 9 Kästchen im Diagramm. A.3 : Runde 11 - 7 Schlaufen auf der Nadel, zum Abstricken mit rechten Maschen Runde 12 sind aber 6 Kästchen angegeben.Würde mich sehr über ihre Hilfe freuen
02.02.2022 - 14:25DROPS Design answered:
Liebe Angela, bei der 9. bis 16. Reihe stricken Sie die letzte Masche in A.3 zusammen mit den 2 ersten Maschen A.1, dann stricken Sie die letzte Masche A.1 zusammen mit den 2 ersten Maschen A.1 und dann A.2,beachten Sie nur, daß Sie immer die richtige Maschenanzahl wie in jedem Diagram haben. Viel Spaß beim stricken!
02.02.2022 - 14:36
![]() Karin Mickelsson Johansson wrote:
Karin Mickelsson Johansson wrote:
Hej! Stickar strl 12/18 mån, på oket, är det ökningar varannat varv med 8 maskor? Mvh Karin
05.01.2022 - 15:35DROPS Design answered:
Hei Karin. Ja. Kastene/økningene til ermene er forklart i oppskriften, mens økningene til forstykket og bakstykket inngår raglanøkningen i diagrammene. 8 økninger på hver 2.omgang. mvh DROPS Design
14.01.2022 - 13:29
![]() Gitte Segato wrote:
Gitte Segato wrote:
Er det korrekt at A2 og A3 for str 2-3/4 ikke har det samme antal masker fra 3. mønsterpind? Så der er 1 maske forskel i antallet på de 2 halve bagstykker?
01.01.2022 - 19:59DROPS Design answered:
Hej Gitte, jeg er ikke sikker på at jeg forstår dit spørgsmål. Diagram A.2 og A.3 er samme for både størrelse 2 og 3/4 år. Men antal masker i opskriften vil ikke være det samme :)
05.01.2022 - 08:41
![]() Helle Andresen wrote:
Helle Andresen wrote:
Jeg har svært ved at få blusen over hoved på mit barnebarn på 9 mdr. strikker str 12/18 mdr. den måler 20 cm rundt, min strikkefasthed passer med opskriften, skal den være åben i nakken eller skal der slåes meget meget løst op ?
30.12.2021 - 10:26DROPS Design answered:
Hei Helle. Det var jo kjedelig å høre. 20 cm stemmer med målskissen og vi har flere oppskrifter som har samme mål i halsen. Nå er den strikket riller i halsen og er ikke så tøyelig, som det er ved en vrangbord. En mulighet er å rekke opp/klippe vekk bare halskanten, og så strikke en ny halskant og evnt felle av med kast på hver ca 3. maske. mvh DROPS Design
04.01.2022 - 15:19
![]() Karoline wrote:
Karoline wrote:
Angående raglan økning hver 2. omgang i denne oppskrift. Hva er en omgang? Hva er to omganger? Er mønster runden + glattstrikk runden en omgang tilsammen? Er mønster strikk runden og glattstrikk runden to separate omganger? Finner ikke fornuftig svar i tekst eller foto. Takk for svar - om sp-målet gav mening…
08.12.2021 - 23:25DROPS Design answered:
Hej Karoline, En omgang er én omgang, det vil sige at du tager ud til raglan på hver 2.omgang. Se gerne vore videoer nederst i opskriften. God fornøjelse!
09.12.2021 - 09:28
![]() Annarosa wrote:
Annarosa wrote:
Buongiorno i vostri modelli sono sempre molto belli, grazie!!! Ho appena cominciato questo bellissimo modello, nella versione in Italiano mi sono accorta che sullo sprone c'è un errore si para di A4 invece di A2. .... Volevo inoltre chiedere se questo modello è disponibile anche per adulti? grazie molte
28.07.2021 - 12:14DROPS Design answered:
Buongiorno Annarosa, grazie per la segnalazione: abbiamo corretto il testo. Purtroppo non c'è un modello simile per adulti, ma ne può trovare tanti altri sul nostro sito. Buon lavoro!
29.07.2021 - 09:48
![]() Berit wrote:
Berit wrote:
Str. 8 år, 13. omgang i diagram A.2: Udgangspunktet er 9+1 retmasker. Efter mønsterstrik i omgang 13 er der 11 masker. I 14. omgang skal man lave 12 retmasker over disse 11 masker? Jeg støder på de efterfølgende omgange også. Hvad gør jeg galt?
04.06.2021 - 19:27DROPS Design answered:
Hei Berit. Husk at i oppskriften står det: På omgangene som starter med at tage 1 maske løs af pinden som om den skulle strikkes ret, strik 2 ret sammen, løft den løse maske over maskerne som blev strikket sammen i A.1, forflyttes starten på omgangen 1 maske tilbage, dvs starten på omgangen starter når der er 1 maske tilbage på forrige omgang. mvh DROPS design
07.06.2021 - 09:05
|
|||||||||||||||||||
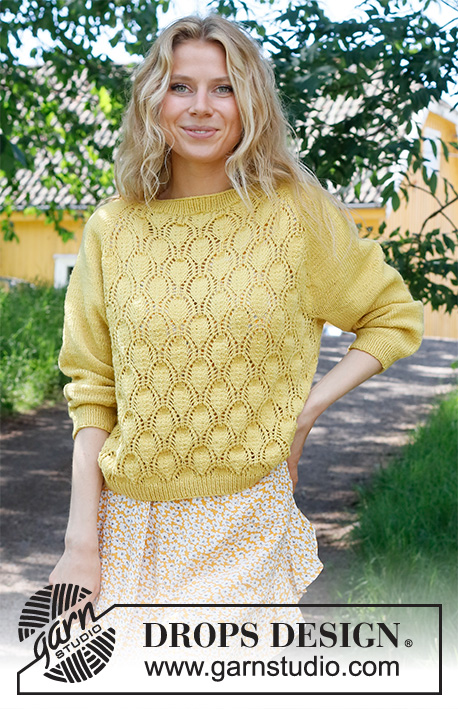
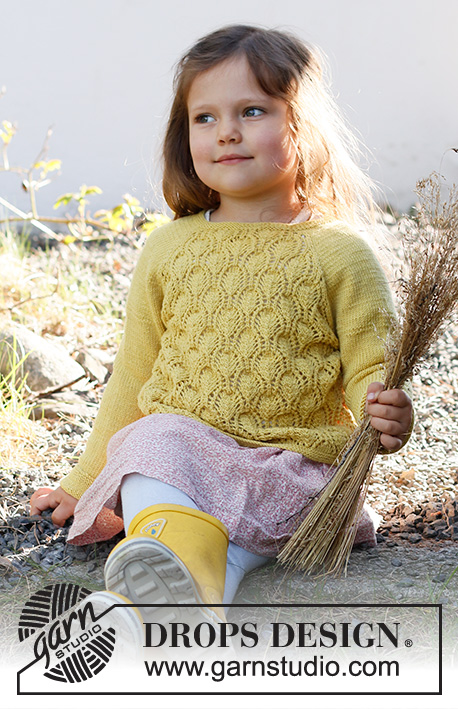
Sweet Marigold Sweater#sweetmarigoldsweater |
|||||||||||||||||||
 |
 |
||||||||||||||||||
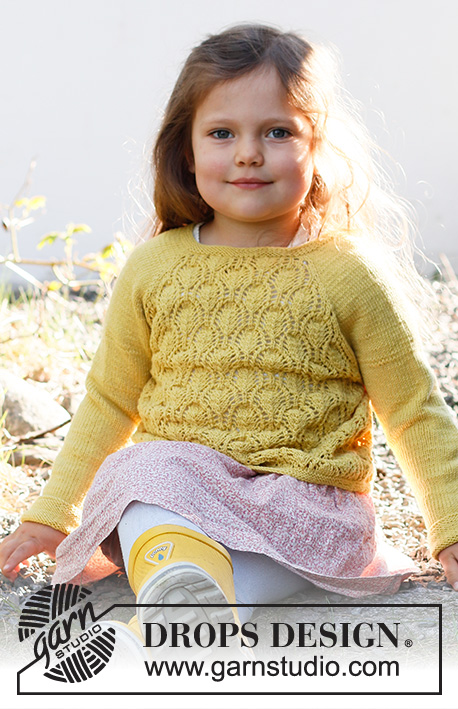
Knitted sweater for baby and kids in DROPS BabyMerino. Piece is knitted top down with raglan pattern and lace pattern. Size 6 month - 8 years
DROPS Baby & Children 38-12 |
|||||||||||||||||||
|
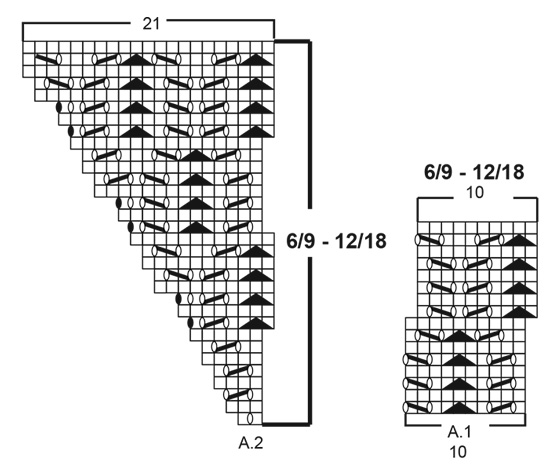
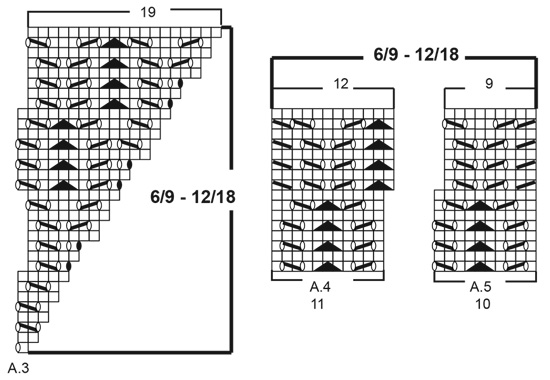
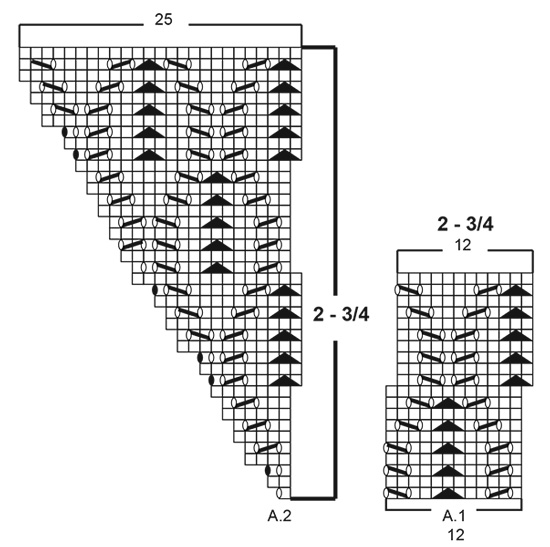
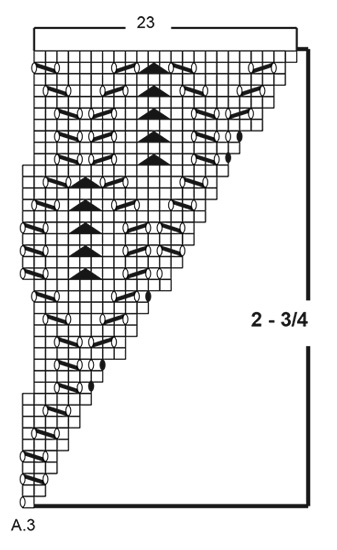
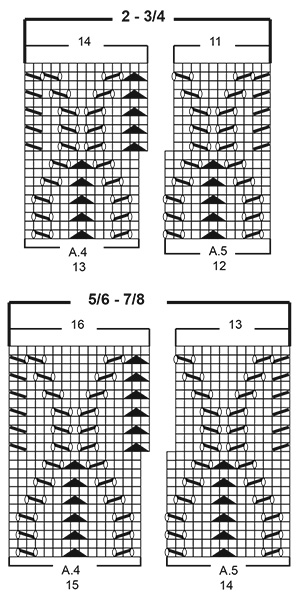
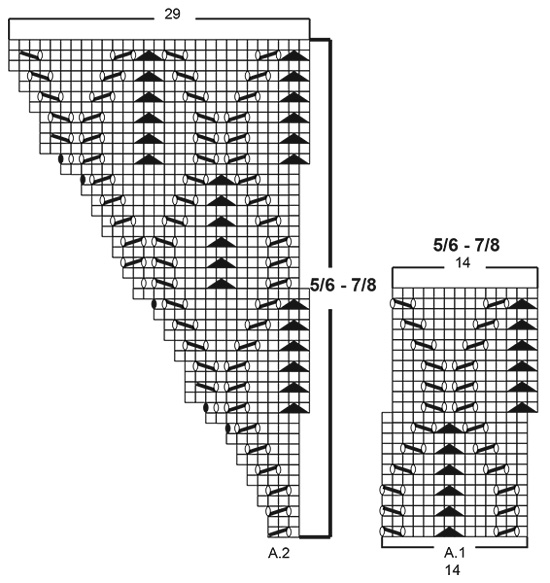
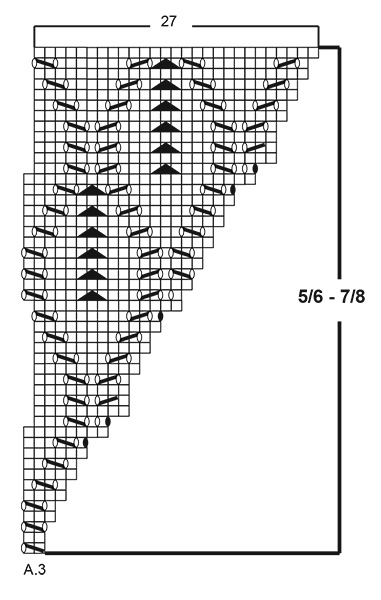
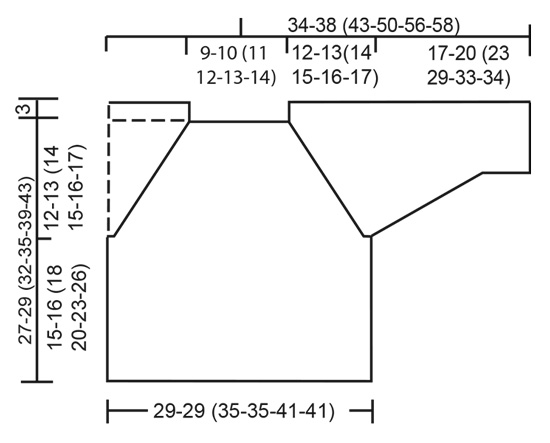
------------------------------------------------------- EXPLANATION FOR THE PATTERN: ------------------------------------------------------- GARTER STITCH (worked in the round): 1 ridge = 2 rounds. Knit 1 round and purl 1 round. PATTERN: See diagrams A.1 to A.5. Choose diagram for your size. INCREASE TIP (evenly): To calculate how to increase evenly, use the total number of stitches on row (e.g. 72 stitches) and divide stitches by number of increases to be done (e.g. 6) = 12. In this example increase by making 1 yarn over after every 12th stitch. On next round work yarn over twisted to avoid hole. RAGLAN: On front and back piece raglan increase is shown in diagrams. Increase for raglan on each of the sleeves as follows: Increase 1 stitch after 1st and 3rd marker and before 2nd and 4th marker by making a yarn over. Knit yarn overs twisted on next round. Then work the new stitches in stockinette stitch. DECREASE TIP (applies to sleeves): Decrease 1 stitch on each side of marker thread as follows: Work until 3 stitches remain before stitch with marker thread, knit 2 together, knit 3, slip 1 stitch knitwise, knit 1, pass slipped stitch over stitch worked. BIND-OFF TIP: To avoid a tight bind-off edge you may use a larger needle size. If this also is too tight, work a 1 yarn over after approx. every 4th stitch while binding off (bind off yarn overs as regular stitches). ------------------------------------------------------- START THE PIECE HERE: ------------------------------------------------------- SWEATER - SHORT OVERVIEW OF THE GARMENT: Worked in the round on circular needle from mid back, top down. Work sleeves in the round on double pointed needles, top down. NECK EDGE: Cast on 72-76 (82-84-90-94) stitches on a short circular needle size 2.5 MM = US 1.5 with Baby Merino. Work 4 ridges in GARTER STITCH - read explanation above. Knit 1 round while increasing 6-2 (2-0-8-4) stitches evenly - read INCREASE TIP = 78-78 (84-84-98-98) stitches. Purl 1 round. Insert 1 marker thread at beginning of round = mid back. NOW MEASURE PIECE FROM HERE! Switch to a short circular needle size 3 MM = US 2.5 and work yoke as explained below. REMEMBER THE KNITTING GAUGE! YOKE: Work next round as follows: Half back piece: Work A.1 (= 10-10 (12-12-14-14) stitches), A.2 (= 2-2 (1-1-3-3) stitches). Right sleeve: Work 1 stitch in stockinette stitch, insert 1st marker, make 1 yarn over, work 14 stitches in stockinette stitch, make 1 yarn over, insert 2nd marker, 1 stitch in stockinette stitch. Front piece: Work A.3 (= 1-1 (1-1-2-2) stitches), A.1 over 20-20 (24-24-28-28) stitches, A.2 over 2-2 (1-1-3-3) stitches. Left sleeve: Work 1 stitch in stockinette stitch, insert 3rd marker, make 1 yarn over, work 14 stitches in stockinette stitch, make 1 yarn over, insert 4th marker, 1 stitch in stockinette stitch. Half back piece: Work A.3 over 1-1 (1-1-2-2) stitches, A.1 (= 10-10 (12-12-14-14) stitches) = 86-86 (92-92-102-102) stitches (including yarn overs). On rounds that begin with slip 1 stitch knitwise, knit 2 together, pass slipped stitch over stitches worked together in A.1, displace beginning of round 1 stitch backwards, i.e. beginning of round begins when 1 stitch remains on previous round. When A.1 has been worked vertically, knit next stitch. Then work beginning of round as previously in piece. Continue pattern like this and increase for RAGLAN - read explanation above, increase every other round 14-16 (17-18-19-20) times in total (including increases on first round after neck edge). When increase for sleeves are finished, continue in stockinette stitch and pattern as before. After last increase for raglan and A.2/A.3 have been worked 1 time vertically, there are 208-216 (244-248-276-280) stitches on needle. Piece measures approx. 10-10 (12-12-15-15) cm = 4"-4" (4¾"-4¾"-6"-6") from neck edge. Now work pattern as follows: Half back piece: Work A.1 over 20-20 (24-24-28-28) stitches, A.4 over 11-11 (13-13-15-15) stitches. Right sleeve: Work 43-47 (49-51-53-55) stitches in stockinette stitch. Front piece: Work A.5 over 10-10 (12-12-14-14) stitches, A.1 over 40-40 (48-48-56-56) stitches (= 4 times in width), A.4 over 11-11 (13-13-15-15) stitches. Left sleeve: Work 43-47 (49-51-53-55) stitches in stockinette stitch. Half back piece: Work A.5 over 10-10 (12-12-14-14) stitches and A.1 over 20-20 (24-24-28-28) stitches. Continue pattern like this until piece measures 12-13 (14-15-16-17) cm = 4¾"-5⅛" (5½"-6"-6¼"-6¾") from marker thread after neck edge mid back. On next round divide piece for body and sleeves as follows: Continue with pattern as before over the first 31-31 (37-37-43-43) stitches (= half back piece), slip the next 43-47 (49-51-53-55) stitches on 1 stitch holder for sleeve, cast on 9-9 (11-11-13-13) new stitches on needle (= in the side under sleeve), continue with pattern as before over the next 61-61 (73-73-85-85) stitches (= front piece), slip the next 43-47 (49-51-53-55) stitches on 1 stitch holder for sleeve, cast on 9-9 (11-11-13-13) new stitches on needle (= in the side under sleeve) and continue with pattern as before over the last 30-30 (36-36-42-42) stitches (= half back piece). Finish body and sleeves separately. BODY: = 140-140 (168-168-196-196) stitches. Work A.1 over all stitches (= 14 times in width, continue on correct round in diagram). Continue with pattern like this until piece measures 14-15 (17-19-22-25) cm = 5½"-6" (6¾"-7½"-8¾"-9¾") from division. Switch to circular needle size 2.5 MM = US 1.5. Work 3 ridges over all stitches. Bind off by knitting– read BIND-OFF TIP. SLEEVES: Slip the 43-47 (49-51-53-55) stitches from stitch holder in one side of piece on double pointed needles size 3 MM = US 2.5 and pick in addition up 1 stitch in each of the 9-9 (11-11-13-13) new stitches cast on under sleeve = 52-56 (60-62-66-68) stitches. Insert 1 marker thread in the middle stitch under sleeve and begin round here. Work in stockinette stitch in the round. When piece measures 2 cm = ¾" from division, decrease 2 stitches mid under sleeve - read DECREASE TIP. Decrease like this every 1½-1½ (2-3-3-3) cm = ½"-½" (¾"-1⅛"-1⅛"-1⅛") , 8-9 (9-8-9-9) times in total = 36-38 (42-46-48-50) stitches. Work until sleeve measures 16-19 (22-28-32-33) cm = 6¼"-7½" (8¾"-11"-12½"-13"). Switch to double pointed needles size 2.5 MM = US 1.5. Work 3 ridges. Bind off by knitting. Sleeve measures approx. 17-20 (23-29-33-34) cm = 6¾"-8" (9"-11⅜"-13"-13⅜") from division. Work the other sleeve the same way. |
|||||||||||||||||||
Diagram explanations |
|||||||||||||||||||
|
|||||||||||||||||||
 |
|||||||||||||||||||
 |
|||||||||||||||||||
 |
|||||||||||||||||||
 |
|||||||||||||||||||
 |
|||||||||||||||||||
 |
|||||||||||||||||||
 |
|||||||||||||||||||
 |
|||||||||||||||||||
Have you finished this pattern?Tag your pictures with #dropspattern #sweetmarigoldsweater or submit them to the #dropsfan gallery. Do you need help with this pattern?You'll find 28 tutorial videos, a Comments/Questions area and more by visiting the pattern on garnstudio.com. © 1982-2026 DROPS Design A/S. We reserve all rights. This document, including all its sub-sections, has copyrights. Read more about what you can do with our patterns at the bottom of each pattern on our site. |
|||||||||||||||||||


With over 40 years in knitting and crochet design, DROPS Design offers one of the most extensive collections of free patterns on the internet - translated to 17 languages. As of today we count 324 catalogs and 12291 patterns - 12281 of which are translated into English (US/in).
We work hard to bring you the best knitting and crochet have to offer, inspiration and advice as well as great quality yarns at incredible prices! Would you like to use our patterns for other than personal use? You can read what you are allowed to do in the Copyright text at the bottom of all our patterns. Happy crafting!
Post a comment to pattern DROPS Baby & Children 38-12
We would love to hear what you have to say about this pattern!
If you want to leave a question, please make sure you select the correct category in the form below, to speed up the answering process. Required fields are marked *.