
Popular categories
Looking for a yarn?


Comments / Questions (70)
![]() Valérie Tussiot wrote:
Valérie Tussiot wrote:
Bonjour, Quand je veux imprimer ou télécharger un modèle, il n'y a pas les diagrammes. Comment faire pour les avoir? Merci
03.10.2021 - 12:25DROPS Design answered:
Bonjour Mme Tussiot, nous avons eu quelques soucis d'affichage, mais tout est réglé maintenant, actualisez la page ou nettoyez le cache de votre navigateur si besoin, les images & diagrammes devraient désormais s'afficher. Bon crochet!
04.10.2021 - 08:26
![]() Rosa Maria Bastaros wrote:
Rosa Maria Bastaros wrote:
Felicidades por las lanas y esta web con los patrones gratuitos y la informacion sobre el punto, saludos
18.08.2021 - 19:00
![]() Gabi wrote:
Gabi wrote:
"Die letzte Reihe von A.5a/A.5b nach unten umklappen..." Steht das kleine schwarze Quadrat bei 5 , wo es mit 6a/b weitergeht bei der Reihe mit den festen Maschen und Luftmaschenbogen oder bei der Reihe mit Halbstäbchen und den Luftmaschenbogen?
13.08.2021 - 17:23DROPS Design answered:
Liebe Gabi, bei unserem DROPS Along zeigen wir diese Technik, bzw Reihe 36 hier - siehe auch das Video. ab ca 07.13. Viel Spaß beim häkeln!
16.08.2021 - 07:36
![]() Weronika wrote:
Weronika wrote:
Zakończyłam przedostatni rząd schematu A.5b. Obliczyłam, że mam 116 łuków i w ostatnim rządzie wyjdzie mi 58 wachlarzy. Wg opisu wzoru powinno być 66 wachlarzy. Kilka razy przeliczyłam poprzednie rzędy i wszystko się zgadza. Z moich obliczeń wynika, że nie "zjadłam" niczego po drodze i oczka dodawałam prawidłowo. Mimo to nie mogę się doszukać tego gdzie zrobiłam błąd. Na pewno ma być 66 wachlarzy? Proszę o pomoc.
01.08.2021 - 19:26DROPS Design answered:
Witaj Weroniko, przy dodawaniu oczek w miejscach oznaczonych strzałkami w schemacie A.5b łatwo o pomyłkę. Zobacz jak szal się układa. Jeśli jest ok. to nie ma co się trudzić i poszukiwać błędu. Dodatkowo po blokowaniu powinno się wszystko ładnie wyrównać. Jeśli brzeg robótki ściąga się, to będziemy szukać błędu. Czekam na odpowiedź i pozdrawiam
02.08.2021 - 16:17
![]() Carlos wrote:
Carlos wrote:
Guten Tag! Ich habe ein Problem mit der Anleitung „ Die erste Reihe von A.6b wie folgt häkeln (A.6a zeigt, wie die Reihe beginnt und wird zusätzlich zu A.6b gehäkelt): 4 Luftmaschen, 1 feste Masche um das erste Halbstäbchen, 3 Luftmaschen + 1 feste Masche um das nächste Halbstäbchen – in dieser Weise am ganzen Tuch entlanghäkeln, dabei.“ Wie häkele ich eine Festmasche UM eine Halbstäbchen? Bis jetzt habe ich es nur um Luftmaschenbögen gemacht… Danke im Voraus!
07.06.2021 - 07:01DROPS Design answered:
Lieber Carlos, eine Variante von diesem Tuch habe wir als DROPS-Along gehäkelt, hier wird es gezeigt wie man die 1. Reihe A.6b von diesem Tuch bzw die Reihe 50 in A.7a , wie man die Festmasche um die Maschen von der vorrigen Reihe häkelt (wie Reliefmaschen). Hoffentlich kann es Ihnen weiter helfen. Viel Spaß beim häkeln!
07.06.2021 - 08:10
![]() Carla Moretti M wrote:
Carla Moretti M wrote:
Ma i 17 archi in quanti giri ?io ne ho fatti 16 di giri dai diagrammi non si capisce bene
11.04.2021 - 16:27DROPS Design answered:
Buonasera Carla, i 17 archi di catenelle li ottiene alla fine dei diagrammi A.2a, A.2b e A.2C, poi deve proseguire a lavorare i diagrammi A.3 come indicato. Buon lavoro!
11.04.2021 - 20:07
![]() Carla Moretti wrote:
Carla Moretti wrote:
Perché dite che alla fine dei diagrammi sono 17 archi invece a me ne vengono 33?
11.04.2021 - 16:17DROPS Design answered:
Buonasera Carla, se conta gli archi alla fine dei diagrammi A.2a, A.2b e A.2c sono 17 gli archi di catenelle. Buon lavoro!!
11.04.2021 - 16:22
![]() DURE ANNETTE wrote:
DURE ANNETTE wrote:
Bonjour, je voudrais faire ce châle mais pour une petite fille de 12 ans. Comment puis-je adapter les diagrammes à la taille enfant ? Je pense aussi changer la laine ''alpaca'' par la laine ''Kid-silk''. Est-ce possible ? Si oui dois-je prendre deux brins de laine Kid-Silk ou avec un seul brin est-ce suffisant ? Merci de votre réponse
06.04.2021 - 17:34DROPS Design answered:
Bonjour Mme Dure, Nous ne sommes malheureusement pas en mesure de pouvoir adapter chacun de nos modèles à chaque demande. Merci de bien vouloir contacter votre magasin, même par mail ou téléphone, pour toute assistance complémentaire. Merci pour votre compréhension.
07.04.2021 - 07:17
![]() Jane Martin wrote:
Jane Martin wrote:
Hi, this is a lovely pattern, as they all are, the patterns are written differently compared to english patterns but I usually manage to work out your explanations. However I am struggling with this one at "Fold last row in A.5a/A.5b down so that right side is against right side and work from wrong side around row with black square " can you please give further instructions on how this is done and what stitch I should be crocheting into. Many thanks for you help
23.03.2021 - 09:18DROPS Design answered:
Dear Jane, it simply means, that you fold the edge out, so you can stitch into the row (marked on the diagram with a black square) from the back (WS), thus creating a litle extra edge on the right side. Happy Crafting!
23.03.2021 - 12:12
![]() Lene wrote:
Lene wrote:
Er opskrift kun i diagram?
04.03.2021 - 17:00DROPS Design answered:
Hej Lene, ja og så kan du se videoen vi har lavet til opskriften, den finder du længere nede i opskriften :)
05.03.2021 - 08:13
|
|||||||||||||||||||||||||||||||||||||||||||||||||||||||
Thoughts of Ireland#thoughtsofirelandshawl |
|||||||||||||||||||||||||||||||||||||||||||||||||||||||
 |
 |
||||||||||||||||||||||||||||||||||||||||||||||||||||||
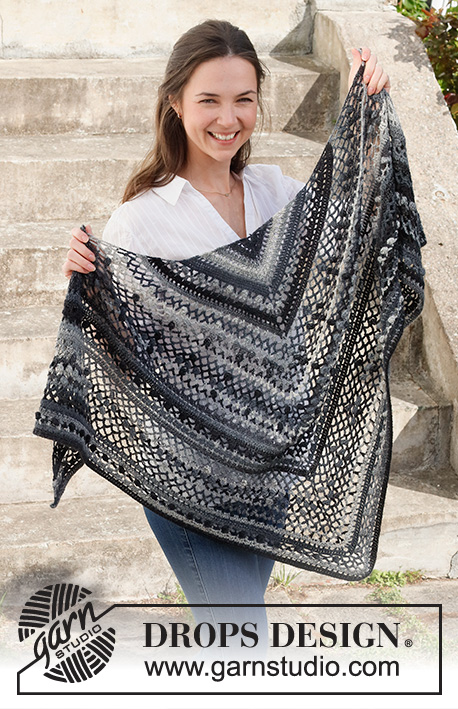
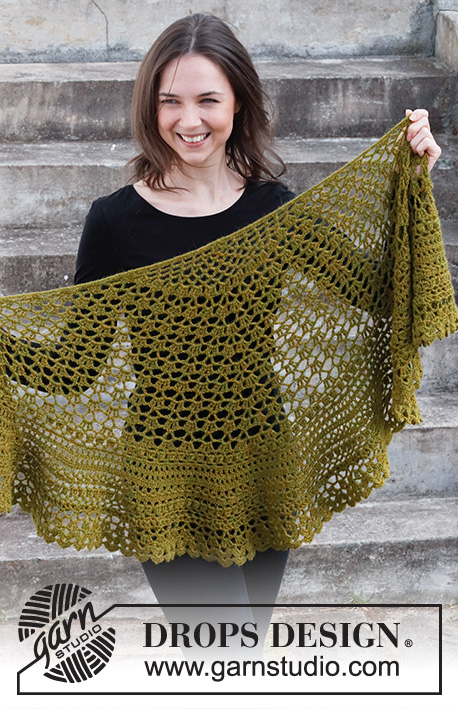
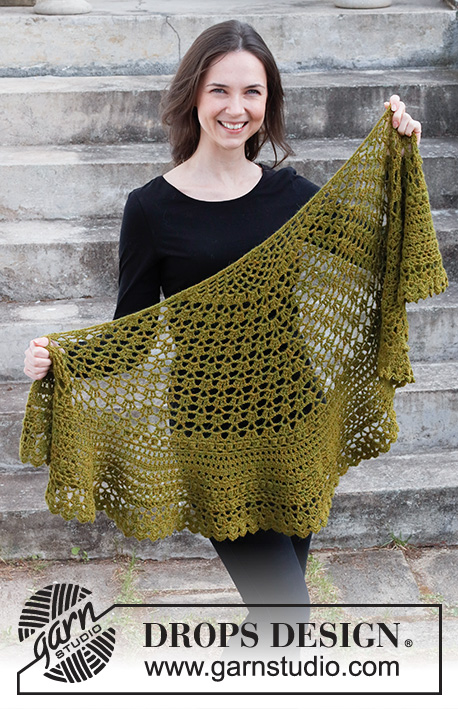
Crocheted shawl in DROPS Alpaca. Piece is crocheted top down with lace pattern.
DROPS 214-41 |
|||||||||||||||||||||||||||||||||||||||||||||||||||||||
|
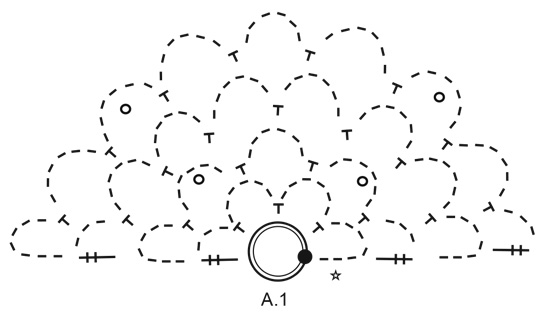
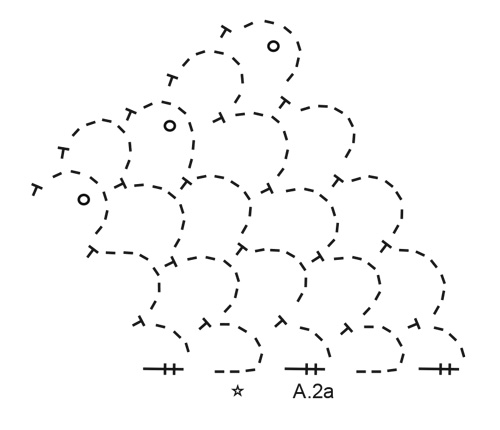
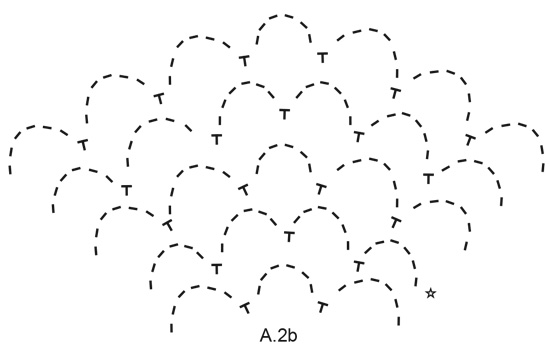
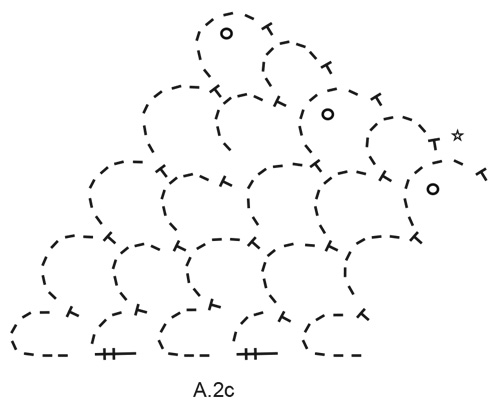
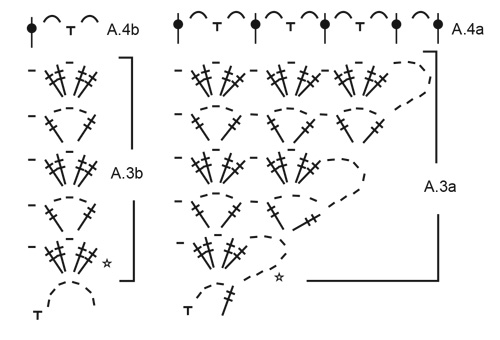
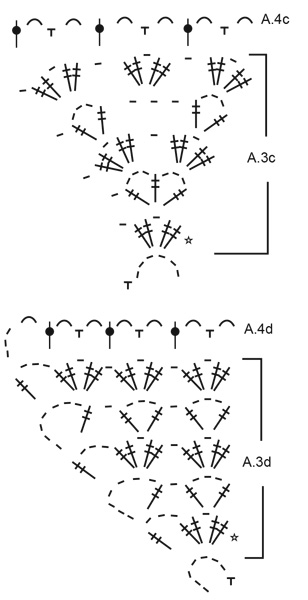
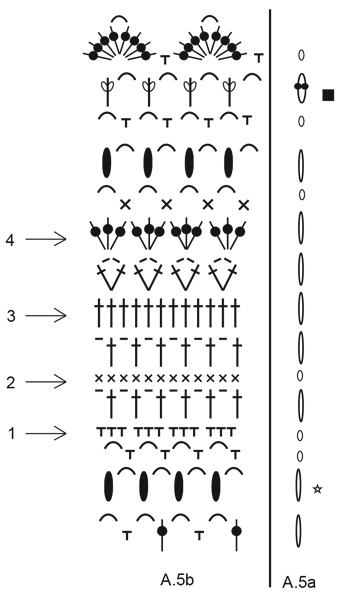
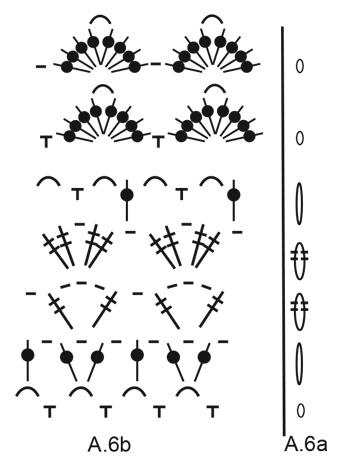
------------------------------------------------------- EXPLANATION FOR THE PATTERN: ------------------------------------------------------- PATTERN: See diagrams A.1 to A.6. A.5a and A.6a show how row begins. NOTE! Begin on rows drawn over each other in the same diagram even though they are worked alternately in right and left side of shawl and not over each other. ------------------------------------------------------- START THE PIECE HERE: ------------------------------------------------------- SHAWL - SHORT OVERVIEW OF THE PIECE: Worked back and forth, top down. SHAWL: Work 5 chain stitches on hook size 3.5 mm = US E/4 with Alpaca. See diagram A.1. When diagram has been worked, continue as follows: A.2a, A.2b and A.2c. When diagrams have been worked vertically, there are 17 chain spaces on row. Piece measures approx. 8 cm = 3⅛" from the first chain stitch ring and down the middle of shawl. REMEMBER THE CROCHET GAUGE! Now work pattern from right side as follows: Work A.3a around first chain space, A.3b around each of the next 7 chain spaces, A.3c around next chain space (= the middle chain space on shawl), A.3b around each of the next 7 chain spaces, A.3d around the last chain space. When A.3a to A.3d have been worked vertically, repeat the last 4 rows in diagrams 3 more times vertically. Piece measures approx. 37 cm = 14½" from beginning and down the middle of shawl. Now work a row with chain spaces from wrong side as follows: Work A.4d over A.3d, A.4c over A.3c, A.4b over A.3b, A.4a over A.3a. There are 84 chain spaces on row. Insert 12 marker threads in piece; This is done to make it easier to increase stitches evenly. Insert markers in the piece as follows: Insert first marker thread in double crochet after 4 chain spaces, * skip 7 chain spaces and insert next marker thread in next double crochet *, repeat from *-* 11 times in total, 3 chain spaces remain on row. Then work pattern A.5b (A.5a shows how every row begins and is worked in addition to stitches in A.5b), AT THE SAME TIME on rows with arrow increase stitches evenly as follows: ARROW-1: Increase 2 single crochets on each side of marker threads by working 1 extra single crochet around each of the 2 chain spaces before and after marker threads (= 48 stitches increased) = 300 single crochets. ARROW-2: Increase 1 single crochet on each side of marker threads by working 2 single crochets in a stitch (= 24 stitches increased) = 324 single crochets. ARROW-3: Increase 1 double crochet on each side of marker threads by working 2 double crochets in a stitch (= 24 stitches increased) = 348 double crochets. ARROW-4: Increase 2 double crochets on each side of marker threads by working 1 extra double crochet around each of the 2 chain spaces before and after marker threads (= 48 stitches increased) = 396 double crochets. Work the remaining rows in diagrams. Piece measures approx. 51 cm = 20" from beginning and down the middle of shawl. There are now 66 fans (= 33 repetitions of A.5b) on row. Fold last row in A.5a/A.5b down so that right side is against right side and work from wrong side around row with black square in A.5b (= row with: 1 half double crochet, 3 chain spaces, etc.) as follows: Work first row in A.6b as follows (A.6a shows how row begins and is worked in addition to A.6b): 4 chain stitches, 1 single crochet around first half double crochet, work (3 chain stitches, 1 single crochet around next half double crochet), work like this along the entire shawl AT THE SAME TIME increase 2 chain spaces on each side of marker threads by working 1 extra chain space in each of the 2 chain spaces before and after every marker thread (= 48 chain spaces increased) = 180 chain spaces. Continue back and forth with A.6a and A.6b until entire diagram has been worked vertically and finish with 1 double crochet in edge stitch on previous row. When entire A.6a and A.6b have been worked vertically, there are 90 fans on row. Shawl measures approx. 59 cm = 23¼" from beginning and down the middle of shawl. Cut and fasten the yarn. |
|||||||||||||||||||||||||||||||||||||||||||||||||||||||
Diagram explanations |
|||||||||||||||||||||||||||||||||||||||||||||||||||||||
|
|||||||||||||||||||||||||||||||||||||||||||||||||||||||
 |
|||||||||||||||||||||||||||||||||||||||||||||||||||||||
 |
|||||||||||||||||||||||||||||||||||||||||||||||||||||||
 |
|||||||||||||||||||||||||||||||||||||||||||||||||||||||
 |
|||||||||||||||||||||||||||||||||||||||||||||||||||||||
 |
|||||||||||||||||||||||||||||||||||||||||||||||||||||||
 |
|||||||||||||||||||||||||||||||||||||||||||||||||||||||
 |
|||||||||||||||||||||||||||||||||||||||||||||||||||||||
 |
|||||||||||||||||||||||||||||||||||||||||||||||||||||||
Have you finished this pattern?Tag your pictures with #dropspattern #thoughtsofirelandshawl or submit them to the #dropsfan gallery. Do you need help with this pattern?You'll find 13 tutorial videos, a Comments/Questions area and more by visiting the pattern on garnstudio.com. © 1982-2026 DROPS Design A/S. We reserve all rights. This document, including all its sub-sections, has copyrights. Read more about what you can do with our patterns at the bottom of each pattern on our site. |
|||||||||||||||||||||||||||||||||||||||||||||||||||||||


With over 40 years in knitting and crochet design, DROPS Design offers one of the most extensive collections of free patterns on the internet - translated to 17 languages. As of today we count 324 catalogs and 12278 patterns - 12268 of which are translated into English (US/in).
We work hard to bring you the best knitting and crochet have to offer, inspiration and advice as well as great quality yarns at incredible prices! Would you like to use our patterns for other than personal use? You can read what you are allowed to do in the Copyright text at the bottom of all our patterns. Happy crafting!
Post a comment to pattern DROPS 214-41
We would love to hear what you have to say about this pattern!
If you want to leave a question, please make sure you select the correct category in the form below, to speed up the answering process. Required fields are marked *.