
Popular categories
Looking for a yarn?


Comments / Questions (28)
![]() Elisabeth Sandberg wrote:
Elisabeth Sandberg wrote:
Legger opp 155 masker til v. Bord. Kommer til A1 b så stemmer ikke mønster. Hva er feilen???
07.04.2024 - 11:01DROPS Design answered:
Hei Elisabeth, Du burde ha lagt opp 156 masker til halskanten og deretter strikker du A.1 rundt (12 masker = 13 rapport i bredden på omgangen = 156 masker). God fornøyelse!
08.04.2024 - 06:44
![]() Randi Aas Sjøvik wrote:
Randi Aas Sjøvik wrote:
Denne ble for vanskelig enda jeg har strikket mye. Har dere forslag til en annen oppskrift jeg kan bruke garnet til. Jeg har de tre fargene og str M
18.03.2024 - 14:36DROPS Design answered:
Hei Randi, Hvis du søker ved å klikke på forstørrelses-glasset øverst til høyre, og setter inn "genser i Fabel", kommer alle våre oppskrifter opp, og du kan velge en som passer til fargene du har kjøpt. Lykke til!
19.03.2024 - 07:01
![]() Randi Aas Sjøvik wrote:
Randi Aas Sjøvik wrote:
Jeg skal begynne på Egyptian Feathers genser men finner ikke mønster A1 i oppskriften
16.03.2024 - 21:12DROPS Design answered:
Hei Randi, Alle diagrammene er på bunnen av oppskriften. God fornøyelse!
18.03.2024 - 06:54
![]() Carol wrote:
Carol wrote:
Hi. Can you please explain in detain how to knit together the yarn over and slipped stitch. My confusion is that the yarn over and the slipped stitch are on the right needle so how do you knit them together? Is there a video on this? Thanks
28.09.2023 - 21:03DROPS Design answered:
Hi carol, Here is a link to our video on English rib in the round. Hope it helps. https://www.garnstudio.com/video.php?id=188&lang=no Happy knitting!
29.09.2023 - 06:44
![]() Laura wrote:
Laura wrote:
Me encanta el modelo, pero no veo cuál es el diseño del gráfico A1 que corresponde al elástico. Es elástico 1/1? cuántas vueltas/hileras hay que hacer? Lo siento, pero no me queda claro. Me podrían despejar la duda por favor? Gracias!
31.10.2021 - 08:51DROPS Design answered:
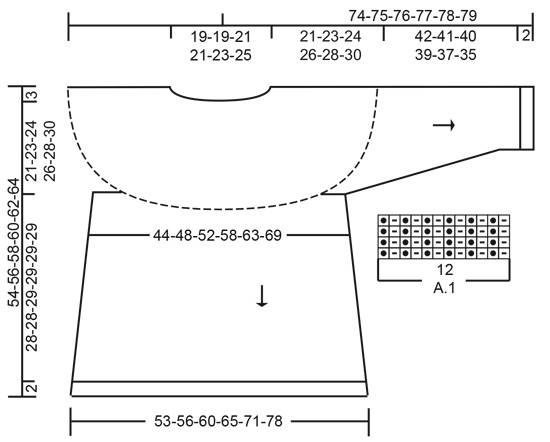
Hola Laura, el gráfico del elástico de A.1 está en el diagrama de las medidas, bajo la manga.
01.11.2021 - 13:00
![]() Anne wrote:
Anne wrote:
Hei. Jeg ser at det er 2 ikoner som betyr det samme; firkant helt farget og firkant halvt dekket på tvers, altså øk 2 masker……. Er det noen grunn til det?
17.10.2021 - 23:11
![]() Anne Synnøve wrote:
Anne Synnøve wrote:
Hei. Jeg lurte på om det finnes et instruksjonsvideo som viser hvordan man: «øk 2 masker med farge-2 slik: Strikk 3 masker i vrangmasken og kastet, dvs strikk kastet og vrangmasken vrang sammen, men vent med å løfte masken av pinnen, lag 1 kast om høyre pinne og strikk masken og kastet vrang sammen 1 gang til = 3 masker» Jeg får det ikke til.
06.10.2021 - 07:37DROPS Design answered:
Hej Anne. Nej det ser dessvärre inte ut som vi har det, vi har kun videon Hvordan strikke 3 masker i 1 maske där det visas med räta maskor. Kanske den ändå kan vara till hjälp, principen är densamma bara att du ska göra det med vrangmasker. Mvh DROPS Design
06.10.2021 - 09:15
![]() Anne wrote:
Anne wrote:
Når en vrangmaske blir til 3, hvorfor er det da ingen foskyvninger på neste omgang?
07.09.2021 - 12:46DROPS Design answered:
Hei Anne, Noen av omgangene med slik økning også feller like mange masker (omgang 1 i A.3 for eksempel). Hvis man ikke feller samtidig, blir det ekstra masker på yttersiden av A.3, som er strikket i mønster på neste omgang. Håper dette hjelper. Hilsen Drops Team
08.09.2021 - 09:51
![]() Anne K wrote:
Anne K wrote:
Jeg får ikke maskeantallet til å gå opp med de forandringene som skal gjøres på A2, første rad med forandringer. Strikker str m med 132 masker. Skal det ikke gå opp på runden?🤔
05.09.2021 - 14:42DROPS Design answered:
Hei Anne, Etter halsen har du 132 masker. A.2 er 12 masker i bredden og du har plass til 11 rapport av mønsteret = 132. Første 10 omganger er det ikke noe endring på maskeantall før du øker i 11. omgang. Håper dette hjelper og god fornøyelse!
06.09.2021 - 08:58
![]() Anne K wrote:
Anne K wrote:
Strikker str m, På første omgang med maskeforandringer i antall får jeg ikke antall masker til å gå opp på runden. Er det riktig?
05.09.2021 - 14:35DROPS Design answered:
Hei Anne, Du øker 2 masker hver gang du strikker A.2 i bredden og det skal gå opp på omgangen på samme måten som de 10 første omgangene. Hilsen Drops Team.
06.09.2021 - 09:00
|
||||||||||||||||||||||||||||||||||||||||
Egyptian Feathers#egyptianfeatherssweater |
||||||||||||||||||||||||||||||||||||||||
 |
 |
|||||||||||||||||||||||||||||||||||||||
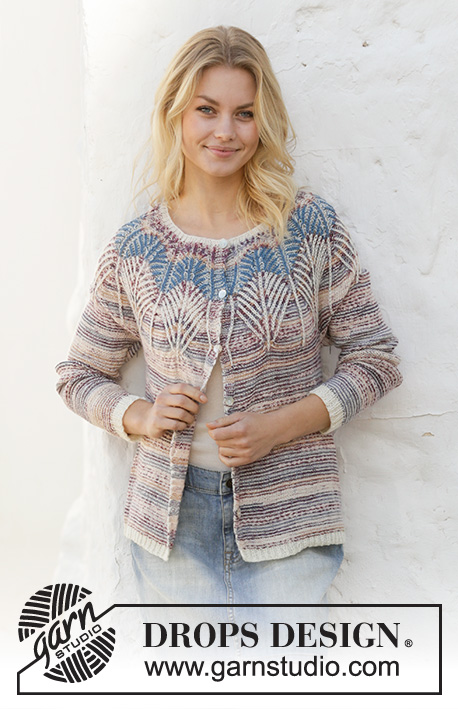
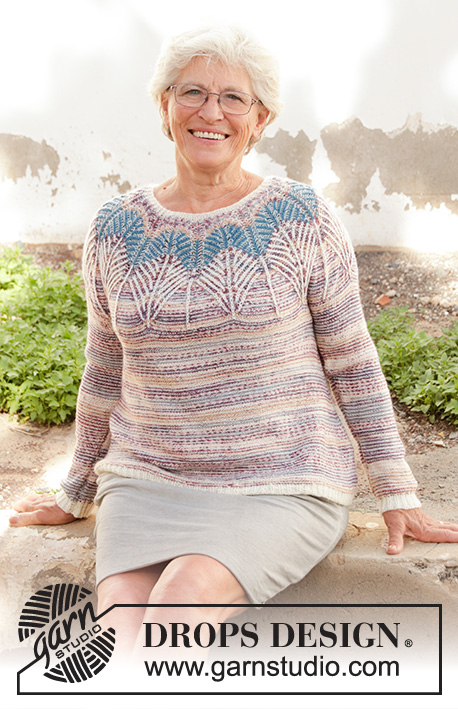
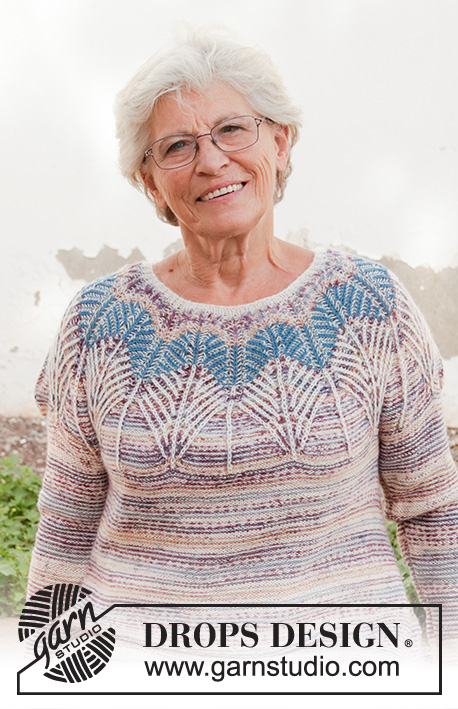
Knitted sweater with round yoke in DROPS Fabel. The piece is worked top down with 2-colored English rib and zigzag stripes. Sizes S - XXXL.
DROPS 201-30 |
||||||||||||||||||||||||||||||||||||||||
|
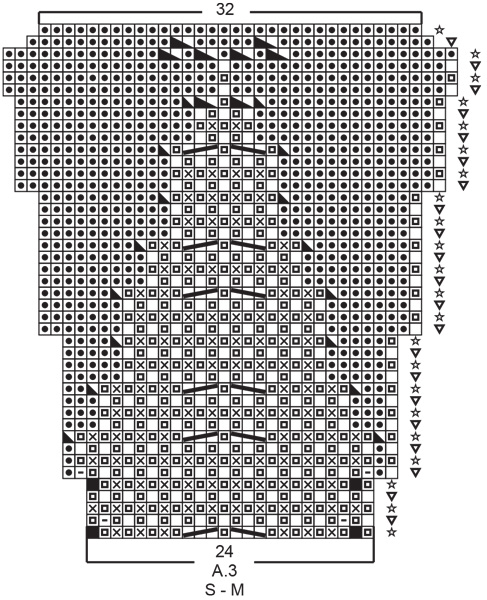
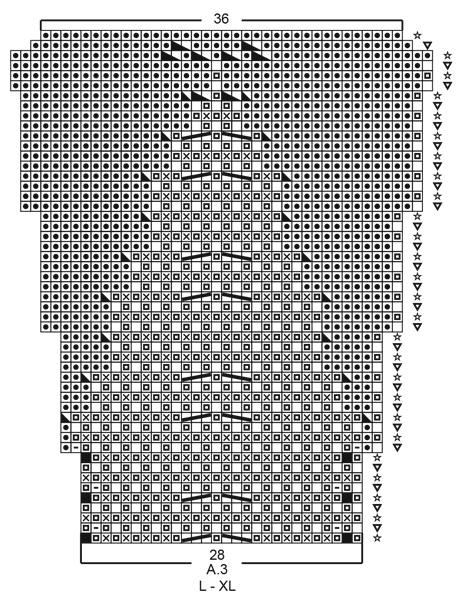
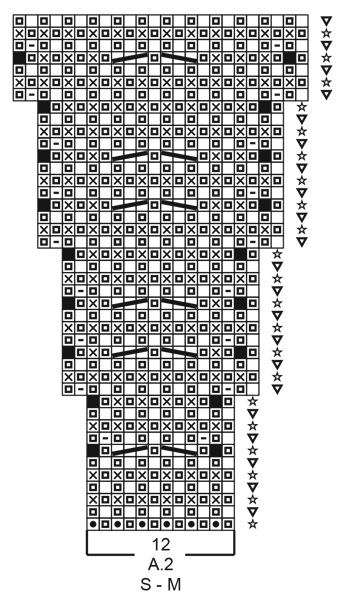
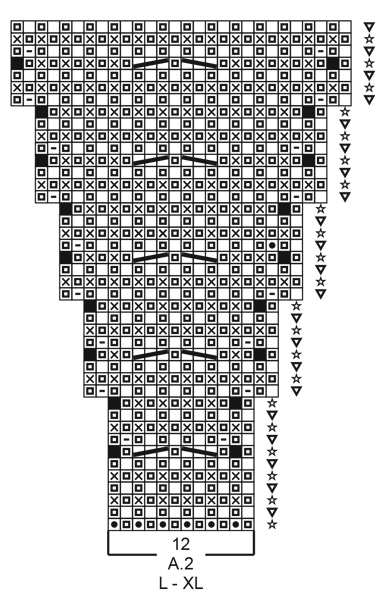
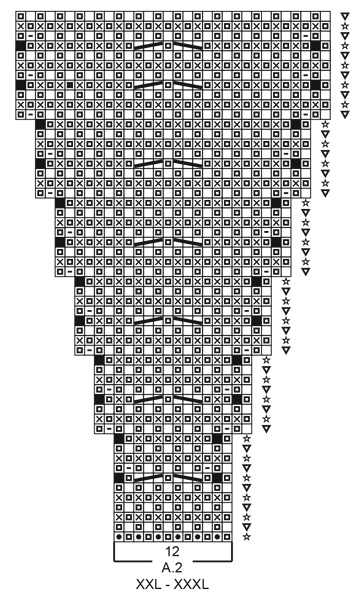
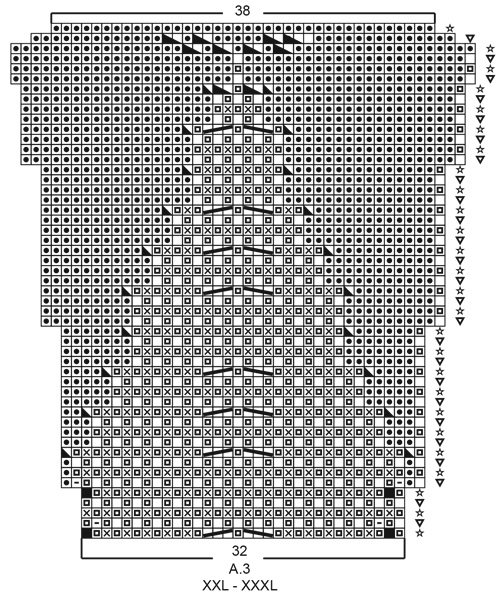
------------------------------------------------------- EXPLANATIONS FOR THE PATTERN: ------------------------------------------------------- PATTERN: See diagrams A.1 to A.3. Choose diagram for your size. First work A.1 (= rib on neck). When A.1 has been worked 1 time in height, work A.2 over A.1. When A.2 has been worked 1 time in height, work A.3 over A.2. STRIPES: To get the 2-colored effect work stripes with, alternately, 1 round of color-2 and 1 round of color-1. Pattern A.2 starts with a round off-white as described in text. Each time you decrease or increase in A.2 and A.3, you work on a round with color-2. Stripes are worked in English rib. STRIPE 1: Color-1 = lavender, color-2 = off white. Work until the piece measures 5 cm = 2" at the shortest point. STRIPE 2: Color-1 = grey blue, color-2 = off white. Work until the piece measures a total of 9 cm = 3½" at the shortest point. STRIPE 3: Color-1 = off white, color-2 = lavender. Work until A.3 has been worked 1 time in height. The last row in the diagram is worked with lavender. Then continue the stripes, in reversed stockinette stitch, as follows: ROUND 1: Work with off white. ROUND 2: Work with lavender. Repeat rounds 1 and 2. KNITTING TIP: All stitch counts when working English rib are without yarn overs, because the yarn overs belong to the knitted stitches and are therefore counted as 1 stitch (unless otherwise stated). DECREASE TIP (for mid under sleeves): Decrease 1 stitch on each side of the marker thread as follows: Work until there are 3 stitches left before the marker thread, purl 2 together, purl 2 (marker thread sits between these 2 stitches), purl 2 stitches together twisted (2 stitches decreased). INCREASE TIP-1 (evenly spaced): To work out how to increase evenly, count the total number of stitches on the needle (e.g. 252 stitches) and divide by the number of increases to be made (e.g. 18) = 14. In this example, increase by making 1 yarn over after each 14th stitch. On the next round work the yarn overs twisted to avoid holes. INCREASE TIP-2 (for sides of body): Work until there are 2 stitches left before marker thread, 1 yarn over, purl 4 (marker thread sits in middle of these 4 stitches), 1 yarn over (= 2 stitches increased). On the next round purl the yarn overs twisted to avoid holes. Then purl the new stitches onwards. ------------------------------------------------------- START THE PIECE HERE: ------------------------------------------------------- SWEATER - SHORT OVERVIEW OF THE PIECE: Neck and yoke are worked in the round with circular needle, top down. The yoke is worked in 2-colored English rib with zigzag, then the piece is continued in stockinette stitch with wrong side out and stripes, with 1 round of each color. The yoke is divided for body and sleeves. The body is continued in the round with circular needle. The sleeves are worked in the round with short circular needle/double pointed needles, top down. NECK: Cast on 120-132-132-144-144-156 stitches with circular needle size 2.5 mm = US 1,5 and off-white. Knit 1 round. Then work A.1 in the round (= 10-11-11-12-12-13 repeats of 12 stitches). When A.1 has been worked 1 time in height, work yoke as described below. YOKE: Change to circular needle size 3 mm = US 2,5. Work A.2 in the round (= 10-11-11-12-12-13 repeats of 12 stitches –first round worked with off-white). Read STRIPES and KNITTING TIP and REMEMBER THE KNITTING GAUGE! When A.2 has been worked 1 time in height there are 240-264-308-336-384-416 stitches on the needle. The piece measures approx. 9-9-9-9-11-11 cm = 3½"-3½"-3½"-3½"-4⅜"-4⅜" from the cast-on edge mid front. Now work A.3 over A.2. When A.3 has been worked 1 time in height there are 320-352-396-432-456-494 stitches on the needle. The piece measures approx. 17-17-19-19-21-21 cm = 6 3/4-6¾"-7½"-7½"-8¼"-8¼" from the cast-on edge mid front. Continue in the round with purl and stripes as before. When the piece measures 19-19-21-21-21-21 cm = 7½"-7½"-8¼"-8¼"-8¼"-8¼" from the cast-on edge increase evenly spaced as follows: Increase 4-4-4-4-8-8 stitches every 2 cm = ¾" a total of 1-2-1-1-2-2 times = 324-360-400-436-472-510 stitches – read INCREASE TIP-1. When the piece measures 21-23-24-26-28-30 cm = 8¼"-9"-9½"-10¼"-11"-11¾" from the cast-on edge mid front, divide the piece for body and sleeves as follows: Purl 49-53-58-65-72-78 stitches as before (= ½ back piece), place the next 64-74-84-88-92-98 stitches on 1 thread for sleeve, cast on 8 new stitches on the needle (= in side under sleeve), purl the next 98-106-116-130-144-157 stitches (= front piece), place the next 64-74-84-88-92-98 stitches on 1 thread for sleeve, cast on 8 new stitches on the needle (= in side under sleeve) and purl the remaining 49-53-58-65-72-79 stitches (= ½ back piece). Cut the strand. Body and sleeves are finished separately. THE PIECE IS NOW MEASURED FROM HERE! BODY: = 212-228-248-276-304-330 stitches. Insert 1 marker thread in each side of the body, in the middle of the 8 stitches cast on under each sleeve. Allow the marker threads to follow your work onwards; they will be used when increasing in the sides. Start the round at one of the marker threads and purl in the round as before with stripes. When the piece measures 2 cm = ¾" from the division, increase 1 stitch on each side of both marker threads – read INCREASE TIP-2 (= 4 stitches increased). Increase like this every 2½-2½-2½-3-3-2½ cm = 1"-1"-1"-1⅛"-1⅛"-1" a total of 10-10-10-9-9-11 times = 252-268-288-312-340-374 stitches. Continue working until the piece measures 28-28-29-29-29-29 cm = 11"-11"-11⅜"-11⅜"-11⅜"-11⅜" from the division (or to desired length; there is 2 cm = ¾" left to finished length). Knit 1 round where you increase 18-20-18-18-17-19 stitches evenly spaced = 270-288-306-330-357-393 stitches. Change to circular needle size 2.5 mm = US 1,5 and work rib in the round with off-white (= knit 1/ purl 2) for 2 cm = ¾". Loosely bind off with knit over knit and purl over purl. The sweater measures approx. 54-56-58-60-62-64 cm = 21¼"-22"-22¾"-23⅝"-24⅜"-25¼" from the shoulder down. SLEEVE: Place the 64-74-84-88-92-98 stitches from the thread on the 1 side of the piece on short circular needle/double pointed needles size 3 mm = US 2,5 and knit up 1 stitch in each of the 8 stitches cast on under the sleeve = 72-82-92-96-100-106 stitches. Insert 1 marker thread in the middle of the 8 stitches cast on under the sleeve. Allow the marker threads to follow your work onwards; they will be used when decreasing under the sleeve. Start the round by the marker thread and purl in the round with stripes as before. When the piece measures 2 cm = ¾" from the division decrease 2 stitches mid under sleeve – read DECREASE TIP. Decrease like this every 4-2½-2-1½-1½-1½ cm = 1½"-1"-¾"-1"-1"-1" a total of 9-13-17-18-19-21 times = 54-56-58-60-62-64 stitches. Continue working until the piece measures 42-41-40-39-37-35 cm = 16½"-16⅛"-15¾"-15¼"-14½"-13¾" from the division (or to desired length; there is 2 cm = ¾" left to finished length. NOTE: Shorter measurements in larger sizes due to wider neck and longer yoke). Knit 1 round where you increase 0-1-2-0-1-2 stitches evenly spaced = 54-57-60-60-63-66 stitches. Change to double pointed needles size 2.5 mm = US 1,5 and work rib in the round with off-white (= knit 1/ purl 2) for 2 cm = ¾". Loosely bind off with knit over knit and purl over purl. The sleeve measures approx. 44-43-42-41-39-37 cm = 17¼"-17"-16½"-16⅛"-15¼"-14½" from the division. Work the other sleeve in the same way. |
||||||||||||||||||||||||||||||||||||||||
Diagram explanations |
||||||||||||||||||||||||||||||||||||||||
|
||||||||||||||||||||||||||||||||||||||||
 |
||||||||||||||||||||||||||||||||||||||||
 |
||||||||||||||||||||||||||||||||||||||||
 |
||||||||||||||||||||||||||||||||||||||||
 |
||||||||||||||||||||||||||||||||||||||||
 |
||||||||||||||||||||||||||||||||||||||||
 |
||||||||||||||||||||||||||||||||||||||||
 |
||||||||||||||||||||||||||||||||||||||||
Have you finished this pattern?Tag your pictures with #dropspattern #egyptianfeatherssweater or submit them to the #dropsfan gallery. Do you need help with this pattern?You'll find 21 tutorial videos, a Comments/Questions area and more by visiting the pattern on garnstudio.com. © 1982-2026 DROPS Design A/S. We reserve all rights. This document, including all its sub-sections, has copyrights. Read more about what you can do with our patterns at the bottom of each pattern on our site. |
||||||||||||||||||||||||||||||||||||||||


With over 40 years in knitting and crochet design, DROPS Design offers one of the most extensive collections of free patterns on the internet - translated to 17 languages. As of today we count 324 catalogs and 12278 patterns - 12268 of which are translated into English (US/in).
We work hard to bring you the best knitting and crochet have to offer, inspiration and advice as well as great quality yarns at incredible prices! Would you like to use our patterns for other than personal use? You can read what you are allowed to do in the Copyright text at the bottom of all our patterns. Happy crafting!
Post a comment to pattern DROPS 201-30
We would love to hear what you have to say about this pattern!
If you want to leave a question, please make sure you select the correct category in the form below, to speed up the answering process. Required fields are marked *.