
Popular categories
Looking for a yarn?


Comments / Questions (58)
![]() Lone Martensen wrote:
Lone Martensen wrote:
Hej tak for svar Vil det sige at jeg skal starte med diagram mønster 5 og læse fra venstre mod højre når jeg skal strikke vrangsiden ? Mvh Lone
31.01.2019 - 13:35DROPS Design answered:
Hei Lone. Ja, om du strikker størrelse S-XL starter du med diagram A.5A, så A.4A, så A.3A osv fra vrangen. Strikker du størrelse XXL eller XXXL starter du med A.2A, så A.5A, A.4A osv. Og diagrammene leses fra venstre mot høyre. God fornøyelse
31.01.2019 - 15:12
![]() Lone Martensen wrote:
Lone Martensen wrote:
Hej Når jeg starter mønsteret står der i opskriften at næste pind strikkes fra retsiden men hver anden pind er jo fra vrangsiden er der taget højde for det i mønsteret ? Vrangpindene er slet ikke beskrevet som jeg kan læse det.
30.01.2019 - 21:17DROPS Design answered:
Hei Lone. Det stemmer, annenhver pinne er strikket fra retten og annenhver pinne er strikket fra vrangen. Etter at du har lagt opp står det "strikk 1 pinne vrang fra vrangen. Neste pinne strikkes slik fra retten...". Altså strikkes første pinne i diagrammet fra rettsiden. Diagrammene viser alle pinner i mønsteret sett fra retten. Det vil si at når du skal strikke fra vrangen må du lese diagrammene motsatt vei (altså fra venstre mot høyre), og du må strikke dem i motsatt rekkefølge slik at diagrammene strikkes over de samme maskene hele veien opp. God fornøyelse
31.01.2019 - 11:09
![]() Solveig Börjesson wrote:
Solveig Börjesson wrote:
Hvilken størrelse bruker modellen?
26.01.2019 - 22:12DROPS Design answered:
Hei Solveig. Modellen har på seg en S eller en M. Det er en målskisse nederst på siden med alle plaggets mål i de ulike størrelsene. God fornøyelse
29.01.2019 - 15:06
![]() Imke De Vrie wrote:
Imke De Vrie wrote:
Super patroon, maten en patroon goed aan te houden, trui is top geworden!
22.01.2019 - 18:02
![]() Imke De Vrie wrote:
Imke De Vrie wrote:
Super patroon, maten en patroon goed aan te houden, trui is top geworden!
22.01.2019 - 18:01
![]() Sarvina wrote:
Sarvina wrote:
Hei! Når det står: Raglan: 2 masker rett (merketråden sitter midt mellom disse 2 maskene) Hvordan skal jeg plassere merketråden når den ligger mellom to masker? Skal den settes foran eller bak de to maskene som strikkes sammen? Bærestykke: SAMTIDIG når det gjenstår 1 pinne før A.1/A.5 treffer raglanfellingen, felles det i tillegg 4 masker jevnt fordelt over fletten i A.1/A.5. Hva betyr dette?
04.12.2018 - 13:46DROPS Design answered:
Hei Sarvina. Når merket er mellom 2 masker: hekt merket på pinnen midt mellom maskene. Du feller slik: Begynn 3 masker før merket, strikk 2 masker sammen (det er nå 1 maske før merket), strikk 1 rett, flytt merket over på høyre pinne, 1 rett (du har nå strikket 2 rett, med merket midt mellom), ta 1 maske løst av pinnen, 1 rett, trekk den løse masken over. Bærestykket: raglanen skråner innover og kommer etterhvert til å treffe/overlappe med mønsteret. Når det er 1 omgang igjen til dette skjer skal du felle over flettene i A.1 og A.5. God fornøyelse
05.12.2018 - 09:13
![]() Sarvina wrote:
Sarvina wrote:
Hei! Når det står: Raglan: 2 masker rett (merketråden sitter midt mellom disse 2 maskene) Hvordan skal jeg plassere merketråden når den ligger mellom to masker? Skal den settes foran eller bak de to maskene som strikkes sammen? Bærestykke: SAMTIDIG når det gjenstår 1 pinne før A.1/A.5 treffer raglanfellingen, felles det i tillegg 4 masker jevnt fordelt over fletten i A.1/A.5. Hva betyr dette?
03.12.2018 - 21:49Annika wrote:
Hej! Jag är nybörjare inom stickning och förstår inte vad de fetade linjerna i A.1.C och A.5.C betyder? Hittar ingen beskrivning. Jättefint mönster! Vänliga hälsningar Annika
21.11.2018 - 12:56DROPS Design answered:
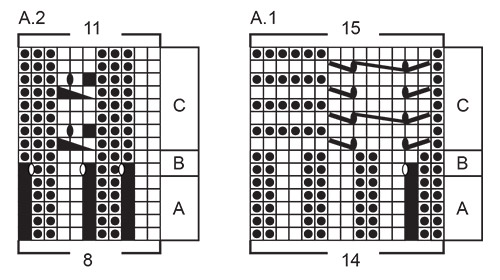
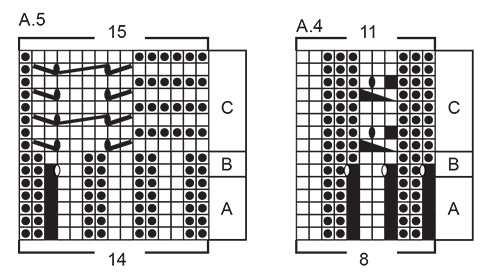
Hei Annika. Mener du fellingene og flettene? I A.1c strikker du feks omgang 3 slik: 1 vrang, 2 masker rett sammen, 1 kast, sett 2 masker på en flettepinne foran arbeidet, strikk 2 rett, strikk 2 rett fra flettepinnen, 1 kast, ta 1 maske løst av pinnen som om den skulle strikkes rett, 1 rett, trekk den løse masken over, 6 masker rett. Omgnag 1 strikkes likt, men uten flettemasken mellom felling, kast og kast, felling. A.5c strikkes på samme måte, men i motsatt rekkefølge. Alle symbolene står forklart i symbolforklaringen - men strekene er noe tynnere på disse. God fornøyelse.
23.11.2018 - 09:06
![]() Sarvina wrote:
Sarvina wrote:
Hva minnes med 2-0-0-0-0-2 rett og 0-0-0-0-1-1 gang?
07.11.2018 - 19:18DROPS Design answered:
Hei Sarvina, Tallene korresponderer med størrelsene. Så hvis du strikker størrelse S, bruker du alltid det første tallet i hver rekke. Da er det "strikke 2 rett 0 ganger" i dette eksemplet . God fornøyelse!
08.11.2018 - 08:27
![]() Romkje wrote:
Romkje wrote:
Beste Drops, ik begrijp niet hoe ik de pas moet breien. Ik heb nu 316 steken. Als ik de raglan brei (24x4=96) hou ik 220 steken over. Maar ik moet eindigen met 108 steken, dus ergens moet ik 14 maal in voor- en achterpand elk 4 steken minderen lees ik. Verdeeld over een kabel. Maar over welke kabel als op het allerlaatst pas de minderingen in de kabels plaats vinden? Hoe houd ik het patroon in stand terwijl ik minder?
31.10.2018 - 18:01DROPS Design answered:
Dag Romkje,
Voor de raglan minder je 24 keer in elke 2e naald, maar omdat je aan beide zijden van elke raglan mindert, minder je per keer 8 steken, waardoor je (24 X 8) 192 steken mindert en daardoor heb je dan in totaal 124 steken op de naald. Daarnaast minder je nog bij de kabels en kom je op 108 steken uit.
02.11.2018 - 08:13
|
||||||||||||||||||||||||||||||||||||||||
Skye#skyesweater |
||||||||||||||||||||||||||||||||||||||||
 |
 |
|||||||||||||||||||||||||||||||||||||||
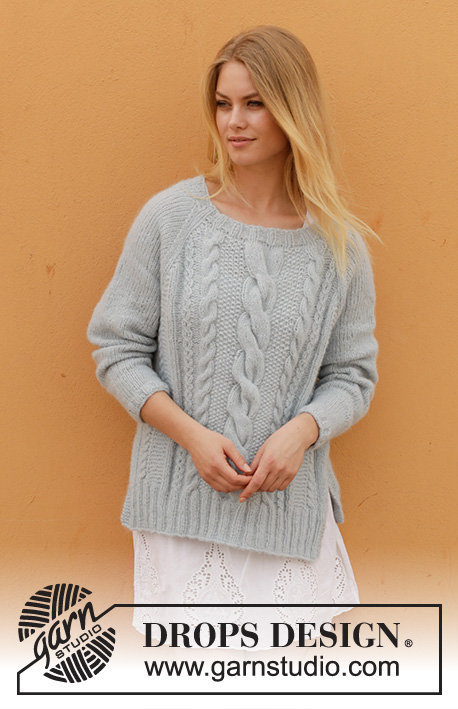
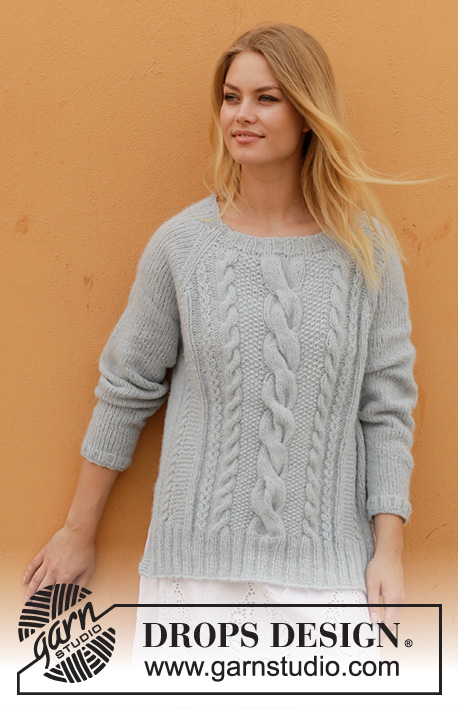
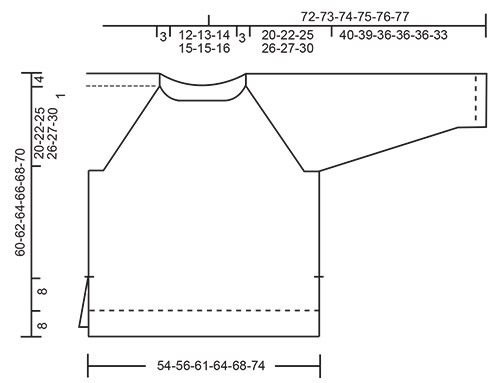
Knitted sweater with cables, lace pattern, split and raglan. Sizes S - XXXL. The piece is worked in DROPS Air.
DROPS 188-36 |
||||||||||||||||||||||||||||||||||||||||
|
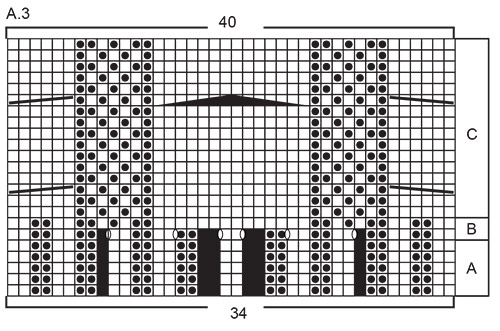
INFORMATION FOR THE PATTERN: RIDGE/GARTER STITCH (worked back and forth): 1 ridge = Knit 2 rows. PATTERN: See diagrams A.1 to A.5. The diagrams show all the rows in the pattern seen from the right side. DECREASE TIP (evenly spaced): To work out how to decrease evenly, count the total number of stitches on the needle (e.g. 40 stitches), and divide by the number of decreases to be made (e.g. 4) = 10. In this example, knit every 9th and 10th stitch together. INCREASE TIP (for sleeve): Increase as follows mid under sleeve – start 1 stitch before the marker thread: Make 1 yarn over, knit 2 stitches (the marker thread sits in the middle of these 2 stitches), 1 yarn over. On the next round knit the yarn overs twisted to avoid holes. RAGLAN: * Work over the back/front piece until there are 3 stitches left before the marker thread. Purl 2 stitches together, knit 2 stitches (the marker thread sits in the middle of these 2 stitches), slip 1 stitch as if to knit, knit 1, pass the slipped stitch over the knitted stitch, work sleeve stitches until there are 3 stitches left before the marker thread, knit 2 together, knit 2 (the marker thread sits in the middle of these 2 stitches), purl 2 stitches together *, work from *-* a total of 2 times. ---------------------------------------------------------- SWEATER: The piece is worked bottom up. The front and back pieces are worked separately back and forth with circular needle as far as the split. Then they are worked together in the round. The sleeves are worked in the round with double pointed needles/short circular needle. BACK PIECE: Cast on 88-92-100-108-108-120 stitches with circular needle size 4 mm / US 6 and Air. Purl 1 row from the wrong side. The next row is worked as follows - from the right side: Work 3 stitches GARTER STITCH - see description above, knit 2-0-0-0-0-2, * purl 2, knit 2 *, work from *-* a total of 0-1-2-3-1-2 times, A.4A (= 8 stitches) 0-0-0-0-1-1 time, A.1A (= 14 stitches), A.2A (= 8 stitches), A.3A (= 34 stitches), A.4A (= 8 stitches), A.5A (= 14 stitches), A.2A (= 8 stitches) 0-0-0-0-1-1 time, * knit 2, purl 2 *, work from *-* a total of 0-1-2-3-1-2 times, knit 2-0-0-0-0-2, 3 stitches in garter stitch. Continue the rib like this until the piece measures 8 cm / 3⅛". REMEMBER THE GAUGE! Change to circular needle size 5 mm / US 8. The next row is worked as follows – from the right side: Work 3 stitches in garter stitch, 2-0-0-0-0-2 stitches in stockinette stitch, * purl 2, knit 2 *, work from *-* a total of 0-1-2-3-1-2 times, work diagrams as before but work B above A, * knit 2, purl 2 *, work from *-* a total of 0-1-2-3-1-2 times, 2-0-0-0-0-2 stitches in stockinette stitch, 3 stitches in garter stitch. When A.1B to A.5B are finished there are 102-106-114-122-128-140 stitches on the needle. The next row is worked as follows - from the right side: Work 3 stitches in garter stitch, 2-4-8-12-4-10 stitches in stockinette stitch – decrease 0-0-0-1-0-1 stitch over these stitches, A.4C (= 11 stitches) 0-0-0-0-1-1 time, A.1C (= 15 stitches), A.2C (= 11 stitches), A.3C (= 40 stitches), A.4C (= 11 stitches), A.5C (= 15 stitches), A.2C (= 11 stitches) 0-0-0-0-1-1 time, 2-4-8-12-4-10 stitches in stockinette stitch – decrease 0-0-0-1-0-1 stitch over these stitches, 3 stitches in garter stitch = 102-106-114-120-128-138 stitches. Continue this pattern until the piece measures 18 cm / 7" in all sizes. FRONT PIECE: Work as for back piece. BODY: Place the back piece on the same circular needle as the front piece = 204-212-228-240-256-276 stitches. Insert 1 marker thread in each side and allow the marker threads to follow your work onwards. Continue with pattern as before, but the stitches in garter stitch in each side are replaced with stockinette stitch from now onwards. When the piece measures 37-37-36-36-37-36 cm / 14½"-14½"-14⅛"-14⅛"-14½"-14⅛" bind off 6-6-8-8-10-10 stitches in each side (= 3-3-4-4-5-5 stitches on each side of the marker threads). There are now 96-100-106-112-118-128 stitches on the back and front pieces. Lay the piece to one side and work the sleeves. SLEEVE: The piece is worked in the round with double pointed needle; change to short circular needle when you have enough stitches. Cast on 40-40-44-44-48-48 stitches with double pointed needles size 4 mm / US 6 and Air. Knit 1 round, then work rib (= knit 2 / purl 2). When the piece measures 2 cm / ¾" change to double pointed needles size 5 mm / US 8. Knit 1 round where you decrease 4-2-4-4-6-4 stitches evenly on round – read DECREASE TIP = 36-38-40-40-42-44 stitches. Insert 1 marker at the beginning of the round (= mid under sleeve). Continue with stockinette stitch. When the piece measures 8-6-9-6-5-9 cm / 3⅛"-2¼"-3½"-2¼"-1⅞"-3½" increase 2 stitches mid under the sleeve – read INCREASE TIP. Increase like this every 2½-2½-1½-1½-1½-1 cm/7/8"-⅞"-½"-½"-½"-⅜" a total of 12-13-16-19-20-20 times = 60-64-72-78-82-84 stitches. When the piece measures 40-39-36-36-36-33 cm / 15⅝"-15¼"-14⅛"-14⅛"-14⅛"-13" (shorter measurements in larger sizes due to longer yoke) bind off the middle 6-6-8-8-10-10 stitches under the sleeve (= 3-3-4-4-5-5 stitches on each side of the marker thread) = 54-58-64-70-72-74 stitches. Lay the piece to one side and work the other sleeve. YOKE: Place the sleeves on the same circular needle as the body, where the stitches were bind off for the armholes = 300-316-340-364-380-404 stitches. Insert a marker thread in each transition between body and sleeves (= 4 marker threads). Continue the pattern as before and decrease to RAGLAN – see description above. Decrease like this every 2nd round a total of 22-24-27-28-30-33 times – the stitches which do not fit into the diagrams are knitted over knitted stitches and purled over purled stitches AT THE SAME TIME when there is 1 round left before A.1/A.5 meets the raglan decrease, decrease in addition 4 stitches evenly over the cable in A.1/A.5 (applies only to the diagrams towards the raglan). After all the decreases there are 108-108-108-124-124-124 stitches on the round. The yoke measures approx. 20-22-25-26-27-30 cm / 7¾"-8⅝"-9¾"-10⅛"-10⅝"-11¾". Knit 1 round and decrease 3 stitches over each cable with 6 stitches and decrease 7 stitches over the cable with14 stitches = 82-82-82-98-98-98 stitches. NECK: Change to short circular needle size 4 mm / US 6 and knit 1 round where you increase 10-10-14-6-10-14 stitches evenly on round = 92-92-96-104-108-112 stitches. Work rib (= knit 2 / purl 2) for 3 cm / 1", bind off with knit over knit and purl over purl. ASSEMBLY: Sew the openings under the sleeves. |
||||||||||||||||||||||||||||||||||||||||
Diagram explanations |
||||||||||||||||||||||||||||||||||||||||
|
||||||||||||||||||||||||||||||||||||||||
 |
||||||||||||||||||||||||||||||||||||||||
 |
||||||||||||||||||||||||||||||||||||||||
 |
||||||||||||||||||||||||||||||||||||||||
 |
||||||||||||||||||||||||||||||||||||||||
Have you finished this pattern?Tag your pictures with #dropspattern #skyesweater or submit them to the #dropsfan gallery. Do you need help with this pattern?You'll find 29 tutorial videos, a Comments/Questions area and more by visiting the pattern on garnstudio.com. © 1982-2026 DROPS Design A/S. We reserve all rights. This document, including all its sub-sections, has copyrights. Read more about what you can do with our patterns at the bottom of each pattern on our site. |
||||||||||||||||||||||||||||||||||||||||


With over 40 years in knitting and crochet design, DROPS Design offers one of the most extensive collections of free patterns on the internet - translated to 17 languages. As of today we count 324 catalogs and 12245 patterns - 12235 of which are translated into English (US/in).
We work hard to bring you the best knitting and crochet have to offer, inspiration and advice as well as great quality yarns at incredible prices! Would you like to use our patterns for other than personal use? You can read what you are allowed to do in the Copyright text at the bottom of all our patterns. Happy crafting!
Post a comment to pattern DROPS 188-36
We would love to hear what you have to say about this pattern!
If you want to leave a question, please make sure you select the correct category in the form below, to speed up the answering process. Required fields are marked *.