
Popular categories
Looking for a yarn?


Comments / Questions (35)
![]() Laura wrote:
Laura wrote:
Hyvä ohje. Kaunis villatakki tuli. Hihat aika kapeahkot, eli tarkista neuloessa leveys.
19.03.2018 - 08:45
![]() Issabell wrote:
Issabell wrote:
Der står sådan i opskriften : Når arb måler 18 cm slåes der 1 kantm op i hver side = 62-66-72-78-84-90 m. Fortsæt i glatstrik med 1 kantm retstrik i hver side. Når arb måler 19 cm tages der 1 m ind i hver side (= 2 m taget ind) Jeg er i tvivl om de 19 cm er incl. De først nævnte 18 cm, så man kun skal strikke 1 cm, eller om det er 18+19 cm det skal ende ud med at måle inden man begynder at tage ind igen.
24.09.2017 - 18:27DROPS Design answered:
Hei Issabell. Når du har strikket 18 cm er du ferdig med de 5 rillene (spliten) og nå legges det opp en kantmaske (denne kantmasken skal brukes til å sy sammen i siden senere) og når du har strikket 1 cm til (altså 19 cm) begynner fellingene i siden. Alle fellinger skjer fra retten. Det felles innenfor 1 rett og 1 kant-m i rille. God Fornøyelse!
27.09.2017 - 09:27Maggie Munro wrote:
Does this come in a two needle pattern, I don't use circular needles.
30.05.2017 - 17:35DROPS Design answered:
Dear Mrs Munro, each piece of the jacket is here worked back and forth on circular needle to have enough room for all sts. You can then use straight needle. Read more here about circular needles. Happy knitting!
31.05.2017 - 08:18
![]() Lou wrote:
Lou wrote:
Bonjour, je suis au niveau du dos où il est demandé de continuer en jersey envers. Cela veut t-il dire que les V du jersey doivent ce trouvez sur l'envers du travail et laisser apparaître l'autre coté du jersey qui ressemble un peu au point mousse sur l'endroit? Aidez moi svp Autre question l'augmentation au début (1 jeté pour les mailles lisières) laisse paraître un trou est ce normal? Peut t-on augmenter autrement? Cordialement
13.11.2016 - 09:14DROPS Design answered:
Bonjour Lou, quand vous tricotez en jersey endroit, vous tricotez à l'end sur l'endroit et à l'env sur l'envers (= les petits "V" sont sur l'extérieur). Quand vous tricotez en jersey envers, vous tricotez à l'env sur l'endroit et à l'end sur l'envers (les petits "V" seront maintenant sur l'envers). Les augmentations avec les jetés forment de petits trous qui s'estompent en général, mais vous pouvez tout à fait augmentez comme il vous plaît. Bon tricot!
14.11.2016 - 10:16
![]() Karin wrote:
Karin wrote:
Hej,där det står när man ska mäta så står det rätstickning på oket,men på mönstret ska man sticka slätstickning med avigsidan utåt,vad gäller?
12.10.2016 - 14:04DROPS Design answered:
Hej Karin. Du skal sticka slätstickning med avigsidan utåt. Vi fjerner lige det med rätstickning i mönstret. Tak for besked.
12.10.2016 - 15:30Asma wrote:
رائع جدا وعملي اشكركم جزيل الشكر على مجهوداتكم
12.08.2016 - 14:45
![]() Antje Schupp wrote:
Antje Schupp wrote:
Gaaanz süß, kann ich mir gut vorstellen zu stricken und Andes ist eine so schöne Wolle, wenn man mal die schnelle Lust hat. Trotz simplem Grundkonzept: Ärmel mit Form SIND einfach schöner als gerade angesetzte. Das kann ich mir allerdings mittlerweile selbst ausrechnen... Also danke für die süße Jacke!
05.08.2016 - 17:03
![]() Zabeth wrote:
Zabeth wrote:
Superbe veste, je craque. La coupe un peu empire, coupée sous la poitrine, sa capuche, les petites fentes côté, tout y est. Le choix va être difficile pour la saison automne/hiver, tout est beau.
27.06.2016 - 09:34
![]() Lydia Dekens wrote:
Lydia Dekens wrote:
Wauw, would maked this one as soon as possible when the patron is out, nice and warm for autum/winter.
24.06.2016 - 17:07
![]() Beatriz Silva wrote:
Beatriz Silva wrote:
Agrada-me o modelo , sendo adequado a outras cores
24.06.2016 - 16:58
|
|||||||
Aredhel#aredheljacket |
|||||||
 |
 |
||||||
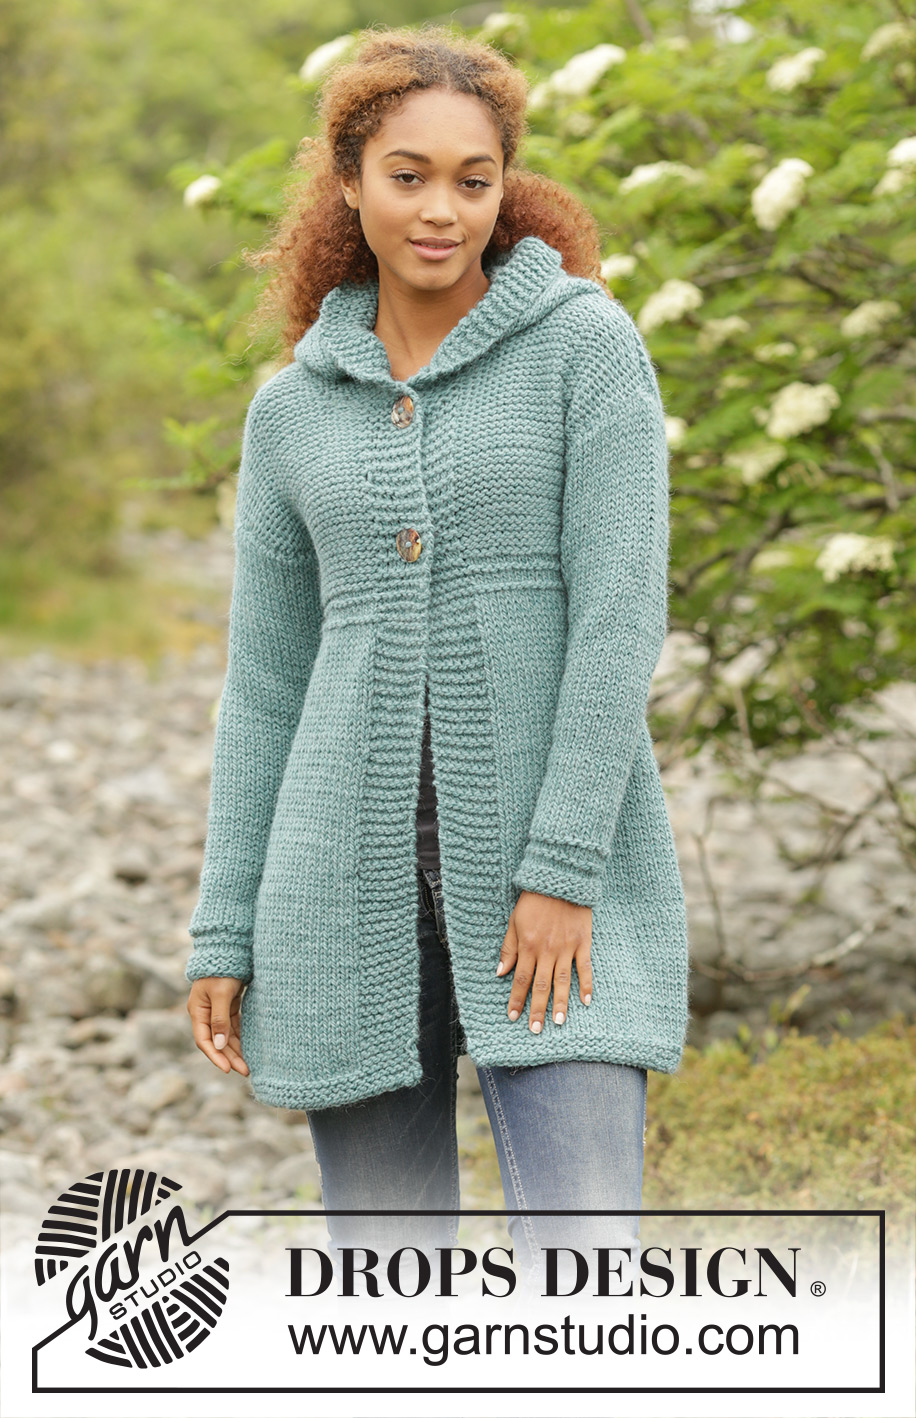
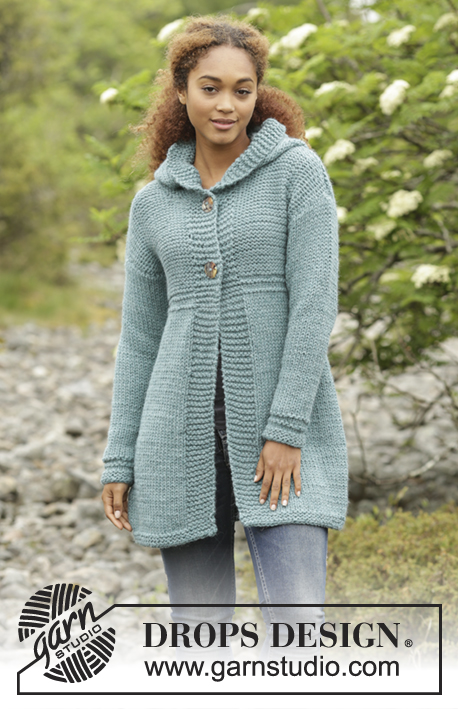
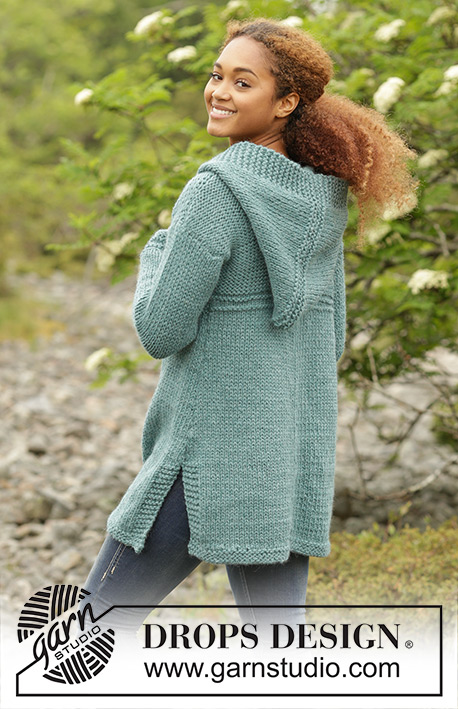
Knitted DROPS jacket with hood and A-shape in "Andes". Size: S - XXXL.
DROPS 172-46 |
|||||||
|
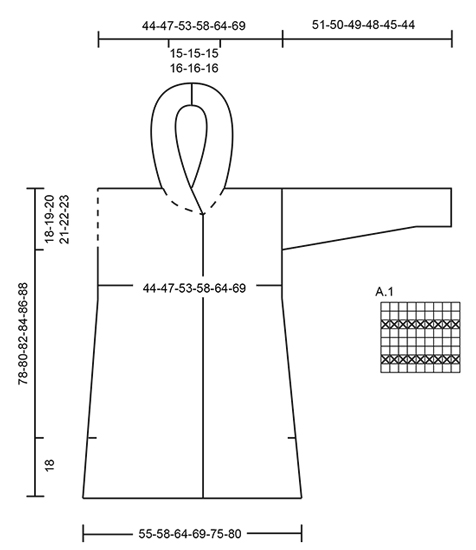
GARTER ST (back and forth): K all rows. 1 ridge = K2 rows. PATTERN: See diagram A.1. The diagram shows all rows in pattern seen from RS. DECREASE TIP: All dec are done from RS! Dec inside 1 st K and 1 edge st in garter st. Dec as follows when 2 sts remain before 1 K st and 1 edge st in garter st: K 2 tog. Dec as follows after 1 st in garter st and K 1: Slip 1 st as if to K, K 1, psso. INCREASE TIP: All inc are done from RS. Inc inside 1 edge st in garter st and 1 K by making 1 YO. On next row P YO twisted to avoid holes. MEASURING TIP-1 (applies to front and back piece): To get the right proportions on jacket length measurements are done when piece is flat. Because of the weight of the yarn the piece will be approx. 10 cm / 4" longer than measurements in chart. MEASURING TIP-2 (applies to sleeve): Because of the weight of the yarn length measurements are done when piece is held up. BUTTONHOLES: bind off for buttonholes on right front piece (from RS): Work 3 sts, bind off 2 sts for buttonhole, work the rest of row. On next row cast on 2 new sts over the bind off sts. bind off for buttonholes when piece measures: SIZE S: 56 and 70 cm / 22" and 27½" SIZE M: 57 and 72 cm / 22½" and 28½" Size L: 58 and 74 cm / 22¾" and 29" SIZE XL: 59 and 76 cm / 23¼" and 30" Size XXL: 60 and 78 cm / 23½" and 30¾" SIZE XXXL: 61 and 80 cm / 24" and 31½" ---------------------------------------------------------- BACK PIECE: The piece is worked back and forth on circular needle because of no of sts. Cast on 60-64-70-76-82-88 sts on circular needle size 7 mm / US 10.75 with Andes. Work 3 ridges in GARTER ST - see explanation above. Switch to circular needle size 8 mm / US 11 and work in stockinette st with 5 sts in garter st in each side. REMEMBER THE KNITTING GAUGE When piece measures 18 cm / 7", cast on 1 edge st in each side = 62-66-72-78-84-90 sts. Continue in stockinette st with 1 edge sts in garter st in each side. When piece measures 19 cm / 7½", dec 1 st in each side (= 2 sts dec) - READ DECREASE TIP and MEASURING TIP-1! Dec in each side every 7-7-8-8-8-8 cm / 2¾"-2¾"-3"-3"-3"-3" a total of 6 times = 50-54-60-66-72-78 sts. AT THE SAME TIME when piece measures 48-49-50-51-52-53 cm / 19"-19¼"-19¾"-20"-20½"-21", work as follows: Work A.1 over all sts with 1 edge st in garter st in each side (edge st continues in garter st). When A.1 has been worked 1 time vertically, work piece until finished measurements in reversed stockinette st (edge st in garter st). When piece measures 60-61-62-63-64-65 cm / 23½"-24"-24½"-24¾"-25¼"-25½", bind off 1 edge st in each side = 48-52-58-64-70-76 sts. When piece measures 76-78-80-82-84-86 cm / 30"-30¾"-31½"-32¼"-33"-33⅞", bind off the middle 14-14-14-16-16-16 sts for neck and finish each shoulder separately. Continue to bind off 1 st on next row from neck = 16-18-21-23-26-29 sts remain on the shoulder. Loosely bind off all sts when piece measures 78-80-82-84-86-88 cm / 30¾"-31½"-32¼"-33"-33⅞"-34⅝". Repeat on the other shoulder. RIGHT FRONT PIECE: Worked back and forth on circular needle. Cast on 35-37-40-43-46-49 sts (includes 8 band sts towards mid front) on circular needle size 7 mm / US 10.75 with Andes. Work 3 ridges. Switch to circular needle size 8 mm / US 11 and work next row from RS as follows: 8 sts in garter st (= band), stockinette st until 5 sts remain, work 5 sts in garter st. Continue like this in stockinette st and garter st. When piece measures 18 cm / 7", work as follows from RS: 8 sts in garter st, stockinette st over the remaining sts, cast on 1 edge st at the end of row (edge st in garter st) = 36-38-41-44-47-50 sts. When piece measures 19 cm / 7½", dec in the side as on back piece, dec 6 times in total = 30-32-35-38-41-44 sts. AT THE SAME TIME when piece measures 48-49-50-51-52-53 cm / 19"-19¼"-19¾"-20"-20½"-21", work as follows: Work 8 sts in garter st, work A.1 over the remaining sts (edge st in garter st). When A.1 has been worked 1 time vertically, work piece until finished measurements in reversed stockinette st (continue band and edge st in garter st). AT THE SAME TIME when piece measures 56-57-58-59-60-61 cm / 22"-22½"-22¾"-23¼"-23½"-24", bind off for BUTTONHOLES - see explanation above. When piece measures 60-61-62-63-64-65 cm / 23½"-24"-24½"-24¾"-25¼"-25½", bind off 1 edge st in the side = 29-31-34-37-40-43 sts. When piece measures 72-74-76-78-80-82 cm / 28⅜"-29⅛"-30"-30¾"-31½"-32¼", slip the outermost 9-9-9-10-10-10 sts towards mid front on 1 stitch holder for neck (work them before slipping them on stitch holder to avoid cutting the yarn). Continue to bind off for neck at beg of every row from neck as follows: bind off 2 sts 1 time and then 1 st 2 times = 16-18-21-23-26-29 sts remain on shoulder. Loosely bind off all sts when piece measures 78-80-82-84-86-88 cm / 30¾"-31½"-32¼"-33"-33⅞'-34⅝". LEFT FRONT PIECE: Cast on and work as right front piece but reversed. Do not dec for buttonholes on left front piece. ASSEMBLY: Sew the shoulder seams. HOOD: Pick up approx. 46 to 58 sts around the neck (includes sts on stitch holders at the front) on circular needle size 7 mm / US 10.75 with Andes. K 1 row from WS while inc evenly to 66-68-70-72-74-76 sts - do not inc over bands. Work 2 ridges. Switch to circular needle size 8 mm / US 11. Then work in stockinette st with 8 sts in garter st in each side, back and forth over all sts until hood measures approx. 30-31-32-33-34-35 cm / 11¾"-12¼"-12½"-13"-13⅜"-13¾". Switch to circular needle size 7 mm / US 10.75. Work 2 ridges over all sts. Bind off. Fold the hood double and sew tog at the top with grafting/kitchener sts. SLEEVE: Worked back and forth on circular needle. Cast on 22-22-24-24-26-26 sts (includes 1 edge st in each side) on circular needle size 7 mm / US 10.75 with Andes. Work 3 ridges - then work A.1 over all sts. Work A.1 1 time vertically. Switch to circular needle size 8 mm / US 11 and work in stockinette st with 1 edge st in garter st in each side. When piece measures 8-8-8-8-10-8 cm / 3"-3"-3"-3"-4"-3", inc 1 st in each side - READ INCREASE TIP (= 2 sts inc) and MEASURING TIP-2. Inc every 5-4-4-3½-3-3 cm / 2"-1½"-1½"-1¼"-1"-1" 9-10-10-11-11-12 times in total = 40-42-44-46-48-50 sts. Bind off when piece measures 51-50-49-48-45-44 cm / 20"-19¾"-19¼"-19"-17¾"-17¼" (NOTE: Shorter measurements in the larger sizes because of wider shoulders). Make another sleeve. ASSEMBLY: Sew in sleeves. Sew under arm and side seams inside 1 edge st, finish when 18 cm / 7" remain at the bottom of body for vent. Sew the buttons on to left front piece. |
|||||||
Diagram explanations |
|||||||
|
|||||||
 |
|||||||
Have you finished this pattern?Tag your pictures with #dropspattern #aredheljacket or submit them to the #dropsfan gallery. Do you need help with this pattern?You'll find 27 tutorial videos, a Comments/Questions area and more by visiting the pattern on garnstudio.com. © 1982-2026 DROPS Design A/S. We reserve all rights. This document, including all its sub-sections, has copyrights. Read more about what you can do with our patterns at the bottom of each pattern on our site. |
|||||||


With over 40 years in knitting and crochet design, DROPS Design offers one of the most extensive collections of free patterns on the internet - translated to 17 languages. As of today we count 324 catalogs and 12245 patterns - 12235 of which are translated into English (US/in).
We work hard to bring you the best knitting and crochet have to offer, inspiration and advice as well as great quality yarns at incredible prices! Would you like to use our patterns for other than personal use? You can read what you are allowed to do in the Copyright text at the bottom of all our patterns. Happy crafting!
Post a comment to pattern DROPS 172-46
We would love to hear what you have to say about this pattern!
If you want to leave a question, please make sure you select the correct category in the form below, to speed up the answering process. Required fields are marked *.