
Popular categories
Looking for a yarn?


Comments / Questions (70)
![]() Stefania wrote:
Stefania wrote:
Cosa vuol dire diminuire a lato (alla fine del ferro dritto) come sul dietro? Vuol dire che se devo diminuire di 8 m devo diminuire 4 alla fine del lato dritto e 4 all'inizio del lato rovescio? Grazie per la risposta
31.10.2020 - 11:55DROPS Design answered:
Buongiorno Stefania, deve lavorare le diminuzioni a lato sul davanti destro come sul dietro, quindi lo stesso numero di maglie alla stessa distanza. Per lavorare le diminuzioni segua il suggerimento all'inizio del lavoro. Buon lavoro!
31.10.2020 - 14:10
![]() Stefania wrote:
Stefania wrote:
Cosa vuol dire diminuire a lato (alla fine del ferro dritto) come sul dietro? Vuol dire che se devo diminuire di 8 m devo diminuire 4 alla fine del lato dritto e 4 all'inizio del lato rovescio? Grazie per la risposta
31.10.2020 - 09:20DROPS Design answered:
Buongiorno Stefania, deve lavorare le diminuzioni a lato sul davanti destro come sul dietro, quindi lo stesso numero di maglie alla stessa distanza. Per lavorare le diminuzioni segua il suggerimento all'inizio del lavoro. Buon lavoro!
31.10.2020 - 14:09
![]() Graciela wrote:
Graciela wrote:
Hola todos los tejidos son con agujas circular?? Donde puedo ver un tutorial no se como hacerlo gracias
10.05.2020 - 23:53DROPS Design answered:
Hola Graciela! Como hacerlo puedes ver AQUI. Buen trabajo!
04.11.2020 - 20:13
![]() Marianne Kjærholm Elsner wrote:
Marianne Kjærholm Elsner wrote:
Hvor finder jeg str. 44? vil strikke i ekstrafine merino 70 100%wool superwash pinde 5+6 er det ok til str. 44?
03.05.2020 - 18:11DROPS Design answered:
Hei Marianne. Størrelsene som er oppgitt til denne jakken er: S - M - L - XL - XXL - XXXL. Målskissen til jakken finner du nederst i oppskriften og der finner du cm mål, da kan du selv måle hvilken størrelse som vil passe deg best. Denne jakken er strikket i DROPS Eskimo og med pinne str. 7 og 8. Strikkefastheten og målene er tatt ut fra disse pinnemålene, bruker du mindre pinner og et tynnere garn (DROPS Merino Extra Fine) vil du få en annen jakken. mvh DROPS design
04.05.2020 - 12:58
![]() Piera wrote:
Piera wrote:
Buongiorno, volevo chiedere se è possibile utilizzare dei ferri diritti anzichè i ferri circolari, visto che è lavorato avanti e indietro. Grazie Piera
29.01.2020 - 23:21DROPS Design answered:
Buongiorno Piera. Sì può usare i ferri dritti al posto dei circolari e seguire le indicazioni riportate. Buon lavoro!
30.01.2020 - 09:06
![]() Cynthia wrote:
Cynthia wrote:
Hallo, würden Sie mir einmal helfen, wie ich in Größe S bei den Armausschnitten abketten soll? Es heißt „ für die Armausschnitte beidseitig in jeder 2. R wie folgt abketten: je 3 M 0-1-1-1-1-1 x, je 2 M 1-0-1-2-3-3 x und je 1 M 1-1-2-2-2-3 x“, leider verstehe ich nicht wie das gemeint ist. Liebe Grüße, Cynthia
24.01.2020 - 21:51DROPS Design answered:
Liebe Cynthia, Ketten Sie so ab: 3 Maschen am Anfang der nächsten 2 Reihen (1 Hin + 1 Rückreihe), 2 Maschen am Anfang der nächsten 2 Reihen, 1 Masche am Anfang der nächsten 4 Reihen. Jetzt ketten Sie 2 Maschen am Anfang der nächsten 2 Reihen bis die Arbeit 54 cm misst, dann ketten Sie 3 Maschen am Anfang nächster 2 Reihen. Viel Spaß beim stricken!
27.01.2020 - 08:02
![]() Marjan wrote:
Marjan wrote:
Mijn vraag gaat over de mouwen: als ik 36 steken opzet wordt de mouw ontzettend wijd. Is dat wel de bedoeling? Op de foto is dat niet het geval, tenminste niet zooo wijd. Klopt het wel?
27.09.2019 - 09:40DROPS Design answered:
Dag Marjan,
Bij een stekenverhouding van 11 steken in de breedte = 10 cm, zou je op 29 cm rondom komen en dat lijkt me een vrij normale afmeting voor dit patroon, dus ik denk niet dat er een fout in zit. Als je het te veel vindt kun je natuurlijk altijd minder steken opzetting.
27.09.2019 - 14:44
![]() Christina wrote:
Christina wrote:
Liebes Drops-Team, ich habe nochmals eine Frage zur Anleitung. Bei der Anleitung zum Rückenteil heisst es "Bei einer Gesamtlänge von 8 cm je 1 neue M am Ende der nächsten 2 R, d.h. beidseitig" Ebenfalls laut Anleitung sollen nach der Zunahme 2 Maschen mehr auf der Nadel sein. Wenn man die Zunahmen aber auf 2 Reihen macht komme ich auf 4 zugenommene Maschen. Was davon ist richtig? Oder habe ich etwas überlesen?
22.08.2019 - 23:49DROPS Design answered:
Liebe Christina, nach 8 cm schlagen Sie 1 Masche am Ende der nächsten Reihe, wenden Sie und schlagen Sie 1 M am Ende der nächsten Reihe = Sie haben jetzt 1 neue Masche beidseitig zugenommen = 2 Zunahmen. Viel Spaß beim stricken!
23.08.2019 - 09:15
![]() Christina wrote:
Christina wrote:
Liebes Drops-Team Bei den Ärmeln heisst es "Zunahmetipp beachten", allerdings finde ich nur einen Abnahmetipp und keinen Zunahmetipp? Auch bei den Videos passend zu diesem Muster ist leider kein passendes zum Zunehmen dabei.
06.08.2019 - 17:31DROPS Design answered:
Liebe Christina, danke für den Hinweis, ZUNAHMETIPP wird dazu geschrieben: es wird mit 1 Umschlag innerhalb 1 Randmasche beidseitig zugenommen; bei der nächsten Reihe stricken Sie die Umschläge verschränkt. Viel Spaß beim stricken!
07.08.2019 - 16:41
![]() Janine Chappell wrote:
Janine Chappell wrote:
Could this be extended longer using the pattern without adjustment, to make a longer length or a coat?
22.06.2019 - 23:21DROPS Design answered:
Dear Janine, absolutely. Maybe start with a few more stitches and gradually decrease those at the sides between where your hip and where your waist would be, but it should woork even without those. Happy Knitting!
23.06.2019 - 08:36
|
|||||||
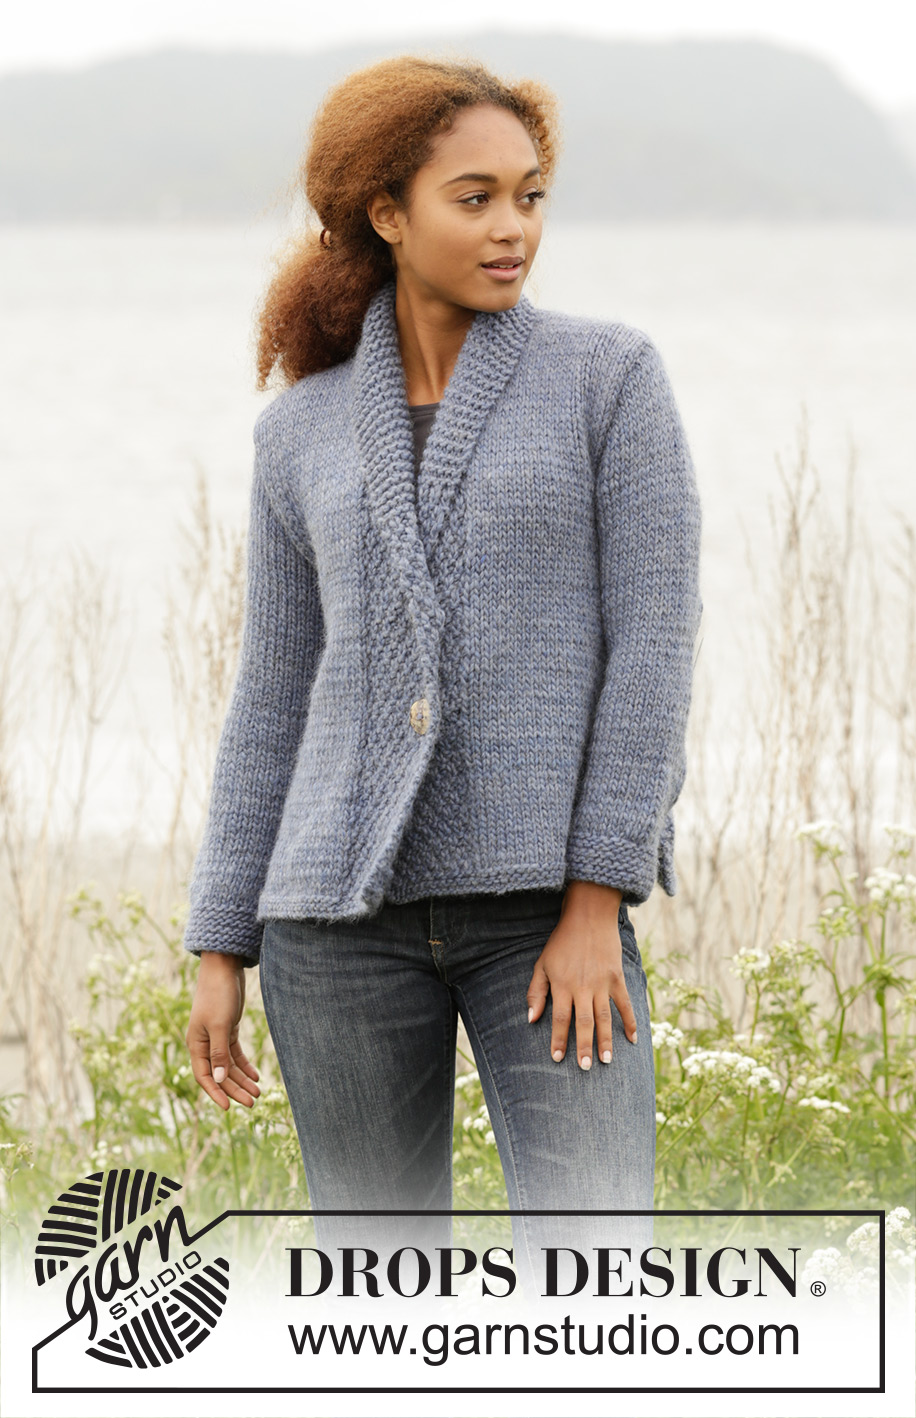
Winter Hues#winterhuescardigan |
|||||||
|
|
|||||||
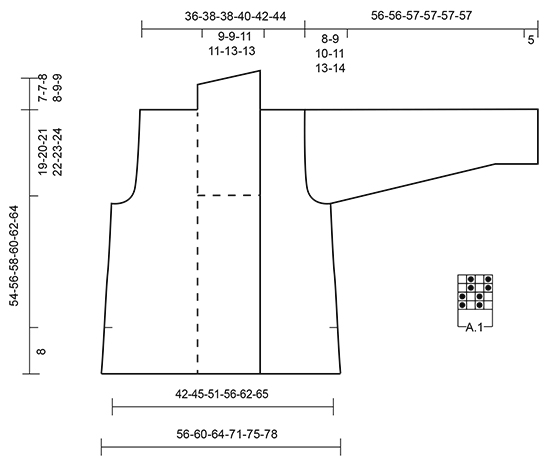
Knitted DROPS jacket with double seed st in band and shawl collar in ”Snow” or DROPS Wish. Size: S - XXXL.
DROPS 171-2 |
|||||||
|
GARTER ST (back and forth): K all rows. 1 ridge = K2 rows. PATTERN: See diagram A.1. Diagram shows all rows in pattern, seen from RS. DECREASE TIP: Dec inside 1 edge st in garter st. All dec are done from RS! Dec as follows before 1 edge st: K 2 tog. Dec as follows after 1 edge sts: Slip 1 st as if to K, K 1, psso. INCREASE TIP Increase 1 stitch with a yarn over inside 1 edge stitch on each side. Work the yarn overs twisted on next row to avoid holes. BUTTONHOLES: Dec for buttonholes on right band. 1 buttonhole = K tog fourth and fifth st from edge and make 1 YO. Dec for buttonholes when piece measures: SIZE S: 17 and 26 cm / 6¾" and 10¼" SIZE M: 18 and 27 cm / 7" and 10½". SIZE L: 19 and 28 cm / 7½" and 11". SIZE XL: 20 and 29 cm / 8" and 11½". SIZE XXL: 21 and 30 cm / 8¼" and 11¾". SIZE XXXL: 22 and 31 cm / 8¾" and 12¼". ---------------------------------------------------------- BACK PIECE: Worked back and forth on circular needle. Cast on 62-66-70-78-82-86 sts on circular needle size 7 mm / US 10.75 with Snow or Wish. Work 2 ridges in GARTER ST - see explanation above. Switch to circular needle size 8 mm / US 11. Work in stockinette st with 3 sts in garter st in each side. When piece measures 8 cm / 3⅛", cast on 1 new st at the end of the next 2 rows = 64-68-72-80-84-88 sts. Work in stockinette st with 1 edge st in garter st in each side. REMEMBER THE KNITTING GAUGE When piece measures 11 cm / 4½", dec 1 st in each side of piece - READ DECREASE TIP! Dec like this every 3-3-4-3-4-4 cm / 1"-1"-1½"-1"-1½"-1½" 8-8-7-8-7-7 times in total = 48-52-58-64-70-74 sts. When piece measures 35-36-37-38-39-40 cm / 13¾"-14¼"-14½"-15"-15¼"-15¾", bind off for armhole in each side of piece on every other row: 3 sts 0-1-1-1-1-1 time, 2 sts 1-0-1-2-3-3 times and 1 st 1-1-2-2-2-3 times = 42-44-44-46-48-50 sts. When piece measures 52-54-56-58-60-62 cm / 20½"-21¼"-22"-22¾"-23⅝"-24⅜", bind off the middle 10-10-12-12-14-14 sts for neck = 16-17-16-17-17-18 sts remain on each shoulder. Bind off when piece measures 54-56-58-60-62-64 cm / 21¼"-22"-22¾"-23⅝"-24⅜"-25¼". RIGHT FRONT PIECE: Cast on 45-47-49-55-57-59 sts (includes 14-14-14-16-16-16 band sts) on circular needle size 7 with Snow or Wish. Work 2 ridges. Switch to circular needle size 8 mm / US 11. Work as follows from RS: 14-14-14-16-16-16 band sts in A.1, stockinette st until 3 sts remain, finish with 3 sts in garter st. Continue like this until piece measures 8 cm / 3⅛". Cast on 1 new st at the end of next row from RS = 46-48-50-56-58-60 sts. Work as follows from WS: 1 edge st in garter st, stockinette st until 14-14-14-16-16-16 sts remain, A.1 over band sts as before. Continue like this. When piece measures 11 cm / 4½", dec in the side (i.e. at the end of row from RS) as on back piece = 38-40-43-48-51-53 sts. REMEMBER BUTTONHOLES! When piece measures 35-36-37-38-39-40 cm / 13¾"-14¼"-14½"-15"-15¼"-15¾", bind off for armhole in the side as on back piece = 35-36-36-39-40-41 sts. When bind off for armhole is done work band sts (= 14-14-14-16-16-16 sts towards mid front) in garter st until finished measurements. When piece measures 54-56-58-60-62-64 cm / 21¼"-22"-22¾"-23⅝"-24⅜"-25¼", bind off the first 16-17-16-17-17-18 sts for shoulder on next row from WS = 19-19-20-22-23-23 sts remain for shawl collar. Continue in garter st over these sts - AT THE SAME TIME work short rows, beg from the neck (RS) as follows: * Work 1 ridge over all sts (= 2 rows K). On next row from RS K 14-14-14-16-16-16, turn and K back *, repeat from *-* until piece measures 7-7-8-8-9-9 cm / 2¾"-2¾"-3⅛"-3⅛"-3½"-3½" from bind off for shoulder (short side). Loosely bind off all sts. LEFT FRONT PIECE: Work as right front piece but reversed. Do not dec for buttonholes on left band. SLEEVE: Worked back and forth on circular needle. Cast on 34-34-36-36-38-38 sts (includes 1 edge st in each side) on circular needle size 7 mm / US 10.75 with Snow or Wish. Work 6 ridges. Switch to circular needle size 8 mm / US 11. Work in stockinette st with 1 edge st in garter st in each side. When piece measures 12-13-13-12-10-11 cm / 4¾"-5"-5"-4¾"-4"-4½", inc 1 st in each side of piece - READ INCREASE TIP! Inc like this every 8-6-6-5-5-4 cm / 3"-2¼"-2¼"-2"-2"-1½" 5-6-6-7-7-8 times in total = 44-46-48-50-52-54 sts. When piece measures 48-47-47-46-44-43 cm / 19"-18½"-18½"-18"-17¼"-17", bind off for sleeve cap in each side on every other row: 3 sts 1 time, 2 sts 1 time, 1 st 2-3-4-4-6-7 times, then bind off 2 sts in each side until piece measures 54-54-55-55-55-55 cm / 21¼"-21¼"-21½"-21½"-21½"-21½" , then bind off 3 sts 1 time in each side before binding off the remaining sts. Piece measures approx. 56-56-57-57-57-57 cm / 22"-22"-22½"-22½"-22½"-22½". Make another sleeve the same way. ASSEMBLY: Sew the shoulder seams tog. Sew in the sleeves inside 1 edge st. Sew side and sleeve seams in one inside 1 edge st down to where edge st were cast on (i.e. approx. 8 cm / 3" vent). Sew collar tog mid back - NOTE: Seam should be at the back so that it is not visible when collar is folded down. Sew collar along neckline in the back of neck. Sew buttons on left band. |
|||||||
Diagram explanations |
|||||||
|
|||||||
 |
|||||||
Have you finished this pattern?Tag your pictures with #dropspattern #winterhuescardigan or submit them to the #dropsfan gallery. Do you need help with this pattern?You'll find 22 tutorial videos, a Comments/Questions area and more by visiting the pattern on garnstudio.com. © 1982-2026 DROPS Design A/S. We reserve all rights. This document, including all its sub-sections, has copyrights. Read more about what you can do with our patterns at the bottom of each pattern on our site. |
|||||||


With over 40 years in knitting and crochet design, DROPS Design offers one of the most extensive collections of free patterns on the internet - translated to 17 languages. As of today we count 324 catalogs and 12245 patterns - 12235 of which are translated into English (US/in).
We work hard to bring you the best knitting and crochet have to offer, inspiration and advice as well as great quality yarns at incredible prices! Would you like to use our patterns for other than personal use? You can read what you are allowed to do in the Copyright text at the bottom of all our patterns. Happy crafting!
Post a comment to pattern DROPS 171-2
We would love to hear what you have to say about this pattern!
If you want to leave a question, please make sure you select the correct category in the form below, to speed up the answering process. Required fields are marked *.