
Popular categories
Looking for a yarn?


Comments / Questions (22)
![]() Mariëlle wrote:
Mariëlle wrote:
Bedankt Garnstudio voor dit leuke patroon! Inmiddels is het af. Ik wil nog wel even doorgeven dat ik zeker één bol extra verbruikt heb dan wat er volgens het patroon aangegeven staat. Wellicht handig voor andere haaksters die ook nog aan dit project willen beginnen.
24.01.2018 - 10:41
![]() Mariëlle wrote:
Mariëlle wrote:
Ik reageer even op de graag van Martha, want volgens mij klopt het patroon inderdaad niet. Voor maat L moet je inderdaad begonnen met 218 lossen te haken. Volgens mij moet je deze echt er niet sluiten met een halve vaste, maar gewoon weer terug haken. Als je het patroon vertaalt vanuit het Engels of het Duits, dan staat er Volgens mij nergens dat je deze ketting van lossen moet sluiten met een halve vaste.
29.06.2017 - 19:25DROPS Design answered:
Hoi Mariële, Ik heb het patroon even goed doorgelezen en je hebt gelijk! Als je in de rondte zou breien, zou je ook geen knoopbies krijgen. Het is aangepast hoor. Dankjewel voor het doorgeven!
29.06.2017 - 20:37
![]() Eva Takacs wrote:
Eva Takacs wrote:
Hi, sorry, me again. Now I am at the point where it says: 'work 1 tr through both layers in each of the 4 tr on band, then work 1 tr in every tr from bottom edge of ch-row' For the life of me I can't imagine what this means how I am supposed to work a tr through two layers of crocheted material. I was looking for video help, also I tried finding info on this generally online, but can't find anything. Could you give me some pointers? Thank you.
27.08.2016 - 23:46DROPS Design answered:
Dear Mrs Takacs, there are no video yet showing how to do, but you will now have to crochet both pieces tog to create the button band: place the first 4 tr from left back piece under the first 4 tr from right back piece and crochet 1 tr in the first of these 4 tr on right back piece and at the same time in the tr on left back piece = both pieces are now crocheted tog. Repeat so that you have worked the 4 band sts on right back piece tog with the 4 band sts of left back piece and continue as stated. Happy crocheting!
29.08.2016 - 11:47
![]() Eva Takacs wrote:
Eva Takacs wrote:
I am really stuck at the back part, from when it starts with the left back. I don't quite understand what the bit about '4tr=band' means. Does this mean to crochet four trebbles into the last stitch? Is there a picture somewhere of the back of the finished garment? Thank you for the help in advance.
26.08.2016 - 01:17DROPS Design answered:
Dear Mrs Takacs, the 4 tr towards mid back are for the button band, these are the last 4 tr on row from RS and first 4 tr from WS. Happy crocheting!
26.08.2016 - 10:57
![]() Martha Vonder-van Der Leij wrote:
Martha Vonder-van Der Leij wrote:
Klopt het patroon wel? Ik moet 218 lossen haken en met een hv tot een ring sluiten, daarna keren en in de 4e losse een stokje haken? Dat moeten dan 2 stokjes zijn maar dat kan toch niet kloppen? Dat ziet er heel raar uit!
23.07.2016 - 11:49DROPS Design answered:
Hoi Martha. Ja, de eerste 3 lossen vervangen het eerste stk. Dus dit is correct
25.07.2016 - 15:54
![]() Kristin Svedberg wrote:
Kristin Svedberg wrote:
Hej! I förklaringen på bakstycket: VÄNSTER BAKST: "Nu virkas det över de första 38-42-46-51-57-63 från överdelen, 4 st mot mitt bak = framkant" borde det kanske stå "knappkant" istället för framkant. Det tog ett tag innan jag fattade vad som menades, sen när man läser längre ner i beskrivningen så kommer nämligen benämningen knappkant. Med vänlig hälsning Kristin
18.07.2016 - 14:37
![]() Metzle wrote:
Metzle wrote:
Combien de pelotes pour ce modèle en 38/40? SVP
02.03.2016 - 19:08DROPS Design answered:
Consultez 'Astuces et Aide'> 'Lecons DROPS' > le titre de la lecon: Comment lire le schema des mesures. Bien cordialement!
03.03.2016 - 19:34
![]() Metzle wrote:
Metzle wrote:
Combien de pelotes pour ce modèle en 38/40 SVP?
02.03.2016 - 19:06DROPS Design answered:
Bonjour Mme Metzle, vous trouverez la quantité requise pour chaque taille sous l'onglet "Fournitures", soit par ex en taille S: 450 g Belle/50 g la pelote = 9 pelotes - cliquez ici pour savoir comment choisir la taille. Bon crochet!
03.03.2016 - 08:44
![]() Råsi-Mari Tengsmo wrote:
Råsi-Mari Tengsmo wrote:
Mycket snygg och lättvirkad. Blir absolut fler virkade.
13.02.2016 - 08:20
![]() Mila wrote:
Mila wrote:
I would love to make this!!
11.01.2016 - 16:20
|
|
Peaceful Mind#peacefulmindtunic |
|
|
|
|
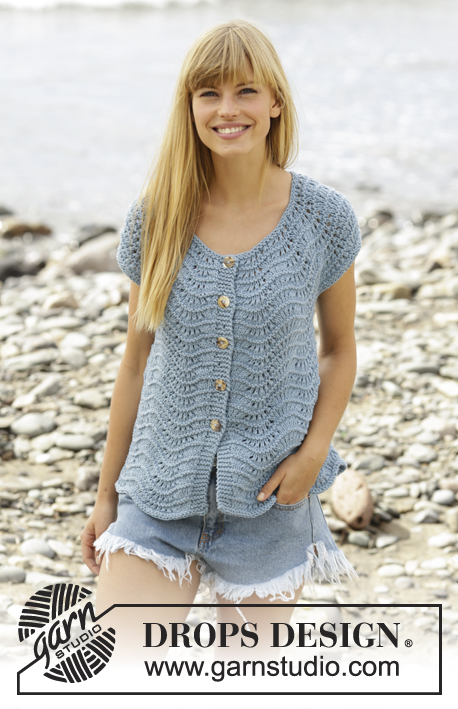
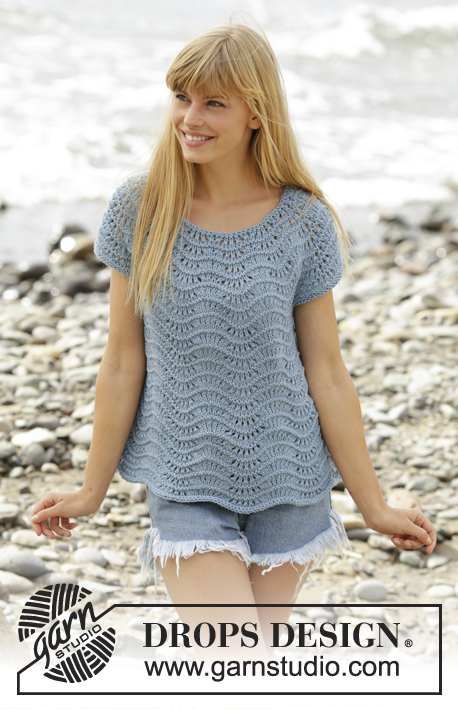
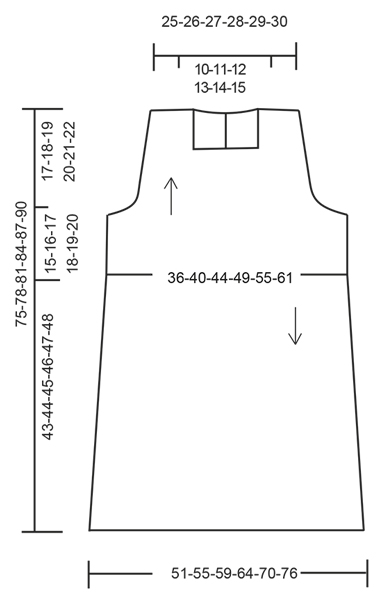
Crochet DROPS tunic with fan pattern in “Belle”. Size: S - XXXL.
DROPS 168-26 |
|
|
CROCHET INFO: Replace first dc at beg of every dc row/round with 3 ch. Finish a round with dc with 1 sl st in 3rd ch. DECREASE TIP: Dec at beg of round as follows: Work sl sts over no of dc to be dec. Dec at end of round as follows: When no of dc to be dec remains, turn piece. ---------------------------------------------------------- US/UK: This pattern is in US English. There are different crochet terms in British and US English. Conversion - see page 4. TUNIC: Worked in several part and in different directions. First work top part with front and back piece, then work body down and in the round. TOP PART: Work 180-199-218-242-271-300 ch on hook size 3.5 mm/E/4 with Belle. Turn and work 1 dc in fourth ch from hook (= 2 dc), * skip ch 1, 1 dc in each of the next 5 ch *, repeat from *-* and finish by skipping ch 1, 1 dc in each of the last 1-2-3-3-2-1 ch = 148-164-180-200-224-248 dc. Turn and work 1 dc in every dc back and forth until piece measures 15-16-17-18-19-20 cm / 6"-6¼"-6¾"-7"-7½"-8" - READ CROCHET INFO. REMEMBER THE CROCHET GAUGE! Cut the yarn. Then work front piece back and forth over the middle 72-80-88-98-110-122 dc on row (= 38-42-46-51-57-63 dc remain in each side for back piece). FRONT PIECE: = 72-80-88-98-110-112 dc. Work 1 dc in every dc AT THE SAME TIME bind off for armhole in each side on every row as follows: 3 dc 1-1-1-2-2-3 times, 2 dc 2-3-4-4-6-7 times and 1 dc 4-4-4-4-4-3 times = 50-54-58-62-66-70 dc - READ DECREASE TIP. Continue to work until piece measures 24-26-28-30-32-34 cm / 9½"-10¼"-11"-11¾"-12½"-13½". Now work only over the first 11-12-13-14-15-16 dc on row (= from RS). Work 1 dc in every dc until piece measures 32-34-36-38-40-42 cm / 12½"-13⅜"-14¼"-15"-15¾"-16½". Repeat in the opposite side but now work over the last 11-12-13-14-15-16 dc on row (= from RS). The 28-30-32-34-36-38 dc not worked towards mid front = neck. LEFT BACK PIECE: Now work over the first 38-42-46-51-57-63 from top part, 4 dc towards mid back = band. Bind off for armhole in the side as on front piece = 27-29-31-33-35-37 dc. When piece measures 30-32-34-36-38-40 cm / 11¾"-12½"-13⅜"-14¼"-15"-15¾, work only over the last 11-12-13-14-15-16 dc on row (= from RS). Work 2 rows in total over these 11-12-13-14-15-16 sts, the 16-17-18-19-20-21 dc not worked towards mid back = neck. Fasten off, piece measures 32-34-36-38-40-42 cm / 12½"-13⅜"-14¼"-15"-15¾"-16½". RIGHT BACK PIECE: Work as left piece but reversed. BODY: Worked top down, from underside of ch-row from top part. Place the outermost 4 dc from left back piece under the outermost 4 dc from right back piece (= bands), beg mid back and work 1 dc through both layers in each of the 4 dc on band, then work 1 dc in every dc from bottom edge of ch-row, finish with 1 sl st in third ch at beg of round = 144-160-176-196-220-244 dc. NOW MEASURE PIECE FROM HERE! Work 1 round with 1 dc in every dc while inc 1-0-4-4-0-1 dc = 145-160-180-200-220-245 dc. Now work fan pattern as follows: ROUND 1: 1 sc in first dc, *4 ch, skip 4 dc, 1 sc in next dc *, repeat from *-* the entire round and finish with ch 4, skip 4 dc and 1 sl st in first sc = 29-32-36-40-44-49 ch-spaces. ROUND 2: 3 dc + 2 ch + 3 dc in every ch-space. ROUND 3: Work sl sts until first ch-space, then work 3 dc + 2 ch + 3 dc in every ch-space. Repeat 3rd round until piece measures 18 cm / 7" in all sizes. WORK NEXT ROUND AS FOLLOWS: Work sl sts until first ch-space, then work 4 dc + 2 ch + 4 dc in every ch-space. Repeat this round until piece measures 31 cm / 12¼" in all sizes. WORK NEXT ROUND AS FOLLOWS: Work sl sts until first ch-space, then work 4 tr + 2 ch + 4 tr in every ch-space. Repeat this round until piece measures 43-44-45-46-47-48 cm / 17"-17¼"-17¾"-18"-18½"-19" Fasten off. CROCHET EDGE AROUND ARMHOLE: Work an edge around the armholes as follows: ROUND 1: Work ch 1, 1 sc, * ch 1, skip approx. 1 cm / ⅜", 1 sc *, repeat from *-* and finish with 1 sl st in ch at beg of round – make sure to work a no of sc/ch that is divisible by 4. ROUND 2: Work ch 1, work 1 sc around first ch-space, * 1 sc around same ch-space, ch 3, 1 dc in first ch, work 2 sc around next ch-space, 1 sc around next ch-space *, repeat from *-* and finish with 1 sl st in first ch on round. Fasten off. CROCHET EDGE AROUND NECK: Work an edge around the neck as follows: ROW 1: Work ch 1, 1 sc, * ch 1, skip approx. 1 cm / ⅜", 1 sc *, repeat from *-* make sure to work a no of sc/ch that is divisible by 4. Turn. ROW 2: Work ch 1, work 1 sc around first ch-space, * 1 sc around same ch-space, ch 3, 1 dc in first ch, work 2 sc around next ch-space, 1 sc around next ch-space *, repeat from *-*. Fasten off. ASSEMBLY: Distribute 5-5-5-6-6-6 buttons on left band mid back and fasten. Button between dc on right band. |
|
 |
|
Have you finished this pattern?Tag your pictures with #dropspattern #peacefulmindtunic or submit them to the #dropsfan gallery. Do you need help with this pattern?You'll find 8 tutorial videos, a Comments/Questions area and more by visiting the pattern on garnstudio.com. © 1982-2026 DROPS Design A/S. We reserve all rights. This document, including all its sub-sections, has copyrights. Read more about what you can do with our patterns at the bottom of each pattern on our site. |


With over 40 years in knitting and crochet design, DROPS Design offers one of the most extensive collections of free patterns on the internet - translated to 17 languages. As of today we count 324 catalogs and 12290 patterns - 12280 of which are translated into English (US/in).
We work hard to bring you the best knitting and crochet have to offer, inspiration and advice as well as great quality yarns at incredible prices! Would you like to use our patterns for other than personal use? You can read what you are allowed to do in the Copyright text at the bottom of all our patterns. Happy crafting!
Post a comment to pattern DROPS 168-26
We would love to hear what you have to say about this pattern!
If you want to leave a question, please make sure you select the correct category in the form below, to speed up the answering process. Required fields are marked *.