
Popular categories
Looking for a yarn?


Comments / Questions (27)
![]() Dea wrote:
Dea wrote:
Buonasera, la costruzione prevede diagramma A1 normale, poi ferri accorciati su A1, poi A1 normale , poi ferri accorciati su A1 e poi A1 normale? Grazie.
02.10.2020 - 22:10DROPS Design answered:
Buonasera Dea. Sì, è corretto come ha indicato. Buon lavoro!
02.10.2020 - 23:03
![]() Adria Vitelli wrote:
Adria Vitelli wrote:
Ma devo saltare le prime 4?.. Perché, ad esempio, continuando con il diagramma a1 su ferri accorciati, eseguendo il primo ferro( lasciate non lavorate 6 mg finali),quando poi vado ad eseguire il secondo ferro, si sfalza il motivo e non combaciano più le maglie ...
19.09.2019 - 15:24DROPS Design answered:
Buongiorno Adria. Sul ferro di ritorno non deve iniziare il diagramma dal primo quadratino, ma dal quadratino che corrisponde all’ultima maglia lavorata sul ferro precedente, in modo che il motivo combaci. Buon lavoro!
19.09.2019 - 17:16
![]() Adria Vitelli wrote:
Adria Vitelli wrote:
Buongiorno, ho lavorato il diagramma A1 per 22cm (tg S) ma ora non riesco a capire come devo proseguire. Dovrei continuare a lavorare A1 ma su ferri accorciati?...non riesco a capire come continuare con il motivo A1 e contemporaneamente lavorare a ferri accorciati. Ringrazio per qualsiasi aiuto.
19.09.2019 - 11:17DROPS Design answered:
Buongiorno Adria. Quando lavora i ferri accorciati, sulle maglie che lavora prosegue con il diagramma in modo che il motivo continui correttamente . Gira il lavoro quando sui ferri rimane il numero di maglie che non deve lavorare (la prima volta 6 m, la seconda 8 maglie e così via). Buon lavoro!
19.09.2019 - 12:02
![]() Giulia Stevanato wrote:
Giulia Stevanato wrote:
Salve volevo sapere se si può acquistare la maglia già finita
20.05.2019 - 14:55DROPS Design answered:
Buongiorno Giulia, purtroppo non vendiamo i capi finiti, ma può rivolgersi a un rivenditore DROPS, che sicuramente avrà delle magliaie disposte a confezionare il capo su commissione. Buon lavoro!
20.05.2019 - 15:48
![]() Bettina wrote:
Bettina wrote:
Liebes DROPS-Team, gibt es eine Möglichkeit, das Diagramm für dieses wunderschöne Modell in höherer Auflösung zu downloaden bzw auszudrucken? Im Video ist es viel besser sichtbar als beim Ausdrucken der Anleitung... Vielen Dank!!!
31.07.2018 - 08:46DROPS Design answered:
Liebe Bettina, es gibt nur dieses Diagram, aber gerne können Sie es beim drücken oder kopieren vergrößern. Viel Spaß beim stricken!
31.07.2018 - 10:02
![]() Marie wrote:
Marie wrote:
Bonjour, Quelle est la méthode utilisée pour les rangs raccourcis ? Si il existe une vidéo pouvez-vous m'indiquer le lien ? Merci d'avance. Cordialement. Marie
30.05.2018 - 21:05DROPS Design answered:
Chere Marie, moi personnellement j’utilise la methode de base, cliquez sur le video ci-apres Comment tricoter des raccourcis (méthode de base). Bon travail!
30.05.2018 - 22:00
![]() Viertel wrote:
Viertel wrote:
Pouvez-vous me donner la longueur totale du modèle je souhaite tricoter au point mousse. D'avance merci. Bien cordialement. Anne
01.03.2016 - 08:49DROPS Design answered:
Bonjour Mme Viertel, ce modèle a été conçu en point fantaisie avec des rangs raccourcis pour correspondre aux tailles indiquées d'après les explications. Aucune autre mesure n'est disponible, je suis désolée. Bon tricot!
01.03.2016 - 09:36Luise Duke wrote:
Thank you kindly for your help. I am happily knitting now, such a beautiful pattern, I just couldnt let it go. Luise Duke
19.02.2016 - 09:55
![]() DROPS Design wrote:
DROPS Design wrote:
Hoi Christien. Ik ben met je eens, dat het raar uitziet. Ik heb daarom de vraag doorgestuurd naar ons Design Team en wacht nu op antwoord/evt correctie. Dus nog even geduld :-)
11.02.2016 - 14:36
![]() Christien Van Dongen wrote:
Christien Van Dongen wrote:
Het gaat om de teltekening van patroon 167-11. Kan het zijn dat de tekening niet helemaal klopt of lees ik hem verkeerd? Ik kom niet uit met het aantal steken namelijk. Er staan in de teltekening ook kleine kruisjes en dikke kruisjes getekend maar van de dikke kruisjes staat nergens wat de bedoeling hiervan is. Ik hoop snel antwoord van u te ontvangen.
02.02.2016 - 16:04DROPS Design answered:
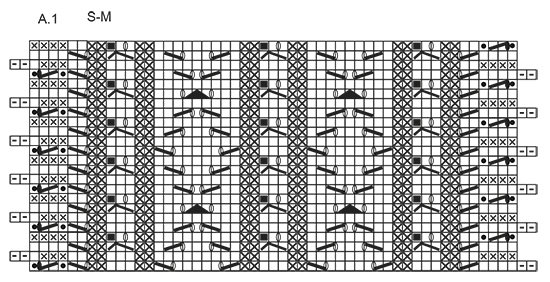
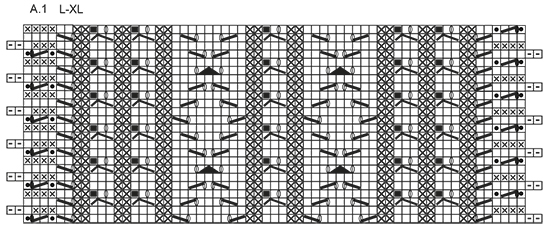
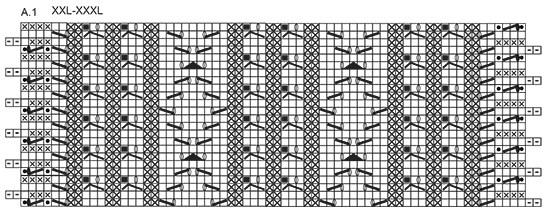
Hoi Christien. Het uitleg is aangepast. Allebei kruisjes zijn averecht aan de goede kant, recht aan de verkeerde kant
16.02.2016 - 16:37
|
||||||||||||||||||||||||||||||||||
Summer Twist#summertwistshoulderpiece |
||||||||||||||||||||||||||||||||||
 |
 |
|||||||||||||||||||||||||||||||||
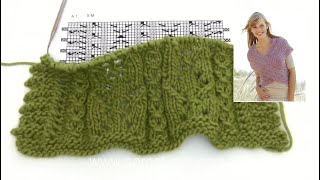
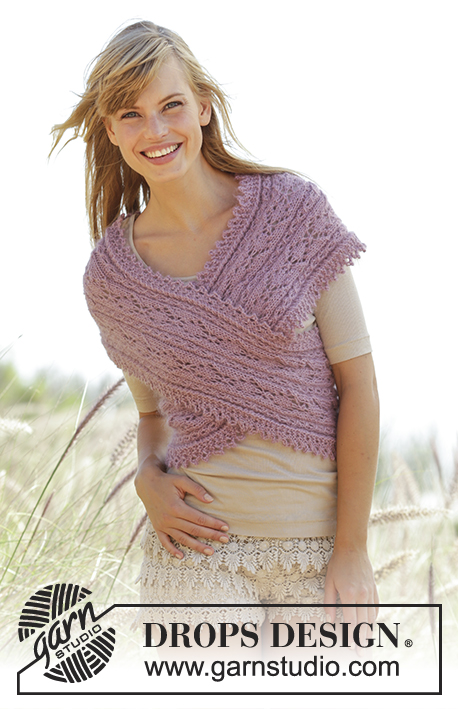
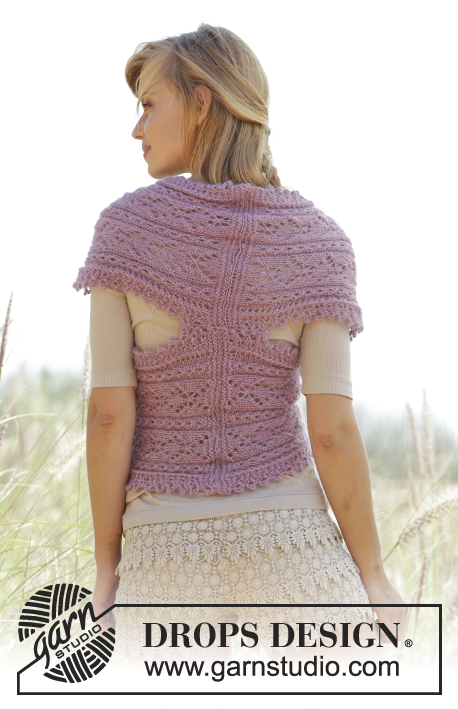
Knitted DROPS shoulder piece with cables, lace pattern and short rows in ”Alpaca” and ”Kid-Silk”. Size: S - XXXL.
DROPS 167-11 |
||||||||||||||||||||||||||||||||||
|
GARTER ST (back and forth): K all rows. 1 ridge = K2 rows. PATTERN: See diagram A.1. The diagram shows all rows in pattern seen from RS. See diagram for size. ---------------------------------------------------------- SHOULDER PIECE: Worked in two parts that are sewn tog mid back. Worked back and forth on needle. RIGHT SIDE: Work from mid back of neck, around the body and finish mid back on back. Cast on 53-53-63-63-68-68 sts on needle size 5 mm / US 8 with 1 strand Alpaca and 1 strand Kid-Silk (= 2 strands). Work 2 ridges in GARTER ST - see explanation above. Then work according to A.1 - see diagram for size. REMEMBER THE KNITTING GAUGE When piece measures 22-24-26-29-32-35 cm / 8¾"-9½"-10¼"-11½"-12½"-13¾", work short rows as follows from RS - continue pattern as before: SIZE S-M: Work until 6 sts remain on row, turn and work back. Work until 8 sts remain on row, turn and work back. Work until 11 sts remain on row, turn and work back. Work until 13 sts remain on row, turn and work back. Work until 22 sts remain on row, turn and work back. Work until 24 sts remain on row, turn and work back. Work until 27 sts remain on row, turn and work back. Work until 29 sts remain on row, turn and work back. Work until 38 sts remain on row, turn and work back. Work until 40 sts remain on row, turn and work back. Work until 43 sts remain on row, turn and work back. Work until 45 sts remain on row, turn and work back. Insert a marker here. Size L-XL: Work until 6 sts remain on row, turn and work back. Work until 8 sts remain on row, turn and work back. Work until 11 sts remain on row, turn and work back. Work until 13 sts remain on row, turn and work back. Work until 16 sts remain on row, turn and work back. Work until 18 sts remain on row, turn and work back. Work until 27 sts remain on row, turn and work back. Work until 29 sts remain on row, turn and work back. Work until 32 sts remain on row, turn and work back. Work until 34 sts remain on row, turn and work back. Work until 43 sts remain on row, turn and work back. Work until 45 sts remain on row, turn and work back. Work until 48 sts remain on row, turn and work back. Work until 50 sts remain on row, turn and work back. Work until 53 sts remain on row, turn and work back. Work until 55 sts remain on row, turn and work back. Insert a marker here. Size XXL-XXXL: Work until 6 sts remain on row, turn and work back. Work until 8 sts remain on row, turn and work back. Work until 11 sts remain on row, turn and work back. Work until 13 sts remain on row, turn and work back. Work until 16 sts remain on row, turn and work back. Work until 18 sts remain on row, turn and work back. Work until 27 sts remain on row, turn and work back. Work until 29 sts remain on row, turn and work back. Work until 32 sts remain on row, turn and work back. Work until 34 sts remain on row, turn and work back. Work until 37 sts remain on row, turn and work back. Work until 39 sts remain on row, turn and work back. Work until 48 sts remain on row, turn and work back. Work until 50 sts remain on row, turn and work back. Work until 53 sts remain on row, turn and work back. Work until 55 sts remain on row, turn and work back. Work until 58 sts remain on row, turn and work back. Work until 60 sts remain on row, turn and work back. Insert a marker here. Then work according to A.1 again - continue pattern where short rows ended. Work A.1 for 30-33-36-40-44-48 cm / 11¾"-13"-14¼"-15¾"-17¼"-19" from marker, then work short rows the same way as last time. Move marker here and work A.1 for 22-24-26-29-32-35 cm / 8¾"-9½"-10¼"-11½"-12½"-13¾", work 2 ridges and bind off. LEFT SIDE: Cast on and work as right side but when working short rows beg from WS. ASSEMBLY: Sew tog cast-on edge from right side towards cast-on edge on left side, cross the sides and sew tog bind-off edges. Sew tog shoulder piece mid back (sew approx. 10 cm / 4") and sew a small stitch mid front. |
||||||||||||||||||||||||||||||||||
Diagram explanations |
||||||||||||||||||||||||||||||||||
|
||||||||||||||||||||||||||||||||||
 |
||||||||||||||||||||||||||||||||||
 |
||||||||||||||||||||||||||||||||||
 |
||||||||||||||||||||||||||||||||||
Have you finished this pattern?Tag your pictures with #dropspattern #summertwistshoulderpiece or submit them to the #dropsfan gallery. Do you need help with this pattern?You'll find 14 tutorial videos, a Comments/Questions area and more by visiting the pattern on garnstudio.com. © 1982-2026 DROPS Design A/S. We reserve all rights. This document, including all its sub-sections, has copyrights. Read more about what you can do with our patterns at the bottom of each pattern on our site. |
||||||||||||||||||||||||||||||||||


With over 40 years in knitting and crochet design, DROPS Design offers one of the most extensive collections of free patterns on the internet - translated to 17 languages. As of today we count 324 catalogs and 12290 patterns - 12280 of which are translated into English (US/in).
We work hard to bring you the best knitting and crochet have to offer, inspiration and advice as well as great quality yarns at incredible prices! Would you like to use our patterns for other than personal use? You can read what you are allowed to do in the Copyright text at the bottom of all our patterns. Happy crafting!
Post a comment to pattern DROPS 167-11
We would love to hear what you have to say about this pattern!
If you want to leave a question, please make sure you select the correct category in the form below, to speed up the answering process. Required fields are marked *.