
Popular categories
Looking for a yarn?


Comments / Questions (83)
![]() Pascale Andron wrote:
Pascale Andron wrote:
Bonjour, Je bloque au dernier rang pour faire le dernier pétale,je ne comprend pas Merci pour votre réponse
17.08.2024 - 22:02DROPS Design answered:
Bonjour Mme Andron, au 6ème rang du diagramme crochetez ainsi: 1 ml pour tourner, *1 ms entre les 2 brides du 5ème rang, dans l'arceau de 5 ml entre les 2 triple-brides du 5ème rang crochetez: 3 triple-B, 5 ml, 1 ms dans l'arceau, (5 ml, 1 triple B, 5 ml, 1 ms dans l'arceau) x 3, 5 ml, 2 triple B dans l'arceau*, répétez de *à*. Bon crochet!
19.08.2024 - 08:11
![]() AK wrote:
AK wrote:
I'm finishing this pattern (well, some semblance of this pattern) out of spite. This is the worst pattern I've ever tried to follow.
04.08.2024 - 03:21
![]() Montserrat Mairata wrote:
Montserrat Mairata wrote:
Trabajar las sig 5 filas como sigue: 3 p. a. en el primer p. b.*1 p.cad, saltar 3 p. b.,3 p. a. en el sig p. b.*repetir de * *a lo largo de la fila,(36 vcs) vcs que significa? Y como seguir la 2da vuelta pues solo hay grupos de 3 p. a. separados por 1cad. Muchas gracias!!
23.07.2024 - 01:15DROPS Design answered:
Hola Montserrat, en la 1ª fila trabajas como se explica, repitiendo la sección entre * * 36 veces en total en la fila. En las siguientes filas trabajarás 3 p.a en el pt (que en este caso sería ahora p.a y no p.b).
28.07.2024 - 16:48
![]() Luisa wrote:
Luisa wrote:
Buon giorno, all’inzio della coppa la prima riga devo saltare catenelle e fare una m. a. nella terza. devo fare lo stesso all’inizio di ogni giro? quindi x tutti e sei i giri? ora sto iniziando nella seconda catenella ma la coppa non rimane simmetrica, ovvero le catenelle libere non sono allineati. grazie, Luisa
09.07.2024 - 14:04DROPS Design answered:
Buonasera Luisa, in questi gg il modello è stato aggiornato: provi a vedere se queste spiegazioni sono più chiare. Buon lavoro!
20.07.2024 - 22:10
![]() Johanna Latvala wrote:
Johanna Latvala wrote:
Millä puuvillalangalla Drops Denimin voi korvata?langalla
02.07.2024 - 17:39DROPS Design answered:
Hei, voit korvata langan DROPS Cotton Light -langalla.
03.07.2024 - 17:07
![]() Anita wrote:
Anita wrote:
This is a very frustrating pattern, I don't really like to crochet clothing, because I don't like to keep a gauge, but my daughter wants some of these for her birthday, where it says, place the 2 bra cups together, I crocheted the 37 stitches, then attached it to the bottom of one of the cups and slip stitched across the bottom, chain 1 and attach the second cup with a slip stitch in the corner bottom of the cup and slip stitch across and then chain the 37 again.
30.06.2024 - 02:11
![]() Odile Cazade wrote:
Odile Cazade wrote:
Bonjour Je bloque au 6e rang pour faire l'arceau entre les 2 triples brides du 5e rang. Merci pour votre réponse
19.06.2024 - 19:40DROPS Design answered:
Bonjour Mme Cazade, cet arceau se fait au 5ème rang: vous crochetez 1 triple-bride dans la maille serrée, puis 4 mailles en l'air et 1 maille coulée dans la triple bride, puis 1 autre triple bride dans la même maille serrée que la 1ère; ainsi, au 6ème rang, vous pouvez crocheter les pétales de la fleur dans cet arceau. Bon crochet!
20.06.2024 - 08:10
![]() Peyroutou wrote:
Peyroutou wrote:
Bonjour.jebloque pour bonnets:a la fin:faire les 2 rangs suivants:2ml+2b etccomment faire le 2 eime rang?
19.06.2024 - 08:51DROPS Design answered:
Bonjour Mme Peyroutou, vous crochetez 1 bride dans chaque bride, et, autour de la maille en l'air du rang précédent (= 2 b, 1 ml, 2 b), vous crochetez de nouveau 2 b, 1 ml, 2 b. À chaque rang, vous avez ainsi 2 brides en plus de chaque côté de la maille en l'air. Bon crochet!
19.06.2024 - 12:11
![]() Ineke wrote:
Ineke wrote:
Worden de bloemen apart van elkaar gehaakt, of worden ze toer voor toer gehaakt. Ik kan er in het patroon niet achterkomen. Alvast bedankt.
29.05.2024 - 19:07DROPS Design answered:
Dag Ineke,
De bloemen worden toer voor toer gehaakt en niet apart . Dus je herhaalt het telpatroon in de breedte totdat je in de rondte hebt gehaakt, dan ga je verder met de volgende toer, enzovoort.
30.05.2024 - 18:37
![]() Theresa wrote:
Theresa wrote:
This pattern is beyond infuriating and has to be one of the worst patterns I’ve tried to make as your directions rarely make sense. That being said, I cannot for the life of me figure out row 4. Nothing I’ve tried lines up and I’m left with several chain spaces and single crochets stitches after I completed all 11 lower edged blossoms. Your diagram doesn’t make sense and I even read your specific directions on how to “read a diagram”.
25.04.2024 - 19:00DROPS Design answered:
Dear Theresa, work 4th row as follows (US-English terminology): 1 ch to turn with, *1 sc around next chain space, ch 3, skip 1 ch-space, 2 tr+3 ch+1 sc+3 ch+2 tr around next ch-space, 3 ch, skip next ch-space*, repeat from *-* all the row and end with 1 sc in last ch-space. Happy crocheting!
26.04.2024 - 07:48
|
||||||||||||||||||||||
Summer Festival |
||||||||||||||||||||||
 |
 |
|||||||||||||||||||||
Crochet top and bottom edge on skirt in DROPS Den-M-nit or Cotton Light
DROPS 69-3 |
||||||||||||||||||||||
|
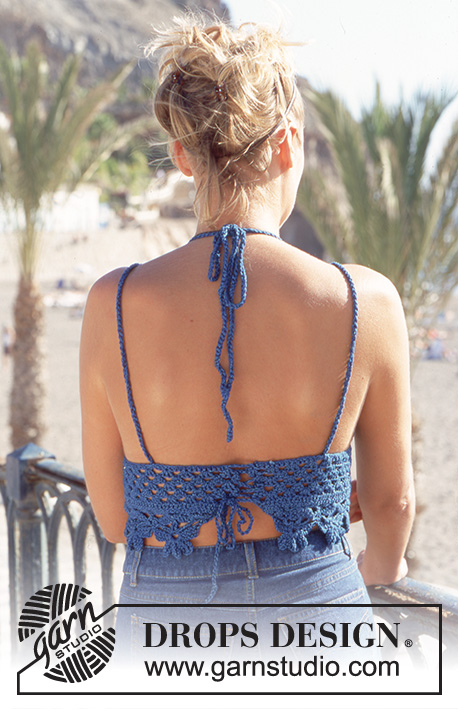
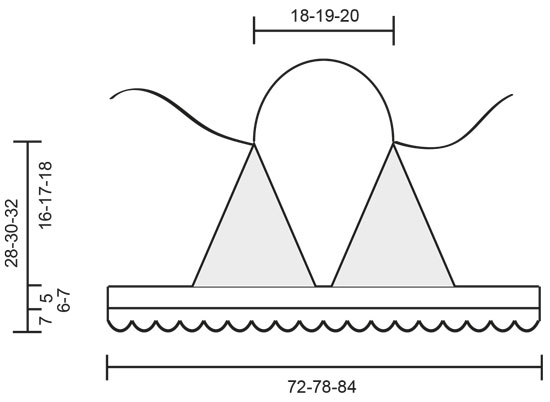
Crochet gauge: 18 dc x 10 rows = 10 x 10 cm [4" x 4"]. 1 repeat of Diag. 1 (1 blossom) measures 6.5 cm [2.5"] in width. Pattern: See diagram for the blossom pattern. «1 rapport» = «1 repeat»; «13 luftm» = «ch 13"; «rad» = «row». Bodice (make 2): Ch 9-11-13. Crochet dc up along one side of chain (first st replaces 2 ch sts) = 7-9-11 dc. In the last ch work 2 dc, ch 1, 2 dc, the continue with dc down the other side of chain. Turn the work, crochet back and forth on each side of center chain - 1 dc in each dc from the previous row and in the ch from previous row at the top, work 2 dc, ch 1 and 2 dc every row. Crochet 6-7-8 rows back and forth. Crochet the next 2 rows as follows: ch 2 + 2 dc in the first dc from previous row, * ch 1, skip over 2 dc, 3 dc in the next dc *, repeat from * - * up to the top, in ch from previous row at the top work 3 dc, ch 1, 2 dc. Repeat from * - * down other side. Top: Place the 2 bodice halves together. Ch 37-39-41 loosely, then sl 35-39-43 along lower edge of one bodice half, ch 1 between halves and sl 35-39-43 along lower edge of the other bodice half, finish with ch 37-39-41. Work 1 row sc in each ch and sl st = 145-157-169 sc. Crochet the next 5-6-7 rows as follows: 3 dc in first sc, * ch 1, skip over 3 sc, 3 dc in the next sc *, repeat from * - * across row (= 36-39-42 times). Then follow Diagr. 1 - start on the 2nd row = 145-157-169 sc. There will be 11-12-13 blossoms on lower edge – each blossom is made on 13 sc of the previous row, therefore on the next row you will need to dec 2-1-0 sts by skipping over 1 sc. Note: on sizes S and L there will be 1 blossom at center front; on size M the space between 2 blossoms will be at center front. Assembly: Sew the 2 bodice halves together at center front for approx. 5 cm [2"]. Make 3 ch-st cords approx. 100 cm [39⅜"] long with 2 strands Den-M-nit. 2 of the cords are used as straps. Sew 1 cord to each side of back, then thread cord through top of bodice halves on front. Tie cords at back of neck. The 3rd cord is used to tie the back together. Start at top and thread cords alternately thought right and left sides of back, cross-crossing cords. CROCHETED BORDER ON SKIRT: The bottom border of the top, (blossoms) can be crocheted to desired length and sewn around bottom edge of skirt or pant leg. Materials: DROPS DEN-M-NIT (disc.) (alternative MUSKAT rom Garnstudio) 50 g of yarn will make approx. 12 flowers. Crocheted border: Measure around bottom edge of skirt and calculate how many blossoms you need - 1 blossom measures approx. 6.5 cm [2.5"] in width. Ch 13 per blossom to start and crochet according to Diagr.1. |
||||||||||||||||||||||
Diagram explanations |
||||||||||||||||||||||
|
||||||||||||||||||||||
 |
||||||||||||||||||||||
 |
||||||||||||||||||||||
Have you finished this pattern?Tag your pictures with #dropspattern or submit them to the #dropsfan gallery. Do you need help with this pattern?You'll find 7 tutorial videos, a Comments/Questions area and more by visiting the pattern on garnstudio.com. © 1982-2026 DROPS Design A/S. We reserve all rights. This document, including all its sub-sections, has copyrights. Read more about what you can do with our patterns at the bottom of each pattern on our site. |
||||||||||||||||||||||


With over 40 years in knitting and crochet design, DROPS Design offers one of the most extensive collections of free patterns on the internet - translated to 17 languages. As of today we count 325 catalogs and 12298 patterns - 12288 of which are translated into English (US/in).
We work hard to bring you the best knitting and crochet have to offer, inspiration and advice as well as great quality yarns at incredible prices! Would you like to use our patterns for other than personal use? You can read what you are allowed to do in the Copyright text at the bottom of all our patterns. Happy crafting!
Post a comment to pattern DROPS 69-3
We would love to hear what you have to say about this pattern!
If you want to leave a question, please make sure you select the correct category in the form below, to speed up the answering process. Required fields are marked *.