
Popular categories
Looking for a yarn?


Comments / Questions (49)
![]() Olga wrote:
Olga wrote:
Does this pattern start as ROW 1 (=WS) or one line below ROW 1-6(1st row = RS)
13.05.2015 - 14:30DROPS Design answered:
Dear Olga, the very first row is worked from WS (= one line below diagram/row 1-6), then you work following diagrams, with Row 1 in diagram = 1st row from RS. Happy crocheting!
13.05.2015 - 16:13
![]() Joke Veenhof wrote:
Joke Veenhof wrote:
Ik snap het patroon niet het begin van het patroon, vanaf de eerste toer. Groetjes, Joke Veenhof
29.04.2015 - 16:35DROPS Design answered:
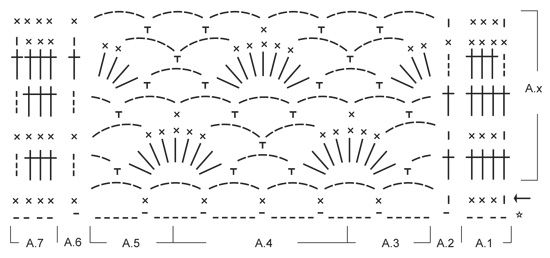
Hoi Joke. Ik kan je niet het hele patroon uitschrijven, maar wel een idee geven hoe je begint. Maak je bijv maat S/M, dan begin je met 69 l en toer 1 haak je: haak 1 stk in 4e l vanaf haak (= 2 stk), 1 stk in elke van de volgende 5 l, * sla 1 l over, haak 1 stk in elke van de volgende 4 l *, herhaal van *-* de hele toer = 55 stk op de toer. Vervolgens haak je de toeren 1 tot 6 als volgt: A.2, A.3, A.4 2 keer herhalen in de breedte, A.5 en A.6. Kijk voor de teltekeningen + beschrijving van de symbolen onderaan. Lees hier hoe je onze teltekeningen moet lezen
30.04.2015 - 15:29
![]() Lizette Vandsted wrote:
Lizette Vandsted wrote:
Jeg har strikket og hæklet i mange år, men ikke med tegnings opskrifter. Denne opskrift er jeg helt vild med, men kan ikke finde ud af tegningen og beskrivelsen. Kunne godt have brug for hjælp. ;0)
08.04.2015 - 18:25DROPS Design answered:
Hej Lizette. Hvad er det praecis du ikke forstaar? Saa kan jeg pröve at forklare.
23.04.2015 - 14:22
![]() Rigo wrote:
Rigo wrote:
Bonjour, Je n'en suis qu'à l'échantillon mais j'ai une question de base : quelle différence faites-vous entre un ms ou une B DANS la m et la AUTOUR de la m? Je ne trouve pas cette distinction dans vos videos. Merci à vous.
04.04.2015 - 12:44DROPS Design answered:
Bonjour Mme Rigo, quand on crochète une ms ou une B autour de la maille, on pique dans l'arceau du rang précédent (diagrammes A.8 et A.9), c'est-à-dire autour des ml de l'arceau. Bon crochet!
07.04.2015 - 08:43
![]() Leena Rissanen wrote:
Leena Rissanen wrote:
ETUKAPPALE:1-6.KRS: (1.krs = oikea puoli): Virkkaa piirroksen A.2 mallivirkkausta, A.3, toista piirroksen A.4 mallikertaa yht. 2-3-4-5 kertaa, Ensimmäinen ongelmakohtani. Jos ja kun A.4 mallikertoja koossa xxl on 4. niin jääkö ylimääräisiä ketjusilmukoita odottamaan myöhempää ajankohtaa ja mihin kohtaan puseroa ne silmukat jatkossa tulevat? (minulle jäi 40 kjs. Kiitos vastauksesta
29.03.2015 - 10:56DROPS Design answered:
Ketjusilmukoita ei tulisi jäädä ollenkaan. Olethan virkannut työn ensimmäisen pylväskerroksen. Tämän kerroksen jälkeen työssä on 91 pylvästä. Vasta tämän jälkeen aloitetaan piirrosten mallivirkkaus.
30.03.2015 - 16:36
![]() Miriam Van Der Zwet wrote:
Miriam Van Der Zwet wrote:
Ik kom niet uit met het patroon. Ik heb het rechtervoorpand tot aan het punt dat de mouwen klaar zijn en ik met het pand verder haak. Als ik 4x a.4 haak zit ik met maar een paar steken over en dat zou dan de mouwen moeten zijn?
23.03.2015 - 22:24DROPS Design answered:
Hoi Miriam. Ja, dat klopt.
24.03.2015 - 14:45
![]() Debbi Trapp wrote:
Debbi Trapp wrote:
I would love to make this but I'm a self taught crocheter. I can not understand the graphs, is it possible to get this in a written pattern.::uu
23.03.2015 - 11:59DROPS Design answered:
Dear Mrs Trapp, start reading diagram from the bottom corner on the right side and read RS rows from the right to the left and WS rows from the left to the right. Each stitch is representated by a symbol - see diagram text. Repeat parts in diagram as stated in written pattern. Happy crocheting!
23.03.2015 - 13:43
![]() Gaby wrote:
Gaby wrote:
Ich denke, den Beginn des Rückenteils habe ich nun verstanden. Bei Aufnahme von 71 LM komme ich aber bei Größe L auf insgesamt 11 Rapporte von A4 (anstatt 10 wie angegeben). Es entstehen 12 komplette "Muscheln". Mach ich was falsch?
22.03.2015 - 15:03DROPS Design answered:
Liebe Gaby, rein rechnerisch komme ich auch auf 11 statt auf 10 Rapporte. Ich werde das bei den Designerinnen nachfragen. Ich denke, es ist einfach nur ein Zahlenfehler und Sie können weiterhäkeln, denn das Muster geht ja auf. Messen Sie vorsichtshalber einmal nach, ob die Breite passt und mit Ihrer Maschenprobe übereinstimmt.
25.03.2015 - 10:59Gerd Solem wrote:
It hard to adjust 10,5 cm to 2 reports of A4 with the needle 3,5. I got 7,5 cm with one report. Have also tried needle no 2,5 and it is still to long according to two reports.
22.03.2015 - 13:30
![]() Gaby wrote:
Gaby wrote:
Sehr süße Jacke. Ich habe eine Frage zum Beginn des Rückenteils. Fange ich hier mit Luftmaschenbögen in die Stäbchen des Vorderteils an? Also Diagramm-Beginn. Oder hat die Schulter dann zwei Stäbchenreihen?
21.03.2015 - 14:28DROPS Design answered:
Ja, Sie fangen mit den Lm-Bögen an, also mit der R von A.2, die im Diagramm mit dem Pfeil gekennzeichnet ist. Weiterhin viel Spaß beim Häkeln!
25.03.2015 - 13:52
|
|||||||||||||||||||||||||
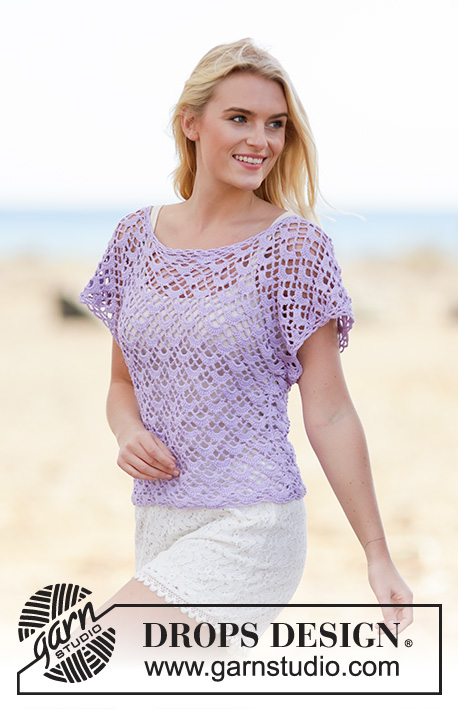
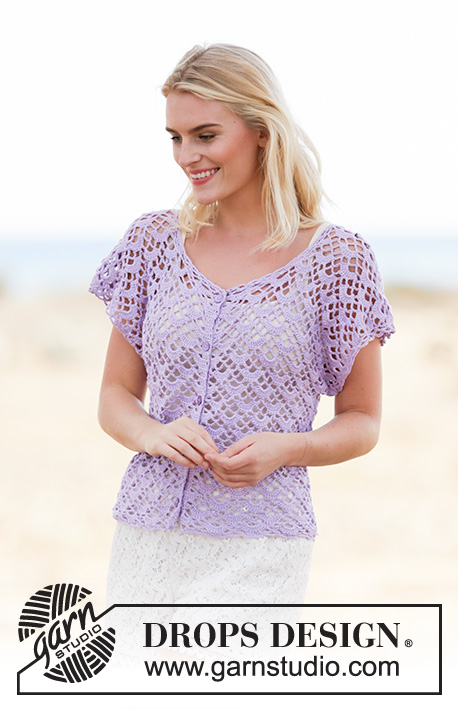
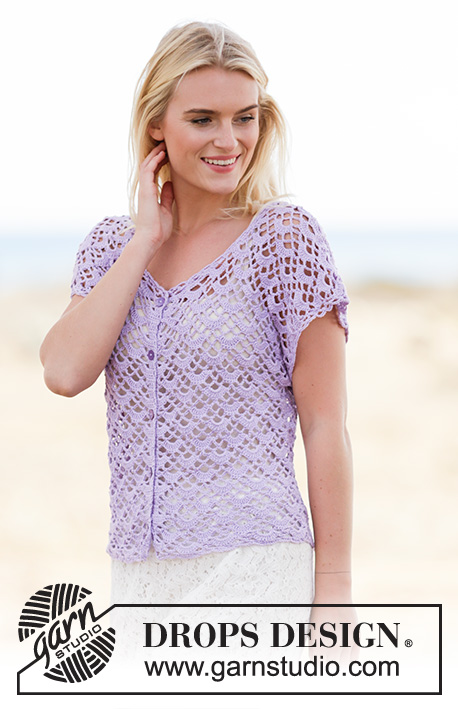
Shy Violet Cardigan#shyvioletcardigan |
|||||||||||||||||||||||||
 |
 |
||||||||||||||||||||||||
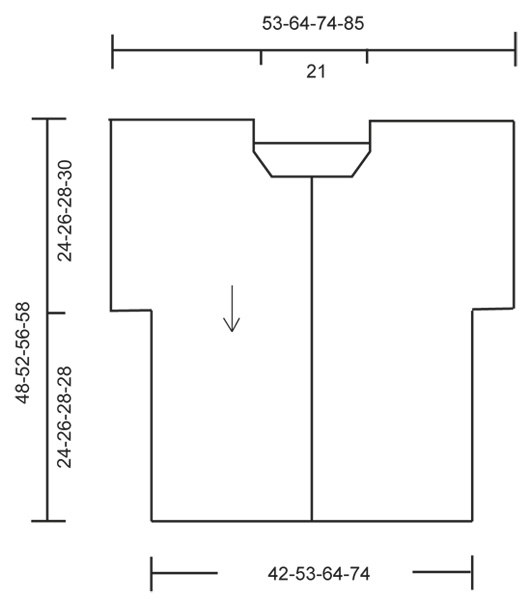
Crochet DROPS jacket with fan pattern, worked top down in ”Safran”. Size S-XXXL.
DROPS 162-14 |
|||||||||||||||||||||||||
|
PATTERN: See diagrams A.1 to A.9. The diagrams show all rows in pattern seen from RS. BUTTONHOLES: Measure from neck edge at the front and sew buttons on left band: SIZE S/M: 1, 9, 17, 25 and 33 cm / 3/8", 3½", 6¾", 9¾", 13". SIZE L: 1, 10, 19, 28 and 37 cm / 3/8", 4", 7½", 11", 14½" SIZE XL/XXL: 1, 8, 16, 24, 32 and 40 cm / 3/8", 3⅛", 6¼", 9½", 12½", 15¾". SIZE XXXL: 1, 9, 17, 25, 33 and 41 cm / 3/8", 3½", 6¾", 9¾", 13", 16⅛" ---------------------------------------------------------- JACKET: The piece is worked top down. RIGHT FRONT PIECE: Work 69-92-114-137 ch (includes 3 ch to turn with) on hook size 3.5 mm/E/4 with Safran. ROW 1 (= WS): Work 1 dc in 4th ch from hook (= 2 dc), 1 dc in each of the next 5-3-5-3 ch, * skip ch 1, work 1 dc in each of the next 4 ch *, repeat from *-* the entire row = 55-73-91-109 dc. NOW MEASURE PIECE FROM HERE! Now work according to diagram, i.e. work as follows: ROW 1-6: (1st row = RS): Work A.2, A.3, A.4 2-3-4-5 times in total, A.5, A.6. REMEMBER THE CROCHET GAUGE! ROW 7 (= RS): Work last row in A.2-A.5 as before but finish with A.8 over A.6. Continue until A.8 has been worked 1 time vertically, in A.2-A.5 repeat rows in A.x. Do not cut the yarn. Take a new strand and work 1 sl st in 3rd ch at beg of last row and 22 ch for neck. Cut the yarn and continue with first strand. Work over all sts, beg from RS as follows: A.2, A.3, A.4 4-5-6-7 times in total, A.5, finish with A.7 (= band). Continue like this. When piece measures approx. 24-26-28-30 cm / 9½"-10¼"-11"-11¾" – adjust after 7th row, sleeves are done. Then work as follows, beg from WS: Work A.7 (= band), A.5, A.4 3-4-5-6 times in total, A.3, finish with A.2 (do not work the last 3 ch-spaces). Continue like this until piece measures approx. 48-52-56-58 cm / 19"-20½"-22"-22¾", adjust after 5th row in diagram. Fasten off. LEFT FRONT PIECE: Work as right front piece to and with 6th row. ROW 7 (= RS): Work last row in A.3-A.6 as before but start with A.9 over A.2. Continue until A.9 has been worked 1 time vertically, in A.3-A.6 repeat rows in A.x. Work 22 ch at the end of row for neck. Now work over all sts, beg from RS as follows: A.1 (= band), A.3, A.4 4-5-6-7 times in total, A.5, finish with A.6. Continue like this. When piece measures approx. 24-26-28-30 cm / 9½"-10¼"-11"-11¾" – adjust after right front piece, sleeves are done. Cut the yarn. Then work as follows, beg from WS: Skip 3 ch-space, beg by working in next sc as follows: A.6, A.5, A.4 3-4-5-6 times in total, A.3, finish with A.1 (= band). Continue like this until piece measures approx. 48-52-56-58 cm / 19"-20½"-22"-22¾", adjust after right front piece. Fasten off. BACK PIECE: Work left shoulder in ch-row from cast on edge (work in same ch as dc's, i.e. in the 55-73-91-109 dc) from left front piece as follows: ROW 1-6: (1st row = RS): Work A.2, A.3, A.4 2-3-4-5 times in total, A.5, A.6. Cut the yarn. Work right shoulder as left shoulder but in right front piece - NOTE! Instead of cutting the yarn work 71 ch for neck at the end of row, fasten with 1 sl st in first ch at beg of last row on left shoulder. Cut the yarn. Now work over all sts, beg from RS as follows: NOTE: (Work first row as first row in diagram A1-A.6, then A.x) Work A.2, A.3, A.4 9-10-11-12 times in total, A.5, finish with A.6. Continue like this. When piece measures approx. 24-26-28-30 cm / 9½"-10¼"-11"-11¾" – adjust after front piece, sleeves are done. Cut the yarn. Then work as follows, beg from WS: Skip 3 ch-space, beg by working in next sc as follows: A.6, A.5, A.4 7-8-9-10 times in total, A.3, finish with A.2 (do not work the last 3 ch-spaces). Continue like this until piece measures approx. 48-52-56-58 cm / 19"-20½"-22"-22¾", adjust after front piece. Fasten off. ASSEMBLY: Sew side and underarm seams in one. Sew buttons on to the left band - see explanation above. Button through a hole in right front piece. EDGES: Work an edge along the neck, beg from band on right front piece as follows: Work * 1 sc, 5 ch *, repeat from *-* along the neck with approx. 2 cm / ¾" between every sc until band on left front piece. Turn piece with 5 ch and work as follows: 1 sc in first ch-space, * ch 5, 1 sc in next ch-space*, repeat from *-* the entire row and finish with 5 ch and 1 sc in first ch from previous row. Fasten off. Work an edge at the bottom along front and back piece the same way, beg from band on left front piece. Work an edge around the sleeve the same way, beg from mid under sleeve. |
|||||||||||||||||||||||||
Diagram explanations |
|||||||||||||||||||||||||
|
|||||||||||||||||||||||||
 |
|||||||||||||||||||||||||
 |
|||||||||||||||||||||||||
 |
|||||||||||||||||||||||||
Have you finished this pattern?Tag your pictures with #dropspattern #shyvioletcardigan or submit them to the #dropsfan gallery. Do you need help with this pattern?You'll find 6 tutorial videos, a Comments/Questions area and more by visiting the pattern on garnstudio.com. © 1982-2026 DROPS Design A/S. We reserve all rights. This document, including all its sub-sections, has copyrights. Read more about what you can do with our patterns at the bottom of each pattern on our site. |
|||||||||||||||||||||||||


With over 40 years in knitting and crochet design, DROPS Design offers one of the most extensive collections of free patterns on the internet - translated to 17 languages. As of today we count 325 catalogs and 12298 patterns - 12288 of which are translated into English (US/in).
We work hard to bring you the best knitting and crochet have to offer, inspiration and advice as well as great quality yarns at incredible prices! Would you like to use our patterns for other than personal use? You can read what you are allowed to do in the Copyright text at the bottom of all our patterns. Happy crafting!
Post a comment to pattern DROPS 162-14
We would love to hear what you have to say about this pattern!
If you want to leave a question, please make sure you select the correct category in the form below, to speed up the answering process. Required fields are marked *.