
Popular categories
Looking for a yarn?


Comments / Questions (260)
![]() Claudine wrote:
Claudine wrote:
Je suis un peu perdue. Je commence le devant droit et je me demande si il faut diminuer de chaque côté en début de chaque rang ;donc aussi bien sur l'endroit que sur l'envers. Dans l'affirmative, comme au 1er marqueur il n'y a que 17B, je me retrouve vite sur le motif A2.Comment diminuer sur le motif alors ? On augmente pas de chaque côté non plus c'est cela
17.08.2015 - 23:12DROPS Design answered:
Bonjour Claudine, on diminue 2 B au début de chaque rang, soit tous les 2 rangs pour chaque côté (2 B en début de rang sur l'endroit, 2 B en début de rang sur l'envers) pendant 12 cm (12 cm = environ 14 rangs env), vous diminuerez donc approx. 7 fois 2 B de chaque côté = 14 B. Bon crochet!
18.08.2015 - 09:45
![]() Nina Väisänen wrote:
Nina Väisänen wrote:
Hello, I'm now crocheting the fronts of the jacket. The intrustuction says: "Continue inc in dc-groups as before" Does that mean only on right sides or as well the wrong side? Yours Nina
07.08.2015 - 20:52DROPS Design answered:
Dear Mrs Väisänen, you continue as before, ie with inc every row from RS as you did before. Happy crocheting!
10.08.2015 - 09:23
![]() PHAM Murielle wrote:
PHAM Murielle wrote:
Bonjour j'attaque le travail du devant mais j'ai un doute... Les parties ou on ne doit pas faire les augmentations sont les 2 groupes de brides des extrémités (qui correspondent au haut du col et bas du gilet) et c'est dans ces mêmes groupent brides qu'on doit faire les diminutions ? Merci.
04.08.2015 - 16:57DROPS Design answered:
Bonjour Mme Pham, vous continuez les augmentations comme avant sauf au-dessus du 1er et du dernier groupe de brides au début et à la fin du devant, c'est effectivement dans ces groupes que l'on diminue 2 B au début de chaque rang. Bon crochet!
04.08.2015 - 18:02
![]() Claudine wrote:
Claudine wrote:
Je suis un peu inquiète car j'utilise Delight print en alternative mais le résultat se tient moins bien par rapport au modèle. Pourtant mon échantillon est bon. Je suppose que la différence est dû au fait que j utilise de la laine et non du coton.
26.07.2015 - 19:24DROPS Design answered:
Bonjour Claudine, Delight et Cotton Viscose étant du groupe A, ce sont des alternatives possibles, toutefois des fils de textures différentes donnent effectivement des effets différents. Bon crochet!
27.07.2015 - 17:47
![]() Britt wrote:
Britt wrote:
Ik ben bij toer 30 aangekomen en daar staat dat ik a2 moet aanpassen? Bedoelen jullie dan dat ik moet zorgen dat a2 over de hele cirkel hetzelfde is? Want dat zou dan betekenen dat ik op de armsgaten het stukje van a2 met 4l-st.-4l moet haken? Ben een beetje verward... alvast bedankt. Verder een heel fijn patroon!
17.07.2015 - 15:37DROPS Design answered:
Hoi Britt. Je begint met dezelfde toer van A.2 zoals net in de vorige herhalingen. Bijvoorbeeld ben je bij de andere herhalingen van A.2 bij de derde toer, dan begin je hier A.2 ook met de derde toer. We hebben het patroon even aangepast om het te verduidelijken.
30.07.2015 - 13:20
![]() Nicole wrote:
Nicole wrote:
Hallo, ich habe nun das Mittelteil der Jacke abgeschlossen und soll aufhören bei 429 Stäbchen also 33 Stäbchen in jeder Stäbchen Gruppe. Dann kommen das rechte und linke Vorderteil. Mein Problem ist, wenn ich bei 429 Stäbchen aufhöre, dann habe ich A2 komplett gehäkelt und muss für die Reihe in welcher die Marker gesetzt werden von A2 die erste Reihe häkeln. Das passt aber doch mit dem Rand nicht, der um die Jacke gehäkelt werden soll. Wo liegt mein Fehler? Liebe Grüße Nicole
09.07.2015 - 22:27
![]() Louise Doyon wrote:
Louise Doyon wrote:
Merci de vos explications j'ai bien compris le 1er rang de A.2 , comment fait-on le 2ème rang de A.2 ?
01.07.2015 - 19:27DROPS Design answered:
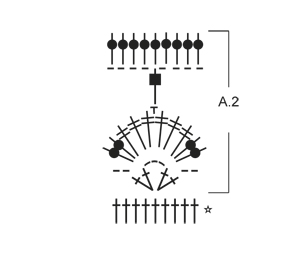
Bonjour Mme Doyon, autour de chaun des arceaux de 3 ml du rang 1, vous crochetez 2 B, 3 DB, 1 picot (2 ml, 1 ms dans la 2ème ml à partir du crochet), 3 DB, 2 B. Bon crochet!
28.07.2015 - 10:26
![]() Louise Doyon wrote:
Louise Doyon wrote:
Pouvez-vous me dire comment faire A.2 au rang 24 je ne comprends pas. Merci.
01.07.2015 - 08:06DROPS Design answered:
Bonjour Mme Doyon, A.2 se crochète entre les groupes de B, au-dessus de 9 B, soit au rang 24 (1er rang de A.2): sautez 4 B, 2 ml, 2 B + 3 ml + 2 B dans la B suivante, 2 ml, sautez 4 B. Bon crochet!
01.07.2015 - 09:36Manena wrote:
Hi, If row 23 finished with 273 tr, how in row 24 i finally have 169? Is a portion? Thank you Maria
01.07.2015 - 00:55DROPS Design answered:
Dear Manena, on row 24 (size S) you start working A.2, so that at the end of this row you have 169 tr + 13 repetitions of A.2. Happy crocheting!
01.07.2015 - 09:33Angelique Ackerman wrote:
I reached row 30 and it looks beautiful! But how I am really confused.... If I continue working back and forth and join every row with a slip stich, the circle will just get bigger and bigger and will fold over at the top towards the neck and hide all that beautiful detail. There is no clear explanation,well, for me, of where to stop working back and forth, and just continue with the pattern till 29 tr in every tr group is reached. Help please!?
20.06.2015 - 13:30DROPS Design answered:
Dear Mrs Ackerman, see answer below - for any individual assistance remember you can get help from your DROPS store. Happy crocheting!
22.06.2015 - 10:20
|
||||||||||||||||||||||||||||||||||||||||
Ros#roscardigan |
||||||||||||||||||||||||||||||||||||||||
 |
 |
|||||||||||||||||||||||||||||||||||||||
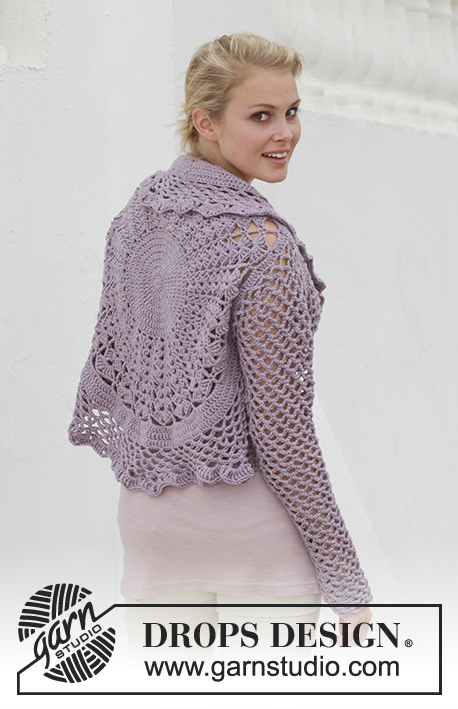
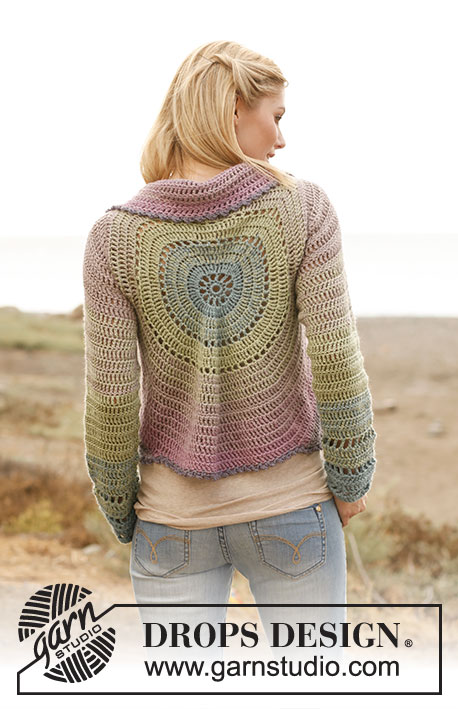
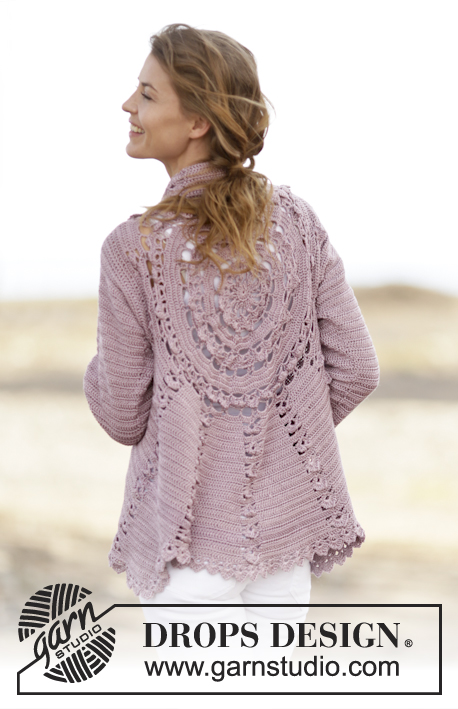
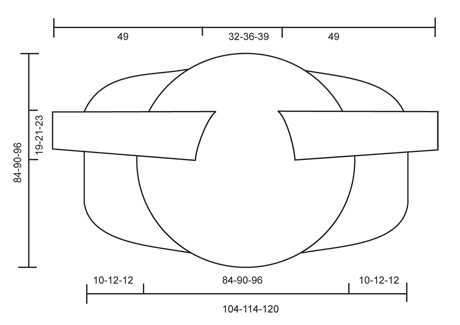
Crochet DROPS jacket worked in a circle with lace pattern in ”Cotton Viscose”. Size: S - XXXL.
DROPS 162-11 |
||||||||||||||||||||||||||||||||||||||||
|
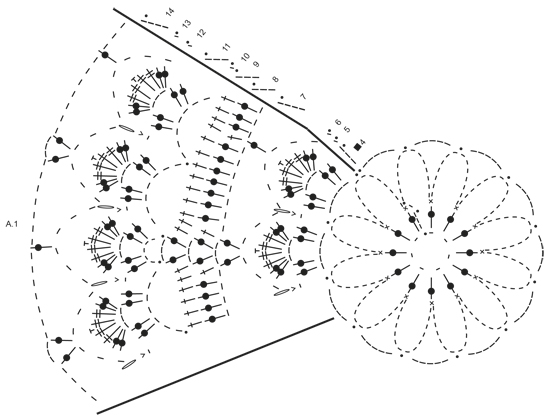
PICOT: Work ch 2, 1 sc in the 2nd ch from hook. CROCHET INFO: Beg every dc round/row with 3 ch that replace first dc and finish every round/row with 1 sl st in 3rd ch from beg of round/row. PATTERN: See diagrams A.1-A.2. After 3rd round, repeat A.1 6 times in total on round. CROCHET 3 dc TOG: Work 3 dc into 1 dc at beg of row as follows: Work 3 ch (= replace 1 dc), work 1 dc, but wait with last pull through (= 2 strands on hook), then work next dc but on last pull through, pull yarn through all sts on hook. DECREASE TIP (applies to sleeves): Dec at beg of row by working 1 sl st over the dc to be dec. Dec at end of row by working until 1 dc to be dec remains, turn piece. ---------------------------------------------------------- CIRCLE: Work 7 ch on hook size 3.5 mm/E/4 with Cotton Viscose and form a ring with 1 sl st in first ch. Then work A.1 as follows: ROUND 1: Work ch 3, 12 dc in ch-ring, finish with 1 sl st in 3rd ch from beg of round. ROUND 2: Work ch 1, * 1 sc in first dc, 14 ch *, repeat from *-* 12 times in total, finish with 1 sl st in first sc. Fasten off. ROUND 3: Work 1 sl st in first ch-space, ch 5, * 1 sl st in next ch-space, 5 ch *, repeat from *-* 11 times in total, finish with 1 sl st in first ch-space. A.1 is repeated 6 times in total on round. ROUND 4: Work ch 3, in first ch-space work: * 2 dc, ch 3, 2 dc in same ch-space, 1 ch *, repeat from *-* 12 times in total, finish with 1 sl st in 3rd ch from beg of round. ROUND 5: Work ch 1, in first ch-space work 2 dc, 2 tr, 1 PICOT – see explanation above, 2 tr, 2 dc, 1 sc in next ch, * in next ch-space work 2 dc, 2 tr, 1 picot, 2 tr, 2 dc, 1 sc in next ch *, repeat from *-* 11 times in total, finish with 1 sl st in first ch = 12 leaves. ROUND 6: Work ch 1, * ch 6, 1 sc in sc and ch (from 5th and 4th round) *, repeat from *-* 12 times in total, finish with 1 sl st in first ch. ROUND 7: Work ch 4, * ch 3, 1 dc in next ch-space, ch 7, 1 dc in next ch-space, ch 3, 1 dc in same ch-space, 4 ch *, repeat from *-* 6 times in total, finish with 1 sl st in 4th ch. ROUND 8: Work ch 3, 3 dc in next ch-space, * 1 dc in next dc, 7 dc in next ch-space, 1 dc in next dc, 1 dc in next ch-space, ch 3, 1 dc in same ch-space, 1 dc in next dc, 7 dc in next ch-space *, repeat from *-* 5 times in total, 1 dc in next dc, 7 dc in next ch-space, 1 dc in next dc, 1 dc in next ch-space, ch 3, 1 dc in same ch-space, 1 dc in next dc, 4 dc in first ch-space, finish with 1 sl st in 3rd ch = 114 dc. REMEMBER THE CROCHET GAUGE! ROUND 9: Work ch 3, * 1 dc in every dc until ch-space, in ch-space as follows: 1 dc, ch 3, 1 dc *, repeat from *-* the entire round, finish with 1 sl st in 3rd ch = 126 dc. ROUND 10: Work ch 1, * ch 7, skip 6 dc, 1 sl st in next dc, ch 7, skip 6 dc, 1 sl st in next dc, ch 5, 1 sl st in next dc, ch 7, skip 6 dc, 1 sl st in next dc *, repeat from *-* 5 times in total, ch 7, skip 6 dc, 1 sl st in next dc, ch 7, skip 6 dc, 1 sl st in next dc, ch 5, 1 sl st in next dc, ch 7, skip 6 dc, 1 sl st in first ch. ROUND 11: Work ch 3, in every ch-space work 2 dc, ch 3, 2 dc, ch 1, finish with 1 sl st in 3rd ch. ROUND 12: Work ch 1, * in next ch-space work 2 dc, 2 tr, 1 picot, 2 tr, 2 dc, 1 sc in next ch *, repeat from *-* 24 times in total, finish with 1 sl st in first ch = 24 leaves. ROUND 13: Work ch 1, * ch 6, 1 sc in sc and ch (from 12th and 11th round) *, repeat from *-* 24 times in total, finish with 1 sl st in first ch. ROUND 14: Work ch 4, * ch 3, 1 dc in next ch-space, ch 7, 1 dc in next ch-space, ch 3, 1 dc in same ch-space, 4 ch *, repeat from *-* 12 times in total, finish with 1 sl st in 4th ch. ROUND 15: Work 3 ch - READ CROCHET INFO, work 4 dc in first ch-space (i.e. ch-space with 3 ch), now work dc in all ch-space with 7 ch from previous round, do not work in ch-space with 3 ch from previous round. Work * 8 dc in each of the next 7 ch-spaces, 9 dc in next ch-space *, repeat from *-* 2 times in total, 8 dc in each of the next 7 ch-spaces, 5 dc in last ch-space (i.e. ch-space with 4 ch) = 195 dc. ROUND 16: Work * 1 dc in each of the first 14 dc, 2 dc in next dc *, repeat from *-* 13 times in total = 208 dc. ROUND 17: Work * 2 dc in first dc, 1 dc in each of the next 15 dc *, repeat from *-* 13 times in total AT THE SAME TIME inc 1 dc extra on round = 222 dc. ROUND 18: Work ch 1, * ch 6, skip 5 dc, 1 sl st in next dc *, repeat from *-* 37 times in total, finish with 1 sl st in first ch. ROUND 19:Work as round 11 in A.1: Work ch 3, in every ch-space work 2 dc, ch 3, 2 dc, ch 1, finish with 1 sl st in 3rd ch. ROUND 20: Work as round 12 in A.1: Work ch 1, * in next ch-space work 2 dc, 2 tr, 1 picot, 2 tr, 2 dc, 1 ch *, repeat from *-* 37 times in total, finish with 1 sl st in first ch = 37 leaves. ROUND 21: Work as round 13 in A.1: Work ch 1, * ch 6, 1 sc in sc and ch (from 20th and 19th round) *, repeat from *-* 37 times in total, finish with 1 sl st in first ch. ROUND 22: Work as round 14 in A.1: Work ch 4, * ch 3, 1 dc in next ch-space, ch 7, 1 dc in next ch-space, ch 3, 1 dc in same ch-space, 4 ch *, repeat from *-* 18 times in total, work ch 3, 1 dc in last ch-space, ch 4, finish with 1 sl st in 4th ch. ROUND 23: Work 4 dc in first ch-space (i.e. ch-space with 3 ch), now work dc in all ch-space with 7 ch from previous round, do not work in ch-space with 3 ch from previous round. Work * 7 dc in next ch-space, 8 dc in next ch-space, 7 dc in next ch-space *, repeat from *-* 11 times in total, 8 dc in next ch-space, 8 dc in next ch-space, 7 dc in next ch-space, 4 dc in last ch-space (i.e. ch-space with 4 ch) = 273 dc. Then work piece back and forth. Work every row tog at the end of row with 1 sl st in 3rd ch from beg of row. Turn piece. ROW 24 (= WS): Work * 2 dc in next dc, 1 dc in each of the next 11 dc (= dc-group), A.2 *, repeat from *-* 13 times in total = 169 dc and 13 A.2. Turn piece. A.2 is repeated vertically until finished measurements. ROW 25 (= RS): Work A.2, 2 dc in first dc, 1 dc in each of the next dc in dc-group, * A.2, 2 dc in first dc in dc-group, 1 dc in each of the next dc *, repeat from *-* until 1 dc-group remains, 2 dc in first dc, 1 dc in each of the next dc = 182 dc. Turn piece. ROW 26: Work as row 24 = 195 dc (15 dc between every A.2). ROW 27: Work as row 25 = 208 dc (16 dc between every A.2). Repeat row 24-27 0-1-1 more time = 208-260-260 dc (= 16-20-20 dc between every A.2). Piece measures approx. 20-23-23 cm / 8"-9"-9" from middle and outwards. Now work arm holes as follows: ROW 28 (= from WS): Work 2 dc in first dc, 1 dc in each of the next 15-19-19 dc, A.2 as before, 2 dc in next dc, 1 dc in each of the next 15-19-19 dc, A.2, 54-62-62 loose ch (= right armhole), skip: 16-20-20 dc + A.2 + 16-20-20 dc + A.2, work * 2 dc in next dc, 1 dc in each of the next 15-19-19 dc, A.2 *, repeat from *-* 5 times in total, 2 dc in first dc, 1 dc in each of the next 15-19-19 dc, 54-62-62 loose ch (= left armhole), skip: A.2 + 16-20-20 dc + A.2 + 16-20-20 dc, work A.2, 2 dc in next dc, 1 dc in each of the next 15-19-19 dc, A.2 = 153-189-189 dc, 9 A.2 and 108-124-124 ch. ROW 29 (from RS): Work A.2, 2 dc in next dc, 1 dc in each of the next 16-20-20 dc, A.2, in ch-row (= left armhole) work as follows: 1 dc in each of the 54-62-62 ch, * 2 dc in next dc, 1 dc in each of the next 16-20-20 dc, A.2 *, repeat from *-* 5 times in total, 2 dc in next dc, 1 dc in each of the next 16-20-20 dc, in next ch-row (= right armhole) work as follows: 1 dc in each of the 54-62-62 ch, then work A.2, 2 dc in next dc, 1 dc in each of the next 16-20-20 dc, A.2, 2 dc in next dc, 1 dc in each of the next 16-20-20 dc = 270-322-322 dc and 9 A.2. ROW 30 (= from WS): Work 1 dc in each of the next 18-22-22 dc, A.2 as before, 1 dc in each of the next 18-22-22 dc, A.2, 1 dc in each of the next 18-22-22 dc, A.2 (adjust row according to the other repetitions), 1 dc in each of the next 18-22-22 dc, A.2, * 1 dc in each of the next 18-22-22 dc, A.2 *, repeat from *-* 5 times in total, 1 dc in each of the next 18-22-22 dc, A.2, 1 dc in each of the next 18-22-22 dc, A.2, 1 dc in each of the next 18-22-22 dc, A.2, 1 dc in each of the next 18-22-22 dc, A.2 = 234-286-286 dc and 13 A.2. Work pattern as before but now inc only on every row from RS until 52-52-60 rows have been worked in total = 377-429-481 dc (29-33-37 dc in every dc-group). Insert 4 markers in the piece as follows from WS: Work 29-33-37 dc, A.2, 14-16-18 dc, insert 1st marker, work 15-17-19 dc, * A.2, 29-33-37 dc *, repeat from *-* 4 times in total, insert 2nd marker here (1st-2nd marker = right front piece). Work A.2, 29-33-37 dc, A.2, 29-33-37 dc and A.2, insert 3rd marker here. * Work 29-33-37 dc, A.2 *, repeat from *-* 4 times in total, 15-17-19 dc, insert 4th marker. (3rd-4th marker = left front piece), 14-16-18 dc, A.2. dc between 1st and 4th marker are up towards neck. Fasten off. RIGHT FRONT PIECE: Now work right front piece between 1st and 2nd marker, beg from 2nd marker (i.e. from RS) = 131-149-167 dc and 4 A.2. Continue inc in dc-groups as before BUT do not inc in dc-groups in each side of front piece - AT THE SAME TIME dec 2 dc at beg of every row by CROCHET 3 dc TOG - see explanation above. Work until 10-12-12 cm / 4"-4¾"-4¾" over front piece have been worked, adjust to finish with 1 whole repetition of A.2. Fasten off. LEFT FRONT PIECE: Work left front piece between 3rd and 4th marker the same way as right front piece, beg from 4th marker (i.e. from RS). EDGE: Work an edge around the entire jacket as follows: Work the first 2 rounds of A.2, when working first round of A.2 over dc-rows, skip 2 dc-rows on each side of dc-group. Beg every round with 3 ch and finish with 1 sl st in 3rd ch. SLEEVES: Work back and forth from armhole and down, work every row tog with 1 sl st at the end of row. Insert 1 marker in piece, NOW MEASURE PIECE FROM HERE. Beg by working 86-94-102 dc evenly around the opening for sleeve, beg of row should be under sleeve. Then work 3 rows with 1 dc in every dc. Continue with 1 dc in every dc - AT THE SAME TIME dec differently in the different sizes as follows: READ DECREASE TIP! SIZE S/M: Dec 1 st in each side of piece alternately every 3rd and 2nd row 16 times in total = 54 dc. SIZE L/XL: Dec 1 st in each side of piece every other row 20 times in total = 54 dc. SIZE XXL/XXXL: Dec 1 st in each side of piece every other row 24 times = 54 dc. ALL SIZES: Work 1 dc in every dc until sleeve measures approx. 47 cm / 18½", adjust so that next row is from WS. Then work the first 2 rounds of A.2 (= 6 repetitions in width). Fasten off. Work the other sleeve the same way. |
||||||||||||||||||||||||||||||||||||||||
Diagram explanations |
||||||||||||||||||||||||||||||||||||||||
|
||||||||||||||||||||||||||||||||||||||||
 |
||||||||||||||||||||||||||||||||||||||||
 |
||||||||||||||||||||||||||||||||||||||||
 |
||||||||||||||||||||||||||||||||||||||||
Have you finished this pattern?Tag your pictures with #dropspattern #roscardigan or submit them to the #dropsfan gallery. Do you need help with this pattern?You'll find 11 tutorial videos, a Comments/Questions area and more by visiting the pattern on garnstudio.com. © 1982-2026 DROPS Design A/S. We reserve all rights. This document, including all its sub-sections, has copyrights. Read more about what you can do with our patterns at the bottom of each pattern on our site. |
||||||||||||||||||||||||||||||||||||||||


With over 40 years in knitting and crochet design, DROPS Design offers one of the most extensive collections of free patterns on the internet - translated to 17 languages. As of today we count 325 catalogs and 12298 patterns - 12288 of which are translated into English (US/in).
We work hard to bring you the best knitting and crochet have to offer, inspiration and advice as well as great quality yarns at incredible prices! Would you like to use our patterns for other than personal use? You can read what you are allowed to do in the Copyright text at the bottom of all our patterns. Happy crafting!
Post a comment to pattern DROPS 162-11
We would love to hear what you have to say about this pattern!
If you want to leave a question, please make sure you select the correct category in the form below, to speed up the answering process. Required fields are marked *.