
Looking for a yarn?


Comments / Questions (270)
![]() Pritika Singh wrote:
Pritika Singh wrote:
For 52 row the pattern is on the wring side and we have 33 dc in each row but the A2 design has the2 chain, 2 dc( in loop after 4 chains) 3 chain 2 dc in the same loop, 2 chain pattern, then we insert markers again in the wrong side of row 53 or we do it in row 52?
31.05.2025 - 11:05DROPS Design answered:
Dear Mrs Singh, every even numbered row should be worked from wrong side, from 24th row, that might be the reason why you are not starting the same way. Happy crocheting!
02.06.2025 - 07:45
![]() Pritika Singh wrote:
Pritika Singh wrote:
Sorry asking too many questions but when we finish the 52 nd row for size L and are inserting our markers what stage is our A2 in that row?
31.05.2025 - 10:31DROPS Design answered:
Dear Pritika, row 52 should be the 1st row of A.2, so you should start working row 2 of A.2 on the next row. Happy crochetting!
31.05.2025 - 22:52
![]() Pritika wrote:
Pritika wrote:
Hi i am confused regarding the left piece and the right piece, when we are increasing in rows barring the 1st and last row on the right side how do we dec3tog at the same time?
30.05.2025 - 21:39DROPS Design answered:
Dear Pritika, you work as stated in CROCHET 3 TR TOG, at the top of the pattern: "Work 3 dc into 1 dc at beg of row as follows: Work 3 ch (= replace 1 dc), work 1 dc, but wait with last pull through (= 2 strands on hook), then work next dc but on last pull through, pull yarn through all sts on hook". The increases are worked in the dc groups, so they won't bother each other and you can decrease at the beginning of the row and increase around the middle of the row. Happy crochetting!
31.05.2025 - 23:13
![]() Pritika Singh wrote:
Pritika Singh wrote:
I have made the circular piece for size L but in the left and right pieces i haven’t understood about the increase and decrease concept. Can you please elaborate that plus the edge and sleeves a little, thankyou
29.05.2025 - 21:43DROPS Design answered:
Dear Mrs Singh, you will decrease at the beginning of every row on each side (both from right side and wrong side) as eexplained under CROCHET 3 TR TOG: (UK-English terminology), ie work the work the first 3 stitches at the beginning of the row together to decrease 2 stitches; then continue row as before increasing as you did for the circle - except that you won't increase in the treble crochets section at the beg + at the end of front piece. Happy crocheting!
30.05.2025 - 09:39
![]() Janice Dolbee wrote:
Janice Dolbee wrote:
The yarn they used for this pattern has been discontinued and they do not have a replacement. They told me to see if you had any suggestions. Looking forward to hearing back from you soon. Thank you Janice
21.05.2025 - 04:06DROPS Design answered:
Hi Janice, Cotton Viscose belonged to yarn group A in the Drops yarn selections. The other cotton yarns in group A are: DROPS Loves You 7, DROPS Loves You 9 and DROPS Safran. Any of these yarns can be used as an alternative to Cotton Viscose, using the same amount and same needle suggestions. However, we always recommend that you work a swatch to check your knitting tension, and adjust the needle size if necessary before starting your project. Regards Drops Team.
21.05.2025 - 06:37
![]() Johanna wrote:
Johanna wrote:
Hello, thx for your promt answer, but due to the translator it seems that my question was not translated accurately so I will try again in english. I came up to row 27, then the instruction says I have to repeat row 24-27. First I have 16 DC between A.2., second row I have 20 DC between A.2. and third row I have again 20 DC between A.2. and 13 flowers in total. But then in row 28 it says I have 15-19-19 DC between A.2. and I don‘t understand how I get so many DC between the flowers in row 28?
23.04.2024 - 18:06DROPS Design answered:
Dear Johanna, on row 28 it doesn't say there are 19 dc between A.2, but 20 as you will work 2 dc in first/next dc + 1 dc in each of the next 19 dc = you have now (2+1=) 21 dc over (1+19=)20 dc. Happy crocheting!
24.04.2024 - 08:14
![]() Johanna wrote:
Johanna wrote:
Hallo, ich stecke fest bei Reihe 28. Bis dahin habe ich 13 Blüten und 20Stb zwischen A.2. Wie komme ich dann auf eine Stäbchengruppe von 15-19-19 bzw. 16-20-20 zwischen A.2. ? Reduziert sich die Anzahl der Blüten und werden diese mit 9Stb umhäkelt? Danke!
22.04.2024 - 23:04DROPS Design answered:
Liebe Johanna, es sind 20 Stb in jeder Stb-Gruppe, die häkeln Sie mit einer Zunahme so: (2 Stb in das 1. Stb, 1 Stb in je die nächsten 19 Stb) = so haben Sie 21 Stb über die 20 Stb. Viel Spaß beim Häkeln!
23.04.2024 - 08:07
![]() Jolanda wrote:
Jolanda wrote:
Ik wil graag het vest drop 161-11 maken maar twijfel over de maat ik draag maat 44 dus veelal xl maar kan niet wijs uit de maten om te kiezen welke maat ik miet maken
29.02.2024 - 09:58DROPS Design answered:
Dag Jolanda,
Het handigst is om een bestaand kledingstuk erbij te pakken dat je goed zit en de maten hiervan te vergelijken met de maten in de maattekening onderaan het patroon. Op deze manier kun je wellicht de maat vinden die bij je past.
01.03.2024 - 07:31
![]() Maria Angela wrote:
Maria Angela wrote:
Terminé los 2 frentes con una repeticion completa de A2, es decir, con la fila de varetas. Sigue la orilla y tengo que tejer las 2 primeras filas de A2. Las partes que serian el cuello y el borde inferior quedaron con la primera fila de A2, es decir, con el grupo de 4 varetas en un mismo punto. Esta correscto? Donde inicio las orillas?
20.05.2023 - 02:25DROPS Design answered:
Hola Maria Angela, para trabajar la orilla tienes que haber acabado la labor con la fila de varetas, no puedes haber terminado unas partes en otra fila de A.2. Revisa que el cuello y el borde inferior estén correctos. La orilla se trabaja según la primera fila de A.2, que se trabaja sobre las varetas,
21.05.2023 - 20:04
![]() Veronica wrote:
Veronica wrote:
Muchas gracias por su explicación anterior, me permitió continuar el proyecto. Tengo dudas con la orilla, debo trabajar las primeras 2 vtas de A.2, y cuando se está trabajando la primera vta de A.2 que seria el grupo de pa, tengo que saltar 2 hileras de p.a. de cada lado del grupo de p.a. Cuales son estas hileras?
03.05.2023 - 23:58DROPS Design answered:
Hola Verónica, es para el ajuste de puntos del borde. Recuerda que el borde no se trabaja sobre puntos específicamente, si no que sobre extremos de filas. Por eso, saltamos 2 filas en el delantero (que sería equivalente a saltar 4 puntos) a cada lado del grupo de p.a. para que el borde no quede demasiado abierto.
07.05.2023 - 13:20
|
||||||||||||||||||||||||||||||||||||||||
Ros#roscardigan |
||||||||||||||||||||||||||||||||||||||||
 |
 |
|||||||||||||||||||||||||||||||||||||||
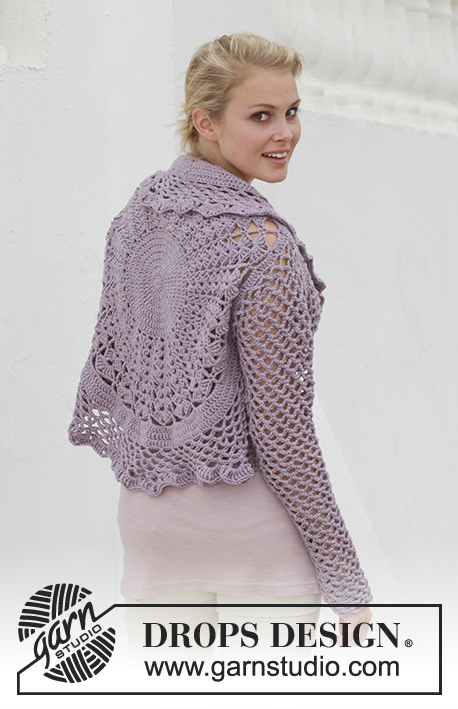
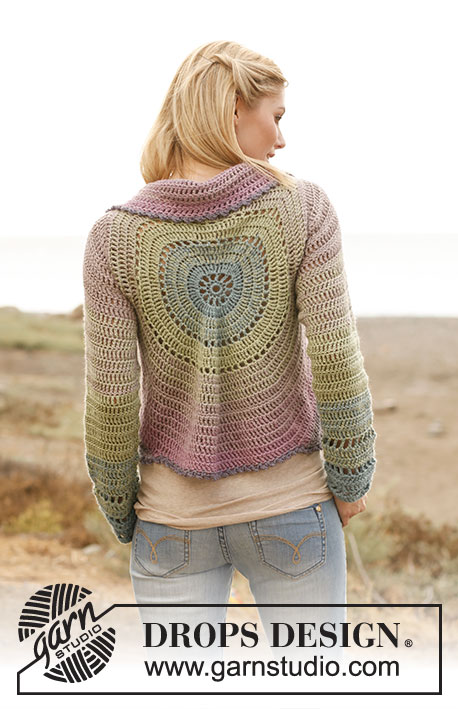
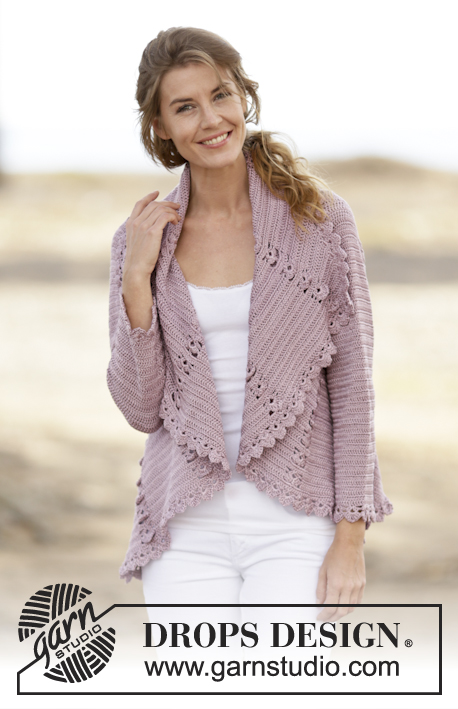
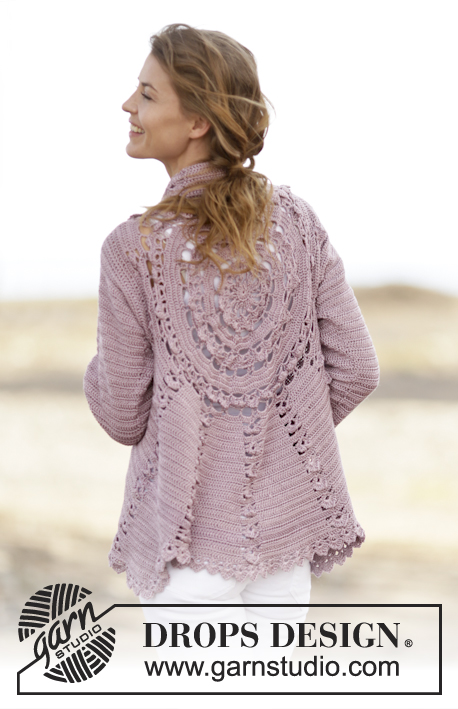
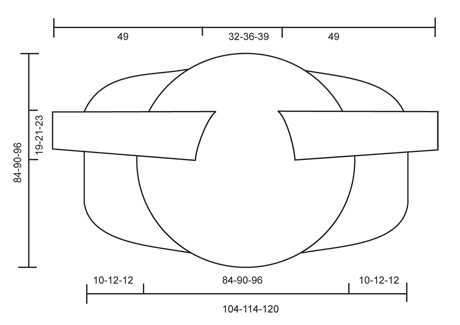
Crochet DROPS jacket worked in a circle with lace pattern in ”Cotton Viscose”. Size: S - XXXL.
DROPS 162-11 |
||||||||||||||||||||||||||||||||||||||||
|
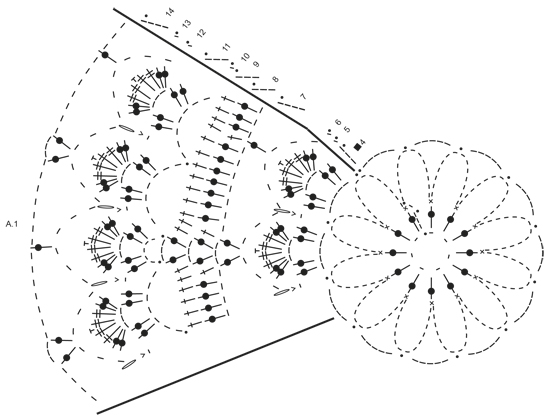
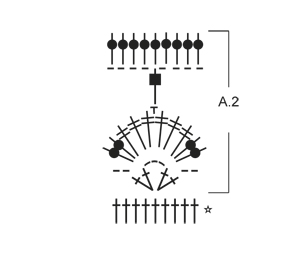
PICOT: Work ch 2, 1 sc in the 2nd ch from hook. CROCHET INFO: Beg every dc round/row with 3 ch that replace first dc and finish every round/row with 1 sl st in 3rd ch from beg of round/row. PATTERN: See diagrams A.1-A.2. After 3rd round, repeat A.1 6 times in total on round. CROCHET 3 dc TOG: Work 3 dc into 1 dc at beg of row as follows: Work 3 ch (= replace 1 dc), work 1 dc, but wait with last pull through (= 2 strands on hook), then work next dc but on last pull through, pull yarn through all sts on hook. DECREASE TIP (applies to sleeves): Dec at beg of row by working 1 sl st over the dc to be dec. Dec at end of row by working until 1 dc to be dec remains, turn piece. ---------------------------------------------------------- CIRCLE: Work 7 ch on hook size 3.5 mm/E/4 with Cotton Viscose and form a ring with 1 sl st in first ch. Then work A.1 as follows: ROUND 1: Work ch 3, 12 dc in ch-ring, finish with 1 sl st in 3rd ch from beg of round. ROUND 2: Work ch 1, * 1 sc in first dc, 14 ch *, repeat from *-* 12 times in total, finish with 1 sl st in first sc. Fasten off. ROUND 3: Work 1 sl st in first ch-space, ch 5, * 1 sl st in next ch-space, 5 ch *, repeat from *-* 11 times in total, finish with 1 sl st in first ch-space. A.1 is repeated 6 times in total on round. ROUND 4: Work ch 3, in first ch-space work: * 2 dc, ch 3, 2 dc in same ch-space, 1 ch *, repeat from *-* 12 times in total, finish with 1 sl st in 3rd ch from beg of round. ROUND 5: Work ch 1, in first ch-space work 2 dc, 2 tr, 1 PICOT – see explanation above, 2 tr, 2 dc, 1 sc in next ch, * in next ch-space work 2 dc, 2 tr, 1 picot, 2 tr, 2 dc, 1 sc in next ch *, repeat from *-* 11 times in total, finish with 1 sl st in first ch = 12 leaves. ROUND 6: Work ch 1, * ch 6, 1 sc in sc and ch (from 5th and 4th round) *, repeat from *-* 12 times in total, finish with 1 sl st in first ch. ROUND 7: Work ch 4, * ch 3, 1 dc in next ch-space, ch 7, 1 dc in next ch-space, ch 3, 1 dc in same ch-space, 4 ch *, repeat from *-* 6 times in total, finish with 1 sl st in 4th ch. ROUND 8: Work ch 3, 3 dc in next ch-space, * 1 dc in next dc, 7 dc in next ch-space, 1 dc in next dc, 1 dc in next ch-space, ch 3, 1 dc in same ch-space, 1 dc in next dc, 7 dc in next ch-space *, repeat from *-* 5 times in total, 1 dc in next dc, 7 dc in next ch-space, 1 dc in next dc, 1 dc in next ch-space, ch 3, 1 dc in same ch-space, 1 dc in next dc, 4 dc in first ch-space, finish with 1 sl st in 3rd ch = 114 dc. REMEMBER THE CROCHET GAUGE! ROUND 9: Work ch 3, * 1 dc in every dc until ch-space, in ch-space as follows: 1 dc, ch 3, 1 dc *, repeat from *-* the entire round, finish with 1 sl st in 3rd ch = 126 dc. ROUND 10: Work ch 1, * ch 7, skip 6 dc, 1 sl st in next dc, ch 7, skip 6 dc, 1 sl st in next dc, ch 5, 1 sl st in next dc, ch 7, skip 6 dc, 1 sl st in next dc *, repeat from *-* 5 times in total, ch 7, skip 6 dc, 1 sl st in next dc, ch 7, skip 6 dc, 1 sl st in next dc, ch 5, 1 sl st in next dc, ch 7, skip 6 dc, 1 sl st in first ch. ROUND 11: Work ch 3, in every ch-space work 2 dc, ch 3, 2 dc, ch 1, finish with 1 sl st in 3rd ch. ROUND 12: Work ch 1, * in next ch-space work 2 dc, 2 tr, 1 picot, 2 tr, 2 dc, 1 sc in next ch *, repeat from *-* 24 times in total, finish with 1 sl st in first ch = 24 leaves. ROUND 13: Work ch 1, * ch 6, 1 sc in sc and ch (from 12th and 11th round) *, repeat from *-* 24 times in total, finish with 1 sl st in first ch. ROUND 14: Work ch 4, * ch 3, 1 dc in next ch-space, ch 7, 1 dc in next ch-space, ch 3, 1 dc in same ch-space, 4 ch *, repeat from *-* 12 times in total, finish with 1 sl st in 4th ch. ROUND 15: Work 3 ch - READ CROCHET INFO, work 4 dc in first ch-space (i.e. ch-space with 3 ch), now work dc in all ch-space with 7 ch from previous round, do not work in ch-space with 3 ch from previous round. Work * 8 dc in each of the next 7 ch-spaces, 9 dc in next ch-space *, repeat from *-* 2 times in total, 8 dc in each of the next 7 ch-spaces, 5 dc in last ch-space (i.e. ch-space with 4 ch) = 195 dc. ROUND 16: Work * 1 dc in each of the first 14 dc, 2 dc in next dc *, repeat from *-* 13 times in total = 208 dc. ROUND 17: Work * 2 dc in first dc, 1 dc in each of the next 15 dc *, repeat from *-* 13 times in total AT THE SAME TIME inc 1 dc extra on round = 222 dc. ROUND 18: Work ch 1, * ch 6, skip 5 dc, 1 sl st in next dc *, repeat from *-* 37 times in total, finish with 1 sl st in first ch. ROUND 19:Work as round 11 in A.1: Work ch 3, in every ch-space work 2 dc, ch 3, 2 dc, ch 1, finish with 1 sl st in 3rd ch. ROUND 20: Work as round 12 in A.1: Work ch 1, * in next ch-space work 2 dc, 2 tr, 1 picot, 2 tr, 2 dc, 1 ch *, repeat from *-* 37 times in total, finish with 1 sl st in first ch = 37 leaves. ROUND 21: Work as round 13 in A.1: Work ch 1, * ch 6, 1 sc in sc and ch (from 20th and 19th round) *, repeat from *-* 37 times in total, finish with 1 sl st in first ch. ROUND 22: Work as round 14 in A.1: Work ch 4, * ch 3, 1 dc in next ch-space, ch 7, 1 dc in next ch-space, ch 3, 1 dc in same ch-space, 4 ch *, repeat from *-* 18 times in total, work ch 3, 1 dc in last ch-space, ch 4, finish with 1 sl st in 4th ch. ROUND 23: Work 4 dc in first ch-space (i.e. ch-space with 3 ch), now work dc in all ch-space with 7 ch from previous round, do not work in ch-space with 3 ch from previous round. Work * 7 dc in next ch-space, 8 dc in next ch-space, 7 dc in next ch-space *, repeat from *-* 11 times in total, 8 dc in next ch-space, 8 dc in next ch-space, 7 dc in next ch-space, 4 dc in last ch-space (i.e. ch-space with 4 ch) = 273 dc. Then work piece back and forth. Work every row tog at the end of row with 1 sl st in 3rd ch from beg of row. Turn piece. ROW 24 (= WS): Work * 2 dc in next dc, 1 dc in each of the next 11 dc (= dc-group), A.2 *, repeat from *-* 13 times in total = 169 dc and 13 A.2. Turn piece. A.2 is repeated vertically until finished measurements. ROW 25 (= RS): Work A.2, 2 dc in first dc, 1 dc in each of the next dc in dc-group, * A.2, 2 dc in first dc in dc-group, 1 dc in each of the next dc *, repeat from *-* until 1 dc-group remains, 2 dc in first dc, 1 dc in each of the next dc = 182 dc. Turn piece. ROW 26: Work as row 24 = 195 dc (15 dc between every A.2). ROW 27: Work as row 25 = 208 dc (16 dc between every A.2). Repeat row 24-27 0-1-1 more time = 208-260-260 dc (= 16-20-20 dc between every A.2). Piece measures approx. 20-23-23 cm / 8"-9"-9" from middle and outwards. Now work arm holes as follows: ROW 28 (= from WS): Work 2 dc in first dc, 1 dc in each of the next 15-19-19 dc, A.2 as before, 2 dc in next dc, 1 dc in each of the next 15-19-19 dc, A.2, 54-62-62 loose ch (= right armhole), skip: 16-20-20 dc + A.2 + 16-20-20 dc + A.2, work * 2 dc in next dc, 1 dc in each of the next 15-19-19 dc, A.2 *, repeat from *-* 5 times in total, 2 dc in first dc, 1 dc in each of the next 15-19-19 dc, 54-62-62 loose ch (= left armhole), skip: A.2 + 16-20-20 dc + A.2 + 16-20-20 dc, work A.2, 2 dc in next dc, 1 dc in each of the next 15-19-19 dc, A.2 = 153-189-189 dc, 9 A.2 and 108-124-124 ch. ROW 29 (from RS): Work A.2, 2 dc in next dc, 1 dc in each of the next 16-20-20 dc, A.2, in ch-row (= left armhole) work as follows: 1 dc in each of the 54-62-62 ch, * 2 dc in next dc, 1 dc in each of the next 16-20-20 dc, A.2 *, repeat from *-* 5 times in total, 2 dc in next dc, 1 dc in each of the next 16-20-20 dc, in next ch-row (= right armhole) work as follows: 1 dc in each of the 54-62-62 ch, then work A.2, 2 dc in next dc, 1 dc in each of the next 16-20-20 dc, A.2, 2 dc in next dc, 1 dc in each of the next 16-20-20 dc = 270-322-322 dc and 9 A.2. ROW 30 (= from WS): Work 1 dc in each of the next 18-22-22 dc, A.2 as before, 1 dc in each of the next 18-22-22 dc, A.2, 1 dc in each of the next 18-22-22 dc, A.2 (adjust row according to the other repetitions), 1 dc in each of the next 18-22-22 dc, A.2, * 1 dc in each of the next 18-22-22 dc, A.2 *, repeat from *-* 5 times in total, 1 dc in each of the next 18-22-22 dc, A.2, 1 dc in each of the next 18-22-22 dc, A.2, 1 dc in each of the next 18-22-22 dc, A.2, 1 dc in each of the next 18-22-22 dc, A.2 = 234-286-286 dc and 13 A.2. Work pattern as before but now inc only on every row from RS until 52-52-60 rows have been worked in total = 377-429-481 dc (29-33-37 dc in every dc-group). Insert 4 markers in the piece as follows from WS: Work 29-33-37 dc, A.2, 14-16-18 dc, insert 1st marker, work 15-17-19 dc, * A.2, 29-33-37 dc *, repeat from *-* 4 times in total, insert 2nd marker here (1st-2nd marker = right front piece). Work A.2, 29-33-37 dc, A.2, 29-33-37 dc and A.2, insert 3rd marker here. * Work 29-33-37 dc, A.2 *, repeat from *-* 4 times in total, 15-17-19 dc, insert 4th marker. (3rd-4th marker = left front piece), 14-16-18 dc, A.2. dc between 1st and 4th marker are up towards neck. Fasten off. RIGHT FRONT PIECE: Now work right front piece between 1st and 2nd marker, beg from 2nd marker (i.e. from RS) = 131-149-167 dc and 4 A.2. Continue inc in dc-groups as before BUT do not inc in dc-groups in each side of front piece - AT THE SAME TIME dec 2 dc at beg of every row by CROCHET 3 dc TOG - see explanation above. Work until 10-12-12 cm / 4"-4 3/4"-4 3/4" over front piece have been worked, adjust to finish with 1 whole repetition of A.2. Fasten off. LEFT FRONT PIECE: Work left front piece between 3rd and 4th marker the same way as right front piece, beg from 4th marker (i.e. from RS). EDGE: Work an edge around the entire jacket as follows: Work the first 2 rounds of A.2, when working first round of A.2 over dc-rows, skip 2 dc-rows on each side of dc-group. Beg every round with 3 ch and finish with 1 sl st in 3rd ch. SLEEVES: Work back and forth from armhole and down, work every row tog with 1 sl st at the end of row. Insert 1 marker in piece, NOW MEASURE PIECE FROM HERE. Beg by working 86-94-102 dc evenly around the opening for sleeve, beg of row should be under sleeve. Then work 3 rows with 1 dc in every dc. Continue with 1 dc in every dc - AT THE SAME TIME dec differently in the different sizes as follows: READ DECREASE TIP! SIZE S/M: Dec 1 st in each side of piece alternately every 3rd and 2nd row 16 times in total = 54 dc. SIZE L/XL: Dec 1 st in each side of piece every other row 20 times in total = 54 dc. SIZE XXL/XXXL: Dec 1 st in each side of piece every other row 24 times = 54 dc. ALL SIZES: Work 1 dc in every dc until sleeve measures approx. 47 cm / 18½'', adjust so that next row is from WS. Then work the first 2 rounds of A.2 (= 6 repetitions in width). Fasten off. Work the other sleeve the same way. |
||||||||||||||||||||||||||||||||||||||||
Diagram explanations |
||||||||||||||||||||||||||||||||||||||||
|
||||||||||||||||||||||||||||||||||||||||
|
||||||||||||||||||||||||||||||||||||||||
|
||||||||||||||||||||||||||||||||||||||||
|
||||||||||||||||||||||||||||||||||||||||
Have you finished this pattern?Tag your pictures with #dropspattern #roscardigan or submit them to the #dropsfan gallery. Do you need help with this pattern?You'll find 11 tutorial videos, a Comments/Questions area and more by visiting the pattern on garnstudio.com. © 1982-2025 DROPS Design A/S. We reserve all rights. This document, including all its sub-sections, has copyrights. Read more about what you can do with our patterns at the bottom of each pattern on our site. |
||||||||||||||||||||||||||||||||||||||||


With over 40 years in knitting and crochet design, DROPS Design offers one of the most extensive collections of free patterns on the internet - translated to 17 languages. As of today we count 314 catalogs and 11821 patterns - 11811 of which are translated into English (US/in).
We work hard to bring you the best knitting and crochet have to offer, inspiration and advice as well as great quality yarns at incredible prices! Would you like to use our patterns for other than personal use? You can read what you are allowed to do in the Copyright text at the bottom of all our patterns. Happy crafting!
Post a comment to pattern DROPS 162-11
We would love to hear what you have to say about this pattern!
If you want to leave a question, please make sure you select the correct category in the form below, to speed up the answering process. Required fields are marked *.