
Popular categories
Looking for a yarn?


Comments / Questions (260)
![]() Anna wrote:
Anna wrote:
Nella riga 28 è scritto A2 come sopra. Cosa significa? Come la riga precedente o ricominciare il diagramma daccapo? Grazie per la disponibilità.buona sera.
18.01.2017 - 18:54DROPS Design answered:
Buonasera Anna, deve continuare con la lavorazione di A.2. Buon lavoro!
18.01.2017 - 20:41
![]() Fodorné Fejes Ilona wrote:
Fodorné Fejes Ilona wrote:
Szia! Segítséget kérnek a 162-11 kardigán kar kivágása hoz. A minta leírásában 54-62-62 laza lánszszem van. Miért van 3 szám. Előre is köszi a segítséget, mert nem tudok tovább haladni. Köszi Ili
18.01.2017 - 07:16DROPS Design answered:
Kedves Ilona! A kötőjellel elválasztott számok a különböző méretekre vonatkozó adatokat jelölik. Így, mivel ez a darab S/M – L/XL – XXL/XXXL méretben készül, az első szám akkor érvényes, ha az S/M méretet készíti, a második szám, ha az L / XL méretet, a harmadik szám, ha az XXL / XXXL méretet. Bízom benne, hogy a válasz segített. Sikeres kézimunkázást!
14.04.2017 - 13:00
![]() Le Bon Patty wrote:
Le Bon Patty wrote:
Hallo, de vest gaat prima tot de opmerking na ronde 30. Daar staat dat ik de meerdering (woord in enkelvoud) enkel aan de goede kant van het werk dien te doen. Maak ik dan 2 meerderingen (vooraan en achteraan van elk stokjesgroepje) of slechts 1 meerdering (afwisselend vooraan en dan weer achteraan). Dank voor de hulp ! Patty
23.12.2016 - 09:32Daniela wrote:
Arbeie xl. Ich habe nun Reihe 30 beendet. Nun weiß ich nicht wie es weitergeht. Muss ich nun in runden, mit wenden, weiter machen? Oder ergeben sich 2 seiten durch die lm für die Ärmel. Und häkel ich nun in den runden die 62 stabchen der ärmel immer mit oder drehe ich vor den ärmeln um? bzw wie starte ich die ärmel? vielen dank im voraus
16.11.2016 - 08:59DROPS Design answered:
Liebe Daniela, nach R 30 müssen Sie einfach wie zuvor weiter häkeln, mit Stb-Gruppen und A.2 aber die Zunahmen werden jetzt nur jede 2. Reihe gehäkelt (= jede Hinreihe). Viel Spaß beim häkeln!
16.11.2016 - 09:36
![]() Della Despres wrote:
Della Despres wrote:
Referring to the right front piece, are you saying to increase at beginning or RS row, then decreasing at beginning or WS row?
14.11.2016 - 23:46DROPS Design answered:
Dear Mrs Despres, you will dec 2 dc at the beg of every row and continue inc in dc-groups as before (do not inc in the first and in the last dc-group between markers, ie at the beg and at the end of front piece). Happy crocheting!
15.11.2016 - 09:21
![]() Della Despres wrote:
Della Despres wrote:
Could you possibly explain out the intructions of working the right front piece, I don't understand at all ? Thanks
14.11.2016 - 23:27DROPS Design answered:
Dear Mrs Despres, right front piece is worked with inc as before (= every other row) in dc-groups except in 1st and last dc-group - at the same time dec 2 dc at the beg of every row (see "CROCHET 3 DC TOG"). Work like for 10-12 cm, but make sure to finish after a whole repeat of A.2 in height. Happy crocheting!
15.11.2016 - 09:20
![]() Karin Portmann wrote:
Karin Portmann wrote:
Danke für Ihre Antwort. Ja habe die Maschenprobe gemacht. Mir scheint, dass es doch etwas zu gross geraten ist. Können Sie mir sagen, ob bei Runde 21 36 cm im Durchmesser angemessen ist???
14.11.2016 - 12:51DROPS Design answered:
Liebe Frau Portmann, wir haben keine Durchmesser aber Sie können Hilfe von dem Maßskizze bekommen um die Maßen zu vergleichen. Viel Spaß beim häkeln!
14.11.2016 - 16:53
![]() Karin Portmann wrote:
Karin Portmann wrote:
Ich bin jetzt bei Runde 21 und habe bereits einen Durchmesser von 36 cm vom Kreis . Ist das nicht zu gross? Ich danke Ihnen sehr für Ihre Antwort
14.11.2016 - 11:18DROPS Design answered:
Liebe Frau Portmann, stimmt Ihre Maschenprobe? Sie müssen 22 St x 12 R = 10 x 10 cm haben - die gleiche Maschenprobe muss man auch beim weiterhäkeln behalten. Viel Spaß beim Häkeln!
14.11.2016 - 11:31Daniela Schrenk wrote:
Arbeie xl. Ich habe nun Reihe 30 beendet. Nun weiß ich nicht wie es weitergeht. Muss ich nun in runden, mit wenden, weiter machen? Oder ergeben sich 2 seiten durch die lm für die Ärmel. Und häkel ich nun in den runden die 62 stabchen der ärmel immer mit oder drehe ich vor den ärmeln um? bzw wie starte ich die ärmel? vielen dank im voraus
09.11.2016 - 10:40DROPS Design answered:
Liebe Frau Schrenk, nach Reihe 30 häkeln Sie wie zuvor, dh am Ende jeder Reihe wie zuvor wenden, und jede 2. Reihe (= jede Hin-R) zunehmen, bis insgesamt 52 R. gehäkelt wurden (jetzt haben Sie 33 Stb in jeder Stb-Gruppe). Bei dern nächsten Rück-R setzen Sie dann 4 Markierung, schneiden Sie dann den Faden, und jedes Vorderteil einzeln weiter häkeln. Die Ärmel werden dann ab dem Armausschnitt nach unten (hin und zurück) gehäkelt. Viel Spaß beim Häkeln!
09.11.2016 - 13:36
![]() Della wrote:
Della wrote:
I have reached Row 24 and I don't understand it at all...Do you have a video turorial for row 24?
31.10.2016 - 17:05DROPS Design answered:
Dear Della, Row 24 is worked from WS, ie turn work, and work now with dc group = [2 dc in next dc, 1 dc in each of the next 11 dc, then work 1st row in A.2]. Repeat from [ to ] aroundn and finish with 1 sl st in 3rd ch from beg of round, turn and work next row from RS. Continue like this, inc in the dc group and continuing A.2 alternately from RS and from WS. Happy crocheting!
01.11.2016 - 12:09
|
||||||||||||||||||||||||||||||||||||||||
Ros#roscardigan |
||||||||||||||||||||||||||||||||||||||||
 |
 |
|||||||||||||||||||||||||||||||||||||||
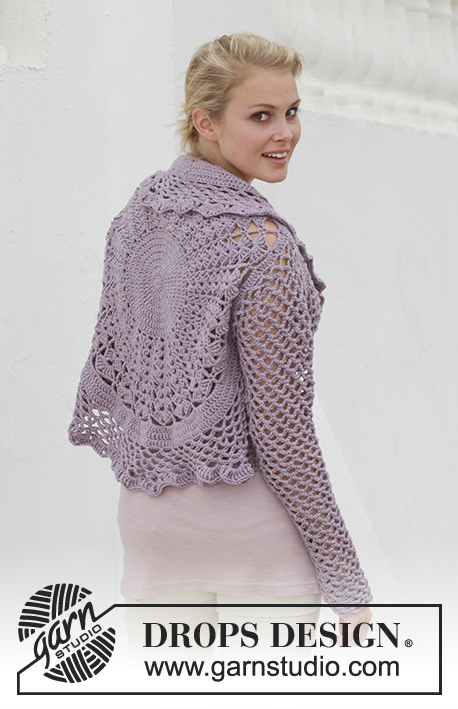
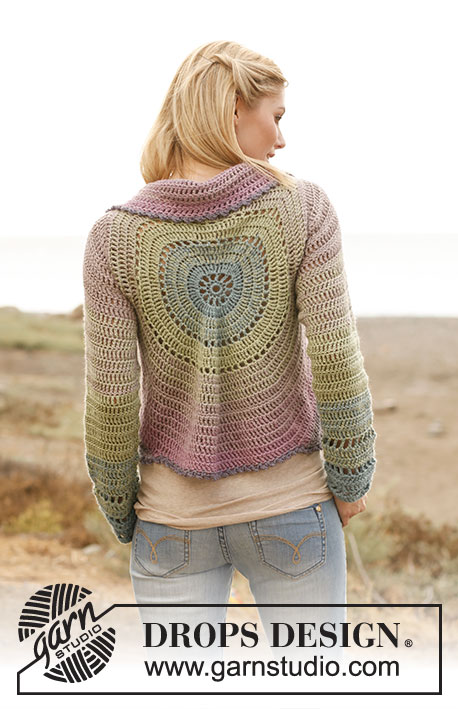
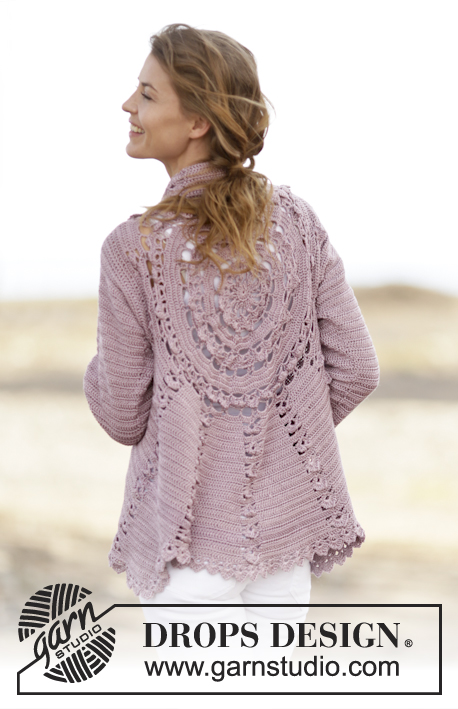
Crochet DROPS jacket worked in a circle with lace pattern in ”Cotton Viscose”. Size: S - XXXL.
DROPS 162-11 |
||||||||||||||||||||||||||||||||||||||||
|
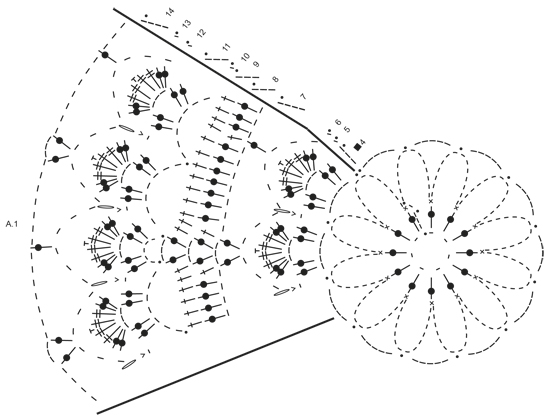
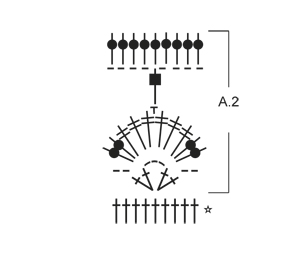
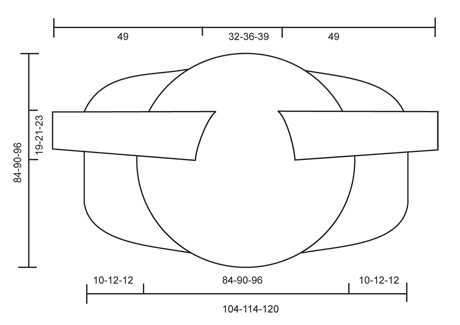
PICOT: Work ch 2, 1 sc in the 2nd ch from hook. CROCHET INFO: Beg every dc round/row with 3 ch that replace first dc and finish every round/row with 1 sl st in 3rd ch from beg of round/row. PATTERN: See diagrams A.1-A.2. After 3rd round, repeat A.1 6 times in total on round. CROCHET 3 dc TOG: Work 3 dc into 1 dc at beg of row as follows: Work 3 ch (= replace 1 dc), work 1 dc, but wait with last pull through (= 2 strands on hook), then work next dc but on last pull through, pull yarn through all sts on hook. DECREASE TIP (applies to sleeves): Dec at beg of row by working 1 sl st over the dc to be dec. Dec at end of row by working until 1 dc to be dec remains, turn piece. ---------------------------------------------------------- CIRCLE: Work 7 ch on hook size 3.5 mm/E/4 with Cotton Viscose and form a ring with 1 sl st in first ch. Then work A.1 as follows: ROUND 1: Work ch 3, 12 dc in ch-ring, finish with 1 sl st in 3rd ch from beg of round. ROUND 2: Work ch 1, * 1 sc in first dc, 14 ch *, repeat from *-* 12 times in total, finish with 1 sl st in first sc. Fasten off. ROUND 3: Work 1 sl st in first ch-space, ch 5, * 1 sl st in next ch-space, 5 ch *, repeat from *-* 11 times in total, finish with 1 sl st in first ch-space. A.1 is repeated 6 times in total on round. ROUND 4: Work ch 3, in first ch-space work: * 2 dc, ch 3, 2 dc in same ch-space, 1 ch *, repeat from *-* 12 times in total, finish with 1 sl st in 3rd ch from beg of round. ROUND 5: Work ch 1, in first ch-space work 2 dc, 2 tr, 1 PICOT – see explanation above, 2 tr, 2 dc, 1 sc in next ch, * in next ch-space work 2 dc, 2 tr, 1 picot, 2 tr, 2 dc, 1 sc in next ch *, repeat from *-* 11 times in total, finish with 1 sl st in first ch = 12 leaves. ROUND 6: Work ch 1, * ch 6, 1 sc in sc and ch (from 5th and 4th round) *, repeat from *-* 12 times in total, finish with 1 sl st in first ch. ROUND 7: Work ch 4, * ch 3, 1 dc in next ch-space, ch 7, 1 dc in next ch-space, ch 3, 1 dc in same ch-space, 4 ch *, repeat from *-* 6 times in total, finish with 1 sl st in 4th ch. ROUND 8: Work ch 3, 3 dc in next ch-space, * 1 dc in next dc, 7 dc in next ch-space, 1 dc in next dc, 1 dc in next ch-space, ch 3, 1 dc in same ch-space, 1 dc in next dc, 7 dc in next ch-space *, repeat from *-* 5 times in total, 1 dc in next dc, 7 dc in next ch-space, 1 dc in next dc, 1 dc in next ch-space, ch 3, 1 dc in same ch-space, 1 dc in next dc, 4 dc in first ch-space, finish with 1 sl st in 3rd ch = 114 dc. REMEMBER THE CROCHET GAUGE! ROUND 9: Work ch 3, * 1 dc in every dc until ch-space, in ch-space as follows: 1 dc, ch 3, 1 dc *, repeat from *-* the entire round, finish with 1 sl st in 3rd ch = 126 dc. ROUND 10: Work ch 1, * ch 7, skip 6 dc, 1 sl st in next dc, ch 7, skip 6 dc, 1 sl st in next dc, ch 5, 1 sl st in next dc, ch 7, skip 6 dc, 1 sl st in next dc *, repeat from *-* 5 times in total, ch 7, skip 6 dc, 1 sl st in next dc, ch 7, skip 6 dc, 1 sl st in next dc, ch 5, 1 sl st in next dc, ch 7, skip 6 dc, 1 sl st in first ch. ROUND 11: Work ch 3, in every ch-space work 2 dc, ch 3, 2 dc, ch 1, finish with 1 sl st in 3rd ch. ROUND 12: Work ch 1, * in next ch-space work 2 dc, 2 tr, 1 picot, 2 tr, 2 dc, 1 sc in next ch *, repeat from *-* 24 times in total, finish with 1 sl st in first ch = 24 leaves. ROUND 13: Work ch 1, * ch 6, 1 sc in sc and ch (from 12th and 11th round) *, repeat from *-* 24 times in total, finish with 1 sl st in first ch. ROUND 14: Work ch 4, * ch 3, 1 dc in next ch-space, ch 7, 1 dc in next ch-space, ch 3, 1 dc in same ch-space, 4 ch *, repeat from *-* 12 times in total, finish with 1 sl st in 4th ch. ROUND 15: Work 3 ch - READ CROCHET INFO, work 4 dc in first ch-space (i.e. ch-space with 3 ch), now work dc in all ch-space with 7 ch from previous round, do not work in ch-space with 3 ch from previous round. Work * 8 dc in each of the next 7 ch-spaces, 9 dc in next ch-space *, repeat from *-* 2 times in total, 8 dc in each of the next 7 ch-spaces, 5 dc in last ch-space (i.e. ch-space with 4 ch) = 195 dc. ROUND 16: Work * 1 dc in each of the first 14 dc, 2 dc in next dc *, repeat from *-* 13 times in total = 208 dc. ROUND 17: Work * 2 dc in first dc, 1 dc in each of the next 15 dc *, repeat from *-* 13 times in total AT THE SAME TIME inc 1 dc extra on round = 222 dc. ROUND 18: Work ch 1, * ch 6, skip 5 dc, 1 sl st in next dc *, repeat from *-* 37 times in total, finish with 1 sl st in first ch. ROUND 19:Work as round 11 in A.1: Work ch 3, in every ch-space work 2 dc, ch 3, 2 dc, ch 1, finish with 1 sl st in 3rd ch. ROUND 20: Work as round 12 in A.1: Work ch 1, * in next ch-space work 2 dc, 2 tr, 1 picot, 2 tr, 2 dc, 1 ch *, repeat from *-* 37 times in total, finish with 1 sl st in first ch = 37 leaves. ROUND 21: Work as round 13 in A.1: Work ch 1, * ch 6, 1 sc in sc and ch (from 20th and 19th round) *, repeat from *-* 37 times in total, finish with 1 sl st in first ch. ROUND 22: Work as round 14 in A.1: Work ch 4, * ch 3, 1 dc in next ch-space, ch 7, 1 dc in next ch-space, ch 3, 1 dc in same ch-space, 4 ch *, repeat from *-* 18 times in total, work ch 3, 1 dc in last ch-space, ch 4, finish with 1 sl st in 4th ch. ROUND 23: Work 4 dc in first ch-space (i.e. ch-space with 3 ch), now work dc in all ch-space with 7 ch from previous round, do not work in ch-space with 3 ch from previous round. Work * 7 dc in next ch-space, 8 dc in next ch-space, 7 dc in next ch-space *, repeat from *-* 11 times in total, 8 dc in next ch-space, 8 dc in next ch-space, 7 dc in next ch-space, 4 dc in last ch-space (i.e. ch-space with 4 ch) = 273 dc. Then work piece back and forth. Work every row tog at the end of row with 1 sl st in 3rd ch from beg of row. Turn piece. ROW 24 (= WS): Work * 2 dc in next dc, 1 dc in each of the next 11 dc (= dc-group), A.2 *, repeat from *-* 13 times in total = 169 dc and 13 A.2. Turn piece. A.2 is repeated vertically until finished measurements. ROW 25 (= RS): Work A.2, 2 dc in first dc, 1 dc in each of the next dc in dc-group, * A.2, 2 dc in first dc in dc-group, 1 dc in each of the next dc *, repeat from *-* until 1 dc-group remains, 2 dc in first dc, 1 dc in each of the next dc = 182 dc. Turn piece. ROW 26: Work as row 24 = 195 dc (15 dc between every A.2). ROW 27: Work as row 25 = 208 dc (16 dc between every A.2). Repeat row 24-27 0-1-1 more time = 208-260-260 dc (= 16-20-20 dc between every A.2). Piece measures approx. 20-23-23 cm / 8"-9"-9" from middle and outwards. Now work arm holes as follows: ROW 28 (= from WS): Work 2 dc in first dc, 1 dc in each of the next 15-19-19 dc, A.2 as before, 2 dc in next dc, 1 dc in each of the next 15-19-19 dc, A.2, 54-62-62 loose ch (= right armhole), skip: 16-20-20 dc + A.2 + 16-20-20 dc + A.2, work * 2 dc in next dc, 1 dc in each of the next 15-19-19 dc, A.2 *, repeat from *-* 5 times in total, 2 dc in first dc, 1 dc in each of the next 15-19-19 dc, 54-62-62 loose ch (= left armhole), skip: A.2 + 16-20-20 dc + A.2 + 16-20-20 dc, work A.2, 2 dc in next dc, 1 dc in each of the next 15-19-19 dc, A.2 = 153-189-189 dc, 9 A.2 and 108-124-124 ch. ROW 29 (from RS): Work A.2, 2 dc in next dc, 1 dc in each of the next 16-20-20 dc, A.2, in ch-row (= left armhole) work as follows: 1 dc in each of the 54-62-62 ch, * 2 dc in next dc, 1 dc in each of the next 16-20-20 dc, A.2 *, repeat from *-* 5 times in total, 2 dc in next dc, 1 dc in each of the next 16-20-20 dc, in next ch-row (= right armhole) work as follows: 1 dc in each of the 54-62-62 ch, then work A.2, 2 dc in next dc, 1 dc in each of the next 16-20-20 dc, A.2, 2 dc in next dc, 1 dc in each of the next 16-20-20 dc = 270-322-322 dc and 9 A.2. ROW 30 (= from WS): Work 1 dc in each of the next 18-22-22 dc, A.2 as before, 1 dc in each of the next 18-22-22 dc, A.2, 1 dc in each of the next 18-22-22 dc, A.2 (adjust row according to the other repetitions), 1 dc in each of the next 18-22-22 dc, A.2, * 1 dc in each of the next 18-22-22 dc, A.2 *, repeat from *-* 5 times in total, 1 dc in each of the next 18-22-22 dc, A.2, 1 dc in each of the next 18-22-22 dc, A.2, 1 dc in each of the next 18-22-22 dc, A.2, 1 dc in each of the next 18-22-22 dc, A.2 = 234-286-286 dc and 13 A.2. Work pattern as before but now inc only on every row from RS until 52-52-60 rows have been worked in total = 377-429-481 dc (29-33-37 dc in every dc-group). Insert 4 markers in the piece as follows from WS: Work 29-33-37 dc, A.2, 14-16-18 dc, insert 1st marker, work 15-17-19 dc, * A.2, 29-33-37 dc *, repeat from *-* 4 times in total, insert 2nd marker here (1st-2nd marker = right front piece). Work A.2, 29-33-37 dc, A.2, 29-33-37 dc and A.2, insert 3rd marker here. * Work 29-33-37 dc, A.2 *, repeat from *-* 4 times in total, 15-17-19 dc, insert 4th marker. (3rd-4th marker = left front piece), 14-16-18 dc, A.2. dc between 1st and 4th marker are up towards neck. Fasten off. RIGHT FRONT PIECE: Now work right front piece between 1st and 2nd marker, beg from 2nd marker (i.e. from RS) = 131-149-167 dc and 4 A.2. Continue inc in dc-groups as before BUT do not inc in dc-groups in each side of front piece - AT THE SAME TIME dec 2 dc at beg of every row by CROCHET 3 dc TOG - see explanation above. Work until 10-12-12 cm / 4"-4¾"-4¾" over front piece have been worked, adjust to finish with 1 whole repetition of A.2. Fasten off. LEFT FRONT PIECE: Work left front piece between 3rd and 4th marker the same way as right front piece, beg from 4th marker (i.e. from RS). EDGE: Work an edge around the entire jacket as follows: Work the first 2 rounds of A.2, when working first round of A.2 over dc-rows, skip 2 dc-rows on each side of dc-group. Beg every round with 3 ch and finish with 1 sl st in 3rd ch. SLEEVES: Work back and forth from armhole and down, work every row tog with 1 sl st at the end of row. Insert 1 marker in piece, NOW MEASURE PIECE FROM HERE. Beg by working 86-94-102 dc evenly around the opening for sleeve, beg of row should be under sleeve. Then work 3 rows with 1 dc in every dc. Continue with 1 dc in every dc - AT THE SAME TIME dec differently in the different sizes as follows: READ DECREASE TIP! SIZE S/M: Dec 1 st in each side of piece alternately every 3rd and 2nd row 16 times in total = 54 dc. SIZE L/XL: Dec 1 st in each side of piece every other row 20 times in total = 54 dc. SIZE XXL/XXXL: Dec 1 st in each side of piece every other row 24 times = 54 dc. ALL SIZES: Work 1 dc in every dc until sleeve measures approx. 47 cm / 18½", adjust so that next row is from WS. Then work the first 2 rounds of A.2 (= 6 repetitions in width). Fasten off. Work the other sleeve the same way. |
||||||||||||||||||||||||||||||||||||||||
Diagram explanations |
||||||||||||||||||||||||||||||||||||||||
|
||||||||||||||||||||||||||||||||||||||||
 |
||||||||||||||||||||||||||||||||||||||||
 |
||||||||||||||||||||||||||||||||||||||||
 |
||||||||||||||||||||||||||||||||||||||||
Have you finished this pattern?Tag your pictures with #dropspattern #roscardigan or submit them to the #dropsfan gallery. Do you need help with this pattern?You'll find 11 tutorial videos, a Comments/Questions area and more by visiting the pattern on garnstudio.com. © 1982-2026 DROPS Design A/S. We reserve all rights. This document, including all its sub-sections, has copyrights. Read more about what you can do with our patterns at the bottom of each pattern on our site. |
||||||||||||||||||||||||||||||||||||||||


With over 40 years in knitting and crochet design, DROPS Design offers one of the most extensive collections of free patterns on the internet - translated to 17 languages. As of today we count 325 catalogs and 12298 patterns - 12288 of which are translated into English (US/in).
We work hard to bring you the best knitting and crochet have to offer, inspiration and advice as well as great quality yarns at incredible prices! Would you like to use our patterns for other than personal use? You can read what you are allowed to do in the Copyright text at the bottom of all our patterns. Happy crafting!
Post a comment to pattern DROPS 162-11
We would love to hear what you have to say about this pattern!
If you want to leave a question, please make sure you select the correct category in the form below, to speed up the answering process. Required fields are marked *.