
Popular categories
Looking for a yarn?


Comments / Questions (260)
![]() Heidy Dirks wrote:
Heidy Dirks wrote:
De zijkanten zijn gelukt. Nu ga ik aan de rand beginnen. Alleen ben ik met de linker en rechter voorpand goed geëindigd. Alleen het pand zelf ben ik met toer 2 van het patroon A.2 geëindigd. Had ik dan ook met een heel patroon moeten eindigen? Nu weten in nl. Niet hoe ik verder moet. Groetjes Heidy
29.04.2017 - 21:25DROPS Design answered:
Hallo Heidy, Ja, dat klopt; het is de bedoeling dat je op het linker en rechter voorpand een hele herhaling van A.2 in de hoogte maakt, zodat het patroon doorloopt als je de rand gaat haken.
03.05.2017 - 09:14
![]() Heidy Dirks wrote:
Heidy Dirks wrote:
Ik ben nu bij het rechtervoorpand. Nu is mijn vraag moet ik minderen aan het begin en het einde van de toer of alleen aan het begin van de toer. En moet ik nog wel steeds meerderen bij de andere stokjes groepjes en zo ja is dat dan alleen aan de goede kant. Alvast bedankt. Groetjes Heidy Dirks
27.04.2017 - 20:08DROPS Design answered:
Hallo Heidi, Je mindert alleen aan het begin van iedere toer. Op het einde keer je het werk en minder je weer aan het begin van de volgende toer. Het meerderen van de stokjes-groepen gaat op exact dezelfde manier verder, behalve meerder je deze niet aan beide zijkanten.
28.04.2017 - 17:45Lisa Lebrija wrote:
Hej. Det var et godt sted at se på Ravely. Jeg kan se andre har hæklet kanten som de selv synes, og også på ærmerne. Tak for hjælpen.
08.02.2017 - 19:00DROPS Design answered:
Hej Lisa. Selv tak - Ravelry er rigtig rar at kigge paa for at faa lidt inspiration nogen gange :)
09.02.2017 - 14:24
![]() Lisa Lebrija wrote:
Lisa Lebrija wrote:
Hej igen. Det var godt jeg spurgte til kanten, for jeg har så lavet dobbelt så mange som man skal. Jeg synes godt nok også det var tæt på kanten rundt om jakken. Men nu får jeg det gjort rigtigt. Tak for hjælpen.
07.02.2017 - 20:59DROPS Design answered:
Hej Lisa. Det var dejligt at höre.
08.02.2017 - 09:20
![]() Lisa Lebrija wrote:
Lisa Lebrija wrote:
Hej. Jeg skal til kanten om jakken, men kan ikke se hvordan jeg kommer fra det ene blad til det andet. Skal jeg hækle den første omg. således: 1stg, 2 lm, spring 4 lm over, 2 stg. 3lm 2 stg. I næste stg, 2 lm, spring 4 lm over, 1 stg, og så mønsteret igen? Der står bare man skal hækle de to første omg. af A2. Så hvordan kommer jeg fra det ene A2 til næste A2?
03.02.2017 - 22:12DROPS Design answered:
Hej Lisa. Ja, du har fat i det rigtige. Du har st masker paa omgangen. Förste omgang af A.2 haekles saadan her: 3 lm (erstatter 1 st) + 2 lm, spring 4 st over, 2 st+3 lm+ 2 st i naeste (5. st), 4 lm, spring 8 st over, osv.
07.02.2017 - 13:59
![]() Lisa Lebrija wrote:
Lisa Lebrija wrote:
Hej. Når jeg har hæklet række 53, den række hvor mærkerne sættes, slutter jeg med 2. række i mønsteret. Forstykkerne skal afsluttes med et helt mønster! Hvordan skal de to ting hænge sammen når kanten skal hækles? Der skal man begynde med første pind i de to første rækker af mønsteret. Det passer ikke sammen. Så her må man hækle 2 rækker mere UDEN udtagninger, inden man begynder på forstykkerne, for at kunne afslutte med et helt mønster. Jeg kan se en anden har haft samme problem.
30.01.2017 - 22:05DROPS Design answered:
Hej Lisa. Jeg laeser det saadan her: Du skal haekle 22 rk efter rk 30 (hvor du er sluttet efter en omg 2 i A.2). Saa er der 2 rk tilbage af en hel gentagelse: 20 rk til du har 52 raekker: 20/4 = 5 hele gentagelser af A.2. Saa da burde du starte paa en ny gentagelse naar du starter paa forstk.
01.02.2017 - 14:32
![]() Lisa Lebrija wrote:
Lisa Lebrija wrote:
Jeg må endnu engang undskylde, har set forkert på A.2. Så ikke klammen startede en række længere oppe.
21.01.2017 - 18:40
![]() Lisa Lebrija wrote:
Lisa Lebrija wrote:
Hej. Jeg skal til p24, men kan se denne pind ikke er magen til billedets række. Jeg kan også læse her på siden til Judy fra d. 30.9.15 at den hækles helt anderledes, end der står i opskriften. Hvilken pind/omgang er så rigtig?
21.01.2017 - 18:24
![]() Lisa Lebrija wrote:
Lisa Lebrija wrote:
Undskyld det er mig der har lavet fejl. Glemt en omgang. 🙈
20.01.2017 - 11:23DROPS Design answered:
Hej Lisa. Ok, fint du er kommet videre
23.01.2017 - 11:50
![]() Lisa Lebrija wrote:
Lisa Lebrija wrote:
Hej, jeg er ved p 21, som skal hækles om p 13; men hvor ser I den fm som der skal hækles en fm om? Der står: 6 lm, 1 fm om FM OG LM fra omg. 19+20. Men på omg 19 er der en km, og på omg 20 er der en lm. Så der kan jo kun hækles en fm om lm.
20.01.2017 - 09:34
|
||||||||||||||||||||||||||||||||||||||||
Ros#roscardigan |
||||||||||||||||||||||||||||||||||||||||
 |
 |
|||||||||||||||||||||||||||||||||||||||
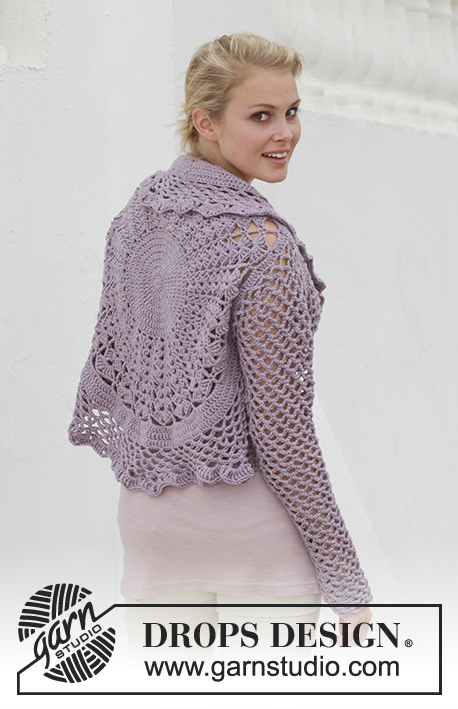
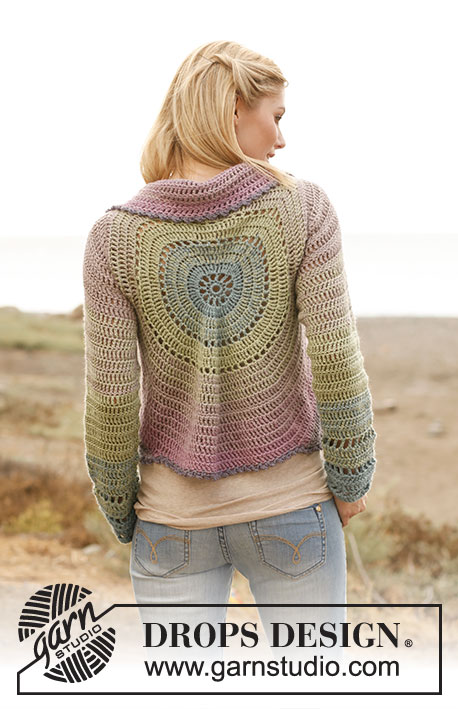
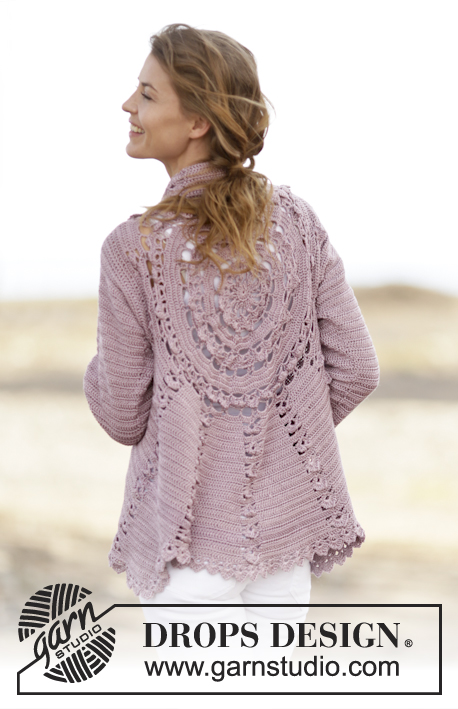
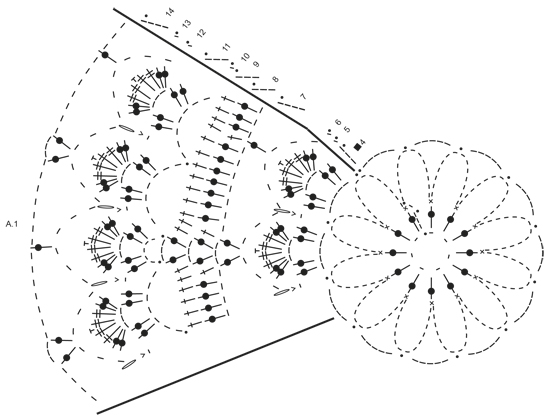
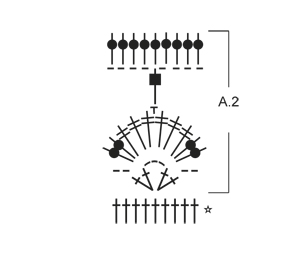
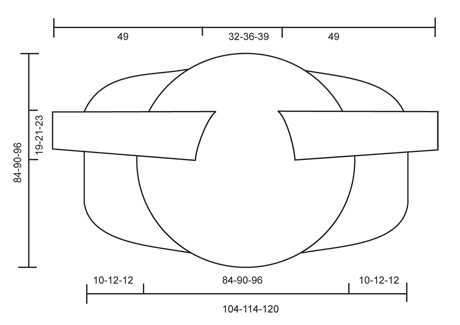
Crochet DROPS jacket worked in a circle with lace pattern in ”Cotton Viscose”. Size: S - XXXL.
DROPS 162-11 |
||||||||||||||||||||||||||||||||||||||||
|
PICOT: Work ch 2, 1 sc in the 2nd ch from hook. CROCHET INFO: Beg every dc round/row with 3 ch that replace first dc and finish every round/row with 1 sl st in 3rd ch from beg of round/row. PATTERN: See diagrams A.1-A.2. After 3rd round, repeat A.1 6 times in total on round. CROCHET 3 dc TOG: Work 3 dc into 1 dc at beg of row as follows: Work 3 ch (= replace 1 dc), work 1 dc, but wait with last pull through (= 2 strands on hook), then work next dc but on last pull through, pull yarn through all sts on hook. DECREASE TIP (applies to sleeves): Dec at beg of row by working 1 sl st over the dc to be dec. Dec at end of row by working until 1 dc to be dec remains, turn piece. ---------------------------------------------------------- CIRCLE: Work 7 ch on hook size 3.5 mm/E/4 with Cotton Viscose and form a ring with 1 sl st in first ch. Then work A.1 as follows: ROUND 1: Work ch 3, 12 dc in ch-ring, finish with 1 sl st in 3rd ch from beg of round. ROUND 2: Work ch 1, * 1 sc in first dc, 14 ch *, repeat from *-* 12 times in total, finish with 1 sl st in first sc. Fasten off. ROUND 3: Work 1 sl st in first ch-space, ch 5, * 1 sl st in next ch-space, 5 ch *, repeat from *-* 11 times in total, finish with 1 sl st in first ch-space. A.1 is repeated 6 times in total on round. ROUND 4: Work ch 3, in first ch-space work: * 2 dc, ch 3, 2 dc in same ch-space, 1 ch *, repeat from *-* 12 times in total, finish with 1 sl st in 3rd ch from beg of round. ROUND 5: Work ch 1, in first ch-space work 2 dc, 2 tr, 1 PICOT – see explanation above, 2 tr, 2 dc, 1 sc in next ch, * in next ch-space work 2 dc, 2 tr, 1 picot, 2 tr, 2 dc, 1 sc in next ch *, repeat from *-* 11 times in total, finish with 1 sl st in first ch = 12 leaves. ROUND 6: Work ch 1, * ch 6, 1 sc in sc and ch (from 5th and 4th round) *, repeat from *-* 12 times in total, finish with 1 sl st in first ch. ROUND 7: Work ch 4, * ch 3, 1 dc in next ch-space, ch 7, 1 dc in next ch-space, ch 3, 1 dc in same ch-space, 4 ch *, repeat from *-* 6 times in total, finish with 1 sl st in 4th ch. ROUND 8: Work ch 3, 3 dc in next ch-space, * 1 dc in next dc, 7 dc in next ch-space, 1 dc in next dc, 1 dc in next ch-space, ch 3, 1 dc in same ch-space, 1 dc in next dc, 7 dc in next ch-space *, repeat from *-* 5 times in total, 1 dc in next dc, 7 dc in next ch-space, 1 dc in next dc, 1 dc in next ch-space, ch 3, 1 dc in same ch-space, 1 dc in next dc, 4 dc in first ch-space, finish with 1 sl st in 3rd ch = 114 dc. REMEMBER THE CROCHET GAUGE! ROUND 9: Work ch 3, * 1 dc in every dc until ch-space, in ch-space as follows: 1 dc, ch 3, 1 dc *, repeat from *-* the entire round, finish with 1 sl st in 3rd ch = 126 dc. ROUND 10: Work ch 1, * ch 7, skip 6 dc, 1 sl st in next dc, ch 7, skip 6 dc, 1 sl st in next dc, ch 5, 1 sl st in next dc, ch 7, skip 6 dc, 1 sl st in next dc *, repeat from *-* 5 times in total, ch 7, skip 6 dc, 1 sl st in next dc, ch 7, skip 6 dc, 1 sl st in next dc, ch 5, 1 sl st in next dc, ch 7, skip 6 dc, 1 sl st in first ch. ROUND 11: Work ch 3, in every ch-space work 2 dc, ch 3, 2 dc, ch 1, finish with 1 sl st in 3rd ch. ROUND 12: Work ch 1, * in next ch-space work 2 dc, 2 tr, 1 picot, 2 tr, 2 dc, 1 sc in next ch *, repeat from *-* 24 times in total, finish with 1 sl st in first ch = 24 leaves. ROUND 13: Work ch 1, * ch 6, 1 sc in sc and ch (from 12th and 11th round) *, repeat from *-* 24 times in total, finish with 1 sl st in first ch. ROUND 14: Work ch 4, * ch 3, 1 dc in next ch-space, ch 7, 1 dc in next ch-space, ch 3, 1 dc in same ch-space, 4 ch *, repeat from *-* 12 times in total, finish with 1 sl st in 4th ch. ROUND 15: Work 3 ch - READ CROCHET INFO, work 4 dc in first ch-space (i.e. ch-space with 3 ch), now work dc in all ch-space with 7 ch from previous round, do not work in ch-space with 3 ch from previous round. Work * 8 dc in each of the next 7 ch-spaces, 9 dc in next ch-space *, repeat from *-* 2 times in total, 8 dc in each of the next 7 ch-spaces, 5 dc in last ch-space (i.e. ch-space with 4 ch) = 195 dc. ROUND 16: Work * 1 dc in each of the first 14 dc, 2 dc in next dc *, repeat from *-* 13 times in total = 208 dc. ROUND 17: Work * 2 dc in first dc, 1 dc in each of the next 15 dc *, repeat from *-* 13 times in total AT THE SAME TIME inc 1 dc extra on round = 222 dc. ROUND 18: Work ch 1, * ch 6, skip 5 dc, 1 sl st in next dc *, repeat from *-* 37 times in total, finish with 1 sl st in first ch. ROUND 19:Work as round 11 in A.1: Work ch 3, in every ch-space work 2 dc, ch 3, 2 dc, ch 1, finish with 1 sl st in 3rd ch. ROUND 20: Work as round 12 in A.1: Work ch 1, * in next ch-space work 2 dc, 2 tr, 1 picot, 2 tr, 2 dc, 1 ch *, repeat from *-* 37 times in total, finish with 1 sl st in first ch = 37 leaves. ROUND 21: Work as round 13 in A.1: Work ch 1, * ch 6, 1 sc in sc and ch (from 20th and 19th round) *, repeat from *-* 37 times in total, finish with 1 sl st in first ch. ROUND 22: Work as round 14 in A.1: Work ch 4, * ch 3, 1 dc in next ch-space, ch 7, 1 dc in next ch-space, ch 3, 1 dc in same ch-space, 4 ch *, repeat from *-* 18 times in total, work ch 3, 1 dc in last ch-space, ch 4, finish with 1 sl st in 4th ch. ROUND 23: Work 4 dc in first ch-space (i.e. ch-space with 3 ch), now work dc in all ch-space with 7 ch from previous round, do not work in ch-space with 3 ch from previous round. Work * 7 dc in next ch-space, 8 dc in next ch-space, 7 dc in next ch-space *, repeat from *-* 11 times in total, 8 dc in next ch-space, 8 dc in next ch-space, 7 dc in next ch-space, 4 dc in last ch-space (i.e. ch-space with 4 ch) = 273 dc. Then work piece back and forth. Work every row tog at the end of row with 1 sl st in 3rd ch from beg of row. Turn piece. ROW 24 (= WS): Work * 2 dc in next dc, 1 dc in each of the next 11 dc (= dc-group), A.2 *, repeat from *-* 13 times in total = 169 dc and 13 A.2. Turn piece. A.2 is repeated vertically until finished measurements. ROW 25 (= RS): Work A.2, 2 dc in first dc, 1 dc in each of the next dc in dc-group, * A.2, 2 dc in first dc in dc-group, 1 dc in each of the next dc *, repeat from *-* until 1 dc-group remains, 2 dc in first dc, 1 dc in each of the next dc = 182 dc. Turn piece. ROW 26: Work as row 24 = 195 dc (15 dc between every A.2). ROW 27: Work as row 25 = 208 dc (16 dc between every A.2). Repeat row 24-27 0-1-1 more time = 208-260-260 dc (= 16-20-20 dc between every A.2). Piece measures approx. 20-23-23 cm / 8"-9"-9" from middle and outwards. Now work arm holes as follows: ROW 28 (= from WS): Work 2 dc in first dc, 1 dc in each of the next 15-19-19 dc, A.2 as before, 2 dc in next dc, 1 dc in each of the next 15-19-19 dc, A.2, 54-62-62 loose ch (= right armhole), skip: 16-20-20 dc + A.2 + 16-20-20 dc + A.2, work * 2 dc in next dc, 1 dc in each of the next 15-19-19 dc, A.2 *, repeat from *-* 5 times in total, 2 dc in first dc, 1 dc in each of the next 15-19-19 dc, 54-62-62 loose ch (= left armhole), skip: A.2 + 16-20-20 dc + A.2 + 16-20-20 dc, work A.2, 2 dc in next dc, 1 dc in each of the next 15-19-19 dc, A.2 = 153-189-189 dc, 9 A.2 and 108-124-124 ch. ROW 29 (from RS): Work A.2, 2 dc in next dc, 1 dc in each of the next 16-20-20 dc, A.2, in ch-row (= left armhole) work as follows: 1 dc in each of the 54-62-62 ch, * 2 dc in next dc, 1 dc in each of the next 16-20-20 dc, A.2 *, repeat from *-* 5 times in total, 2 dc in next dc, 1 dc in each of the next 16-20-20 dc, in next ch-row (= right armhole) work as follows: 1 dc in each of the 54-62-62 ch, then work A.2, 2 dc in next dc, 1 dc in each of the next 16-20-20 dc, A.2, 2 dc in next dc, 1 dc in each of the next 16-20-20 dc = 270-322-322 dc and 9 A.2. ROW 30 (= from WS): Work 1 dc in each of the next 18-22-22 dc, A.2 as before, 1 dc in each of the next 18-22-22 dc, A.2, 1 dc in each of the next 18-22-22 dc, A.2 (adjust row according to the other repetitions), 1 dc in each of the next 18-22-22 dc, A.2, * 1 dc in each of the next 18-22-22 dc, A.2 *, repeat from *-* 5 times in total, 1 dc in each of the next 18-22-22 dc, A.2, 1 dc in each of the next 18-22-22 dc, A.2, 1 dc in each of the next 18-22-22 dc, A.2, 1 dc in each of the next 18-22-22 dc, A.2 = 234-286-286 dc and 13 A.2. Work pattern as before but now inc only on every row from RS until 52-52-60 rows have been worked in total = 377-429-481 dc (29-33-37 dc in every dc-group). Insert 4 markers in the piece as follows from WS: Work 29-33-37 dc, A.2, 14-16-18 dc, insert 1st marker, work 15-17-19 dc, * A.2, 29-33-37 dc *, repeat from *-* 4 times in total, insert 2nd marker here (1st-2nd marker = right front piece). Work A.2, 29-33-37 dc, A.2, 29-33-37 dc and A.2, insert 3rd marker here. * Work 29-33-37 dc, A.2 *, repeat from *-* 4 times in total, 15-17-19 dc, insert 4th marker. (3rd-4th marker = left front piece), 14-16-18 dc, A.2. dc between 1st and 4th marker are up towards neck. Fasten off. RIGHT FRONT PIECE: Now work right front piece between 1st and 2nd marker, beg from 2nd marker (i.e. from RS) = 131-149-167 dc and 4 A.2. Continue inc in dc-groups as before BUT do not inc in dc-groups in each side of front piece - AT THE SAME TIME dec 2 dc at beg of every row by CROCHET 3 dc TOG - see explanation above. Work until 10-12-12 cm / 4"-4¾"-4¾" over front piece have been worked, adjust to finish with 1 whole repetition of A.2. Fasten off. LEFT FRONT PIECE: Work left front piece between 3rd and 4th marker the same way as right front piece, beg from 4th marker (i.e. from RS). EDGE: Work an edge around the entire jacket as follows: Work the first 2 rounds of A.2, when working first round of A.2 over dc-rows, skip 2 dc-rows on each side of dc-group. Beg every round with 3 ch and finish with 1 sl st in 3rd ch. SLEEVES: Work back and forth from armhole and down, work every row tog with 1 sl st at the end of row. Insert 1 marker in piece, NOW MEASURE PIECE FROM HERE. Beg by working 86-94-102 dc evenly around the opening for sleeve, beg of row should be under sleeve. Then work 3 rows with 1 dc in every dc. Continue with 1 dc in every dc - AT THE SAME TIME dec differently in the different sizes as follows: READ DECREASE TIP! SIZE S/M: Dec 1 st in each side of piece alternately every 3rd and 2nd row 16 times in total = 54 dc. SIZE L/XL: Dec 1 st in each side of piece every other row 20 times in total = 54 dc. SIZE XXL/XXXL: Dec 1 st in each side of piece every other row 24 times = 54 dc. ALL SIZES: Work 1 dc in every dc until sleeve measures approx. 47 cm / 18½", adjust so that next row is from WS. Then work the first 2 rounds of A.2 (= 6 repetitions in width). Fasten off. Work the other sleeve the same way. |
||||||||||||||||||||||||||||||||||||||||
Diagram explanations |
||||||||||||||||||||||||||||||||||||||||
|
||||||||||||||||||||||||||||||||||||||||
 |
||||||||||||||||||||||||||||||||||||||||
 |
||||||||||||||||||||||||||||||||||||||||
 |
||||||||||||||||||||||||||||||||||||||||
Have you finished this pattern?Tag your pictures with #dropspattern #roscardigan or submit them to the #dropsfan gallery. Do you need help with this pattern?You'll find 11 tutorial videos, a Comments/Questions area and more by visiting the pattern on garnstudio.com. © 1982-2026 DROPS Design A/S. We reserve all rights. This document, including all its sub-sections, has copyrights. Read more about what you can do with our patterns at the bottom of each pattern on our site. |
||||||||||||||||||||||||||||||||||||||||


With over 40 years in knitting and crochet design, DROPS Design offers one of the most extensive collections of free patterns on the internet - translated to 17 languages. As of today we count 325 catalogs and 12298 patterns - 12288 of which are translated into English (US/in).
We work hard to bring you the best knitting and crochet have to offer, inspiration and advice as well as great quality yarns at incredible prices! Would you like to use our patterns for other than personal use? You can read what you are allowed to do in the Copyright text at the bottom of all our patterns. Happy crafting!
Post a comment to pattern DROPS 162-11
We would love to hear what you have to say about this pattern!
If you want to leave a question, please make sure you select the correct category in the form below, to speed up the answering process. Required fields are marked *.