
Popular categories
Looking for a yarn?


Comments / Questions (317)
![]() Nadine wrote:
Nadine wrote:
Hallo liebes Drops Team, Ich hab gerade erst angefangen diese tolle Jacke zu häkeln. Leider erschließt sich mir der Sinn dieses Satzes nicht: "Die 8. und 9. R wdh, bis insgesamt 6 Rd (Runden?)+ 18-20-22 R (was bedeutet hier das R?)" wenn man die Runden 8. und 9. Reihe 6mal wiederholt kommt man nicht auf die Maschenzahlen die zwischen den Stäbchengrp vorhanden sein sollen. Könnten sie mir bitte erklären was hier mit den insgesamt 6 Rd gemeint ist? vielen Dank schon mal im Voraus Nadine
18.01.2015 - 09:49DROPS Design answered:
Die 6 Rd beziehen sich auf den Anfang, dort wird ja in "normalen" Rd gehäkelt, also immer auf der Vorderseite der Arbeit. Dann wechseln Sie wie erklärt zu Reihen, denn Sie wenden die Arbeit nun und häkeln abwechselnd von der Vorder- und der Rückseite, beenden jede R aber dennoch wie eine Rd (das ist einfach eine Frage der Betrachtung, ob es eine R oder Rd ist). Sie häkeln also die 8. und 9. R so lange, bis Sie insgesamt 18-20-22 R gehäkelt haben plus die 6 Rd vom Anfang, also insgesamt 24-26-28 R/Rd.
18.01.2015 - 18:53
![]() Ulrike wrote:
Ulrike wrote:
Hallo! Starte ich in Rd. 8 mit 3LM oder direkt mit mit der Mustergruppe (=1LM)? Stimmt also die Häkelinfo für ALLE Runden? LG Ulrike
15.01.2015 - 16:00
![]() Cynthia wrote:
Cynthia wrote:
Bonjour, j'ai des questions concernant le tour 6 : Faut il faire les 3 ml du début du rang car il est demandé de commencer le motif dans la première bride ? Faut-il sauter des brides dans ce tour ? En effet, j'ai fait les 3ml du début, puis un motif puis la bride puis un autre motif ... etc et j'obtiens 15 motifs dans ce tour et non 13, et puis il me reste 2 brides à la fin au lieu d'une... Cel
10.01.2015 - 09:00DROPS Design answered:
Bonjour Cynthia, au début du tour 6, on commence par 1 groupe de motif dans la 1ère B, et on remplace la 1ère B du début du tour par 3 ml - on crochète alternativement 1 groupe de motif et 1 B dans chacune des B du tour 5 : on avait 26 B, on a 13 groupes de motifs + 13 B. Bon crochet!
10.01.2015 - 17:37
![]() Alexandra wrote:
Alexandra wrote:
...und direkt noch eine Frage: wie kann der Reihenanfang der 8.R. gemacht werden? Wenn man Reihe 7 mit einer KM in das erste Stäbchen dieser Reihe schließt, ist man doch eigentlich zu weit von den 2LM der ersten Mustergruppe entfernt, um dort für die erste Mustergruppe von Reihe 8 einzustechen? Ich hoffe, meine Frage ist verständlich...
02.01.2015 - 21:53DROPS Design answered:
Sie wenden die Arb ja, dann liegt die letzte Mustergruppe der 7. Rd als erste Mustergruppe vor, in die Sie in der 8. Rd häkeln.
08.01.2015 - 23:06
![]() Alexandra wrote:
Alexandra wrote:
Liebes DROPS-Team, leider ist mir nicht ganz klar, wo ich die Maschen der 6. RD platzieren muss. Einerseits heißt es 1 Muster-Gruppe IN das erste Stäbchen häkeln, andererseits soll ja bei den zusammengehäkelten Stäbchen der Faden um den Lm-Bogen herum geholt werden. Steche ich also nicht in den Kopf des Stäbchens ein?
02.01.2015 - 15:41DROPS Design answered:
In der 6. Rd stechen Sie in die Stb ein, das Zusammenhäkeln der Stb bezieht sich dann auf die nächsten Rd, bei denen Sie immer um den Lm-Bogen der vorangegangenen Stb-Gruppe häkeln. Die 6. Rd als "Start-Rd" für die Mustergruppen ist hier eine Ausnahme. Sie stechen also insgesamt 4x in jedes 2. Stb ein, um 1 Mustergruppe zu häkeln (nämlich 2 x 2 zusammengeh. Stb, plu die Lm der Mustergruppe)
08.01.2015 - 23:01
![]() Tilde wrote:
Tilde wrote:
Voor iedereen die last heeft van de a-symetrische voorpanden, je begin is niet het midden van de kraag. Onderaan (boven de billen) is een patroon groep het midden. Het duurde ook even voordat ik het door had. Gewoon patroon volgen dan kom je vanzelf uit...
19.12.2014 - 13:44
![]() Mimma wrote:
Mimma wrote:
Eine Frage zu den Maßen, die "ab der Mitte" angegeben sind. Ist damit gemeint, ab den Reihen zu messen wo die Mustergruppen beginnen oder ganz in der Mitte am Startpunkt der kompletten Arbeit. Ich hoffe meine Frage ist verständlich formuliert.
19.12.2014 - 12:20DROPS Design answered:
Antwort siehe unten! :-)
21.12.2014 - 22:42
![]() Mimma wrote:
Mimma wrote:
Eine Frage zu den Maßen, die "ab der Mitte" angegeben sind. Ist damit gemeint, ab den Reihen zu messen wo die Mustergruppen beginnen oder ganz in der Mitte am Startpunkt der kompletten Arbeit. Ich hoffe meine Frage ist verständlich formuliert.
19.12.2014 - 10:38DROPS Design answered:
Es wird immer ab dem Mittelpunkt gemessen, also ab dem Startpunkt. Viel Spaß beim Häkeln!
21.12.2014 - 22:41Beth wrote:
I for the life of me cant make this sweater I have tried several times is there a video that I can watch hope to hear from you soon have a nice day beth
15.12.2014 - 21:49DROPS Design answered:
Dear Beth, for any individual assistance, you are welcome to contact your DROPS store - if you have any question about the pattern, you are free to ask it here. Happy crocheting!
16.12.2014 - 09:49
![]() Laura wrote:
Laura wrote:
Hallo,ik hoop dat jullie me kunnen helpen..Ik ben bij het rechter voorpand aangekomen maar snap er niets van. Er staat dat ik elke toer moet meerderen in de stkgroepen maar niet in de stk groepen aan de zijkant. Tegelijkertijd moet ik aan het begin van elke toer minderen. Dat minderen snap ik..alleen wat moet ik zien als de zijkant? Is dat bij de steekmarkeerder, dus waar ik moet minderen? Of is dat de lange kant?
09.12.2014 - 21:56DROPS Design answered:
Hoi Laura. De voorpanden zijn tussen markeerder 1-2 en 3-4. Je haakt hier heen en weer. Je gaat dan door met de meerderingen zoals hiervoor, alleen NIET over de eerste en laatste stk-groep van de toer (voorpand), hier ga je minderen.
10.12.2014 - 14:07
|
|
Winter Solstice#wintersolsticecardigan |
|
 |
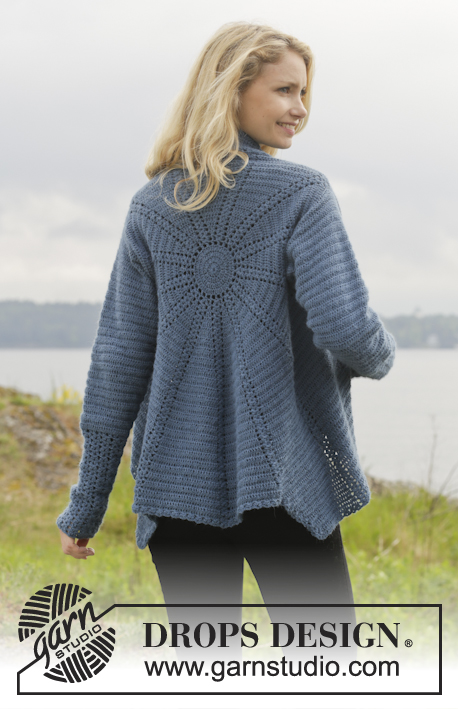 |
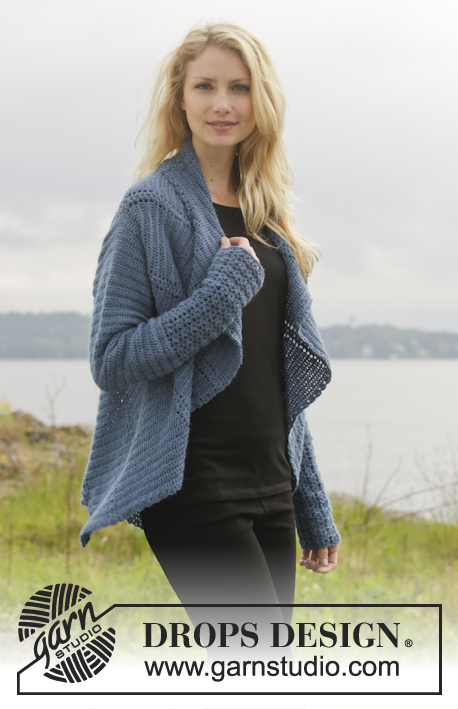
Crochet DROPS jacket worked in a circle in "Alpaca". Size: S - XXXL.
DROPS 158-10 |
|
|
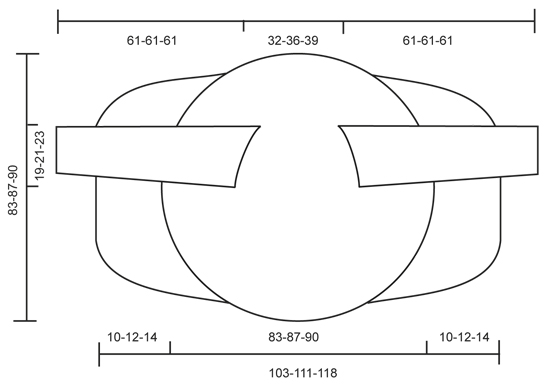
CROCHET INFO: Beg every round/row with 3 ch that replace 1st dc and finish every round/row with 1 sl st in 3rd ch from beg of round/row. PATTERN GROUP: Each pattern group consists of: ch 1, 2 dc WORKED TOG - see explanation below, ch 2, 2 dc worked tog and 1 ch. DC WORKED TOG: * Make 1 YO, insert hook in ch-space, get yarn, make a YO, pull through 2 of the sts on hook *, repeat from *-* one more time, make 1 YO and pull yarn through all 3 sts on hook. CROCHET 3 dc TOG: Work 3 dc into 1 dc at beg of row as follows: Work 2 ch (= replace 1 dc), work 1 dc, but wait with last pull through (= 2 strands on hook), then work next dc but on last pull through, pull yarn through all sts on hook. DECREASE TIP (applies to sleeves): Dec at beg of row by working 1 sl st over the dc to be dec. Dec at end of row by working until 1 dc to be dec remains, turn piece. -------------------------------------------------------- CIRCLE: Work 5 ch on hook size 3.5 mm/E with Alpaca and form a ring with 1 sl st in first ch. READ CROCHET INFO. ROUND 1: Work 13 dc in ch-ring. ROUND 2: Work * 2 dc in every dc*, repeat from *-* the entire round = 26 dc. ROUND 3: Work * 2 dc in first dc, then 1 dc in next dc *, repeat from *-* the entire round = 39 dc. ROUND 4: Work * 2 dc in first dc, then 1 dc in each of the next 2 dc *, repeat from *-* the entire round = 52 dc. ROUND 5: Work * 1 dc in next dc, then ch 2, skip 1 dc *, repeat from *-* the entire round = 26 ch-spaces and 26 dc. REMEMBER THE CROCHET GAUGE! ROUND 6: In first dc work PATTERN GROUP - see explanation above, * 1 dc in next dc, 1 pattern group in next dc *, repeat from *-* until 1 dc remains, 1 dc in last dc = 13 pattern groups with 1 dc between each. Then work piece back and forth. Work every row tog at the end of row with 1 sl st in first st on row. Turn piece. ROW 7 (= from WS): 2 dc in first dc, * 1 pattern group in next pattern group, 2 dc in next dc (= dc-group) *, repeat from *-* until 1 pattern group from previous row remains, 1 pattern group = 13 pattern groups with 13 dc-groups between each. Turn piece. ROW 8: 1 pattern groups in first pattern group, * 2 dc in first dc, 1 dc in each of the next dc in dc-group, 1 pattern group in next pattern group *, repeat from *-* until 1 dc-group remains, 2 dc in first dc, 1 dc in each of the next dc in dc-group = 13 groups with 3 dc between each. Turn piece. ROW 9: 2 dc in first dc, 1 dc in each of the next dc in dc-group, * 1 pattern group in pattern group, 2 dc in first dc of dc-group, 1 dc in each of the next dc *, repeat from *-* until 1 pattern group from previous row remains, 1 pattern group = 13 groups with 4 dc between each. Turn piece. Then repeat 8th and 9th row until 6 rounds + 18-20-22 rows have been worked (= 19-21-23 dc between every pattern group) = 247-273-299 dc and 13 pattern group. Piece measures approx. 20-22-23 cm / 8"-8¾"-9" from middle and outwards. Now work armholes as follows in the different sizes: SIZE S/M: ROW 25 (= from WS): Inc in every groups with dc as before. Work 20 dc, 1 pattern group, 20 dc, work 50 loose ch (= right armhole), skip 2 dc-groups and 2 pattern groups. Then work dc-groups and pattern groups as before over the next 114 dc, work 50 loose ch (= left armhole), skip 2 dc-groups and 2 pattern groups, work as before the rest of row, finish with 1 sl st in first dc on row = 180 dc and 100 ch. Turn piece. ROW 26: Continue with pattern and inc as before but work first ch-row (= left armhole) as follows: 10 dc, skip ch 1, 11 dc, skip ch 1, 1 pattern group, skip ch 1, 11 dc, skip ch 1, 10 dc, skip ch 1, 1 pattern group and skip 1 ch. I next ch-row (= right armhole) work the same way but in opposite order, i.e. beg by skipping ch 1, 1 pattern group and finish with dc = 273 dc. ROW 27-50: Work pattern as before but now inc only on even numbered rows until 50 rows have been worked in total = 429 dc (33 dc in every dc-group). Piece measures approx. 42 cm / 16½" from middle and outwards. Fasten off. SIZE L/XL: ROW 27 (= from WS): Inc in every groups with dc as before. Work 22 dc, 1 pattern group, 22 dc, work 54 loose ch (= right armhole), skip 2 dc-groups and 2 pattern groups. Then work pattern as before over the next 126 dc, work 54 loose ch (= left armhole), skip 2 dc-groups and 2 pattern groups, work as before the rest of row, finish with 1 sl st in first dc on row = 198 dc and 108 ch. Turn piece. ROW 28: Continue with pattern and inc as before but work first ch-row (= left armhole) as follows: 11 dc, skip ch 1, 12 dc, skip ch 1, 1 pattern group, skip ch 1, 12 dc, skip ch 1, 11 dc, skip ch 1, 1 pattern group and skip 1 ch. I second ch-row (= right armhole) work the same way but in opposite order, i.e. beg by skipping ch 1, 1 pattern group and finish with dc = 299 dc. ROW 29-52: Work pattern as before but now inc only on even numbered rows until 52 rows have been worked in total = 455 dc (35 dc in every dc-group). Piece measures approx. 43 cm / 17" from middle and outwards. Fasten off. SIZE XXL/XXXL: ROW 29 (= from WS): Inc in every groups with dc as before. Work 24 dc, 1 pattern group, 24 dc, work 58 loose ch (= right armhole), skip 2 dc-groups and 2 pattern groups. Then work pattern as before over the next 138 dc, work 58 loose ch (= left armhole), skip 2 dc-groups and 2 pattern groups, work as before the rest of row, finish with 1 sl st in first pattern group on row = 216 dc and 116 ch. Turn piece. ROW 30: Continue with pattern and inc as before but work first ch-row (= left armhole) as follows: 12 dc, skip ch 1, 13 dc, skip ch 1, 1 pattern group, skip ch 1, 13 dc, skip ch 1, 12 dc, skip ch 1, 1 pattern group and skip 1 ch. I second ch-row (= right armhole) work the same way but in opposite order, i.e. beg by skipping ch 1, 1 pattern group and finish with dc = 325 dc. ROW 31-54: Work pattern as before but now inc only on even numbered rows until 54 rows have been worked in total = 481 dc and 37 dc in every dc-group. Piece measures approx. 45 cm / 17¾" from middle and outwards. Fasten off. ALL SIZES: Insert 4 markers in the piece as follows from WS: Work 16-17-18, insert 1st marker here, work 17-18-19 dc, * 1 pattern group, 33-35-37 dc *, repeat from *-* 3 more times, insert 2nd marker here (1st-2nd marker = right front piece). Work 1 pattern group, 33-35-37 dc, 1 pattern group, 33-35-37 dc and 1 pattern group, insert 3rd marker here. * Work 33-35-37 dc, 1 pattern group *, repeat from *-* 3 more times, 17-18-19 dc, insert 4th marker. (3rd-4th marker = left front piece). Work the rest of row. Sts between 1st and 4th marker are up towards neck. Cut the yarn and fasten. RIGHT FRONT PIECE: Now work right front piece between 1st and 2nd marker, beg from 2nd marker (i.e. from RS) = 149-158-167 dc and 4 pattern groups. Continue inc on every row in dc-groups as before BUT do not inc in dc-groups in each side of front piece - AT THE SAME TIME dec 2 dc at beg of every row by CROCHET 3 dc TOG - see explanation above. Continue to work until 12-14-16 rows have been worked over front piece. Cut the yarn and fasten. LEFT FRONT PIECE: Work left front piece between 3rd and 4th marker the same way as right front piece, beg from 4th marker (i.e. from RS). SLEEVES: Work back and forth from armhole and down, work every row tog with 1 sl st at the end of row. Use hook size 3.5 mm and Alpaca. Beg by working 86-94-102 dc around the opening for sleeve, beg of row should be under sleeve. Then work 3 rows with 1 dc in every dc. Continue with 1 dc in every dc - AT THE SAME TIME dec in the different sizes as follows: READ DECREASE TIP! SIZE S/M: Dec 1 st in each side of piece every other row 4 times and then every 3rd row 12 times (= 16 times in total) = 54 dc. SIZE L/XL: Dec 1 st in each side of piece alternately every 3rd and 2nd row 18 times in total = 58 dc. SIZE XXL/XXXL: Dec 1 st in each side of piece every other row 17 times and then every 3rd row 4 times (= 21 times in total) = 60 dc. Then work pattern groups as follows: ROW 1: 2 dc, 1 ch * work the next 2 dc tog, 1 ch *, repeat from *-* and finish with 2 dc. ROW 2: Work 2 dc, * in next ch work 1 pattern group, skip 1 ch *, repeat from *-*, and finish with 1 dc in each of the last 2 dc. Turn piece. ROW 3: Work 2 dc, 1 pattern group in each of the next pattern groups until 2 dc remain, work 1 dc in each of these. Turn piece. Repeat 3rd row until piece measures approx. 61 cm / 24" in all sizes. Fasten off. CROCHET EDGE: Work 1 round with around the entire jacket as follows: * 1 pattern group, skip 2 dc/1 row *, repeat from *-* the entire round. |
|
 |
|
Have you finished this pattern?Tag your pictures with #dropspattern #wintersolsticecardigan or submit them to the #dropsfan gallery. Do you need help with this pattern?You'll find 8 tutorial videos, a Comments/Questions area and more by visiting the pattern on garnstudio.com. © 1982-2026 DROPS Design A/S. We reserve all rights. This document, including all its sub-sections, has copyrights. Read more about what you can do with our patterns at the bottom of each pattern on our site. |
|


With over 40 years in knitting and crochet design, DROPS Design offers one of the most extensive collections of free patterns on the internet - translated to 17 languages. As of today we count 324 catalogs and 12290 patterns - 12280 of which are translated into English (US/in).
We work hard to bring you the best knitting and crochet have to offer, inspiration and advice as well as great quality yarns at incredible prices! Would you like to use our patterns for other than personal use? You can read what you are allowed to do in the Copyright text at the bottom of all our patterns. Happy crafting!
Post a comment to pattern DROPS 158-10
We would love to hear what you have to say about this pattern!
If you want to leave a question, please make sure you select the correct category in the form below, to speed up the answering process. Required fields are marked *.