
Popular categories
Looking for a yarn?


Comments / Questions (317)
![]() Yvonne Van Doorn wrote:
Yvonne Van Doorn wrote:
Hoelang duurt het voor je antwoord op een vraag krijgt?
29.01.2015 - 12:05DROPS Design answered:
Hoi Yvonne. Dat kan ik helaas niet zeggen. Dat verschilt van hoe druk het is. Kan je niet hierop wachten, dan kan je ook altijd contact opnemen met jouw DROPS verkooppunt.
29.01.2015 - 14:28
![]() Yvonne Van Doorn wrote:
Yvonne Van Doorn wrote:
Ik heb net toer 29 gehaakt met de 58 losse voor de armsgaten maar op de foto lijkt het aan de bovenkant 3 stokjes patronen te zitten en ik kom op 4 x stokjes het lijkt nu alsof er teveel steken aan de bovenkant van de mouwen zit het komt zo hoog uit in de nek en ik kom ook niet aan die 138 steken snap er even niks meer van, ik hoop dat je me vraag begrijpt
28.01.2015 - 19:10DROPS Design answered:
Hoi Yvonne. Het model op de foto is een kleinere maat. Je moet haken zoals beschreven in het patroon.
29.01.2015 - 15:09
![]() Ulrike wrote:
Ulrike wrote:
Ich häkle Größe L/XL. Starte ich in Rd. 27 mit der LM-Kette nach der 2. Mustergruppe? Denn in Rd. 28 passt sonst die umgekehrte Reihenfolge in der LM-Kette nicht. Oder mache ich einen Denkfehler?
24.01.2015 - 11:28DROPS Design answered:
Antwort siehe unten! :-)
28.01.2015 - 14:31
![]() Ulrike wrote:
Ulrike wrote:
Ich häkle Größe L/XL. Starte ich in Rd. 27 mit der LM-Kette nach der 2. Mustergruppe? Denn in Rd. 28 passt sonst die umgekehrte Reihenfolge in der LM-Kette nicht. Oder mache ich einen Denkfehler?
24.01.2015 - 10:53DROPS Design answered:
Eigentlich beginnen Sie direkt vor der 2. Mustergruppe mit der Lm-Kette, das müsste die Mustergruppe sein, die Sie als erstes überspringen. Die M, die Sie überspringen, werden in der nächsten Rd in der Lm-Kette so fortgesetzt, so als ob sie nicht übersprungen worden wären, d.h. das Muster wird wie zuvor folgerichtig weitergearbeitet, allerdings überspringen Sie ab und zu 1 Lm. Es wurden mehr Lm als benötigt angeschlagen, damit der Armausschnitt lockerer wird.
28.01.2015 - 14:31Connie Taylor wrote:
Thank you, Drops Design! :)
21.01.2015 - 23:48Connie Taylor wrote:
Question part 3: I am really sorry if this questions seems a bit petty, but I know from experience, that a mistake early on can mess up everything else. I would also appreciate if you could give the number of dc after each pattern group for the next couple of rows, so I know I am on the right track... Thank you very VERY much! Connie
19.01.2015 - 21:07DROPS Design answered:
Dear Mrs Taylor, just continue as you said below dec 2 dc at beg of every row, inc 1 dc in each dc group but not in the last dc at the end of row. Happy crocheting!
20.01.2015 - 10:01Connie Taylor wrote:
Question part 2 which currently is as follows: 35 dc - 1 pattern group - 35 dc - 1 pattern group - 35 dc - 1 pattern group - 35 dc - 1 pattern group - 18 dc = 4 pattern groups and 158 dc. If I interpret the pattern correctly the first row of the right from piece should look as follows: 33 dc (after dec 2) - 1 pattern group - 36 dc (inc 1dc) - 1 Pattern group - 36 dc (inc 1 dc) - 1 pattern group - 36 dc (inc 1 dc) - 1 pattern group - 18 dc (no increase) = 4 pattern groups and 159 dc.
19.01.2015 - 21:07DROPS Design answered:
Dear Mrs Taylor, that's correct, that's how you will work the 1st row from RS for right front piece. Happy crocheting!
20.01.2015 - 10:00Connie Taylor wrote:
Question part 1: Hi, I am making this cardigan for my mum (size L/XL). I have now completed the first part (circle with markers for front pieces). And now I am stuck. Using US terms the pattern specifies that first row of the right front piece for size L is worked with 4 pattern groups and 158 dc - but I am struggling to work out HOW the 158 dc are distributed across the area between 2nd and 1st marker
19.01.2015 - 21:06DROPS Design answered:
Dear Mrs Taylor, you insert 1st marker, work 18 dc, then repeat *1 pattern group, 35 dc* a total of 4 times: 18 dc + (4 x 35 dc) = 158 dc + 4 pattern groups, seen from WS, ie from RS you will have 2nd marker, *35 dc, 1 pattern group* a total of 4 times, and 18 dc. Happy crocheting!
20.01.2015 - 09:58
![]() Ulrike wrote:
Ulrike wrote:
Hallo! Starte ich in Rd. 8 mit 3LM oder direkt mit mit der Mustergruppe (=1LM)? Stimmt also die Häkelinfo für ALLE Runden? LG Ulrike
19.01.2015 - 20:00DROPS Design answered:
Liebe Ulrike, ich habe Ihre Frage an die Designerinnen weitergeleitet, da ich es auch nicht genau beantworten kann, wie die Anleitung an dieser Stelle gemeint ist. Oder haben Sie inzwischen eine Lösung für sich gefunden?
28.01.2015 - 14:21
![]() Birthe Skydsgaard wrote:
Birthe Skydsgaard wrote:
Skøn jakke! Men vil gerne vide om man kunne få en opskrift så det bliver en vest i stedet? Venlig hilsen Birthe Skydsgaard
19.01.2015 - 10:52DROPS Design answered:
Hej Birthe. Vi kan desvaerre ikke hjaelpe med individuelle tilpasninger og önsker paa vores gratis mönstre. Men du er velkommen til at lave dine egne tilpasninger. God fornöjelse.
19.01.2015 - 13:22
|
|
Winter Solstice#wintersolsticecardigan |
|
 |
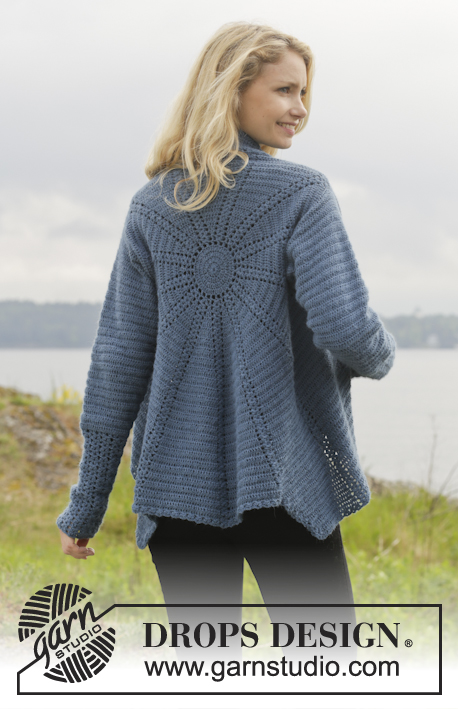 |
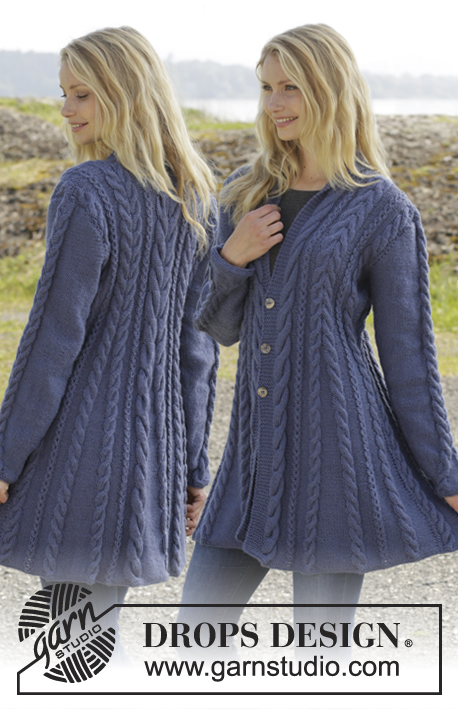
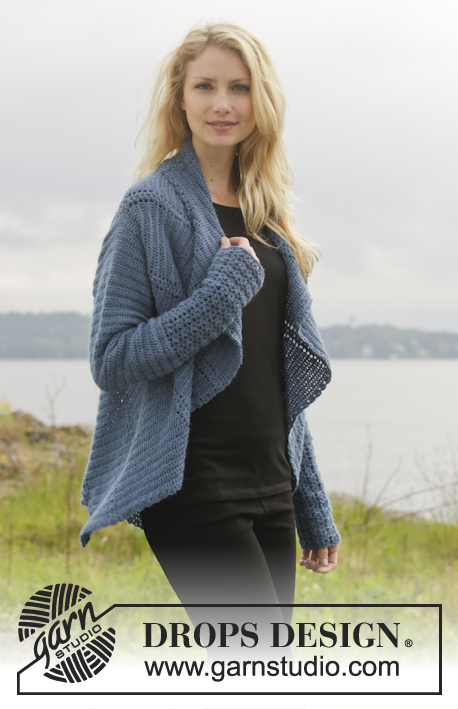
Crochet DROPS jacket worked in a circle in "Alpaca". Size: S - XXXL.
DROPS 158-10 |
|
|
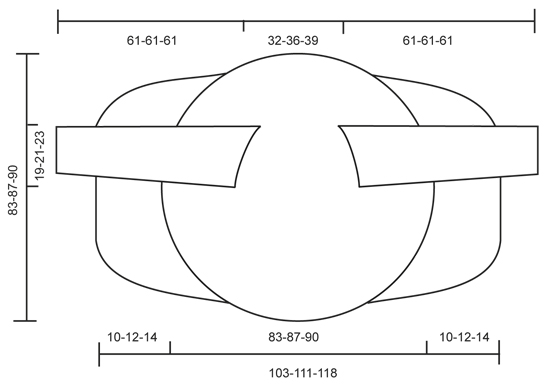
CROCHET INFO: Beg every round/row with 3 ch that replace 1st dc and finish every round/row with 1 sl st in 3rd ch from beg of round/row. PATTERN GROUP: Each pattern group consists of: ch 1, 2 dc WORKED TOG - see explanation below, ch 2, 2 dc worked tog and 1 ch. DC WORKED TOG: * Make 1 YO, insert hook in ch-space, get yarn, make a YO, pull through 2 of the sts on hook *, repeat from *-* one more time, make 1 YO and pull yarn through all 3 sts on hook. CROCHET 3 dc TOG: Work 3 dc into 1 dc at beg of row as follows: Work 2 ch (= replace 1 dc), work 1 dc, but wait with last pull through (= 2 strands on hook), then work next dc but on last pull through, pull yarn through all sts on hook. DECREASE TIP (applies to sleeves): Dec at beg of row by working 1 sl st over the dc to be dec. Dec at end of row by working until 1 dc to be dec remains, turn piece. -------------------------------------------------------- CIRCLE: Work 5 ch on hook size 3.5 mm/E with Alpaca and form a ring with 1 sl st in first ch. READ CROCHET INFO. ROUND 1: Work 13 dc in ch-ring. ROUND 2: Work * 2 dc in every dc*, repeat from *-* the entire round = 26 dc. ROUND 3: Work * 2 dc in first dc, then 1 dc in next dc *, repeat from *-* the entire round = 39 dc. ROUND 4: Work * 2 dc in first dc, then 1 dc in each of the next 2 dc *, repeat from *-* the entire round = 52 dc. ROUND 5: Work * 1 dc in next dc, then ch 2, skip 1 dc *, repeat from *-* the entire round = 26 ch-spaces and 26 dc. REMEMBER THE CROCHET GAUGE! ROUND 6: In first dc work PATTERN GROUP - see explanation above, * 1 dc in next dc, 1 pattern group in next dc *, repeat from *-* until 1 dc remains, 1 dc in last dc = 13 pattern groups with 1 dc between each. Then work piece back and forth. Work every row tog at the end of row with 1 sl st in first st on row. Turn piece. ROW 7 (= from WS): 2 dc in first dc, * 1 pattern group in next pattern group, 2 dc in next dc (= dc-group) *, repeat from *-* until 1 pattern group from previous row remains, 1 pattern group = 13 pattern groups with 13 dc-groups between each. Turn piece. ROW 8: 1 pattern groups in first pattern group, * 2 dc in first dc, 1 dc in each of the next dc in dc-group, 1 pattern group in next pattern group *, repeat from *-* until 1 dc-group remains, 2 dc in first dc, 1 dc in each of the next dc in dc-group = 13 groups with 3 dc between each. Turn piece. ROW 9: 2 dc in first dc, 1 dc in each of the next dc in dc-group, * 1 pattern group in pattern group, 2 dc in first dc of dc-group, 1 dc in each of the next dc *, repeat from *-* until 1 pattern group from previous row remains, 1 pattern group = 13 groups with 4 dc between each. Turn piece. Then repeat 8th and 9th row until 6 rounds + 18-20-22 rows have been worked (= 19-21-23 dc between every pattern group) = 247-273-299 dc and 13 pattern group. Piece measures approx. 20-22-23 cm / 8"-8¾"-9" from middle and outwards. Now work armholes as follows in the different sizes: SIZE S/M: ROW 25 (= from WS): Inc in every groups with dc as before. Work 20 dc, 1 pattern group, 20 dc, work 50 loose ch (= right armhole), skip 2 dc-groups and 2 pattern groups. Then work dc-groups and pattern groups as before over the next 114 dc, work 50 loose ch (= left armhole), skip 2 dc-groups and 2 pattern groups, work as before the rest of row, finish with 1 sl st in first dc on row = 180 dc and 100 ch. Turn piece. ROW 26: Continue with pattern and inc as before but work first ch-row (= left armhole) as follows: 10 dc, skip ch 1, 11 dc, skip ch 1, 1 pattern group, skip ch 1, 11 dc, skip ch 1, 10 dc, skip ch 1, 1 pattern group and skip 1 ch. I next ch-row (= right armhole) work the same way but in opposite order, i.e. beg by skipping ch 1, 1 pattern group and finish with dc = 273 dc. ROW 27-50: Work pattern as before but now inc only on even numbered rows until 50 rows have been worked in total = 429 dc (33 dc in every dc-group). Piece measures approx. 42 cm / 16½" from middle and outwards. Fasten off. SIZE L/XL: ROW 27 (= from WS): Inc in every groups with dc as before. Work 22 dc, 1 pattern group, 22 dc, work 54 loose ch (= right armhole), skip 2 dc-groups and 2 pattern groups. Then work pattern as before over the next 126 dc, work 54 loose ch (= left armhole), skip 2 dc-groups and 2 pattern groups, work as before the rest of row, finish with 1 sl st in first dc on row = 198 dc and 108 ch. Turn piece. ROW 28: Continue with pattern and inc as before but work first ch-row (= left armhole) as follows: 11 dc, skip ch 1, 12 dc, skip ch 1, 1 pattern group, skip ch 1, 12 dc, skip ch 1, 11 dc, skip ch 1, 1 pattern group and skip 1 ch. I second ch-row (= right armhole) work the same way but in opposite order, i.e. beg by skipping ch 1, 1 pattern group and finish with dc = 299 dc. ROW 29-52: Work pattern as before but now inc only on even numbered rows until 52 rows have been worked in total = 455 dc (35 dc in every dc-group). Piece measures approx. 43 cm / 17" from middle and outwards. Fasten off. SIZE XXL/XXXL: ROW 29 (= from WS): Inc in every groups with dc as before. Work 24 dc, 1 pattern group, 24 dc, work 58 loose ch (= right armhole), skip 2 dc-groups and 2 pattern groups. Then work pattern as before over the next 138 dc, work 58 loose ch (= left armhole), skip 2 dc-groups and 2 pattern groups, work as before the rest of row, finish with 1 sl st in first pattern group on row = 216 dc and 116 ch. Turn piece. ROW 30: Continue with pattern and inc as before but work first ch-row (= left armhole) as follows: 12 dc, skip ch 1, 13 dc, skip ch 1, 1 pattern group, skip ch 1, 13 dc, skip ch 1, 12 dc, skip ch 1, 1 pattern group and skip 1 ch. I second ch-row (= right armhole) work the same way but in opposite order, i.e. beg by skipping ch 1, 1 pattern group and finish with dc = 325 dc. ROW 31-54: Work pattern as before but now inc only on even numbered rows until 54 rows have been worked in total = 481 dc and 37 dc in every dc-group. Piece measures approx. 45 cm / 17¾" from middle and outwards. Fasten off. ALL SIZES: Insert 4 markers in the piece as follows from WS: Work 16-17-18, insert 1st marker here, work 17-18-19 dc, * 1 pattern group, 33-35-37 dc *, repeat from *-* 3 more times, insert 2nd marker here (1st-2nd marker = right front piece). Work 1 pattern group, 33-35-37 dc, 1 pattern group, 33-35-37 dc and 1 pattern group, insert 3rd marker here. * Work 33-35-37 dc, 1 pattern group *, repeat from *-* 3 more times, 17-18-19 dc, insert 4th marker. (3rd-4th marker = left front piece). Work the rest of row. Sts between 1st and 4th marker are up towards neck. Cut the yarn and fasten. RIGHT FRONT PIECE: Now work right front piece between 1st and 2nd marker, beg from 2nd marker (i.e. from RS) = 149-158-167 dc and 4 pattern groups. Continue inc on every row in dc-groups as before BUT do not inc in dc-groups in each side of front piece - AT THE SAME TIME dec 2 dc at beg of every row by CROCHET 3 dc TOG - see explanation above. Continue to work until 12-14-16 rows have been worked over front piece. Cut the yarn and fasten. LEFT FRONT PIECE: Work left front piece between 3rd and 4th marker the same way as right front piece, beg from 4th marker (i.e. from RS). SLEEVES: Work back and forth from armhole and down, work every row tog with 1 sl st at the end of row. Use hook size 3.5 mm and Alpaca. Beg by working 86-94-102 dc around the opening for sleeve, beg of row should be under sleeve. Then work 3 rows with 1 dc in every dc. Continue with 1 dc in every dc - AT THE SAME TIME dec in the different sizes as follows: READ DECREASE TIP! SIZE S/M: Dec 1 st in each side of piece every other row 4 times and then every 3rd row 12 times (= 16 times in total) = 54 dc. SIZE L/XL: Dec 1 st in each side of piece alternately every 3rd and 2nd row 18 times in total = 58 dc. SIZE XXL/XXXL: Dec 1 st in each side of piece every other row 17 times and then every 3rd row 4 times (= 21 times in total) = 60 dc. Then work pattern groups as follows: ROW 1: 2 dc, 1 ch * work the next 2 dc tog, 1 ch *, repeat from *-* and finish with 2 dc. ROW 2: Work 2 dc, * in next ch work 1 pattern group, skip 1 ch *, repeat from *-*, and finish with 1 dc in each of the last 2 dc. Turn piece. ROW 3: Work 2 dc, 1 pattern group in each of the next pattern groups until 2 dc remain, work 1 dc in each of these. Turn piece. Repeat 3rd row until piece measures approx. 61 cm / 24" in all sizes. Fasten off. CROCHET EDGE: Work 1 round with around the entire jacket as follows: * 1 pattern group, skip 2 dc/1 row *, repeat from *-* the entire round. |
|
 |
|
Have you finished this pattern?Tag your pictures with #dropspattern #wintersolsticecardigan or submit them to the #dropsfan gallery. Do you need help with this pattern?You'll find 8 tutorial videos, a Comments/Questions area and more by visiting the pattern on garnstudio.com. © 1982-2026 DROPS Design A/S. We reserve all rights. This document, including all its sub-sections, has copyrights. Read more about what you can do with our patterns at the bottom of each pattern on our site. |
|


With over 40 years in knitting and crochet design, DROPS Design offers one of the most extensive collections of free patterns on the internet - translated to 17 languages. As of today we count 324 catalogs and 12290 patterns - 12280 of which are translated into English (US/in).
We work hard to bring you the best knitting and crochet have to offer, inspiration and advice as well as great quality yarns at incredible prices! Would you like to use our patterns for other than personal use? You can read what you are allowed to do in the Copyright text at the bottom of all our patterns. Happy crafting!
Post a comment to pattern DROPS 158-10
We would love to hear what you have to say about this pattern!
If you want to leave a question, please make sure you select the correct category in the form below, to speed up the answering process. Required fields are marked *.