
Popular categories
Looking for a yarn?


Comments / Questions (317)
![]() Hannah wrote:
Hannah wrote:
Van de vorige uitleg word ik niet zoveel wijzer, kan U misschien vertellen hoeveel stk groepen en patroon groepen je over houd aan het rechter en linker voorpand als jemaat L/XL haakt. bvd
28.04.2015 - 22:25DROPS Design answered:
Hoi Hannah. Je hebt volgens het patroon 4 markeerders in het werk geplaatst. Voor L/XL, doe je het zo: haak tot 17 stk voor de tweede patroongroep op de toer, plaats 1e markeerder, haak 18 stk, * 1 patroongroep, 35 stk *, herhaal *-* nog 3 keer, plaats 2e markeerder (1e-2e markeerder = rechtervoorpand). Haak 1 patroongroep, 35 stk, 1 patroongroep, 35 stk en 1 patroongroep, plaats 3e markeerder. * Haak 35 stk, 1 patroongroep *, herhaal *-* nog 3 keer, 18 stk, plaat 4e markeerder. (3e-4e markeerder = linkervoorpand). Dwz, je hebt dan 158 stk en 4 patroongroepen voor de voorpand (tussen 1e-2e markeerder en tussen 3e-4e markeerder).
30.04.2015 - 15:39Cassi wrote:
I have a question about the pattern group. When you say "2tc worked together" do you mean to repeat the "tc worked together" pattern twice, ch2, repeat the"tc worked together" pattern twice. Or do you mean triple crochet 2 together, ch2, triple crochet 2 together. In other words, should I have 2 tcworkedtogether or 4 tcworkedtogether per pattern group?
28.04.2015 - 22:02DROPS Design answered:
Dear Cassi, 1 pattern group = 1 ch, 2 treble crochet tog, 2 ch, 2 treble crochet together, 1 ch. You will have 2 tr tog with 2 ch in between. Happy crocheting!
29.04.2015 - 09:34
![]() Hannah wrote:
Hannah wrote:
Ik wil aan de voorpanden beginnen, daar moet je meerderingen als voorgaande toeren doen, en tevens minderingen. Waar moet je minderen en waar meerderen? BVD
28.04.2015 - 15:07DROPS Design answered:
Hoi Hannah. Als je de voorgaande toeren hebt gehaakt (tot 9) heb je al de eerste meerderingen gedaan - je gaat dus door zoals eerst
28.04.2015 - 16:01
![]() Angela wrote:
Angela wrote:
MAAT L/XL: minder 1 st aan elke kant van het werk afwisselend elke 3e en 2e toer 18 keer in totaal = 58 stk. Ik snap niet precies wat bedoeld word. Heb nou 3 toeren van 94 stokjes gedaan. Maar daarna snap ik niet meer
26.04.2015 - 21:46DROPS Design answered:
Hoi Angela. Je haakt heen en weer en mindert in elke 3e en 2e toer aan beide zijkanten van de mouw (2 minder per keer), dwz, je haakt eerst 2 toeren, mindert in de derde toer, dan haak je 1 toer zonder minderingen, en mindert in de volgende (2e toer), dan weer 2 toeren zonder minderingen en mindert weer in derde enzovoort. Je herhaalt dit in totaal 18 keer: 2 x 18 = 36 minder = 94-36 = 58 stk over.
28.04.2015 - 16:11
![]() Yvonne Kutz wrote:
Yvonne Kutz wrote:
I'm working size L/Cl, row 27,after the first right armhole then working the pattern over 126 dc. Do I make a pattern group before the 54 chain? Do I continued working in a round thru row 52? I love all your patterns especially this one. Thank you, Yvonne
20.04.2015 - 14:30DROPS Design answered:
Dear Mrs Kutz, row 27 is worked from WS, work: 22 tr, 1 pattern group, then 54 loose ch and skip 2 tr-groups and 2 pattern groups (right armhole), and continue in pattern as before over the next 126 tr, work 54 loose ch (= left armhole), skip 2 tr-groups and 2 pattern groups, work as before the rest of row, finish with 1 sl st in first tr on row = 198 tr and 108 ch. turn and work next row from RS. Continue then as before working alternately from RS and from WS, at the same time finish each row with 1 sl st. Happy crocheting!
20.04.2015 - 18:15Rachel wrote:
I have got to round 7 and don't understand the term (=from WS): can you explain please?
09.04.2015 - 08:03DROPS Design answered:
Dear Rachel, you work round 1 to 6 in the round from right side of work, but from round 7 you will continue working in the round (ie join at the end of each round) but you will turn piece to work alternately from WS and from RS, at the end of round 6, turn and work round 7 from wrong side of piece, join at the end of row with 1 sl st, turn and work round 8 from the right side of piece etc. Happy crocheting!
09.04.2015 - 09:58
![]() Barroyer wrote:
Barroyer wrote:
Bonjour à vous, Je suis entrain de faire la veste au crochet 158-10 et arriver aux emmanchures pour la taille L/XL, c'est inscrit de faire 22 B, un motif, 22 B et lors du tours terminer. Je dois tourner le travail et je ne tombe pas bien pour refaire l'emmanchure. Je tombe sur les deux mêmes emmanchures et non une gauche et une droite. Donc je me suis aperçue que je devais faire à la suite des 22 B, un motif 22 B un autre motif pour avoir une emmanchure gauche et droite. Bonne journée Miryam
08.04.2015 - 13:28
![]() Carry Van Houteghem wrote:
Carry Van Houteghem wrote:
Bestaat er een diagram van het patroon. Of een patroon met symbolen getekend, is makkelijker te lezen. Graag zou ik deze willen downloaden.
06.04.2015 - 10:12DROPS Design answered:
Beste Carry, er is van dit patroon geen diagram beschikbaar, als we voor patronen een diagram hebben, dan plaatsen we het online.
06.04.2015 - 15:26
![]() Bárbara wrote:
Bárbara wrote:
No entiendo como puedo montar *10 p.a., saltar 1 cad, 11 p.a., saltar 1 cad, 1 grupo de motivos, saltar 1 cad, 11 p.a., saltar 1 cad, 10 p.a., saltar 1 cad, 1 grupo de motivos y saltar 1 cad.* que según mis cálculos son 56 puntos, sobre las 50 cadenas que se han dejado para la sisa. ¿Cuál es la razón para saltar cadenas? Muchas gracias por su ayuda. Un saludo
03.04.2015 - 13:55DROPS Design answered:
Hola Bárbara, 10+1+11+1+1+1+11+1+10+1+1+1 son 50. Repasa los cálculos a ver si has hecho algo mal. Las cadenas se saltan para ajustar la medida.
05.04.2015 - 11:29
![]() Hélène wrote:
Hélène wrote:
Bonjour, Merci de votre réponse mais j'avais bien lu ce que vous me répondez : ce que je ne comprends pas c'est pourquoi, lorsqu'on crochète l'emmanchure gauche, à la fin on a un motif et que s'enchaîne tout de suite un motif du cercle initial alors que ce n'est pas le cas pour l'emmanchure droite... Merci !
20.03.2015 - 18:26DROPS Design answered:
Bonjour Hélène, au tour 25 (sur l'envers), vous avez sauté (1 groupe de motif, 1 groupe de B, 1 groupe de motif, 1 groupe de B) pour chaque emmanchure (remplacés par 50 ml à chaque fois), au tour 26 (sur l'endroit), vous crochetez au-dessus de chaque chaînette : 1 groupe de B, 1 groupe de motif, 1 groupe de B, 1 groupe de motif - vérifiez peut-être l'emplacement de votre emmanchure droite au tour 25. Bon crochet!
21.03.2015 - 10:27
|
|
Winter Solstice#wintersolsticecardigan |
|
 |
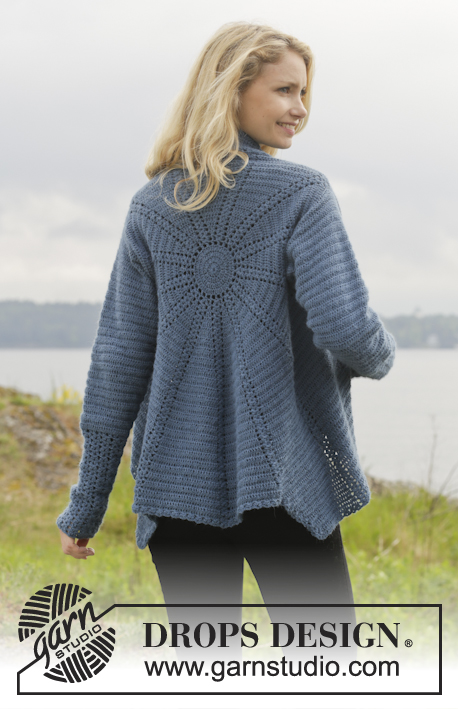 |
Crochet DROPS jacket worked in a circle in "Alpaca". Size: S - XXXL.
DROPS 158-10 |
|
|
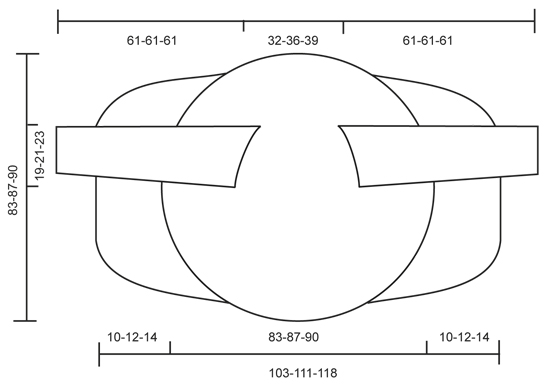
CROCHET INFO: Beg every round/row with 3 ch that replace 1st dc and finish every round/row with 1 sl st in 3rd ch from beg of round/row. PATTERN GROUP: Each pattern group consists of: ch 1, 2 dc WORKED TOG - see explanation below, ch 2, 2 dc worked tog and 1 ch. DC WORKED TOG: * Make 1 YO, insert hook in ch-space, get yarn, make a YO, pull through 2 of the sts on hook *, repeat from *-* one more time, make 1 YO and pull yarn through all 3 sts on hook. CROCHET 3 dc TOG: Work 3 dc into 1 dc at beg of row as follows: Work 2 ch (= replace 1 dc), work 1 dc, but wait with last pull through (= 2 strands on hook), then work next dc but on last pull through, pull yarn through all sts on hook. DECREASE TIP (applies to sleeves): Dec at beg of row by working 1 sl st over the dc to be dec. Dec at end of row by working until 1 dc to be dec remains, turn piece. -------------------------------------------------------- CIRCLE: Work 5 ch on hook size 3.5 mm/E with Alpaca and form a ring with 1 sl st in first ch. READ CROCHET INFO. ROUND 1: Work 13 dc in ch-ring. ROUND 2: Work * 2 dc in every dc*, repeat from *-* the entire round = 26 dc. ROUND 3: Work * 2 dc in first dc, then 1 dc in next dc *, repeat from *-* the entire round = 39 dc. ROUND 4: Work * 2 dc in first dc, then 1 dc in each of the next 2 dc *, repeat from *-* the entire round = 52 dc. ROUND 5: Work * 1 dc in next dc, then ch 2, skip 1 dc *, repeat from *-* the entire round = 26 ch-spaces and 26 dc. REMEMBER THE CROCHET GAUGE! ROUND 6: In first dc work PATTERN GROUP - see explanation above, * 1 dc in next dc, 1 pattern group in next dc *, repeat from *-* until 1 dc remains, 1 dc in last dc = 13 pattern groups with 1 dc between each. Then work piece back and forth. Work every row tog at the end of row with 1 sl st in first st on row. Turn piece. ROW 7 (= from WS): 2 dc in first dc, * 1 pattern group in next pattern group, 2 dc in next dc (= dc-group) *, repeat from *-* until 1 pattern group from previous row remains, 1 pattern group = 13 pattern groups with 13 dc-groups between each. Turn piece. ROW 8: 1 pattern groups in first pattern group, * 2 dc in first dc, 1 dc in each of the next dc in dc-group, 1 pattern group in next pattern group *, repeat from *-* until 1 dc-group remains, 2 dc in first dc, 1 dc in each of the next dc in dc-group = 13 groups with 3 dc between each. Turn piece. ROW 9: 2 dc in first dc, 1 dc in each of the next dc in dc-group, * 1 pattern group in pattern group, 2 dc in first dc of dc-group, 1 dc in each of the next dc *, repeat from *-* until 1 pattern group from previous row remains, 1 pattern group = 13 groups with 4 dc between each. Turn piece. Then repeat 8th and 9th row until 6 rounds + 18-20-22 rows have been worked (= 19-21-23 dc between every pattern group) = 247-273-299 dc and 13 pattern group. Piece measures approx. 20-22-23 cm / 8"-8¾"-9" from middle and outwards. Now work armholes as follows in the different sizes: SIZE S/M: ROW 25 (= from WS): Inc in every groups with dc as before. Work 20 dc, 1 pattern group, 20 dc, work 50 loose ch (= right armhole), skip 2 dc-groups and 2 pattern groups. Then work dc-groups and pattern groups as before over the next 114 dc, work 50 loose ch (= left armhole), skip 2 dc-groups and 2 pattern groups, work as before the rest of row, finish with 1 sl st in first dc on row = 180 dc and 100 ch. Turn piece. ROW 26: Continue with pattern and inc as before but work first ch-row (= left armhole) as follows: 10 dc, skip ch 1, 11 dc, skip ch 1, 1 pattern group, skip ch 1, 11 dc, skip ch 1, 10 dc, skip ch 1, 1 pattern group and skip 1 ch. I next ch-row (= right armhole) work the same way but in opposite order, i.e. beg by skipping ch 1, 1 pattern group and finish with dc = 273 dc. ROW 27-50: Work pattern as before but now inc only on even numbered rows until 50 rows have been worked in total = 429 dc (33 dc in every dc-group). Piece measures approx. 42 cm / 16½" from middle and outwards. Fasten off. SIZE L/XL: ROW 27 (= from WS): Inc in every groups with dc as before. Work 22 dc, 1 pattern group, 22 dc, work 54 loose ch (= right armhole), skip 2 dc-groups and 2 pattern groups. Then work pattern as before over the next 126 dc, work 54 loose ch (= left armhole), skip 2 dc-groups and 2 pattern groups, work as before the rest of row, finish with 1 sl st in first dc on row = 198 dc and 108 ch. Turn piece. ROW 28: Continue with pattern and inc as before but work first ch-row (= left armhole) as follows: 11 dc, skip ch 1, 12 dc, skip ch 1, 1 pattern group, skip ch 1, 12 dc, skip ch 1, 11 dc, skip ch 1, 1 pattern group and skip 1 ch. I second ch-row (= right armhole) work the same way but in opposite order, i.e. beg by skipping ch 1, 1 pattern group and finish with dc = 299 dc. ROW 29-52: Work pattern as before but now inc only on even numbered rows until 52 rows have been worked in total = 455 dc (35 dc in every dc-group). Piece measures approx. 43 cm / 17" from middle and outwards. Fasten off. SIZE XXL/XXXL: ROW 29 (= from WS): Inc in every groups with dc as before. Work 24 dc, 1 pattern group, 24 dc, work 58 loose ch (= right armhole), skip 2 dc-groups and 2 pattern groups. Then work pattern as before over the next 138 dc, work 58 loose ch (= left armhole), skip 2 dc-groups and 2 pattern groups, work as before the rest of row, finish with 1 sl st in first pattern group on row = 216 dc and 116 ch. Turn piece. ROW 30: Continue with pattern and inc as before but work first ch-row (= left armhole) as follows: 12 dc, skip ch 1, 13 dc, skip ch 1, 1 pattern group, skip ch 1, 13 dc, skip ch 1, 12 dc, skip ch 1, 1 pattern group and skip 1 ch. I second ch-row (= right armhole) work the same way but in opposite order, i.e. beg by skipping ch 1, 1 pattern group and finish with dc = 325 dc. ROW 31-54: Work pattern as before but now inc only on even numbered rows until 54 rows have been worked in total = 481 dc and 37 dc in every dc-group. Piece measures approx. 45 cm / 17¾" from middle and outwards. Fasten off. ALL SIZES: Insert 4 markers in the piece as follows from WS: Work 16-17-18, insert 1st marker here, work 17-18-19 dc, * 1 pattern group, 33-35-37 dc *, repeat from *-* 3 more times, insert 2nd marker here (1st-2nd marker = right front piece). Work 1 pattern group, 33-35-37 dc, 1 pattern group, 33-35-37 dc and 1 pattern group, insert 3rd marker here. * Work 33-35-37 dc, 1 pattern group *, repeat from *-* 3 more times, 17-18-19 dc, insert 4th marker. (3rd-4th marker = left front piece). Work the rest of row. Sts between 1st and 4th marker are up towards neck. Cut the yarn and fasten. RIGHT FRONT PIECE: Now work right front piece between 1st and 2nd marker, beg from 2nd marker (i.e. from RS) = 149-158-167 dc and 4 pattern groups. Continue inc on every row in dc-groups as before BUT do not inc in dc-groups in each side of front piece - AT THE SAME TIME dec 2 dc at beg of every row by CROCHET 3 dc TOG - see explanation above. Continue to work until 12-14-16 rows have been worked over front piece. Cut the yarn and fasten. LEFT FRONT PIECE: Work left front piece between 3rd and 4th marker the same way as right front piece, beg from 4th marker (i.e. from RS). SLEEVES: Work back and forth from armhole and down, work every row tog with 1 sl st at the end of row. Use hook size 3.5 mm and Alpaca. Beg by working 86-94-102 dc around the opening for sleeve, beg of row should be under sleeve. Then work 3 rows with 1 dc in every dc. Continue with 1 dc in every dc - AT THE SAME TIME dec in the different sizes as follows: READ DECREASE TIP! SIZE S/M: Dec 1 st in each side of piece every other row 4 times and then every 3rd row 12 times (= 16 times in total) = 54 dc. SIZE L/XL: Dec 1 st in each side of piece alternately every 3rd and 2nd row 18 times in total = 58 dc. SIZE XXL/XXXL: Dec 1 st in each side of piece every other row 17 times and then every 3rd row 4 times (= 21 times in total) = 60 dc. Then work pattern groups as follows: ROW 1: 2 dc, 1 ch * work the next 2 dc tog, 1 ch *, repeat from *-* and finish with 2 dc. ROW 2: Work 2 dc, * in next ch work 1 pattern group, skip 1 ch *, repeat from *-*, and finish with 1 dc in each of the last 2 dc. Turn piece. ROW 3: Work 2 dc, 1 pattern group in each of the next pattern groups until 2 dc remain, work 1 dc in each of these. Turn piece. Repeat 3rd row until piece measures approx. 61 cm / 24" in all sizes. Fasten off. CROCHET EDGE: Work 1 round with around the entire jacket as follows: * 1 pattern group, skip 2 dc/1 row *, repeat from *-* the entire round. |
|
 |
|
Have you finished this pattern?Tag your pictures with #dropspattern #wintersolsticecardigan or submit them to the #dropsfan gallery. Do you need help with this pattern?You'll find 8 tutorial videos, a Comments/Questions area and more by visiting the pattern on garnstudio.com. © 1982-2026 DROPS Design A/S. We reserve all rights. This document, including all its sub-sections, has copyrights. Read more about what you can do with our patterns at the bottom of each pattern on our site. |
|


With over 40 years in knitting and crochet design, DROPS Design offers one of the most extensive collections of free patterns on the internet - translated to 17 languages. As of today we count 324 catalogs and 12290 patterns - 12280 of which are translated into English (US/in).
We work hard to bring you the best knitting and crochet have to offer, inspiration and advice as well as great quality yarns at incredible prices! Would you like to use our patterns for other than personal use? You can read what you are allowed to do in the Copyright text at the bottom of all our patterns. Happy crafting!
Post a comment to pattern DROPS 158-10
We would love to hear what you have to say about this pattern!
If you want to leave a question, please make sure you select the correct category in the form below, to speed up the answering process. Required fields are marked *.