
Popular categories
Looking for a yarn?


Comments / Questions (71)
![]() Epi wrote:
Epi wrote:
Hallo, Gibt es für dieses wunderschöne Modell auch eine Anleitung mit langen Ärmeln?
11.11.2014 - 20:12DROPS Design answered:
Liebe Epi, dies ist ein Sommermodell und bedauerlicherweise können wir mit einer Variante mit Ärmeln nicht dienen. Das Top kann aber auch gut über einem Longsleeve getragen werden. Ansonsten stöbern Sie einfach bei den Pullovern, vielleicht gefällt Ihnen dort ein Modell ähnlich gut.
11.11.2014 - 23:30
![]() Jill wrote:
Jill wrote:
Can you please tell me the corresponding body measurements for S,M,L,XL and XXL in your patterns? I have looked for a chart on your tips and help section but can not find anything. Thank you!
15.10.2014 - 16:19DROPS Design answered:
Dear Jill, you will find at the bottom of the pattern a measurement chart with all measures for each size, taken flat from side to side. Compare these to a similar garment you like the shape to find out the matching size. Happy knitting!
15.10.2014 - 16:39
![]() Soraia wrote:
Soraia wrote:
Ola boa tsrde, preciso imenso da vossa ajuda. regulo-me por qual numero? tenho 200 malhas Na carreira seguinte, diminuir 1 m/p a cada marcador – ver DIMINUIÇÕES = 4 diminuições. NOTA! O número de ms/pts a meio da frente e a meio das costas é o mesma, as diminuições fazem-se nos lados. Repetir estas diminuições mais 6-7-7-9-8-6 vezes a cada 8 -8 -8 -6 -6 -8 carreiras (= 7-8-8-10-9-7 diminuições ao todo) = restam 152-168-188-200-224-252 ms/pts.
04.10.2014 - 16:17DROPS Design answered:
Bom dia, Deve regular-se sempre pelo 2.º número Repetir estas diminuições mais 7 vezes a cada 8 carreiras (8 diminuições ao todo) : restam 168 ms/pts
10.10.2014 - 11:06
![]() Nancy wrote:
Nancy wrote:
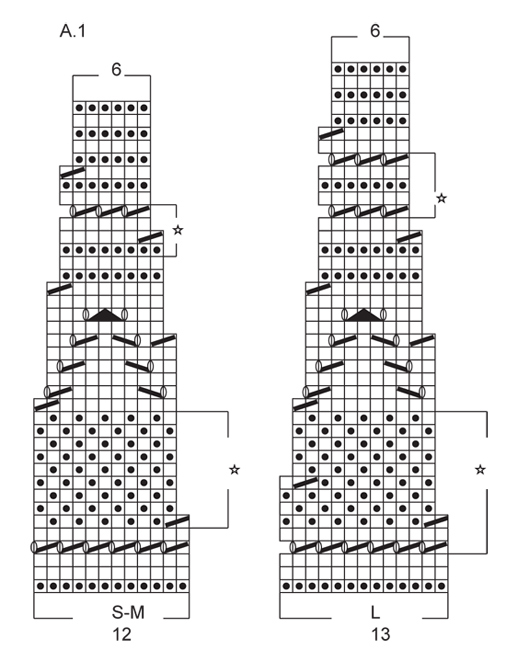
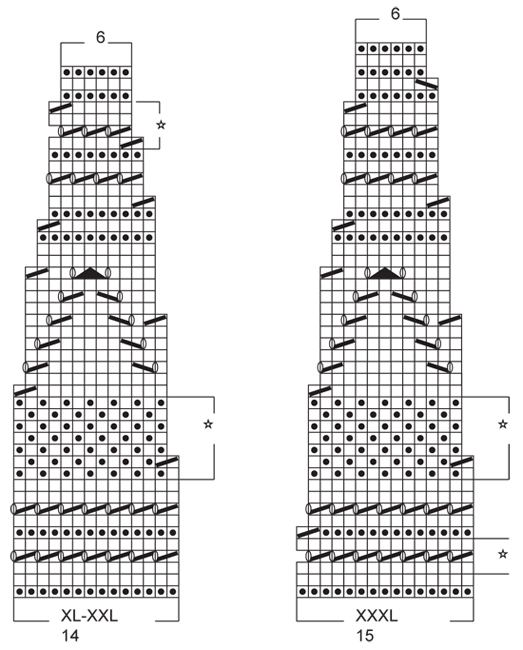
On section A-1 there are 9 rows that are in brackets with a star on the side. What does that mean? I can't find any explanation.
11.08.2014 - 17:50DROPS Design answered:
Dear Nancy, the star in diagram means "pattern in diagram does not fit the repetition but fits no of sts on the entire top" (in diagram text). Happy knitting!
12.08.2014 - 11:57
![]() Marianne Romijn wrote:
Marianne Romijn wrote:
Bij de eerste minderingen in de pas zit volgens mij een fout: er komen 2 rechte steken na elkaar bij de 2e mindering in de toer ( je eindigt steek 14 met recht en moet dan 2 recht samenbreien. hoe nu verder?
11.08.2014 - 16:33DROPS Design answered:
Kunt u ons vertellen welke maat u breit?
01.09.2014 - 16:39
![]() Edith wrote:
Edith wrote:
Hvordan skal jeg forstå "Samtidig med at der i tillæg tages xx m ind jævnt fordelt i r m. Er der bare jævnt ind over alle masker lige inden bærestykket skal strikkes?
30.07.2014 - 16:40DROPS Design answered:
Hej Edith. Ja, du skal bare tage jævnt ind over alle masker. Skal du f.eks. tage 8 m ind (str S) over de 2 x 80 masker (for- og bagstykke), så tager du 4 m ind på hvert stykke = ca 20 m imellem hver indtagning.
04.08.2014 - 15:56
![]() Annamaria wrote:
Annamaria wrote:
Buonasera.Sono arrivata alla sezione degli intrecci per le maniche,ma la spiegazione per me non mi è chiara,cosa devo fare per prima intrecciare ma al prossimo giro come posso diminuire le maglie? grazie
18.07.2014 - 16:16DROPS Design answered:
Buonasera Annamaria. Deve intrecciare per gli scalfi e, nel corso dello stesso giro, diminuire il numero di m indicato per la sua taglia, a intervalli regolari, sulle m del davanti e del dietro. Buon lavoro!
18.07.2014 - 22:24
![]() Annamaria wrote:
Annamaria wrote:
Dato che nell'istruzione c'è scritto che si comincia dal secondo segna punti per poi finire dal 1 al 3 segnapunti,quindi essendo in tondo sono nel giro seguente o no? grazie
14.07.2014 - 07:32DROPS Design answered:
Buongiorno Annamaria, nelle istruzioni è indicato di diminuire sul giro successivo, all'altezza di tutti i segnapunti,quindi 4 diminuzioni sul giro; nel suggerimento per le diminuzioni viene indicato come fare. Buon lavoro!!
14.07.2014 - 17:58
![]() Annamaria wrote:
Annamaria wrote:
Buongiorno,sono arrivata alle prime diminuzione,diminuire il 2 e 4 segnapunti e cosi via.ma diminuendo il primo e il terzo segnapunti viene nel secondo giro? dove sbaglio grazie
13.07.2014 - 10:44DROPS Design answered:
Buonasera Annamaria, le diminuzioni vanno fatte tutte sullo stesso ferro come indicato nel suggerimento per le diminuzioni. Ci riscriva se ha altri dubbi. Buon lavoro!!
13.07.2014 - 21:30
![]() Annamaria wrote:
Annamaria wrote:
Buonasera,non ho capito :spostare il marca punto verso l'alto durante il lavoro grazie
11.07.2014 - 20:51DROPS Design answered:
Buonasera Annamaria, durante il lavoro deve passare il segnapunti dal ferro sinistro al destro, in modo che segua il lavoro. Buon lavoro!!
12.07.2014 - 15:24
|
||||||||||||||||||||||
Sunny Side#sunnysidetop |
||||||||||||||||||||||
|
|
||||||||||||||||||||||
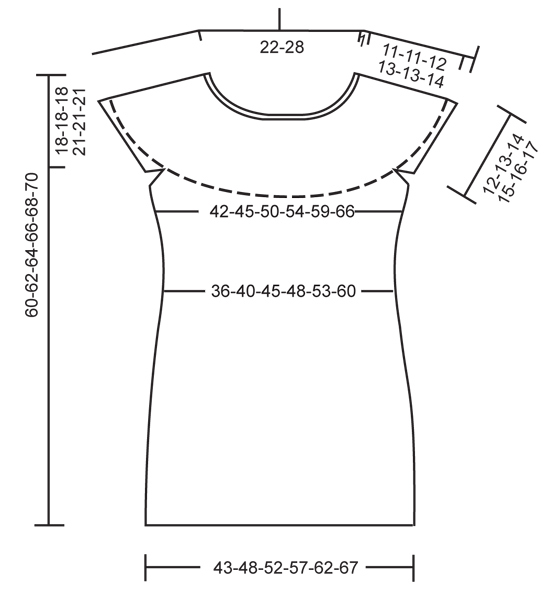
Knitted DROPS top with lace pattern and round yoke in ”Muskat” or "Belle". Size: S - XXXL.
DROPS 152-9 |
||||||||||||||||||||||
|
GARTER ST (back and forth on needle): K all rows. 1 ridge = K2 rows. GARTER ST (in the round on circular needle): * K 1 round and P 1 round *, repeat from *-*. 1 ridge = 2 rounds. PATTERN: See diagram A.1. See diagram for correct size. DECREASE TIP: Dec 1 st after 2nd and 4th marker as follows: K 2 tog. Dec 1 st before 1st and 3rd marker as follows: Work until 2 sts remain before marker, slip 1 st as if to K, K 1, psso. INCREASE TIP: Inc 1 st after 2nd and 4th marker as follows: Make 1 YO. Inc 1 st before 1st and 3rd marker as follows: Make 1 YO. On next round K YO twisted (i.e. work in back loop of YO instead of front) to avoid holes. ---------------------------------------------------------- BODY: Worked in the round on circular needle. Cast on 180-200-220-240-260-280 sts on circular needle size 3.5 mm / US 4 with Muskat or "Belle". Work 4 ridges in GARTER ST - see explanation above. Switch to circular needle size 4 mm / US 6. Work in stockinette st until piece measures 7 cm / 2¾". REMEMBER THE GAUGE! Now insert 4 markers in the piece as follows: K 25-30-30-35-35-40, insert 1 marker (= 1st marker), K 40-40-50-50-60-60, insert 1 marker (= 2nd marker), K 50-60-60-70-70-80, insert 1 marker (= 3rd marker), K 40-40-50-50-60-60, insert 1 marker (= 4th marker), finish with K 25-30-30-35-35-40. Move the markers upwards when working. On next round, dec 1 st at every marker – Read DECREASE TIP = 4 sts dec. NOTE! No of sts mid front and mid back is the same, dec in side sts. Repeat dec every 8th-8th-8th-6th-6th-8th round 6-7-7-9-8-6 more times (= 7-8-8-10-9-7 dec in total) = 152-168-188-200-224-252 sts on needle. Continue in stockinette st until piece measures 32 cm / 12½". On next round, inc 1 st at every marker – Read INCREASE TIP = 4 sts inc. NOTE! No of sts mid front and mid back is the same, inc in side sts. Repeat inc every 4th-6th-6th-4th-6th-8th round 5-4-5-6-5-5 more times (= 6-5-6-7-6-6 times in total) = 176-188-212-228-248-276 sts on needle. Continue in stockinette st until piece measures 41-43-45-44-46-48 cm / 16"-17"-17¾"-17¼"-18"-19". Then work 1 ridge in garter st over all sts. READ ALL OF THE FOLLOWING SECTION BEFORE CONTINUING! Now bind off for sleeve on next round as follows: bind off the first 4 sts, K 80-86-98-106-116-130, bind off the next 8 sts, K 80-86-98-106-116-130, bind off the last 4 sts AT THE SAME TIME dec 8-16-13-4-32-29 sts evenly in K sts = 152-156-183-208-200-231 sts on needle. Fasten off. Put piece aside and knit the sleeve edges. SLEEVE EDGE: Worked back and forth on circular needle. Cast on 54-58-62-68-72-76 sts on circular needle size 3.5 mm / US 4 with Muskat or "Belle". Work 2 ridges in GARTER ST – see explanation above, AT THE SAME TIME on 1st row dec 4 sts evenly (this is done to avoid a tight edge on sleeve) = 50-54-58-64-68-72 sts on needle. Fasten off. Put piece aside and Make another sleeve edge. YOKE: Slip sleeve edges on to same circular needle size 4 mm / US 6 as body where armholes were bind off = 252-264-299-336-336-375 sts on needle (do not work sts when slipping them on same needle). Work diagram A.1(= 12-12-13-14-14-15 sts) – see explanation above – over all sts (= 21-22-23-24-24-25 repetitions in width). Continue pattern like this. After all dec are done, 126-132-138-144-144-150 sts remain on needle. Bind off. ASSEMBLY: Sew sleeve edges (i.e. the 2 ridges) to the first 2 sts on body where bound off for sleeve in each side. |
||||||||||||||||||||||
Diagram explanations |
||||||||||||||||||||||
|
||||||||||||||||||||||
 |
||||||||||||||||||||||
 |
||||||||||||||||||||||
 |
||||||||||||||||||||||
Have you finished this pattern?Tag your pictures with #dropspattern #sunnysidetop or submit them to the #dropsfan gallery. Do you need help with this pattern?You'll find 20 tutorial videos, a Comments/Questions area and more by visiting the pattern on garnstudio.com. © 1982-2026 DROPS Design A/S. We reserve all rights. This document, including all its sub-sections, has copyrights. Read more about what you can do with our patterns at the bottom of each pattern on our site. |
||||||||||||||||||||||


With over 40 years in knitting and crochet design, DROPS Design offers one of the most extensive collections of free patterns on the internet - translated to 17 languages. As of today we count 325 catalogs and 12298 patterns - 12288 of which are translated into English (US/in).
We work hard to bring you the best knitting and crochet have to offer, inspiration and advice as well as great quality yarns at incredible prices! Would you like to use our patterns for other than personal use? You can read what you are allowed to do in the Copyright text at the bottom of all our patterns. Happy crafting!
Post a comment to pattern DROPS 152-9
We would love to hear what you have to say about this pattern!
If you want to leave a question, please make sure you select the correct category in the form below, to speed up the answering process. Required fields are marked *.