
Popular categories
Looking for a yarn?


Comments / Questions (71)
![]() Lara wrote:
Lara wrote:
Così però dovrò fare 47 giri anziché 38 (per la taglia S), non verrà troppo grande??
08.03.2019 - 09:12DROPS Design answered:
Buongiorno Lara. Se il suo filato è più sottile, molto probabilmente anche la tensione in verticale è più piccola. Quindi un numero maggiore di righe potrebbe andare bene lo stesso. Eventualmente può modificare il diagramma adattandolo (nel numero di righe) a quello della taglia S. Buon lavoro!
08.03.2019 - 09:47
![]() Lara wrote:
Lara wrote:
Buongiorno, chiedo un ultimo aiuto! Ho usato un filato più fine e mi ritrovo con 315 m. anziché 252, posso comunque usare lo schema per taglia S suddividendo per 15 maglie anziché 12m. oppure dovrò usare lo schema per taglia XXXL? Inoltre lo schema si legge da destra a sinistra o viceversa? Vi ringrazio sempre molto!
08.03.2019 - 08:46DROPS Design answered:
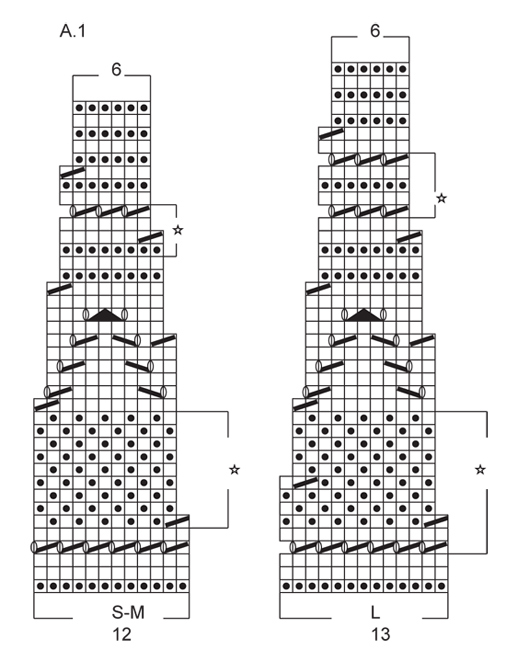
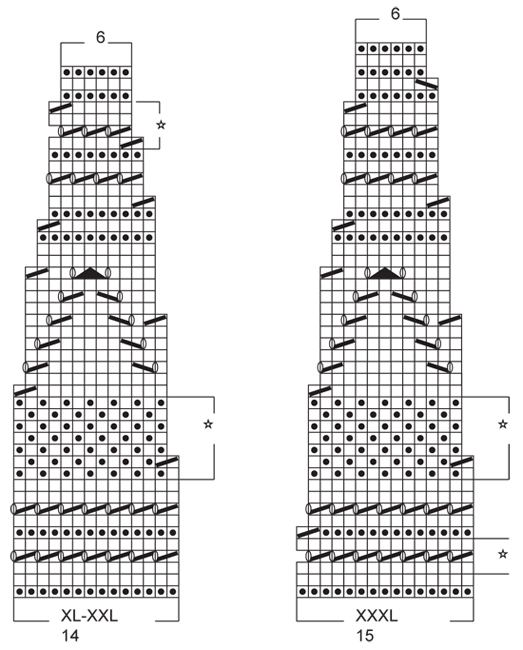
Buongiorno Lara. Avendo 315 maglie può seguire lo schema per la taglia XXXL, in modo da avere ripetizioni intere del motivo. Il diagramma viene letto dal basso verso l'alto e da destra verso sinistra. Buon lavoro!
08.03.2019 - 08:59
![]() Lara wrote:
Lara wrote:
Buonasera, al cm. 41 devo intrecciare le maglie, vorrei sapere da quale segna punto iniziare, credo il primo che ho messo dopo le 25 m. (per la taglia S), potete darmene conferma? Grazie!
01.03.2019 - 17:43DROPS Design answered:
Buongiorno Lara. Il giro inizia sul lato. Deve iniziare intrecciando le prime 4 m sul giro. Potrebbe considerare di iniziare intrecciando le ultime 4 m del giro precedente: in questo caso intreccia 8 m, ne lavora 80, intreccia 8 m e lavora le ultime 80 m. Buon lavoro!
01.03.2019 - 17:57
![]() Lara wrote:
Lara wrote:
Buonasera, nella parte del bordo delle maniche, verso la fine scrivete "Affrancare" e poi mettere in sospeso, ma Affrancare cosa vuol dire? Grazie per le sempre cortesi risposte!
11.02.2019 - 16:53DROPS Design answered:
Buonasera Lara, affrancare vuol dire fermare i fili, poi passa a lavorare l'altro bordo delle maniche. Buon lavoro!
11.02.2019 - 16:58
![]() Canel wrote:
Canel wrote:
Bonjour, vous dites :( Rabattre les 4 premières m, tricoter 80-86-98-106-116-130 m end, rabattre les 8 m suiv, tricoter 80-86-98-106-116-130 m end, rabattre les 4 dernières m, EN MÊME TEMPS, répartir 8-16-13-4-32-29 diminutions dans les m tricotées à l'end) est ce qu'il faut utiliser les memes explications du debut pour les diminutions et rmet les marqueurs. merci
24.10.2018 - 07:05DROPS Design answered:
Bonjour Mme Canel, vous diminuez 8-16-13-4-32-29 mailles à intervalles réguliers au-dessus des 80-86-98-106-116-130 m end tricotées pour le devant et le dos, pour diminuer 1 m, tricoter 2 m ens à l'end, essayez de bien diminuer le même nombre de mailles pour le devant et le dos. Bon tricot!
24.10.2018 - 08:46
![]() Elaine Greywalker wrote:
Elaine Greywalker wrote:
There are decreases shown in the starred sections. Do i decrease once or are those repeated decreases?
01.06.2018 - 00:54DROPS Design answered:
Dear Mrs Greywalker, repeat the dec in every repeat in the round as shown in diagram. Happy knitting!
01.06.2018 - 08:41
![]() Laurie wrote:
Laurie wrote:
Do you think this would work in yarn that is 60% merino/40% silk? The needle size for the yarn is in the right range and I'd test the gauge. I'm newer to switching up patterns and yarn and just wanted to check. It's yarn I got from a local sheep/wool festival. Thanks in advance.
14.05.2018 - 18:16DROPS Design answered:
Dear Laurie, We are able to provide free patterns thanks to our yarns sold throughout the world. You will therefore understand that we can only recomand you to contact our DROPS Store in USA for any further help & assistance. Thank you for your comprehension.
15.05.2018 - 08:30
![]() Paula Dominique wrote:
Paula Dominique wrote:
Thank you, Drops! It now makes sense!❤
09.05.2018 - 15:03
![]() Paula Dominique wrote:
Paula Dominique wrote:
Size M. Two sections of 40 stitches each, two sections containing 60 stitches. If 60 stitch sectiins are front and back, starting point of round is center back. If decreases made BEFORE 1st marker and AFTER 2nd, they will occur in front and back rather than sides as directed.
08.05.2018 - 18:50DROPS Design answered:
Dear Mrs Dominique, round is here starting on the side, markers are placed on mid front on either side of 40 sts (= there are 60 sts on each side). You will then dec before 1st and 3rd marker and after 2nd and 4th marker, you should still have 40 sts on mid front and mid back, the 60 sts on each side will be dec to 58 sts after 1st dec. Happy knitting!
09.05.2018 - 08:08
![]() Nicole wrote:
Nicole wrote:
* es sind natürlich 23 Rapporte, aber trotzdem ungerade...
06.09.2017 - 22:39
|
||||||||||||||||||||||
Sunny Side#sunnysidetop |
||||||||||||||||||||||
|
|
||||||||||||||||||||||
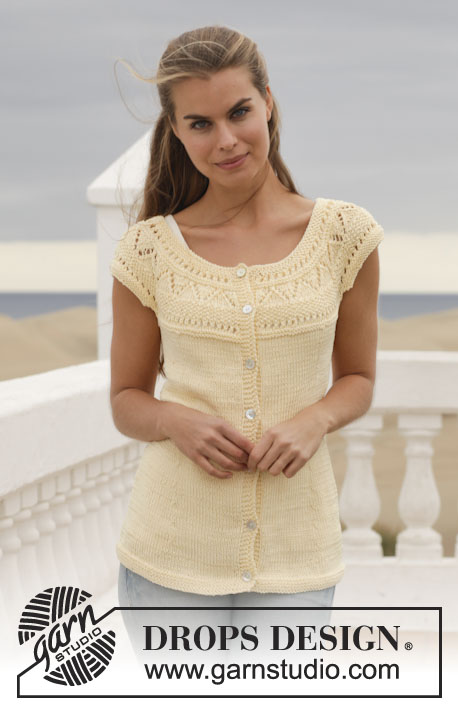
Knitted DROPS top with lace pattern and round yoke in ”Muskat” or "Belle". Size: S - XXXL.
DROPS 152-9 |
||||||||||||||||||||||
|
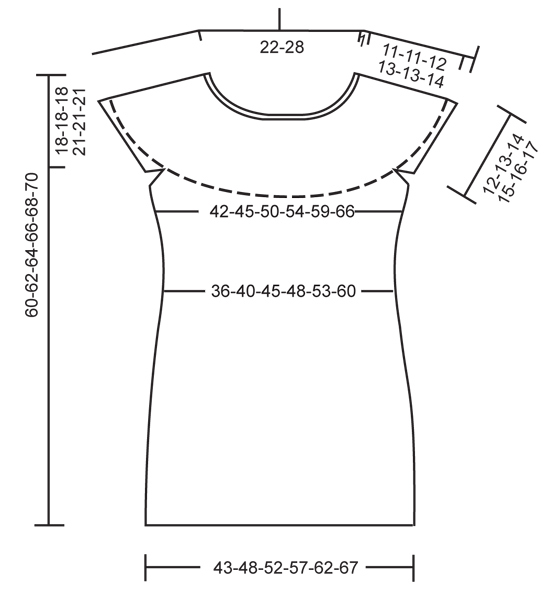
GARTER ST (back and forth on needle): K all rows. 1 ridge = K2 rows. GARTER ST (in the round on circular needle): * K 1 round and P 1 round *, repeat from *-*. 1 ridge = 2 rounds. PATTERN: See diagram A.1. See diagram for correct size. DECREASE TIP: Dec 1 st after 2nd and 4th marker as follows: K 2 tog. Dec 1 st before 1st and 3rd marker as follows: Work until 2 sts remain before marker, slip 1 st as if to K, K 1, psso. INCREASE TIP: Inc 1 st after 2nd and 4th marker as follows: Make 1 YO. Inc 1 st before 1st and 3rd marker as follows: Make 1 YO. On next round K YO twisted (i.e. work in back loop of YO instead of front) to avoid holes. ---------------------------------------------------------- BODY: Worked in the round on circular needle. Cast on 180-200-220-240-260-280 sts on circular needle size 3.5 mm / US 4 with Muskat or "Belle". Work 4 ridges in GARTER ST - see explanation above. Switch to circular needle size 4 mm / US 6. Work in stockinette st until piece measures 7 cm / 2¾". REMEMBER THE GAUGE! Now insert 4 markers in the piece as follows: K 25-30-30-35-35-40, insert 1 marker (= 1st marker), K 40-40-50-50-60-60, insert 1 marker (= 2nd marker), K 50-60-60-70-70-80, insert 1 marker (= 3rd marker), K 40-40-50-50-60-60, insert 1 marker (= 4th marker), finish with K 25-30-30-35-35-40. Move the markers upwards when working. On next round, dec 1 st at every marker – Read DECREASE TIP = 4 sts dec. NOTE! No of sts mid front and mid back is the same, dec in side sts. Repeat dec every 8th-8th-8th-6th-6th-8th round 6-7-7-9-8-6 more times (= 7-8-8-10-9-7 dec in total) = 152-168-188-200-224-252 sts on needle. Continue in stockinette st until piece measures 32 cm / 12½". On next round, inc 1 st at every marker – Read INCREASE TIP = 4 sts inc. NOTE! No of sts mid front and mid back is the same, inc in side sts. Repeat inc every 4th-6th-6th-4th-6th-8th round 5-4-5-6-5-5 more times (= 6-5-6-7-6-6 times in total) = 176-188-212-228-248-276 sts on needle. Continue in stockinette st until piece measures 41-43-45-44-46-48 cm / 16"-17"-17¾"-17¼"-18"-19". Then work 1 ridge in garter st over all sts. READ ALL OF THE FOLLOWING SECTION BEFORE CONTINUING! Now bind off for sleeve on next round as follows: bind off the first 4 sts, K 80-86-98-106-116-130, bind off the next 8 sts, K 80-86-98-106-116-130, bind off the last 4 sts AT THE SAME TIME dec 8-16-13-4-32-29 sts evenly in K sts = 152-156-183-208-200-231 sts on needle. Fasten off. Put piece aside and knit the sleeve edges. SLEEVE EDGE: Worked back and forth on circular needle. Cast on 54-58-62-68-72-76 sts on circular needle size 3.5 mm / US 4 with Muskat or "Belle". Work 2 ridges in GARTER ST – see explanation above, AT THE SAME TIME on 1st row dec 4 sts evenly (this is done to avoid a tight edge on sleeve) = 50-54-58-64-68-72 sts on needle. Fasten off. Put piece aside and Make another sleeve edge. YOKE: Slip sleeve edges on to same circular needle size 4 mm / US 6 as body where armholes were bind off = 252-264-299-336-336-375 sts on needle (do not work sts when slipping them on same needle). Work diagram A.1(= 12-12-13-14-14-15 sts) – see explanation above – over all sts (= 21-22-23-24-24-25 repetitions in width). Continue pattern like this. After all dec are done, 126-132-138-144-144-150 sts remain on needle. Bind off. ASSEMBLY: Sew sleeve edges (i.e. the 2 ridges) to the first 2 sts on body where bound off for sleeve in each side. |
||||||||||||||||||||||
Diagram explanations |
||||||||||||||||||||||
|
||||||||||||||||||||||
 |
||||||||||||||||||||||
 |
||||||||||||||||||||||
 |
||||||||||||||||||||||
Have you finished this pattern?Tag your pictures with #dropspattern #sunnysidetop or submit them to the #dropsfan gallery. Do you need help with this pattern?You'll find 20 tutorial videos, a Comments/Questions area and more by visiting the pattern on garnstudio.com. © 1982-2026 DROPS Design A/S. We reserve all rights. This document, including all its sub-sections, has copyrights. Read more about what you can do with our patterns at the bottom of each pattern on our site. |
||||||||||||||||||||||


With over 40 years in knitting and crochet design, DROPS Design offers one of the most extensive collections of free patterns on the internet - translated to 17 languages. As of today we count 325 catalogs and 12298 patterns - 12288 of which are translated into English (US/in).
We work hard to bring you the best knitting and crochet have to offer, inspiration and advice as well as great quality yarns at incredible prices! Would you like to use our patterns for other than personal use? You can read what you are allowed to do in the Copyright text at the bottom of all our patterns. Happy crafting!
Post a comment to pattern DROPS 152-9
We would love to hear what you have to say about this pattern!
If you want to leave a question, please make sure you select the correct category in the form below, to speed up the answering process. Required fields are marked *.