
Popular categories
Looking for a yarn?


Comments / Questions (56)
![]() Sabrina wrote:
Sabrina wrote:
Le spiegazioni del punto sono corrette ma manca un punto si deve partire con 56 punti numero divisibile per 3 se si tolgono le due maglie a legaccio..così sono riuscita!
20.09.2013 - 06:42
![]() Sabrina wrote:
Sabrina wrote:
Queste spiegazioni non sono corrette non mi vengono le righe cosi
17.09.2013 - 21:00DROPS Design answered:
Buonasera Sabrina, le spiegazioni del modello sono corrette, è sicura di aver seguito attentamente le istruzioni e i colori da usare per i diversi ferri? Nel caso ci può riscrivere descrivendo meglio il suo problema, o mandare una mail con la foto del suo lavoro a italy@garnstudio.com. Buon lavoro!
17.09.2013 - 23:11
![]() Emma wrote:
Emma wrote:
I cannot seem to get this pattern correct. YO, to me means wrap the yarn over the needle and knit or purl. In your pattern, this does not apply. Yfwd seems the correct term, but again I am finding that I do not have the correct number of stitches and end up decreasing. Please can you advise? I have a deadline with this item and it is a gift.
15.07.2013 - 21:47DROPS Design answered:
Dear Emma, you are correct, working with thread in the right hand, the YO will be here Yfwd (so that yarn wrap around needle as for a YO). You cast on more sts than required for english ribs so that edge is not too tight, eg in 1st size, work 1st row :1 garter st, (P1, P2tog) x 23 times, P1, 1 garter st. Happy knitting!
16.07.2013 - 10:06
![]() Sissel wrote:
Sissel wrote:
Nydelig.. dette må jeg få laget før vinteren setter inn,Helt herlige farger også,selv om mann kanskje kan sette sitt eget lille preg på det..
04.07.2013 - 13:46Sue wrote:
Unique and clever design! I like it!
19.06.2013 - 14:40Bettina wrote:
Fantastic, a great work
19.06.2013 - 06:59
![]() Elianeperrin wrote:
Elianeperrin wrote:
Sympa
16.06.2013 - 18:12
![]() Sissel wrote:
Sissel wrote:
Skjønne farger, og ett artig innslag på rett og vrangt. En god gammel klassikker er på vei tilbake..
16.06.2013 - 13:26
![]() Corny wrote:
Corny wrote:
Mütze wie Muster db-029, nur mit anderer Wolle gstrickt. Gefällt mir aber
12.06.2013 - 21:18Verna wrote:
Very unique. We won't find it anywhere else!
07.06.2013 - 03:10
|
|
Nina#ninaset |
|
 |
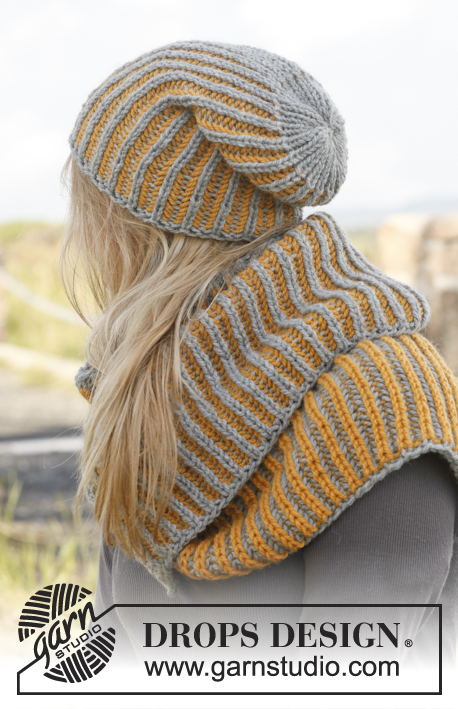 |
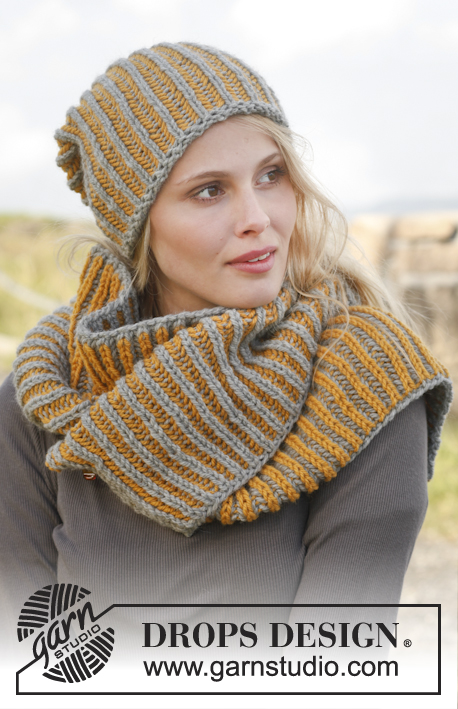
Knitted DROPS hat and neck warmer with English rib in two colors in ”Nepal”.
DROPS 149-43 |
|
|
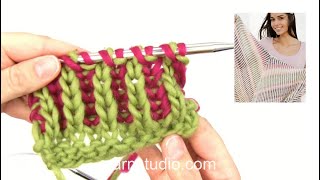
GARTER ST (back and forth on needle): K all rows. 1 ridge = 2 rows K. ENGLISH RIB IN TWO COLORS: ROW 1 (= WS): Worked with color 0501, gray 1 st in garter st, * 1 YO, slip 1 st as if to P, K 1 *, repeat from *-* until 2 sts remain, 1 YO, slip 1 st as if to P, 1 st in garter st. Turn piece. ROW 2 (= RS): Worked with color 0501, gray 1 st in garter st, * K tog YO and slipped st, 1 YO, slip 1 st as if to P *, repeat from *-* until 1 yo and 2 sts remain, K tog YO and slipped st, 1 st in garter st. Move sts back on circular needle to work from same side one more time and switch color (read KNITTING TIP 1 and 2). ROW 3 (= RS): Worked with color 2923, goldenrod 1 st in garter st, * 1 YO, slip 1 st as if to P, P tog YO and slipped st *, repeat from *-* until 2 sts remain, 1 YO, slip 1 st as if to P, 1 st in garter st. Turn piece. ROW 4 (= WS): Worked with color 0501, gray 1 st in garter st, * P tog YO and slipped st, 1 YO, slip 1 st as if to P *, repeat from *-* until 1 yo and 2 sts remain, P tog YO and slipped st, 1 st in garter st. Move sts back on circular needle to work from same side one more time and switch color. ROW 5 (= WS): Worked with color 2923, goldenrod 1 st in garter st, * 1 YO, slip 1 st as if to P, K tog YO and slipped st *, repeat from *-* until 2 sts remain, finish with 1 YO, slip 1 st as if to P, 1 st in garter st. Turn piece. Repeat rows 2- 5. KNITTING TIP 1: No of sts is divisible with uneven number when English rib is worked. To make an English rib in stripes work back and forth on a circular needle as follows: Work 1st and 2nd row as explained below. Move all sts on circular needle to the other end of circular needle so that next row can be worked with a new color from same side as 2nd row. Then turn piece and work the next 2 rows from the other side the same way as 2nd and 3rd row. That means that 1 row is worked with every color from same side before turning the piece. KNITTING TIP 2: If you are in doubt, see what color the previous row was worked with on the color of edge st. ---------------------------------------------------------- HAT: Worked back and forth on circular needle. Cast on 72-81 sts on circular needle size 5 mm / US 8 with gray. K 1 row. Work next row as follows from RS: 1 edge st in GARTER ST - see explanation above -, * P 1, P 2 tog *, repeat from *-* until 2 sts remain, finish with P 1 and 1 edge st in GARTER ST = 49-55 sts. Then work ENGLISH RIB IN TWO COLORS - see explanation above. REMEMBER THE GAUGE! When piece measures 23-24 cm / 9"-9½" – adjust to finish after 5th row and work next row in gray as follows: 1 edge st in garter st, * K tog YO and slipped st, P 1 *, repeat from *-* until 2 sts remain, K tog YO and slipped st and 1 edge st in garter st. Turn and continue with rib K 1/P 1 with 1 edge st in garter st in each side with gray until rib measures approx. 3 cm / 1". Work 4 rows in stockinette st - AT THE SAME TIME on 2nd row from RS work sts tog 2 by 2, repeat on 4th row = 13-14 sts. Piece measures approx. 27-28 cm / 10½"-11". Tighten tog the last sts at the top and sew hat tog mid back, garter st against garter st. ---------------------------------------------------------- NECK WARMER: Loosely cast on 161-173 sts on circular needle size 6 mm / US 10 with gray and work back and forth on needle. Work ENGLISH RIB IN TWO COLORS - see explanation above. When piece measures approx. 27-32 cm / 10½"-12½" - adjust to finish after 5th row. Turn piece and work next row in gray as follows from RS: 1 edge st in garter st, * K tog YO and slipped st, P 1 *, repeat from *-* until 2 sts remain, K tog YO and slipped st and 1 edge st in garter st. On next row bind off with K over K and P over P. Cut the yarn and sew neck warmer tog with small stitches, sew in outer loops of edge sts and fasten the yarn. |
|
Have you finished this pattern?Tag your pictures with #dropspattern #ninaset or submit them to the #dropsfan gallery. Do you need help with this pattern?You'll find 13 tutorial videos, a Comments/Questions area and more by visiting the pattern on garnstudio.com. © 1982-2026 DROPS Design A/S. We reserve all rights. This document, including all its sub-sections, has copyrights. Read more about what you can do with our patterns at the bottom of each pattern on our site. |
|


With over 40 years in knitting and crochet design, DROPS Design offers one of the most extensive collections of free patterns on the internet - translated to 17 languages. As of today we count 324 catalogs and 12284 patterns - 12274 of which are translated into English (US/in).
We work hard to bring you the best knitting and crochet have to offer, inspiration and advice as well as great quality yarns at incredible prices! Would you like to use our patterns for other than personal use? You can read what you are allowed to do in the Copyright text at the bottom of all our patterns. Happy crafting!
Post a comment to pattern DROPS 149-43
We would love to hear what you have to say about this pattern!
If you want to leave a question, please make sure you select the correct category in the form below, to speed up the answering process. Required fields are marked *.