
Popular categories
Looking for a yarn?


Comments / Questions (56)
![]() María wrote:
María wrote:
Hola! Tejo estilo inglés, no continental. He intentado realizar el patrón varias veces pero no consigo que me salga. Hay que adaptar las instrucciones? Estoy muy interesada en saber como hacerlo, el modelo me parece muy bonito. Estaría muy agradecida si me pudiese ayudar. Atentamente, María.
14.11.2014 - 00:09DROPS Design answered:
Hola Maria. Puedes trabajar con ag circular al estilo inglés. Las ag circulares las usamos para tener suficiente espacio para todos los pts. De trabajar con 2 agujas tendrían que ser de doble punta y no cerradas por un lado puesto que la técnica consiste en "...mover los pts para la otra punta de la ag para tejer por el mismo lado una vez más..."
17.11.2014 - 00:11
![]() Lenie Terpstra wrote:
Lenie Terpstra wrote:
Goedemiddag, Ik geef het op! Ben er nu voor de 3e keer aan begonnen maar het klopt niet. Ik krijg niet die v-tjes. En die video helpt ook niet want daar breien ze heel anders op. Misschien is het bekend dat er een fout in de beschrijving zit? Dan is er nog hoop voor mij. Vrgr, lenie
09.11.2014 - 16:48DROPS Design answered:
Hoi Lenie. Er is geen fout in de beschrijving.
10.11.2014 - 09:45
![]() Julie wrote:
Julie wrote:
Hej. Jeg tror, der er en fejl i opskriften. Der, hvor der skal strikkes masker 2 og 2 sammen, står der, at man ender på 13/14 masker. Det er ikke korrekt. Skal man strikke markerne sammen 2 og 2 både på 2. og 4. række glatstrik?
21.01.2014 - 23:52DROPS Design answered:
Hej Julie, ja du ska strikke de sammen også på 4.p. Vi retter oppskriften, tack för at du gav oss besked :)
13.02.2014 - 21:39
![]() Mercedes Rodríguez wrote:
Mercedes Rodríguez wrote:
¿Como se cierra el cuello? Derecho contra derecho? Es que lo he hecho así, pero puesto, al darle dos vueltas alrededor del cuello queda como bastante "enredado".
21.01.2014 - 09:49DROPS Design answered:
Hola Mercedes! Efectivamente se cierra derecho sobre derecho como siempre. El problema puede venir al ponérselo. Hay que hacer un ¨8¨ es decir, lo introduces por la cabeza, lo giras a la altura del cuello formando un 8 y vuelves a pasar el segundo círculo por la cabeza. Luego hay que colocarlo de manera que no agobie por delante, puede aplastarse más o menos a gusto de cada una.
23.01.2014 - 10:22
![]() Concetta wrote:
Concetta wrote:
Salve! Questo modello è bellissimo.. Bisogna necessariamente eseguirlo con i ferri circolari? Se volessi usare i ferri dritti, come dovrei procedere? Grazie!
21.12.2013 - 13:11DROPS Design answered:
Buonasera Concetta, sia il cappello che lo scaldacollo sono lavorati avanti e indietro sui ferri circolari, quindi può lavorarlo anche con i ferri dritti: i ferri circolari sono più comodi a causa del numero di maglie elevato. Buon lavoro!!
22.12.2013 - 19:16Farhad wrote:
Hi To learn more, I need your help I'm knitting.
14.12.2013 - 20:03
![]() Ana wrote:
Ana wrote:
Hola, no entiendo como se empieza con los dos colores para tejer el punto ingles en dos colores, el video empieza con un trozo de labor ya tejida! Gracias!
22.11.2013 - 20:49
![]() Patti wrote:
Patti wrote:
Finalmente! sono riuscita a realizzare il mio campione correttamente, sbagliavo la maglia gettata e l'ho capito guardando il vostro video. Adesso sembra addirittura facile, grazie ancora per l'aiuto!!
26.10.2013 - 15:05DROPS Design answered:
Buongiorno Patti, siamo contente che sia riuscita a realizzare il suo campione: effettivamente il gettato sembra così immediato, ma a volte crea qualche problema, soprattutto prima delle m rov. Ora vogliamo vedere il suo lavoro, può postare la foto nel forum, la aspettiamo, anche per fare quattro chiacchiere. Buon lavoro!!
27.10.2013 - 15:43
![]() Patti wrote:
Patti wrote:
Niente da fare!! Credo ci sia qualcosa di errato nelle spiegazioni, ho provato e riprovato ma le righe non vengono, forse è per il numero delle maglie? adesso sto lavorando su un campione di maglie ridotto ma non viene lo stesso... quasi rinuncio, grazie tante per il video.
25.10.2013 - 10:20DROPS Design answered:
Buongiorno Patti, abbiamo controllato, le spiegazioni del modello e del video coincidono, quindi se segue attentamente il video dovrebbe riuscire a fare le righe. Lavora English o Continental? Se lavora English, controlli di eseguire correttamente il gettato prima delle m a rovescio. Ha provato a mandare una foto del lavoro a italy@garnstudio.com? Ci riscriva se ha altri dubbi. Buon lavoro!
25.10.2013 - 11:57
![]() Vero wrote:
Vero wrote:
Bonjour, je souhaitais faire se modèle mais ne voyais pas comment faire ce point côte anglaises malgré les explications. Un très grand merci pour cette vidéo plus explicative que n'importe quels mots. Maintenant y a plus qu'à....... Il me manque juste les aiguilles circulaires. Encore Merci pour ce site trop bien
23.10.2013 - 08:18
|
|
Nina#ninaset |
|
 |
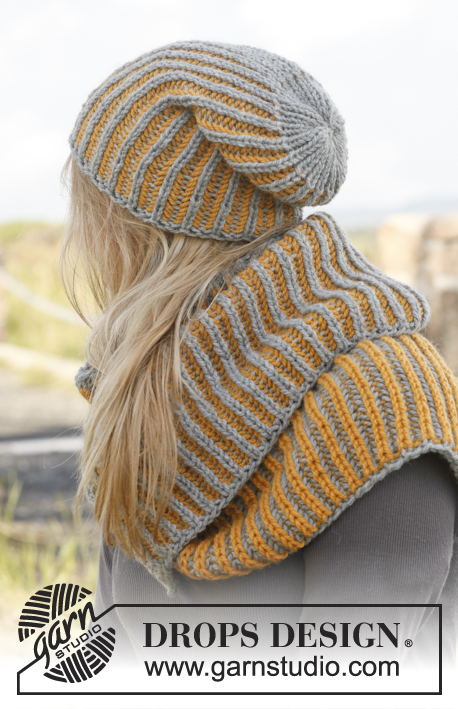 |
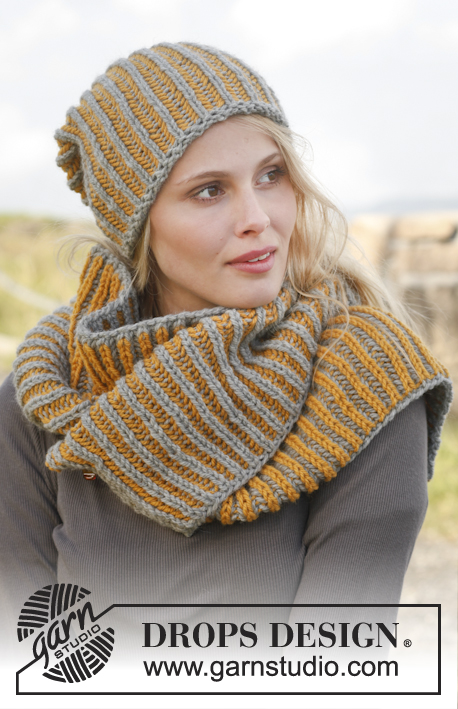
Knitted DROPS hat and neck warmer with English rib in two colors in ”Nepal”.
DROPS 149-43 |
|
|
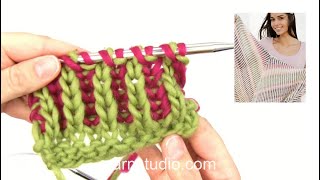
GARTER ST (back and forth on needle): K all rows. 1 ridge = 2 rows K. ENGLISH RIB IN TWO COLORS: ROW 1 (= WS): Worked with color 0501, gray 1 st in garter st, * 1 YO, slip 1 st as if to P, K 1 *, repeat from *-* until 2 sts remain, 1 YO, slip 1 st as if to P, 1 st in garter st. Turn piece. ROW 2 (= RS): Worked with color 0501, gray 1 st in garter st, * K tog YO and slipped st, 1 YO, slip 1 st as if to P *, repeat from *-* until 1 yo and 2 sts remain, K tog YO and slipped st, 1 st in garter st. Move sts back on circular needle to work from same side one more time and switch color (read KNITTING TIP 1 and 2). ROW 3 (= RS): Worked with color 2923, goldenrod 1 st in garter st, * 1 YO, slip 1 st as if to P, P tog YO and slipped st *, repeat from *-* until 2 sts remain, 1 YO, slip 1 st as if to P, 1 st in garter st. Turn piece. ROW 4 (= WS): Worked with color 0501, gray 1 st in garter st, * P tog YO and slipped st, 1 YO, slip 1 st as if to P *, repeat from *-* until 1 yo and 2 sts remain, P tog YO and slipped st, 1 st in garter st. Move sts back on circular needle to work from same side one more time and switch color. ROW 5 (= WS): Worked with color 2923, goldenrod 1 st in garter st, * 1 YO, slip 1 st as if to P, K tog YO and slipped st *, repeat from *-* until 2 sts remain, finish with 1 YO, slip 1 st as if to P, 1 st in garter st. Turn piece. Repeat rows 2- 5. KNITTING TIP 1: No of sts is divisible with uneven number when English rib is worked. To make an English rib in stripes work back and forth on a circular needle as follows: Work 1st and 2nd row as explained below. Move all sts on circular needle to the other end of circular needle so that next row can be worked with a new color from same side as 2nd row. Then turn piece and work the next 2 rows from the other side the same way as 2nd and 3rd row. That means that 1 row is worked with every color from same side before turning the piece. KNITTING TIP 2: If you are in doubt, see what color the previous row was worked with on the color of edge st. ---------------------------------------------------------- HAT: Worked back and forth on circular needle. Cast on 72-81 sts on circular needle size 5 mm / US 8 with gray. K 1 row. Work next row as follows from RS: 1 edge st in GARTER ST - see explanation above -, * P 1, P 2 tog *, repeat from *-* until 2 sts remain, finish with P 1 and 1 edge st in GARTER ST = 49-55 sts. Then work ENGLISH RIB IN TWO COLORS - see explanation above. REMEMBER THE GAUGE! When piece measures 23-24 cm / 9"-9½" – adjust to finish after 5th row and work next row in gray as follows: 1 edge st in garter st, * K tog YO and slipped st, P 1 *, repeat from *-* until 2 sts remain, K tog YO and slipped st and 1 edge st in garter st. Turn and continue with rib K 1/P 1 with 1 edge st in garter st in each side with gray until rib measures approx. 3 cm / 1". Work 4 rows in stockinette st - AT THE SAME TIME on 2nd row from RS work sts tog 2 by 2, repeat on 4th row = 13-14 sts. Piece measures approx. 27-28 cm / 10½"-11". Tighten tog the last sts at the top and sew hat tog mid back, garter st against garter st. ---------------------------------------------------------- NECK WARMER: Loosely cast on 161-173 sts on circular needle size 6 mm / US 10 with gray and work back and forth on needle. Work ENGLISH RIB IN TWO COLORS - see explanation above. When piece measures approx. 27-32 cm / 10½"-12½" - adjust to finish after 5th row. Turn piece and work next row in gray as follows from RS: 1 edge st in garter st, * K tog YO and slipped st, P 1 *, repeat from *-* until 2 sts remain, K tog YO and slipped st and 1 edge st in garter st. On next row bind off with K over K and P over P. Cut the yarn and sew neck warmer tog with small stitches, sew in outer loops of edge sts and fasten the yarn. |
|
Have you finished this pattern?Tag your pictures with #dropspattern #ninaset or submit them to the #dropsfan gallery. Do you need help with this pattern?You'll find 13 tutorial videos, a Comments/Questions area and more by visiting the pattern on garnstudio.com. © 1982-2026 DROPS Design A/S. We reserve all rights. This document, including all its sub-sections, has copyrights. Read more about what you can do with our patterns at the bottom of each pattern on our site. |
|


With over 40 years in knitting and crochet design, DROPS Design offers one of the most extensive collections of free patterns on the internet - translated to 17 languages. As of today we count 324 catalogs and 12284 patterns - 12274 of which are translated into English (US/in).
We work hard to bring you the best knitting and crochet have to offer, inspiration and advice as well as great quality yarns at incredible prices! Would you like to use our patterns for other than personal use? You can read what you are allowed to do in the Copyright text at the bottom of all our patterns. Happy crafting!
Post a comment to pattern DROPS 149-43
We would love to hear what you have to say about this pattern!
If you want to leave a question, please make sure you select the correct category in the form below, to speed up the answering process. Required fields are marked *.