
Popular categories
Looking for a yarn?


Comments / Questions (147)
Sophia wrote:
I have a little problem with dec.if we make dec to the 2nd and 3rd st,what hapened with ch between tr; and then we must change pattern? because the pattern doesnt look write
02.03.2016 - 12:06DROPS Design answered:
Dear Sofia, work only tr over the sts that do not fit the pattern anymore when dec on the sides. Happy crocheting!
02.03.2016 - 14:57
![]() Sérédiak Chantale wrote:
Sérédiak Chantale wrote:
Je réalise ce modèle,taille L et je retrouve :51 cm de large au lieu de 47!
12.04.2015 - 19:35DROPS Design answered:
Bonjour Mme Sérédiak, avez-vous vérifié votre tension ? Vous devez avoir, et conserver pendant votre ouvrage, 24 brides x 13 rangs = 10 x 10 cm. Ajustez la taille du crochet si nécessaire. Bon crochet!
13.04.2015 - 10:01Sofia wrote:
I just finished it. very nice and easy. But i used a little more yarn. I love it
14.10.2014 - 22:14
![]() Halima wrote:
Halima wrote:
Beste drops, ik ben er al uit, door hulp van de vorige vragen , toch erg bedankt , groeten
13.08.2014 - 18:38DROPS Design answered:
Hoi Halima. Goed om te horen.
14.08.2014 - 16:14
![]() Halima wrote:
Halima wrote:
Beste drops, ik heb een vraag ik ben nu bij; Minder in de volgende toer 1 stk aan elke kant door het 2e en 3e stk en de 2 voorlaatste stk samen te haken , bij het minderen alleen stk over de st die niet in het patroon passen...ik heb de hele schema al gehaakt en ben nu weer vanaf onderaan in het schema weer begonnen zodat ik de juiste lengte haal, maar als ik ga minderen links en rechts kom ik niet uit, ik ben begonnen bij het stokje/2losse/stokje/2losse , zit hier misschien de fout in ?
13.08.2014 - 18:11
![]() Martina Krebs wrote:
Martina Krebs wrote:
Liebes Drops Team, Ich fange gerade die 2. Seite des Boleros an und habe meine Schwierigkeiten damit... meine erste Hälfte beginnt mit 113 LM, über die ich in der 1. Runde 94 FM gehäkelt habe. Wenn ich nun die zweite Hälfte an den 94 FM der ersten Hälfte anhäkeln soll, dann bleiben mir diese 113 LM als Rand/Wulst stehen, ist das so gewollt? Ich überlege momentan, ob ich nicht einfach nochmal eine Seite extra häkle und diese später zusammenfüge?
26.07.2014 - 17:41DROPS Design answered:
Liebe Martina, Sie müssen das untere Glied der Lm erfassen, in die Sie die fM in der 1. R gehäkelt haben. D.h. Sie stechen noch mal in dieselbe Lm ein wie am Anfang des 1. Teils. Dann sollte kein Wulst stehen bleiben.
28.07.2014 - 10:04
![]() Libby DeRoo wrote:
Libby DeRoo wrote:
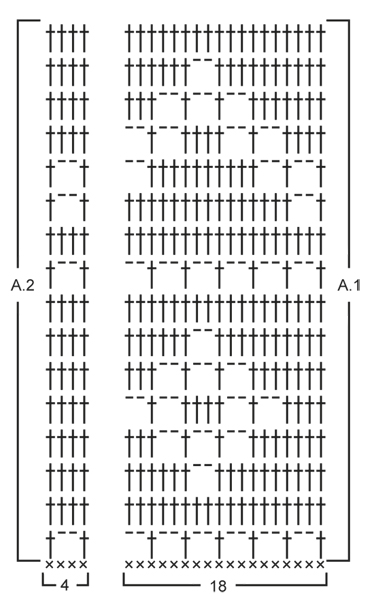
Hello and thank you for this beautiful pattern. I am, however, understanding the diagrams. There is white space between the 18 sc and the 4 sc. What does this mean please>?
13.06.2014 - 15:44DROPS Design answered:
Dear Mrs DeRoo, you repeat the 18 sts in A.1 in width, and finish with the 4 sts in A.2 (seen from RS, from WS, start with first 4 sts in A.2 and repeat 18 sts in A.1). Happy crocheting!
13.06.2014 - 17:57
![]() Lian wrote:
Lian wrote:
Hoe kan ik het 2e en 3e stokje samenhaken als dit twee lossen zijn in het patroon?
28.05.2014 - 20:10DROPS Design answered:
Hoi Lian. Dan maak je van de 2 l 1 l. Het gaat erom dat je 1 st minder krijgt aan weerskanten. Veel haakplezier verder
05.06.2014 - 17:32Tien wrote:
Ik ben pas begonnen aan dit patroon maar de ruglengte ervan is een stuk langer dan hoe de lengte op het plaatje eruit ziet. Klopt dit? Ik heb de kleinste maat genomen en draag normaal een L/XL. I just startend this pattern but the backlength is longer the the length on the picture looks like. Is this right? I used the smallest size while I usually have L/XL?
23.05.2014 - 07:45DROPS Design answered:
Dear Tien, have you checked your tension ? In size L/XL, back piece is 47 cm width on a basis on 24 dc x 13 rows = 10 x 10 cm in width. Happy crocheting!
23.05.2014 - 09:00
![]() Rian wrote:
Rian wrote:
Graag antwoord op: Rian 25.04.2014 kl. 01:37: Ik bedoel dat het minderen me nog steeds niet duidelijk is, ondanks het antwoord dat u aan Au3 hebt gegeven. Is het de bedoeling dat het patroon bij de mouwnaad netjes doorloopt, maar dat de rest een rommeltje wordt?
29.04.2014 - 02:11DROPS Design answered:
U mindert door stokjes samen te haken, het patroon wordt dan aan de zijkanten iets smaller en er komt een lijn van samengehaakte stokjes boven elkaar - u mindert aan weerskanten 1 steek van de kant. Het is uiteraard niet de bedoeling dat dit rommelig wordt.
29.04.2014 - 09:24
|
|||||||||||||
Caroline#carolinebolero |
|||||||||||||
 |
 |
||||||||||||
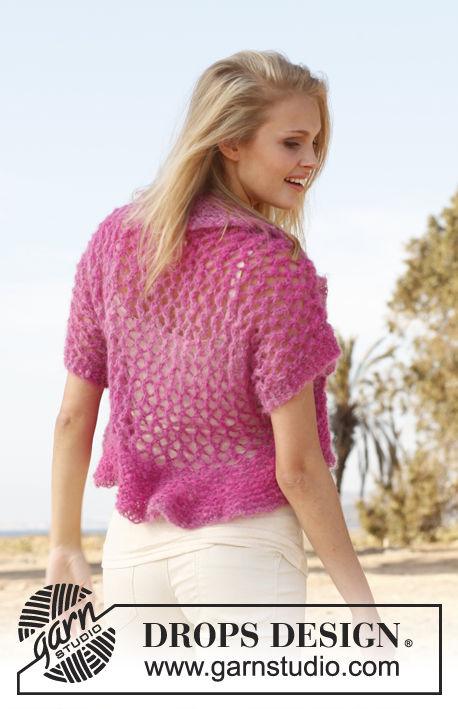
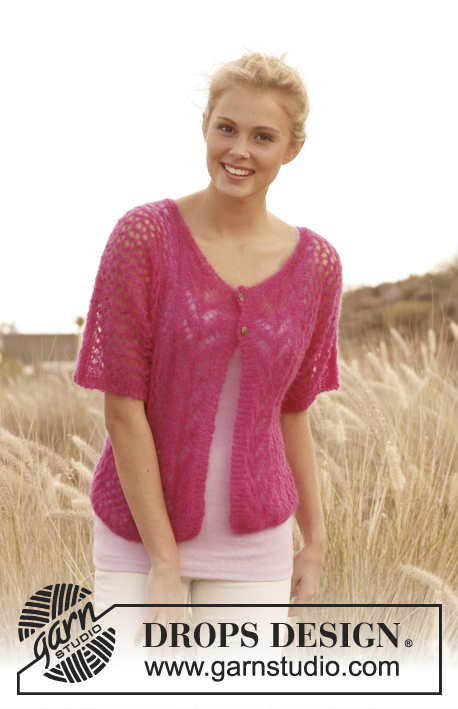
Crochet DROPS bolero with lace pattern in ”BabyAlpaca Silk”. Size: S - XXXL
DROPS 147-4 |
|||||||||||||
|
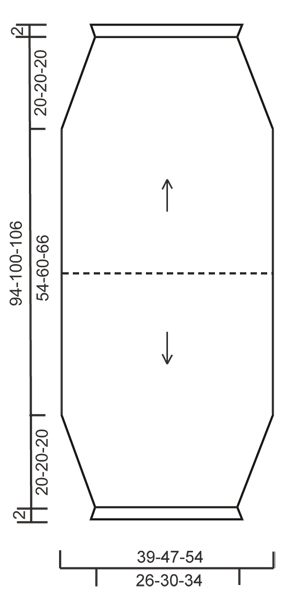
CROCHET INFO: Replace first dc on every row with 3 ch. PATTERN: See diagrams A.1 and A.2 - NOTE: The first row with sc is not in the repetition and is not repeated upwards. DECREASE TIP: Crochet 2 dc tog as follows: Work 1 dc in first st but wait with last pull through, work 1 dc in next st but on last pull through, pull thread through all 3 loops on hook. -------------------------------------------------------- BOLERO: Worked from mid back. First work one side and down to beg of sleeve, then work the other side and down to the other sleeve. Then sew the sleeve seams and work 1 flounce around the entire opening. FIRST SIDE: Ch 113-135-156 with Baby Alpaca Silk on hook size 3 mm / C. Turn and work 1 sc in 2nd ch from hook, continue with 1 sc in each of the next 3-1-4 ch, * skip ch 1, 1 sc in each of the next 5 ch *, repeat from *-* the entire row = 94-112-130 sc (first ch on row is NOT counted as one sc). Continue with diagram A.1 over the first 90-108-126 sc and diagram A.2 over the last 4 sc – READ CROCHET TIP! Repeat pattern until finished measurements. AT THE SAME TIME when piece measures 27-30-33 cm / 10½"-11¾"-13", insert 1 marker in the side (this marks how far up to sew the sleeve seam afterwards). On next row dec 1 dc each side by working 2nd and 3rd dc and the 2 next to last dc tog – SEE DECREASE TIP! Repeat dec on every row a total of 16-20-24 times = 62-72-82 sts remain - NOTE: When dec work only dc over the sts that do not fit the pattern. Continue with pattern until piece measures approx. 47-50-53 cm / 18½"-19¾"-21" in total – finish after a row with only dc, cut the thread. SECOND SIDE: Work 1 sc in each of the 94-112-130 sc worked on 1st row on first side (i.e. mid back). Then work pattern as on first side. Make sure to finish on same row in diagram at the bottom of sleeve in both sides. ASSEMBLY: Fold the bolero double across and sew tog from bottom of each sleeve and up to where marker was inserted in each side – sew edge to edge to avoid a chunky seam. FLOUNCE AROUND OPENING: Work around the entire opening as follows (beg mid back): ROUND 1: 1 sl st in first st, * ch 3, 1 sc in next dc *, repeat from *-* the entire round and finish with 3 ch and 1 sl st in sl st from beg of round - NOTE: make sure that an even number of ch-spaces has been worked otherwise 5th round will not fit. ROUND 2: Work 1 sl st and 1 sc in first ch-space, * ch 3, 1 sc in next ch-space *, repeat from *-* the entire round, finish with 1 sl st in first sc from beg of round. Round 3 and 4: Work as 2nd round. ROUND 5: Work 1 sl st and 1 sc in first ch-space, * 8 ch, 1 sc in next ch-space, ch 1, 1 sc in next ch-space *, repeat from *-* the entire round, finish with 1 sl st in first sc from beg of round. ROUND 6: 1 ch, 1 sc in first large ch-space, [* ch 4, 1 dc in the first ch made (= 1 picot), 1 sc in same ch-space *, repeat from *-* 2 more times (i.e. so that there are 3 picots in the large ch-space), 1 sc in the small ch-space (the one with only 1 ch between the large ch-spaces), 1 sc in next large ch-space], repeat from [-] the entire round, instead of last sc, work 1 sl st in first sc on round. Cut and fasten the thread. FLOUNCE AT THE BOTTOM OF SLEEVE: Work a shorter edge at the bottom of sleeve, only work 1st, 5th and 6th round of the flounce around the opening – NOTE: On 1st round skip 1 dc between every ch-space. |
|||||||||||||
Diagram explanations |
|||||||||||||
|
|||||||||||||
 |
|||||||||||||
 |
|||||||||||||
Have you finished this pattern?Tag your pictures with #dropspattern #carolinebolero or submit them to the #dropsfan gallery. Do you need help with this pattern?You'll find 7 tutorial videos, a Comments/Questions area and more by visiting the pattern on garnstudio.com. © 1982-2026 DROPS Design A/S. We reserve all rights. This document, including all its sub-sections, has copyrights. Read more about what you can do with our patterns at the bottom of each pattern on our site. |
|||||||||||||


With over 40 years in knitting and crochet design, DROPS Design offers one of the most extensive collections of free patterns on the internet - translated to 17 languages. As of today we count 325 catalogs and 12298 patterns - 12288 of which are translated into English (US/in).
We work hard to bring you the best knitting and crochet have to offer, inspiration and advice as well as great quality yarns at incredible prices! Would you like to use our patterns for other than personal use? You can read what you are allowed to do in the Copyright text at the bottom of all our patterns. Happy crafting!
Post a comment to pattern DROPS 147-4
We would love to hear what you have to say about this pattern!
If you want to leave a question, please make sure you select the correct category in the form below, to speed up the answering process. Required fields are marked *.