
Popular categories
Looking for a yarn?


Comments / Questions (198)
![]() Fabienne De Massaud wrote:
Fabienne De Massaud wrote:
Je ne sais pas comment monter les manches, en particulier les goussets
29.08.2024 - 20:35DROPS Design answered:
Bonjour Mme De Massaud, en fonction de votre taille, disposez les 20 ou 30 carrés en long rectangle, assemblez les carrés entre eux puis le long des emmanchures; cousez les côtés du gousset le long des carrés sous la manche, puis si vous avez une ouverture en haut du gousset, cette ouverture sera assemblée aux carrés des emmanchures dos/devant. Bon assemblage!
30.08.2024 - 08:26
![]() Gautier Dominique wrote:
Gautier Dominique wrote:
Bonjour, Je voudrais réaliser ce modèle en safran. Le métrage est légèrement inférieur . La quantité indiquée est-elle valable ou dois-je acheter le double ?
16.05.2024 - 11:28DROPS Design answered:
Bonjour Mme Gautier, vous pouvez effectivement remplacer 1 fil Alpaca (utilisé ici) par 1 fil Safran, utilisez le convertisseur pour savoir la quantité nécessaire pour la taille choisie. Bon crochet!
16.05.2024 - 14:04
![]() Jayne wrote:
Jayne wrote:
Thanks for your reply. This makes sense. I misunderstood the five squares in height instruction. I would have said five squares in length. Thank you again.
11.03.2024 - 17:21
![]() Jayne wrote:
Jayne wrote:
I've attached the gusset to the sleeves but it's much longer than the four squares length for the small size. I assume I must be doing something wrong. I can't figure out a way to insert the sleeves. I feel your instructions are too vague regarding the sleeve.
10.03.2024 - 20:50DROPS Design answered:
Dear Jayne, remember to check and keep correct tension, the 5 squares in height (approx. 6,5 cm each) should be approx. 33cm, ie the same length as the gusset. Happy crocheting!
11.03.2024 - 09:26
![]() Peguy Sitbon wrote:
Peguy Sitbon wrote:
Bonjour Pour réaliser ce modèle peut on le crocheter avec une autre équivalence de fils car l’alpaga est cher je pensais soit en baby merinos soit en Nord soit en coton (peut être plus lourd à porter!) soit en flora Merci de vos conseils Cordialement Peguy
24.02.2024 - 10:34DROPS Design answered:
Bonjou Mme Sibon, vous pouvez réaliser ce modèle en Nord, en Safran ou en Flora car toutes ces laines appartiennent au groupe de fils A. utilisez notre convertisseur pour voir les autres alternatives possibles et les quantités correspondantes. Votre magasin saura vous conseiller, même par mail ou téléphone, la meilleure alternative possible. Bon crochet!
26.02.2024 - 08:09
![]() Annette wrote:
Annette wrote:
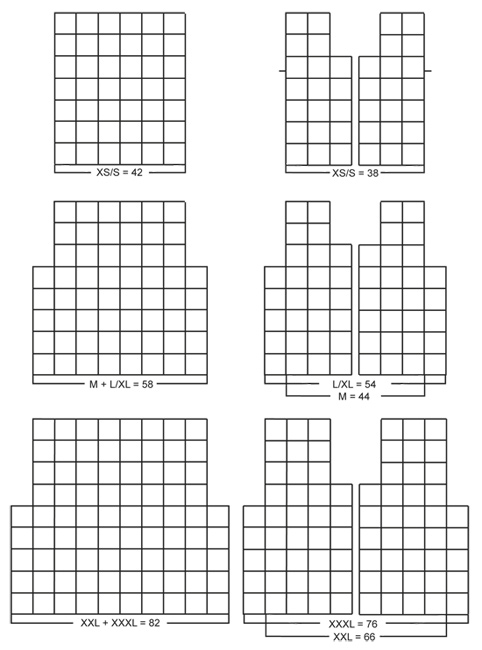
Hej igen - jeg kan se diagrammerne nederst, men hvor mange firkanter går fx til ryggen i L - XL osv. Det er det jeg ikke rigtig forstår. Er L = 52 firkanter til ryggen og forstykker? Hvordan skal jeg forstå inddelingen? Håber det giver mening 😄 hilsen Annette
22.02.2024 - 12:44DROPS Design answered:
Hej Annette, i L/XL hækler du ialt 152 ruder, du skal bruge 58 ruder til ryggen, 54 til forstykkerne og 20 til hver af ærmerne :)
23.02.2024 - 13:35
![]() Annette wrote:
Annette wrote:
Hej Jeg forstå ikke diagrammet - altså hvor mange 4 kanter går til ryggen, forstykker osv.
20.02.2024 - 20:58DROPS Design answered:
Hej Annette, du finder antal firkanter i de forskellige størrelser nederst i opskriften :)
22.02.2024 - 11:55
![]() Sian Brereton wrote:
Sian Brereton wrote:
Hello I have nearly completed this - ordered the quantities as directed for my size in Drops Alpaca. But find I have two unused balls of coloured yarn, but won’t have enough of the off white. I don’t have a store locally so will need to order online. For all we stores I’ve tried, the delivery costs exceed (or almost) the cost of the yarn. So not very happy and suggest you might need to revise your quantities
11.09.2023 - 14:17
![]() Anita wrote:
Anita wrote:
Hallo .. ich finde die Anleitung super nur leider ist für die ärmel kein bild dabei .. wie funktioniert das mit dem Keil und wie wird es angenäht.. ein bild wäre sehr hilfreich Bitte um Hilfe.. danke Lg anita
02.04.2023 - 22:32DROPS Design answered:
Liebe Anita, den Keil wird unter den Ärmel sein (auf dem 2. Foto kann man ein Teil davon sehen), damit die Ärmel oben breiter sind. So wird man nur mit natur häkeln und nach 10 cm beidseitig zunehmen. Je nach der Grösse wird dann mann den Keil in 2 teilen und jedes Teil separat bis zur Ende fertig häkeln. Viel Spaß beim häkeln!
11.04.2023 - 10:53
![]() Grada Kreijkes wrote:
Grada Kreijkes wrote:
Hallo, Ik ben bezig met de Summer Patchwork vestje Ik kom er maar niet achter hoe het moet met de mouwen Hoe moet ik ze aan de 'mouwspie' zetten? Daar kom ik niet uit... Ik zou het vestje graag af hebben, is zooo mooi Bedankt voor het patroon!!! H.G., Grada Kreijkes
21.02.2023 - 12:50DROPS Design answered:
Dag Grada,
Als je onderaan het patroon de maattekening bekijkt, dan zie je dat er bij de oksels een inham zit. Het laatste stukje van de naad onder aan de mouw naai je niet dicht op de mouw, maar naai je aan het voor- en achterpand. Dit is wat de 'mouwspie'.
22.02.2023 - 13:08
|
|
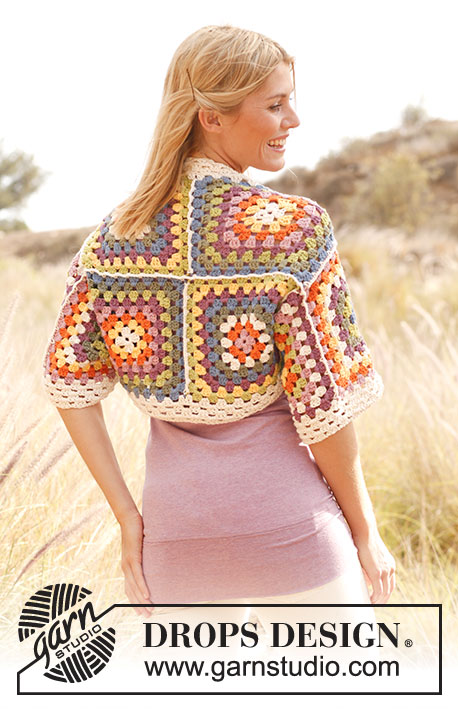
Summer Patchwork#summerpatchworkcardigan |
|
 |
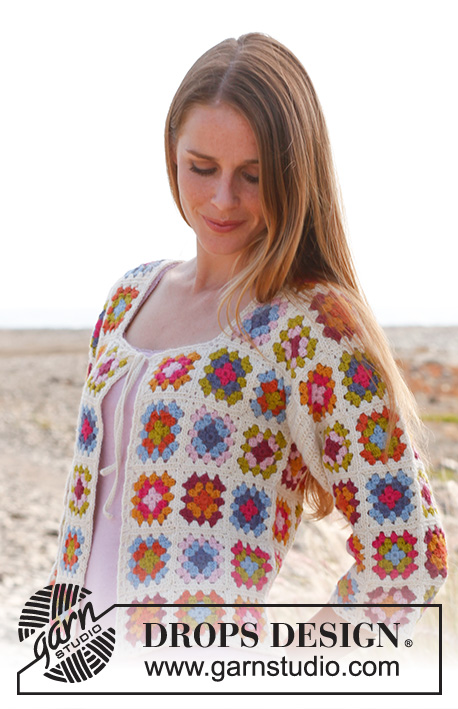 |
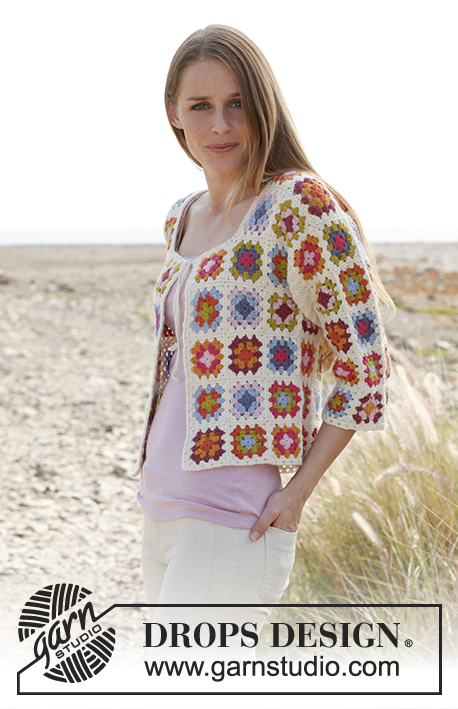
Crochet DROPS jacket with ¾ sleeves and granny squares in ”Alpaca”. Size: S - XXXL
DROPS 147-9 |
|
|
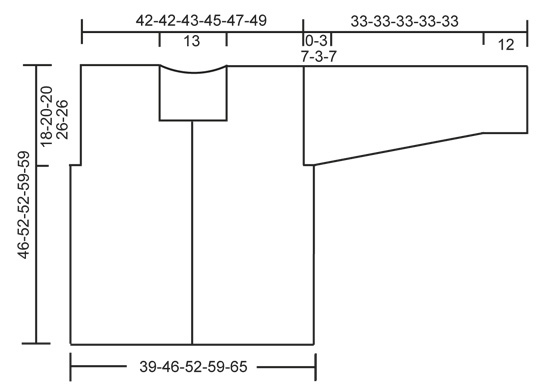
COLORS ON SQUARES: Last round (= color 4) on all squares is off white. SQUARE A: Color 1 = lime, color 2 = orange, color 3 = light blue. SQUARE B: Color 1 = goldenrod, color 2 = light pink, color 3 = dark pink. SQUARE C: Color 1 = light blue, color 2 = lime, color 3 = orange. SQUARE D: Color 1 = dark pink, color 2 = light pink, color 3 = lime. SQUARE E: Color 1 = light pink, color 2 = pink, color 3 = goldenrod. SQUARE F: Color 1 = pink, color 2 = gray purple, color 3 = light blue. SQUARE G: Color 1 = gray purple, color 2 = light blue, color 3 = light pink. SQUARE H: Color 1 = pink, color 2 = gray purple, color 3 = lime. SQUARE I: Color 1 = orange, color 2 = goldenrod, color 3 = dark pink. SQUARE J: Color 1 = light blue, color 2 = lime, color 3 = pink. GRANNY SQUARE: Ch 6 on hook size 3 mm / C with color 1 and form a ring with 1 sl st in first ch. ROUND 1 (color 1): ch3 , 2 dc in ch-ring, * ch 3, 3 dc in ch-ring *, repeat from *-* a total of 3 times and finish with 3 ch and 1 sl st in 3rd ch from beg of round. Turn piece. ROUND 2 (color 2): ch3 , 2 dc in first ch-space, ch 3, 3 dc in same ch-space, * ch 1, 3 dc in next ch-space, ch 3, 3 dc in same ch-space *, repeat from *-* a total of 3 times and finish with 1 ch and 1 sl st in 3rd ch from beg of round. Turn piece. ROUND 3 (color 3): ch3 , 2 dc in first ch-space, ch 1, * 3 dc in next ch-space, ch 3, 3 dc in same ch-space, ch 1, 3 dc in next ch-space, 1 ch *, repeat from *-* a total of 3 times, 3 dc in next ch-space, ch 3, 3 dc in same ch-space, 1 ch and finish with 1 sl st in 3rd ch from beg of round. Turn piece. ROUND 4 (color 4): ch3 , 2 dc in first ch-space, ch 1, * 3 dc in next ch-space, ch 3, 3 dc in same ch-space, ch 1, 3 dc in next ch-space, ch 1, 3 dc in next ch-space, 1 ch *, repeat from *-* a total of 3 times, 3 dc in next ch-space, ch 3, 3 dc in same ch-space, ch 1, 3 dc in next ch-space, 1 ch and finish with 1 sl st in 3rd ch from beg of round. Cut the yarn. 1 square measures approx. 6.5 x 6.5 cm / 2½" x 2½". Work 12-14-15-20-21 squares of every color combination, work in addition 0-2-2-8-8 extra squares (choose your own color combination on these squares) = 120-142-152-208-218 squares in total. SLEEVE GUSSET: Work a piece with dc shaped as a gusset to be sewn under sleeve so it is wider at the top than the at bottom. Replace first dc on every row with 3 ch. Work 7-8-8-8-8 ch on hook size 3 mm / C with off white. Turn and work 1 dc in 4th ch from hook, then work 1 dc in the remaining 3-4-4-4-4 ch = 5-6-6-6-6 dc. Continue back and forth with 1 dc in every dc until piece measures 10 cm / 4". READ ALL OF THE FOLLOWING SECTION BEFORE FINISHING! On next row inc 1 dc in each side by working 2 dc in next to last dc in each side. Repeat inc every 3-2-2-2-2 rows a total of 9-12-12-12-12 times. NOTE: In size XS/S continue with 1 dc in every dc until piece measures 33 cm / 13". In sizes M and XXL divide the piece in the middle when it measures 30 cm / 11¾", then work each side separately with 1 dc in every dc until piece measures 33 cm / 13". In sizes L/XL and XXXL divide the piece in the middle when it measures 26 cm / 10¼", then work each side separately, when inc is done, with 1 dc in every dc until piece measures 33 cm / 13". The piece is divided in the 4 largest sizes because of dec for armholes. This is not done in the smallest size. Work another sleeve gusset. Place the squares tog for back and front piece as shown on diagram – you can choose in which order you want to put the squares. Distribute the remaining 40-40-40-60-60 squares for 2 sleeves, with 20-20-20-30-30 squares on each sleeve. In the 3 smallest sizes there should be 4 x 5 squares and in the 2 largest sizes there should be 6 x 5 squares - there are 5 squares vertically in all sizes. Sew the squares tog edge to edge with off white. Sew sleeve gusset to each side of squares on sleeves and sew sleeves in body – with the widest part of gusset in the bottom of armhole. Then sew the side seams and shoulder seams the same way – NOTE: In sizes M and XXL there is 1 row with squares in the middle of each side under armhole, in sizes L/XL and XXXL there are 2 rows with squares in each side under armhole. Work around the entire jacket with off white as follows (beg mid back of neck): 1 sc in 1 ch at the edge of 1 square, ch 3 and 2 dc in same ch, * ch 1, 3 dc in next ch *, repeat from *-*. NOTE: In the corners faced inwards work as follows: 1 dc in last ch before corner, 1 dc in the corner and 1 dc in first ch after corner. In the corners faced outwards work as follows: 3 dc in ch-space in the corner on square, 3 ch and 3 more dc in the same ch-space. In every corner at the top by neck also work a tie as follows: 3 dc in ch-space in the corner on square, then work loose ch for approx. 28 cm / 11", turn and work 1 sc in every ch on the way back, then 3 dc in the same ch-space in the corner. Work the same way at bottom around the sleeves – over the section between the squares work as follows: * 1 dc in each of the first 3 dc, ch 1, skip 1 dc *, repeat from *-*. |
|
 |
|
 |
|
Have you finished this pattern?Tag your pictures with #dropspattern #summerpatchworkcardigan or submit them to the #dropsfan gallery. Do you need help with this pattern?You'll find 9 tutorial videos, a Comments/Questions area and more by visiting the pattern on garnstudio.com. © 1982-2026 DROPS Design A/S. We reserve all rights. This document, including all its sub-sections, has copyrights. Read more about what you can do with our patterns at the bottom of each pattern on our site. |
|


With over 40 years in knitting and crochet design, DROPS Design offers one of the most extensive collections of free patterns on the internet - translated to 17 languages. As of today we count 325 catalogs and 12298 patterns - 12288 of which are translated into English (US/in).
We work hard to bring you the best knitting and crochet have to offer, inspiration and advice as well as great quality yarns at incredible prices! Would you like to use our patterns for other than personal use? You can read what you are allowed to do in the Copyright text at the bottom of all our patterns. Happy crafting!
Post a comment to pattern DROPS 147-9
We would love to hear what you have to say about this pattern!
If you want to leave a question, please make sure you select the correct category in the form below, to speed up the answering process. Required fields are marked *.