
Popular categories
Looking for a yarn?


Comments / Questions (17)
![]() Lucia wrote:
Lucia wrote:
Luego tejo de ida y vuelta, entiendo que hasta que termine la capucha habra una carrerita de 23 puntos mas (tejidos), pero que al final no se nota. gracias por su ayuda.
07.09.2012 - 15:58DROPS Design answered:
Hola Lucia, no hay ningún aumento de puntos al tejer la capucha. Saludos!
07.12.2012 - 08:42
![]() Lucia wrote:
Lucia wrote:
Luego tejo de ida y vuelta, entiendo que hasta que termine la capucha habra una carrerita de 23 puntos mas (tejidos), pero que al final no se nota. gracias por su ayuda.
07.09.2012 - 15:46
![]() Lucia wrote:
Lucia wrote:
Al inicio del tejido se coloca un marcaptos aqui inicia y termina la fila, ahora 23 punto derechos en redondo y coloco un segundo marca puntos de hay continuo con los 2 ptos jtos una laz, una vuelta de rev. y una de der. si me sale bien pero este no es el inicio de mi tejido si no de la parte del frente ahora empezaria las vueltas siguientes desde el segundo marcaptos,y
07.09.2012 - 15:45DROPS Design answered:
Lucía, el marcapuntos que se coloca al inicio de la vta, después del montaje de los pts, sirve para marcar el lado. El segundo marcapuntos solo es una sugerencia para que distingas dónde empieza y termina la vta de ojetes que va a servir para pasar el cordón con los pompones.
09.09.2012 - 06:36
![]() Lucia wrote:
Lucia wrote:
ME confundo, cuando dice teje 23 ptos los sigo tejiendo en forma circular o es que debo de girar mi tejido antes de los 23 puntos. ayudemem por favor, gracias.
06.09.2012 - 20:41DROPS Design answered:
Hola Lucía, cuando tejes los 23 pts derechos, esto equivale a llegar hasta el centro del frente. Ahora las vtas empiezan aquí. Continúas tejiendo en redondo con * 2 pjd, 1 HEB (lazada) * y repites de *a* en toda la vta (puedes colocar un marcapuntos en el primer “2 pjd” para saber donde empieza la vta). Después, tejes 1 vta de revés y 1 vta de derecho. Continúas con la capucha.
07.09.2012 - 00:52
![]() Lucia wrote:
Lucia wrote:
Por favor esta parte no entiendo donde dice tejer 23 ptos, hasta aqui entiendo. ahora giro el tejido para hacer la siguiente vuelta o sigo de frente?, Además donde dice 2 pjd, 1 laz. pero si son 92 puntos como ubico la ultima lazada. podría ayudarme por favor
06.09.2012 - 18:23DROPS Design answered:
Hola Lucia, no se gira el trabajo, se tejen 3 vueltas más (incluida la vuelta de lazadas). Los 92 puntos se pueden dividir por 2, asi que: 46 x * 2 pjd, 1 HEB (lazada) *, es decir la vuelta termina con una lazada.
07.12.2012 - 08:41
![]() Teresa wrote:
Teresa wrote:
Me encanta
01.07.2012 - 19:32
![]() Helena wrote:
Helena wrote:
Ser rolig ut att sticka lite "gansey" stil över den. Mycket fin och moderiktig!Den blir nog höstens första projekt
19.06.2012 - 14:36
![]() Marie wrote:
Marie wrote:
This looks like a lot of fun to knit!
14.06.2012 - 16:15
![]() Véronique wrote:
Véronique wrote:
Je suis sous le charme de ce modèle,tant par la couleur,la douceur que les différents points.Cependant je le trouve trop court à mon goût.Je rajouterai donc une bande ou deux de point fantaisie.
05.06.2012 - 15:52
![]() Monica wrote:
Monica wrote:
Molto bello l'abbinamento dei punti
04.06.2012 - 23:44
|
|||||||||||||
Smilla#smillaponcho |
|||||||||||||
 |
 |
||||||||||||
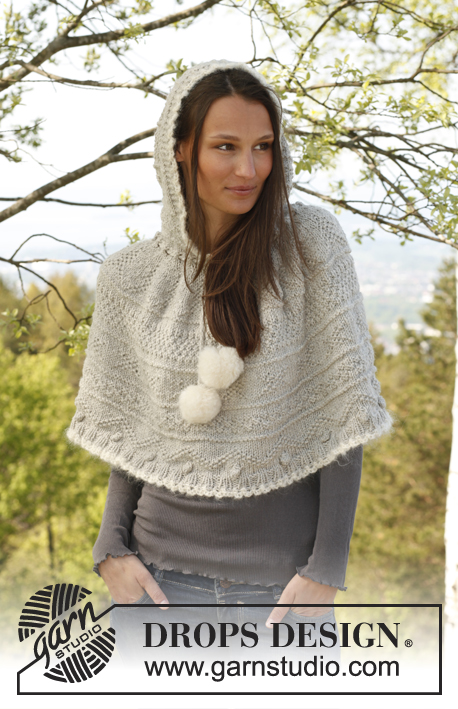
Knitted DROPS poncho with textured pattern and hood in ”Nepal”. Pompoms and crochet edges in "Vienna". Size: S - XXXL
DROPS 141-22 |
|||||||||||||
|
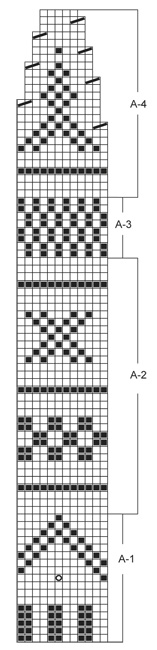
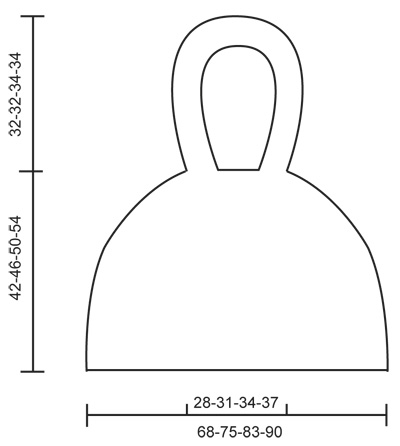
GARTER ST (back and forth on circular needle): K sts on all rows. PATTERN: See diagrams A-1 to A-4. Diagrams show pattern from RS. ---------------------------------------------------------- PONCHO: Worked in the round on circular needle from bottom up. Cast on 216-240-264-288 sts on circular needle size 5.5 mm / US 9 with Nepal. Insert a marker at beg of round (= the side). Work diagram A-1 (= 18-20-22-24 repetitions on the round). REMEMBER THE GAUGE! Continue with A-2 one time vertically and then A-3 until piece measures 29-33-37-41 cm / 11½"-13"-14½"-16". Then work and dec according to A-4 = 90-100-110-120 sts. K 1 round while at the same time adjusting no of sts to 92-92-104-104. The piece now measures approx. 42-46-50-54 cm / 16½"-18"-19¾"-21¼" vertically. K 23-23-26-26 sts. It has now been worked until mid front - now rounds beg here. Work next round as follows: * K 2 tog, 1 YO *, repeat from *-* the entire round. P 1 round and K 1 round. Continue with hood. HOOD: Worked back and forth on circular needle from mid front as follows: 4 sts in GARTER ST - see explanation above. A-2 until 4 sts remain, work these in garter st. After A-2, work A-3, then work A-2 again until hood measures approx. 32-32-34-34 cm / 12½"-12½"-13½"-13½" vertically (finish after 1 whole border), then work 4 rows in garter st over all sts. Fold hood double and sew tog at the top with grafting/kitchener sts. CROCHET EDGES: Work around the hood and at the bottom of poncho with Vienna on hook size 5 mm / H/8 as follows: 1 sc in first st, * ch 3, skip 1 st / 2 rows in garter st, 1 sc in next st *, repeat from *-* the entire round and finish with 1 sl st in first sc. TIE AND TASSELS: Cut 3 strands in Nepal approx. 3 meters/ 3.2 yds each. Twine them hard, fold them double and they will twine again. Make a knot at each end. Thread the tie in the row with eyelet holes at the top of poncho – start mid front. Make 2 dense pompoms with Vienna with an approx. diameter of 5 cm / 2". Fasten one pompom in each end of tie around the neck. |
|||||||||||||
Diagram explanations |
|||||||||||||
|
|||||||||||||
 |
|||||||||||||
 |
|||||||||||||
Have you finished this pattern?Tag your pictures with #dropspattern #smillaponcho or submit them to the #dropsfan gallery. Do you need help with this pattern?You'll find 7 tutorial videos, a Comments/Questions area and more by visiting the pattern on garnstudio.com. © 1982-2026 DROPS Design A/S. We reserve all rights. This document, including all its sub-sections, has copyrights. Read more about what you can do with our patterns at the bottom of each pattern on our site. |
|||||||||||||


With over 40 years in knitting and crochet design, DROPS Design offers one of the most extensive collections of free patterns on the internet - translated to 17 languages. As of today we count 324 catalogs and 12290 patterns - 12280 of which are translated into English (US/in).
We work hard to bring you the best knitting and crochet have to offer, inspiration and advice as well as great quality yarns at incredible prices! Would you like to use our patterns for other than personal use? You can read what you are allowed to do in the Copyright text at the bottom of all our patterns. Happy crafting!
Post a comment to pattern DROPS 141-22
We would love to hear what you have to say about this pattern!
If you want to leave a question, please make sure you select the correct category in the form below, to speed up the answering process. Required fields are marked *.