
Popular categories
Looking for a yarn?


Comments / Questions (146)
![]() Lucinda wrote:
Lucinda wrote:
I am struggling to understand one part of the written pattern. Where it says "at the same time next time 3rd row in diagram is worked.......". Does this mean when you get to the third row for the first time, for the second time or what? I am confused. Thanks
02.04.2016 - 09:18DROPS Design answered:
Dear Lucinda, when you work 3rd row in diagram the 2nd time you start dec for neck according diagram M.3. Happy crocheting!
02.04.2016 - 18:06
![]() Helena wrote:
Helena wrote:
Men det är ju det jag gjort! 5 inledande maskor + (8*24) + 2 =199 Eftersom jag har 224 maskor där jag börjar nederdelen blir 25 maskor över?
30.03.2016 - 14:49DROPS Design answered:
Hej Helena, du virkar i fm (inte i lm). Du har 192 fm = 24 rapporter incl första och sista m. Lycka till!
31.03.2016 - 08:51
![]() Helena wrote:
Helena wrote:
Behöver hjälp m den nedre delen, strl M. I mönstret står att det ska vara 24 rapporter. Varje rapport är 8 maskor. 24*8 =192 dvs det totala antalet maskor. Dock börjar ju varvet med 5 maskor "före" rapporten och två "efter". Man skulle då behöva 199 maskor... Ska man istället utgå från 224 maskor när man gör nederdelen? (Det stämmer dock inte heller...) För visst menas 24 _hela_ M2rapporter?
24.03.2016 - 14:07DROPS Design answered:
Hej Helena, Första raden virkar du enligt beskrivningen, sätt en markering för varje gång du börjar om vid * då får du 24 hela rapporter och då är det bara att följa diagrammet. Lycka till!
30.03.2016 - 14:34Franca wrote:
Hi, thanks for your reply. i did as written, tried several repeats of M1 with 4 different hooks (4.5, 3.5, 3, 2.5) but there's no way 5 arcs stay in 10 cm. also the result is not soft. i have no drops shop nearby... any other advice?
15.03.2016 - 10:16DROPS Design answered:
Dear Franca, each crocheter may have a different way to crochet and this can have an influence of the size of crochet hook, DROPS Muskat is here worked with the usual crochet hook size - remember your DROPS store will answer you even per mail or telephone -you can check their number/e-mail in the retailer list. Happy crocheting!
15.03.2016 - 11:25Franca wrote:
Hi, i'm trying to realize this model, i've got muskat and tried with hook 4,5 and m it's enormous, then tried 3,5 snd still no fitting 5 arc m1 in 10 cm... so i tried 2,5 but still no and also it's impossible to crochet (thread keeps dividing) what else can i do? are instructions correct?
14.03.2016 - 21:47DROPS Design answered:
Dear Franca, you have to work several repeat in width and in height then measure your gauge in M.1 and in M.2 - your DROPS store will have probably further tips & advices for you. Happy crocheting!
15.03.2016 - 09:07
![]() Regina Reifferscheid wrote:
Regina Reifferscheid wrote:
Leider komme ich mit einem Anschlag von 187 Lm (bei Gr. XS/S) überhaupt nicht hin! Die Maschenprobe ergibt bei mir (5 große Lm- Bogen im Muster1, 15 cm !!? Da ich noch noch ein Restbestand an Wolle hatte; (60% Baumwolle, 40% Polyacryl, Nadelstärke 3,5-4,5, Maschenprobe glatt rechts = 22M x 26 R.),suchte ich mir diese schöne Jacke aus. Das wird alles viel zu groß, verstehe nicht warum. Ich benutze eine Häkelnadel Nr. 4,5 ! Über eine Antwort würde ich mich sehr freuen.
13.03.2016 - 12:01DROPS Design answered:
Liebe Frau Reifferscheid, diese Anleitung wurde für die Qualität Muskat geschrieben und die Maschenprobe ist darauf angepasst. Leider können wir die Anleitung nicht für eine andere Qualität umrechnen.
14.03.2016 - 08:49
![]() Karin wrote:
Karin wrote:
Ik heb een vraag over het minderen bij de hals. ik begrijp het telpatroon M3 niet, zou u dat kunnen omschrijven per toer?
10.03.2016 - 11:14DROPS Design answered:
Hoi Karin. Lees hier hoe je onze telpatronen moet lezen. Je haakt de M.3 over de boogjes van 4/5 lossen, met bijvoorbeeld (eerste toer) van links naar rechts 5 l, 1 v in de middelste l op de l-lus, maak 2 l en 1 hv in dezelfde l als de v, dan 5 l, weer 1 v in de middelste l op de l-lus..enzovoort, 5 l, en 1 v (het kruisje) om de laaste l-lus op de toer, keer en haak 3 l, en 1 v in de middelste l op de eerste l-lus, enzovoort. Op deze manier maak je een mindering langs de hals.
10.03.2016 - 13:40
![]() Sheila wrote:
Sheila wrote:
I would love to try this pattern - Buttercup - but I can't even figure out how many to stitches to chain to start so think this is too complicated for me. I need line by line instructions I think rather than a picture diagram. I am teaching myself and have made a few projects, but this is too advanced for me I think. It is so beautiful though I'm annoyed with myself that I can't figure it out.
02.10.2015 - 19:33DROPS Design answered:
Dear Sheila, each symbol represents 1 st or group of st, read diagram from the right towards the left from RS and from the left towards the right from WS. For any help and assistance to this pattern, please contact your DROPS store. Happy crocheting!
03.10.2015 - 08:53
![]() Marjan wrote:
Marjan wrote:
Hallo, Ik heb 187 losse gemaakt en dan kan ik niet verder.. Hoe zit dat met 3-5-1-2-4 l? En 160-192-224-255-287? Alvast bedank!
13.08.2015 - 16:20DROPS Design answered:
Hoi Marjan. Je haakt de kleinste maat (XS/S) en begint met 187 l, daarna moet je de beschrijving verder volgen met de eerste getal in de reeks (net zoals bij het opzetten van de lossen): Dus je haakt: Keer, haak 1 v in de 2e l van de haak, haak dan 1 v in iedere van de volgende 3 l, * sla 1 l over, haak 1 v in iedere van de volgende 6 l *, herhaal van *-* de rest van de toer, en dan eindig je met 160 v op de toer.
14.08.2015 - 12:49
![]() Carla De Waal wrote:
Carla De Waal wrote:
Dit bedoel ik: Wordt heen en weer gehaakt van middenvoor naar middenvoor. Haak eerst PATROON 1 tot de schouder, haak dan PATROON 2 vanaf de opzetrand naar beneden. De mouwen worden vanaf de armsgaten naar beneden gehaakt. Je haakt vanuit de hals naar beneden?
04.08.2015 - 10:48DROPS Design answered:
Hoi Carla. zie mijn antwoord hieronder.
04.08.2015 - 14:35
|
||||||||||||||||
Buttercup#buttercupcardigan |
||||||||||||||||
 |
 |
|||||||||||||||
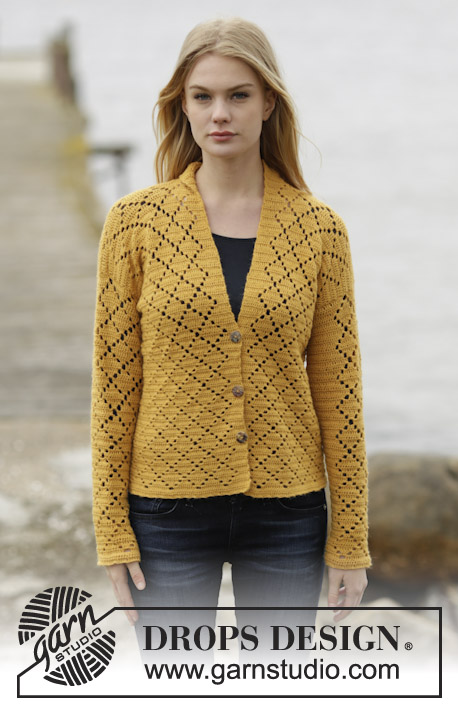
Crochet DROPS jacket in ”Muskat”. Size: XS - XXXL.
DROPS 136-30 |
||||||||||||||||
|
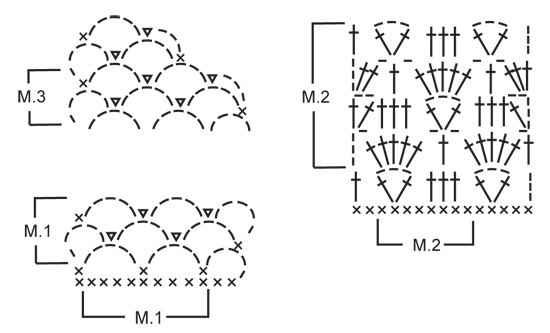
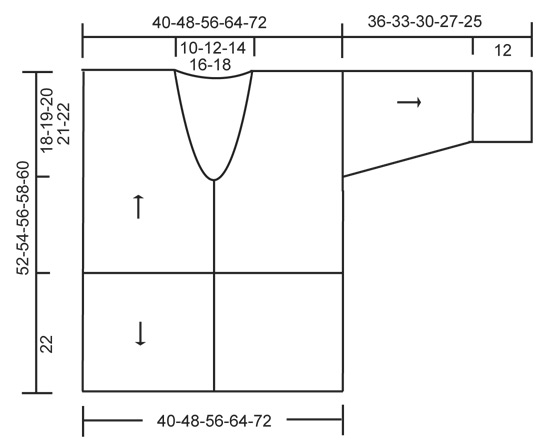
PATTERN 1 (also see diagram M.1): ROW 1: See explanation in pattern. ROW 2: ch 5, 1 sc in middle ch on first ch-space, ch 2, 1 sl st in same ch, * ch 5, 1 sc in middle ch on next ch-space, ch 2, 1 sl st in same ch *, repeat from *-* until 1 ch-space remains, ch 5, 1 sc in middle ch on last ch-space, turn piece. Repeat 2nd row upwards. PATTERN 2 (also see diagram M.2): ROW 1: See explanation in pattern. ROW 2: ch 4, * 5 dc in ch-space, ch 1, skip 2 dc, 1 dc in next dc, ch 1, skip 2 dc *, repeat from *-* until 1 ch-space remains, work 5 dc in this ch-space, ch 1 and 1 dc in 3rd ch from beg of row, turn piece. ROW 3: ch 5, 1 dc in first dc, * skip 1 dc, 1 dc in each of the next 3 dc, skip 1 dc, in next dc work 1 dc + ch 3 + 1 dc *, repeat from *-* until 5 dc remain, skip 1 dc, 1 dc in each of the next 3 dc, skip 1 dc, 1 dc + ch 2 + 1 dc in 3rd ch from beg of previous row, turn piece. ROW 4: ch 3, 2 dc in first ch-space, * ch 1, skip 2 dc, 1 dc in next dc, ch 1, skip 2 dc, in next ch-space work 5 dc *, repeat from *-* until 5 dc remain, ch 1, skip 2 dc, 1 dc in next dc, ch 1, skip 2 dc, in last ch-space work 3 dc, turn piece. ROW 5: 3 ch, skip 2 dc, * in next dc work 1 dc + 3 ch + 1 dc, skip 1 dc, 1 dc in each of the next 3 dc, skip 1 dc *, repeat from *-* until 4 dc remain, in next dc work 1 dc + 3 ch + 1 dc, skip 2 dc, 1 dc in 3rd ch from beg of previous row. Repeat rows 2 to 5. -------------------------------------------------------- JACKET: Worked back and forth from mid front. First work PATTERN 1 up to shoulder, then work PATTERN 2 from cast on edge and down. The sleeves are worked from armholes and down. Ch 187-224-262-298-335 on hook size 4.5 mm/US 7 with Muskat. Turn, work 1 sc in 2nd ch from hook, then work 1 sc in each of the next 3-5-1-2-4 ch, * skip ch 1, work 1 sc in each of the next 6 ch *, repeat from *-* the rest of row = 160-192-224-255-287 sc. Work next row as follows: ch 5, skip the first 2 sc, 1 sc in next sc, * ch 5, skip 3 sc, 1 sc in next sc, ch 5, skip 4 sc, 1 sc in next sc *, repeat from *-* until 4-0-5-0-5 sc remain, work these: SIZE XS/S: ch 5, skip 3 sc, 1 sc in last sc. Sizes M and XXL are done. SIZE L/XL and XXXL: ch 5, skip 4 sc, 1 sc in last sc. Turn piece (= 35-42-49-56-63 large ch-spaces + loop used when turning at beg of row). Continue PATTERN 1 (beg on 2nd row) – see explanation above! REMEMBER THE CROCHET GAUGE! When piece measures approx. 12-13-14-15-16 cm / 4¾"-5⅛"-5½"-6"-6¼", divide for armholes and finish each piece separately. RIGHT FRONT PIECE: Work diagram M.1 back and forth over the first 9-11-12-14-16 large ch-spaces - AT THE SAME TIME next time 3rd row in diagram is worked, dec for neck according to diagram M.3. Repeat dec until 6-7-9-10-11 large ch-spaces remain on shoulder. Continue to work diagram M.1 until piece measures approx. 29-31-33-35-37 cm / 11⅜"-12¼"-13"-13¾"-14½"– work last row as follows: ch 5, 1 sc in middle ch on first ch-space from previous row, * ch 5, 1 sc in middle ch on next ch-space *, repeat from *-* the rest of row, cut the yarn. LEFT FRONT PIECE: Work as right front piece but reversed. BACK PIECE: Work back and forth over the middle 17-20-25-28-31 large ch-spaces. When piece measures approx. 29-31-33-35-37 cm / 11⅜"-12¼"-13"-13¾"-14½" (count so that no of ch-spaces vertically on front piece is the same as on back piece), work 1 last row over 6-7-9-10-11 ch-spaces in each side as on front piece (the 5-6-7-8-9 middle ch-spaces = neck). EDGE AT THE BOTTOM: Work down from cast on edge as follows (beg from WS): 1 sl st in first sc, then ch 3, skip 2 sc, in next sc work 1 dc + ch 3 + 1 dc, * skip 2 sc, work 1 dc in each of the next 3 sc, skip 2 sc, in next sc work 1 dc + ch 3 + 1 dc *, repeat from *-* until 4-4-4-3-3 sc remain, skip 3-3-3-2-2 sc and work 1 dc in last sc, turn piece. Continue PATTERN 2 (beg on 2nd row) – see explanation above! There will be a total of 20-24-28-32-36 repetitions on row. Work diagram M.2 for approx. 22 cm / 8¾", finish after 2nd or 4th row in pattern. Work last row as follows: * ch 3, skip 1 st (either 1 dc or 1 ch), 1 sc in next dc *, repeat from *-* the rest of row, cut the thread. The entire body measures approx. 52-54-56-58-60 cm / 20½"-21¼"-22"-22¾"-23⅝" vertically. ASSEMBLY: Crochet the shoulders tog as follows: * 1 sc in first large ch-space on front piece, ch 2, 1 sc in first large ch-space on back piece, ch 2 *, repeat from *-* on both shoulders. SLEEVE: Worked back and forth from armhole and down. Work 1 sc in first ch-space at the bottom of armhole, * ch 5, skip approx. 2 cm / ¾", fasten with 1 sc *, repeat from *-* until bottom of other side of armhole, there should be 18-19-20-21-22 ch-spaces in total. Turn and continue with 2ND ROW in PATTERN 1 (= 17-18-19-20-21 large ch-spaces on row + ch-space used when turning). When piece measures 2 cm / ¾", dec 1 large ch-space at the end of next row, this is done by working until 2 large ch-spaces remain, ch 5, skip first ch-space and work 1 sc in middle ch on last ch-space. Repeat dec every 4-3-3-2-2 cm / 1½"-1⅛"-1⅛"-¾"-¾" (dec alternately in the right and left side) until 11-11-13-13-15 large ch-spaces remain + ch-space used when turning. When sleeve measures 24-21-18-15-13 cm / 9½"-8¼"-7"-6"-5⅛" (shorter measurements in the larger sizes because of wider shoulders), work next row as follows: ch 5, 1 sc in middle ch on first ch-space, * ch 5, 1 sc in middle ch on next ch-space *, repeat from *-* the rest of row. Work next row as follows: 4 sc in every ch-space and 3 sc in last ch-space on row = 47-47-55-55-63 sc. Work next row as follows: ch 3, skip the first 2 sc, in next sc work 1 dc + ch 3 + 1 dc, * skip 2 sc, work 1 dc in each of the next 3 sc, skip 2 sc, in next sc work 1 dc + ch 3 + 1 dc *, repeat from *-* until 4 sc remain, skip 3 sc and work 1 dc in last sc, turn piece. Continue PATTERN 2 (beg on 2nd row) – see explanation above! There will be a total of 6-6-7-7-8 repetitions on row. When diagram M.2 has been worked for approx. 12 cm / 4¾" (finish after 2nd or 4th row in pattern), work next row as follows: * ch 3, skip 1 st (either 1 dc or 1 ch), 1 sc in next dc *, repeat from *-* the rest of row, cut the yarn. ASSEMBLY: Work sleeve seams tog the same way as on shoulders. BANDS AND NECK EDGE: Work 1 sc row up along right band, around the neck and down along left band - make sure that sc row neither tightens nor widens the edges. There should be approx. 16 sc on 10 cm / 4". Turn and work 1 row with 1 sc in every sc - when finished around the neck and beg down right front piece work as follows: 1 sc in first sc, ch 2, skip 2 sc (= button hole), continue with sc down along the rest of front piece. Turn and work 1 sc row – work 2 sc in ch-space. Fasten off. Sew on button. |
||||||||||||||||
Diagram explanations |
||||||||||||||||
|
||||||||||||||||
 |
||||||||||||||||
 |
||||||||||||||||
Have you finished this pattern?Tag your pictures with #dropspattern #buttercupcardigan or submit them to the #dropsfan gallery. Do you need help with this pattern?You'll find 3 tutorial videos, a Comments/Questions area and more by visiting the pattern on garnstudio.com. © 1982-2026 DROPS Design A/S. We reserve all rights. This document, including all its sub-sections, has copyrights. Read more about what you can do with our patterns at the bottom of each pattern on our site. |
||||||||||||||||


With over 40 years in knitting and crochet design, DROPS Design offers one of the most extensive collections of free patterns on the internet - translated to 17 languages. As of today we count 324 catalogs and 12291 patterns - 12281 of which are translated into English (US/in).
We work hard to bring you the best knitting and crochet have to offer, inspiration and advice as well as great quality yarns at incredible prices! Would you like to use our patterns for other than personal use? You can read what you are allowed to do in the Copyright text at the bottom of all our patterns. Happy crafting!
Post a comment to pattern DROPS 136-30
We would love to hear what you have to say about this pattern!
If you want to leave a question, please make sure you select the correct category in the form below, to speed up the answering process. Required fields are marked *.