
Popular categories
Looking for a yarn?


Comments / Questions (77)
![]() Karin Jarl Borg wrote:
Karin Jarl Borg wrote:
Er det riktig at det ikke skal strikkes forhøyning bak? Har alltid gjort det på dresser/bukser til bleiebarn.
19.06.2022 - 14:47DROPS Design answered:
Hei Karin. På denne modellen er det ikke skrevet inn en forhøyning bak. Ønsker du å ha det, kan du fint strikke en, men vi har dessverre ikke mulighet til å skrive det inn/tilpasse hver enkelt str. til denne modellen. mvh DROPS Design
20.06.2022 - 14:17
![]() Eva Fjell wrote:
Eva Fjell wrote:
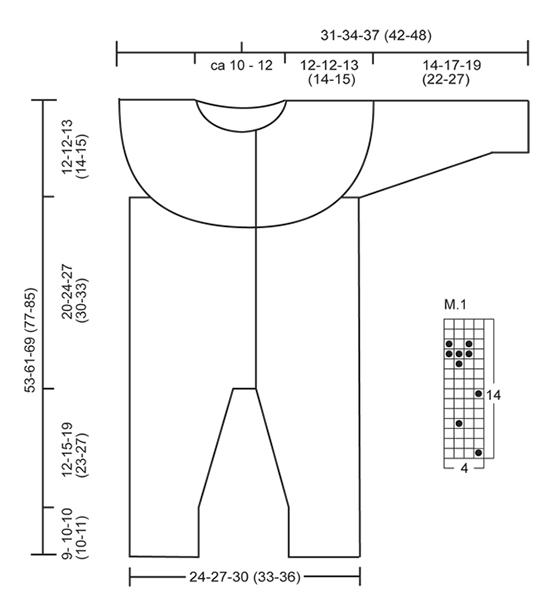
Hvor finner jeg diagrammene M1 og M2?
25.09.2021 - 22:31DROPS Design answered:
Hej Eva. M.1 hittar du vid sidan av måleskissen och M.2 under måleskissen. Mvh DROPS Design
27.09.2021 - 08:19
![]() Delphine wrote:
Delphine wrote:
Bonjour, Je suis en train de tricoter cette combinaison, je viens de finir les 2 jambes. Par contre, comme une autre tricoteuse, je n'arrive tout simplement pas à les mettre sur la même aiguille. C'est tout simplement physiquement impossible. Ou alors je vais abimer le tricot. Comment faire alors? est-ce qu'il faut tout détricoter et recommencer en aller-retour plutôt qu'en rond? Je vous remercie pour votre aide.
01.07.2021 - 20:08DROPS Design answered:
Bonjour Delphine, vous tricotez les 2 jambes en allers et retours, vous pouvez continuer sur les aiguilles doubles pointes pendant quelques rangs si vous êtes plus à l'aise (en tournant bien à la fin de chaque rang), mais l'aiguille circulaire devrait vous permettre de pouvoir tricoter librement toutes les mailles (contrairement à une aiguille droite effectivement).. Bon tricot!
02.07.2021 - 07:21
![]() Susanna wrote:
Susanna wrote:
Hallo, Ist es bei M2 angedacht dass der Faden am Ende einer Reihe öfters abgeschnitten wird (z.B. hellgrau lila nach der ersten Reihe)? Ansonsten habe ich das Problem, dass sich die Wolle in der richtigen Farbe für das Muster leider am falschen Ende der Reihe befindet? Dankeschön!
09.03.2021 - 23:18DROPS Design answered:
Liebe Susanna, wenn man mit einer Rundnadel strickt, kann man die Reihen anfangen, bei der Seite wo der Faden ist. Viel spaß beim stricken!
10.03.2021 - 07:28
![]() Marion Schuhmann-Ränsch wrote:
Marion Schuhmann-Ränsch wrote:
Die Maschenprobe stimmt bei mir überhaupt nicht. Nach der ersten Probe habe ich gleich eine Nadel Nr. 3 probiert. Allerdings kommt nun bei der Maschenprobe nur 9 x 9 cm heraus. Was soll ich tun? Bei diesem Anzug ist es ja sehr wichtig, daß die Maschenprobe passt.
18.10.2020 - 10:48DROPS Design answered:
Liebe Frau Schuhmann-Ränsch, waschen Sie und lassen Sie Ihre Maschenprobe trocknen (= spannen Sie sie) und prüfen Sie noch mal, ob sie 10 x10 cm misst, sonnst sollen Sie mit grösseren Nadeln noch einmal versuchen - hier lesen Sie mehr über die Maschenprobe. Viel Spaß beim stricken!
19.10.2020 - 09:01
![]() Katherine wrote:
Katherine wrote:
Hello! The suit is absolutely gorgeous and the knitting with DROPS yarn is a pleasure, but I've got a question on knitting the sleeves. Is there a mistake or I should increase every three *rounds*, not *cm* ? In this case all increases (for 12-18m size) are made by the 27th row, which is less than 10 cm. Thx in advance
25.09.2020 - 13:19DROPS Design answered:
Dear Katherine, pattern is correct, you increase on every 3rd round in size 12/18 monts and at 15 cm from cast on edge work M.1 then cast off mid under sleeve. Happy knitting!
25.09.2020 - 14:42
![]() Chris Lapointe wrote:
Chris Lapointe wrote:
Is there a yarn that I can substitute for this pattern? (Winter Wonder) I'm looking for more colour options.
23.06.2020 - 18:28DROPS Design answered:
Dear Mrs Lapointe, you can find here all colours available in DROPS BabyAlpaca Silk - try our yarn converter to find alternatives (click on their name to see their shadecard). Happy knitting!
24.06.2020 - 07:20
![]() Marie-Louise Björk wrote:
Marie-Louise Björk wrote:
Hej! Är det meningen att jag ska klippa av garnet efter varje varv när jag stickar mönstret i oket? Eller tänker jag fel?
10.09.2019 - 14:06DROPS Design answered:
Hej Marie-Louise, i och med att du stickar på rundsticka, så kan du börja varvet i den sidan du har tråden. Lycka till :)
10.09.2019 - 15:44
![]() Vivi Baun Højland wrote:
Vivi Baun Højland wrote:
Har generelt været glad for drops opskrifter, men denne virker som en skrivebordsøvelse uden praksis. Perlestrik rundt med lige antal masker og et mønster hvor garnet ikke følger med, men skal brydes 😫. Virker så uigennemtænkt. 👎
15.07.2019 - 14:21
![]() Varpu Torkko wrote:
Varpu Torkko wrote:
Hei. Ostin alpaca uni colour lankaa. Mikään ohje ei ollut tälle langalle. Jos teen ohjeen mukaan omalla langalla niin eikö työstä tule isompi kokoinen kuin malli, kun tämä on ohuempi lanka.?
06.06.2019 - 13:07DROPS Design answered:
Hei, voit korvata BabyAlpaca Silk -langan Alpaca-langalla, niiden neuletiheys ja menekki on sama.
08.01.2020 - 16:50
|
||||||||||
Winter Wonder#winterwonderonesie |
||||||||||
|
|
||||||||||
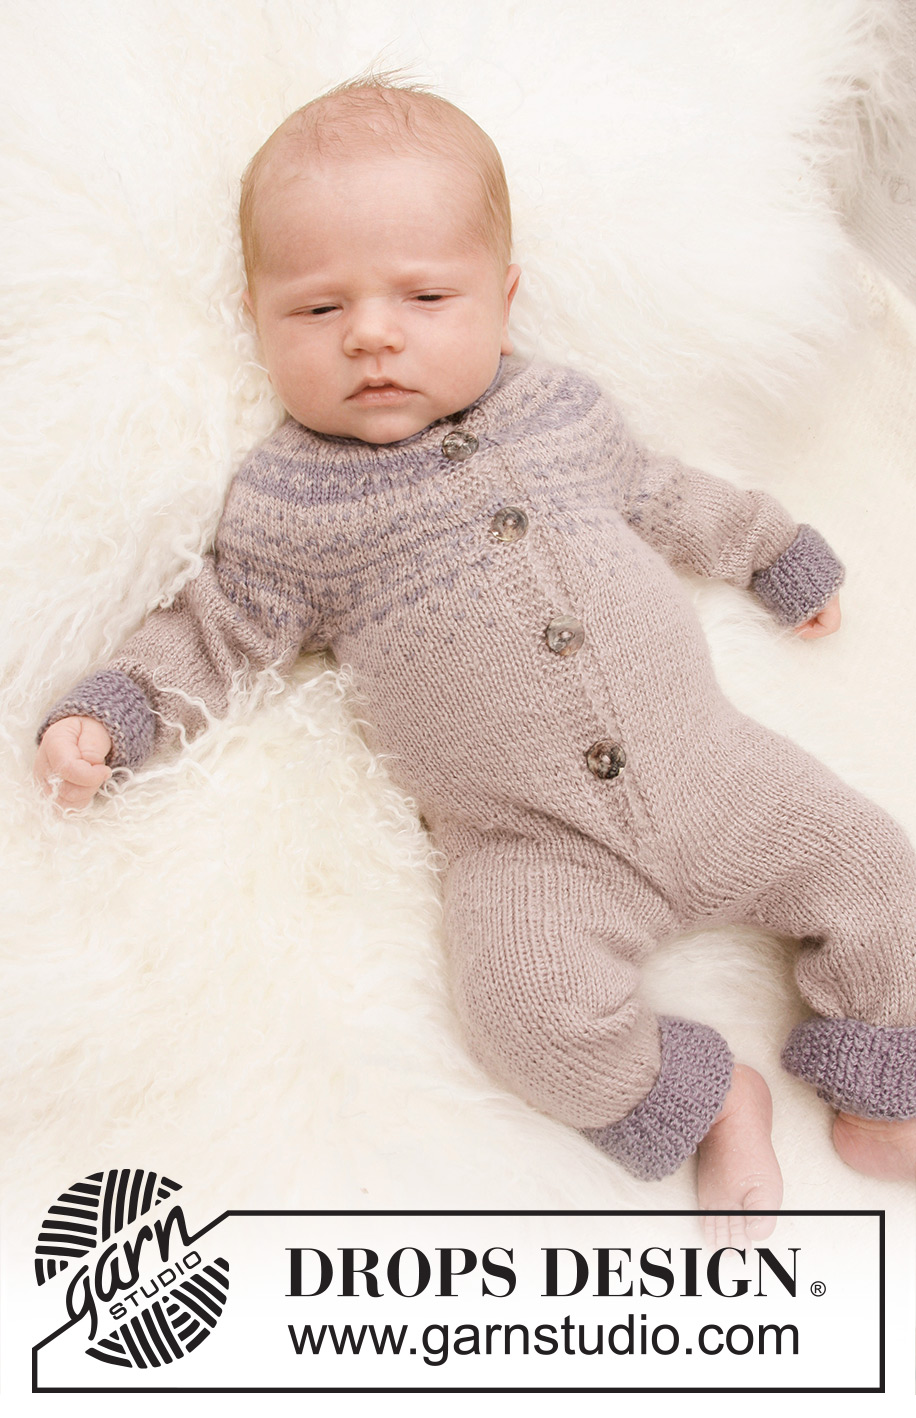
Knitted jumpsuit with Nordic pattern for baby and children in DROPS BabyAlpaca Silk
DROPS Baby 21-3 |
||||||||||
|
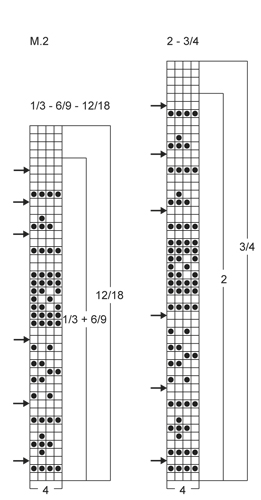
SEED ST (in the round on double pointed needles): ROUND 1: * K 1, P 1 *, repeat from *-*. ROUND 2: K over P and P over K. Repeat 2nd round. INCREASE TIP: Inc 1 st by working 2 sts in 1 st before and after the marker. GARTER ST (back and forth on needle): K all rows. PATTERN: See diagrams M.1 and M.2. BUTTON HOLES: Bind off for button holes by K 4th and 5th st from edge tog, then make 1 YO. Bind off for 5-5-5 (6-6) button holes on right band when piece measures from where legs were placed tog: 1/3 months: 6, 12, 17, 22, 27 cm / 2⅜", 4¾", 6¾", 8¾", 10⅝". 6/9 months: 6, 12, 18, 24, 30 cm / 2⅜", 4¾",7", 9½", 11¾". 12/18 months: 7, 14, 21, 28, 34 cm / 2¾", 5½", 8¼", 11", 13⅜". 2 years: 7, 14, 20, 26, 32, 38 cm / 2¾", 5½", 8", 10¼", 12½", 15". 3/4 years: 7, 14, 21, 28, 35, 42 cm / 2¾", 5½", 8¼", 11", 13¾", 16½". ---------------------------------------------------------- LEG: Worked in the round on double pointed needles. Cast on 46-50-52 (54-60) sts on double pointed needles size 2.5 MM = US 1.5 with grey purple, work moss st for 9-10-7 (8-9) cm = 3½"-4"-2¾" (3⅛"-3½") - Read explanation above. Insert a marker at beg of round (= inside of leg) and move the marker upwards. Then switch to light grey purple and then continue in stockinette st - while at the same time inc 2 sts on next round on each side of marker - Read INCREASE TIP above. Repeat inc every 3-3-4 (4-4) rounds a total of 11-13-17 (20-21) times = 68-76-86 (94-102) sts. When piece measures 21-25-29 (33-37) cm, bind off 3-3-4 (4-4) sts on each side of marker (= 6-6-8-8-8 sts bind off) = 62-70-78 (86-94) sts. Put piece aside and knit another leg the same way. BODY: Slip both legs in on same circular needle size 2.5 mm / US 1or2 with bound off sts towards each other = 124-140-156 (172-188) sts. Now measure piece from here. Continue to work back and forth from mid front with light gray purple as follows (1st row = RS): Cast on 5 new sts on needle, K over all sts and cast on 5 new sts at the end of row = 134-150-166 (182-198) sts. Insert a marker 36-40-44 (48-52) sts in from each side (= 62-70-78 (86-94) sts between markers on back piece). Move the markers upwards when working. Then work in stockinette st but work the 5 outermost sts in each side towards mid front in garter st until finished measurements (= front bands). AT THE SAME TIME when piece measures 6-6-7 (7-7) cm / 2⅜"-2⅜"-2¾" (2¾"-2¾"), bind off for first button hole on right band - Read explanation above. When piece measures 16-20-23 (26-29) cm / 6¼"-8"-9" (10¼"-11⅜"), work diagram M.1 on next row from RS with 5 band sts in each side. NOTE: On last row in diagram M.1 (= WS), bind off 4-4-4 (5-5) sts on each side of every marker for armholes (= 8-8-8 (10-10) dec sts in each side) = 118-134-150 (162-178) sts. Now the piece measures approx. 20-24-27 (30-33) cm / 8"-9½"-10⅝" (11¾"-13") from where legs were placed tog. Put piece aside and knit the sleeves. SLEEVE: Worked in the round on double pointed needles. Cast on 38-40-42 (44-46) sts on double pointed needles size 2.5 mm / US 1or2 with gray purple, work seed st for 5-5-5 (6-6) cm / 2"-2"-2" (2½"-2½"). Insert a marker at beg of round (= mid under sleeve) and move the marker upwards. Then switch to light gray purple and then continue in stockinette st - while at the same time inc 1 st on next round on each side of marker. Repeat inc every 2-3-3 (4-5) rounds a total of 7-8-9 (10-11) times = 52-56-60 (64-68) sts. When piece measures 10-13-15 (18-23) cm / 4"-5⅛"-6" (7"-9"), work diagram M.1 - On last round in diagram M.1, bind off 4-4-4 (5-5) sts on each side of marker for armhole (= 8-8-8 (10-10) sts bind off) = 44-48-52 (54-58) sts. Put piece aside and knit another sleeve the same way. YOKE: Slip sleeves on to same circular needle as body where armholes were bind off = 206-230-254 (270-294) sts. Then work diagram M.2 back and forth with 5 band sts in garter st in each side towards mid front (1st row = RS). NOTE: Dec 20-20-24 (24-28) sts evenly on row which is marked with an arrow in diagram M.2. REMEMBER TO CONTINUE TO BIND OFF FOR BUTTON HOLES ON RIGHT BAND! When diagram M.2 has been worked, there are 86-110-110 (126-126) sts on needle and piece measures approx. 12-12-13 (14-15) cm / 4¾"-4¾"-5⅛" (5½"-6") from where sleeves were placed tog (i.e. 1st row in diagram M.2). NECK EDGE: Then work back and forth in seed st with gray purple as follows: K from RS while at the same time dec 4-20-16 (30-26) sts evenly on 1st row (= RS) = 82-90-94 (96-100) sts. Then work 1 row in seed st. On next row from RS, bind off for last button hole on right band. Continue in seed st until neck edge measures 2-2-2 (3-3) cm / ¾"-¾"-¾" (1⅛"-1⅛"). Loosely bind off all sts. ASSEMBLY: Sew tog the openings under the sleeves and between the legs, sew on buttons. |
||||||||||
Diagram explanations |
||||||||||
|
||||||||||
 |
||||||||||
 |
||||||||||
Have you finished this pattern?Tag your pictures with #dropspattern #winterwonderonesie or submit them to the #dropsfan gallery. Do you need help with this pattern?You'll find 16 tutorial videos, a Comments/Questions area and more by visiting the pattern on garnstudio.com. © 1982-2026 DROPS Design A/S. We reserve all rights. This document, including all its sub-sections, has copyrights. Read more about what you can do with our patterns at the bottom of each pattern on our site. |
||||||||||


With over 40 years in knitting and crochet design, DROPS Design offers one of the most extensive collections of free patterns on the internet - translated to 17 languages. As of today we count 324 catalogs and 12278 patterns - 12268 of which are translated into English (US/in).
We work hard to bring you the best knitting and crochet have to offer, inspiration and advice as well as great quality yarns at incredible prices! Would you like to use our patterns for other than personal use? You can read what you are allowed to do in the Copyright text at the bottom of all our patterns. Happy crafting!
Post a comment to pattern DROPS Baby 21-3
We would love to hear what you have to say about this pattern!
If you want to leave a question, please make sure you select the correct category in the form below, to speed up the answering process. Required fields are marked *.