
Popular categories
Looking for a yarn?


Comments / Questions (25)
![]() Giuseppina wrote:
Giuseppina wrote:
Hallo zusammen! ich hab eine Frage bezüglich dieser Passage: ZUSAMMENNÄHEN: Die Schulternaht zusammennähen. Die Knöpfe annähen. Sollen die Knöpfe nur als Deko dienen? Oder sollte da evtl. stehen "Die Seitennähte zusammennähen.?" Besten Dank für die Hilfe! Giuseppina
11.09.2016 - 22:30DROPS Design answered:
Liebe Giuseppina, die Knöpfe sollen auf dem Rückenteil aufgenäht, den Knopflöchern von dem Vorderteil gegenüber.
12.09.2016 - 09:56
![]() Sabrina wrote:
Sabrina wrote:
Hallo, das Kleidchen ist wirklich süß! Allerdings stimmt in den Größenangaben etwas nicht, 74/88 soll bestimmt 74/80 heißen oder? LG Sabrina
04.09.2016 - 23:42DROPS Design answered:
Liebe Sabrina, das ist ja korrekt, Anleitung wurde korrigiert. Herzlichen Dank!
09.09.2016 - 11:07
![]() Monique wrote:
Monique wrote:
Ja, ich habe das Original-Garn Drops Merino Extra Fine genommen. Mit der 4,5er Häkelnadel bin ich jetzt auf 17 Maschen auf 10cm gekommen. Ich werde einfach eine 5er nehmen und dann klappt es sicher :-) Danke für die Hilfe.
05.11.2015 - 22:05DROPS Design answered:
Ja, es hört sich so an, dass Sie mit einer 5-er Nadel die richtige Maschenprobe erhalten müssten. Gutes Gelingen und viel Spaß beim Häkeln!
07.11.2015 - 12:16
![]() Monique wrote:
Monique wrote:
Hallo :-) Ich komme mit der Maschenprobe für das Kleidchen nicht zurecht. Ich möchte das Kleid für die Größe 74/80 machen. Mit einer 5er-Häkelnadel komme ich nach 2 Reihen H-Stb nicht auf 41cm, sondern nur auf 34cm. Mit einer 6er-Nadel sind es 37,5cm. Muss ich eine 7er-Nadel nehmen, wenn doch 4,5 angegeben ist. Ich häkel auch weder zu straff noch zu locker. Haben Sie eine Idee, was ich falsch mache bzw. was ich anders machen sollte? Vielen herzlichen Dank. Monique
17.10.2015 - 21:54DROPS Design answered:
Haben Sie denn ein passendes Garn verwendet? Halten Sie sich an die angegebene Maschenprobe, die oben unter dem Material genannt ist, 10 cm in der Breite müssten Sie mit 16 H-Stb erreichen. Schlagen Sie hierfür mindestens 20 Luft-M an und häkeln Sie Halb-Stb, dann messen Sie in der Mitte aus, wie viele Sie auf 10 cm benötigen und passen ggf. die Nadelstärke an. Wichtig ist, dass Sie entweder das Originalgarn oder ein Garn ähnlicher Stärke verwenden, dann sollte es mit der Maschenprobe klappen.
29.10.2015 - 14:27
![]() Michela wrote:
Michela wrote:
Buonasera. Volevo provare a fare il cappello, ma non trovo la descrizione per quanto riguarda il motivo tipo pizzetto. Forse interpreto male qualcosa. Grazie mille
22.08.2015 - 19:02DROPS Design answered:
Buonasera Michela, le istruzioni del cappellino ci sono tutte, quale parte non le è chiara? Buon lavoro!
22.08.2015 - 21:22
![]() Michela wrote:
Michela wrote:
Buonasera. Volevo provare a fare il cappello, ma non trovo la descrizione per quanto riguarda il motivo tipo pizzetto. Forse interpreto male qualcosa. Grazie mille
22.08.2015 - 19:01DROPS Design answered:
Buonasera Michela, le istruzioni del cappellino ci sono tutte, quale parte non le è chiara? Buon lavoro!
22.08.2015 - 21:23
![]() Madeleine wrote:
Madeleine wrote:
Hallo, ich finde das Kleidchen richtig süß und würde es sehr gerne nachhäkeln. Doch leider bin ich nicht so geübt in Häkelschrift lesen. Gibt es noch eine andere Anleitung die für mich einfacher ist? Ich komme mit den ganzen Zahlen in den Klammern nicht zurecht. Vielleicht kann mir jemand helfen. Vielen Dank schon mal Lg Madeleine
24.02.2014 - 16:02DROPS Design answered:
Liebe Madeleine, die Zahlen stehen für die verschiedenen Größen, und zwar in der Reihenfolge, wie sie bei den Größenangaben ganz am Anfang vor den Materialangaben zu finden sind. Sie suchen sich also immer die passende Zahl heraus: wenn Sie z.B. Größe (cm) 74/88 stricken wollen, wählen Sie immer die Zahl vor der Klammer. Wenn Ihnen die Anleitung noch zu schwierig ist, wenden Sie sich am besten an Ihr Wollgeschäft, dort kann man Ihnen weiterhelfen.
24.02.2014 - 23:11
![]() Monika wrote:
Monika wrote:
Een vraag over het minderen is elke (voor mij) 3cm is dit inclusief het rijtje met de vermindering erin?
13.10.2013 - 14:49DROPS Design answered:
Hoi Monika. Je meet in totaal. Dus je mindert op 3 cm, en vervolgens op elke 3 cm = 6, 9, 12 cm enzovoort. Veel haakplezier.
16.10.2013 - 13:35
![]() Annika wrote:
Annika wrote:
Tere, tahaks lapsele kleiti teha aga mitte ei saa sellest 1.reast aru...1. RIDA: vaata heegeldamise infot - heegelda 1 psm 3. ahels-sse heegelnõelast, 1 psm igasse järgmisse 3 ahels-sse, * jäta vahele 1 ahels, 1 psm igasse järgmisesse 4 ahels-sse *, korda * - *, kuni jääb 2-3-5 (3-4) ahels, jäta vahele 1 ahels ja lõpetuseks tee 1 psm igasse viimasesse 1-2-4 (2-3) ahels-sse = 54-59-65 (71-76) poolsammast.Ette tänades
24.06.2013 - 13:12DROPS Design answered:
Millisest kohast täpsemalt aru ei saa?
29.08.2013 - 15:43
![]() Anna wrote:
Anna wrote:
Ik wil ipv een jurkje een hemdje van dit patroon maken. Dus ik wil het patroon korter maken. Voor de maat 2 jr. Met hoeveel lossen moet ik dan beginnen, en hoeveel keer moet ik minderen? Oftewel, waar in het patroon begin ik dan? Ik hoop dat jullie me willen helpen. Bedankt en een groet, Anna
12.04.2013 - 10:09DROPS Design answered:
Hoi Anna. We kunnen je niet helpen met individuele aanpassingen op onze gratis patronen. Je kunt hiervoor beter contact opnemen met jouw verkooppunt of probeer zelf te puzzelen met een juiste oplossing. Veel haakplezier.
17.04.2013 - 22:22
|
|
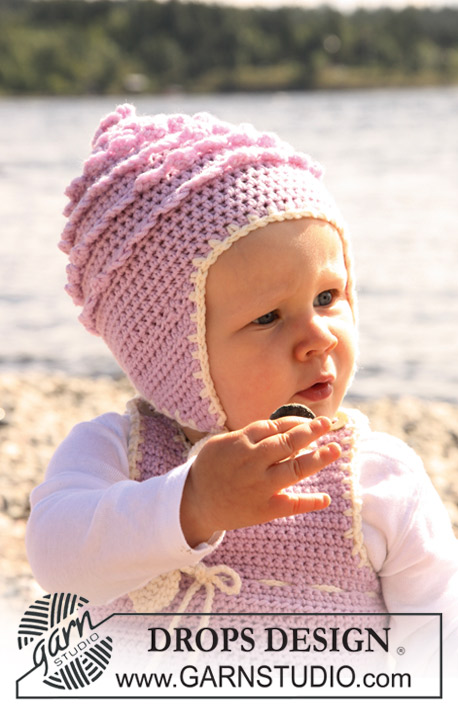
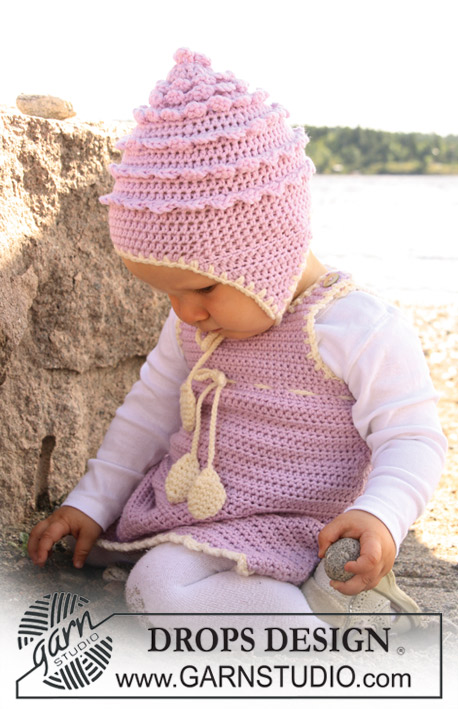
Sweet Little Cupcake#sweetlittlecupcakedress |
|
 |
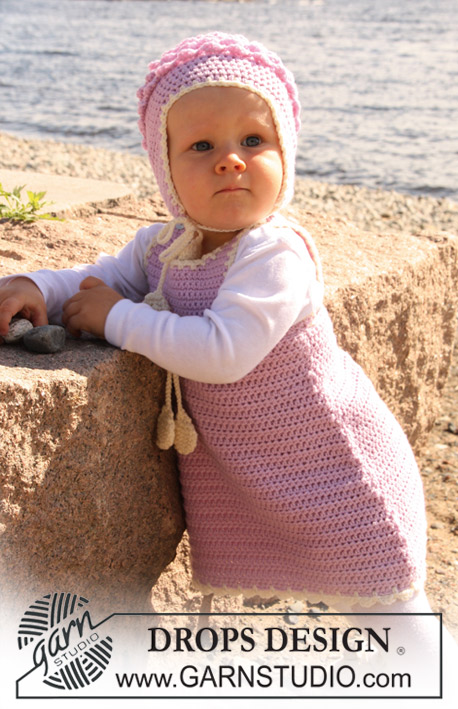 |
Set of crochet dress and hat for baby and children in DROPS Merino Extra Fine
DROPS Baby 20-20 |
|
|
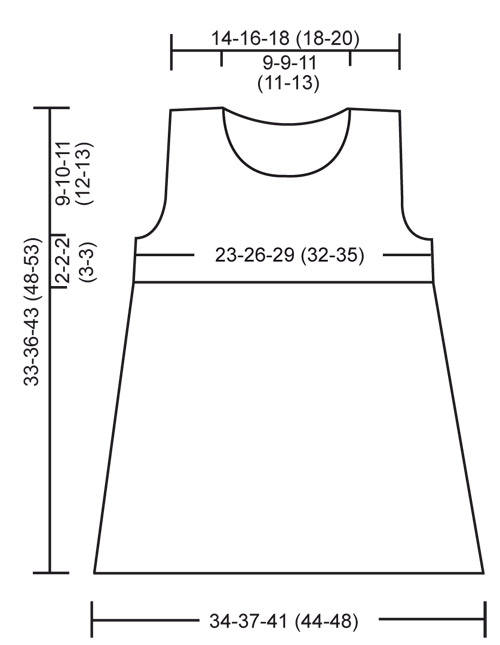
DRESS: CROCHET INFO: Replace first hdc on row with ch 2 and first sc on row with ch 1. Finish each row with hdc with 1 hdc in 2nd ch from beg of previous row and finish each row with sc with 1 sc in first ch from beg of previous row. DECREASING TIP-1: Dec 1 hdc by crochet 2 hdc tog, i.e. crochet 1 hdc but wait with the last YO and pull-through (= 3 sts on hook), crochet 1 hdc in next st and pull the last YO through all 5 sts on hook. DECREASING TIP-2 (applies to armhole and neck): Dec as follows at beg of row: replace 1 sc with 1 sl st. Dec as follows at the end of row: Turn piece when number of sc to be dec remain and work return row. CROCHET SC TOG (applies to pompom): Crochet 2 sc tog to 1 sc as follows: Insert hook in first st, pull thread through, insert hook in next st, pull thread though, make 1 YO and pull thread through all 3 sts on hook. ---------------------------------------------------------- ---------------------------------------------------------- DRESS Worked back and forth in 2 pieces. FRONT PIECE: With hook size 4.5 mm/US 7 and light pink ch 68-74-81 (89-95) (includes 2 ch to turn with). ROW 1: See CROCHET INFO – crochet 1 hdc in 3rd ch from hook, 1 hdc in each of the next 3 ch, * skip 1 ch, 1 hdc in each of the next 4 ch *, repeat from *-* until 2-3-5 (3-4) ch remain, skip 1 ch and finish with 1 hdc in each of the last 1-2-4 (2-3) ch = 54-59-65 (71-76) hdc. Continue with 1 hdc in each hdc – REMEMBER THE CROCHET GAUGE! When piece measures 3 cm / 1⅛" dec 1 hdc each side – See DECREASING TIP-1 - and repeat the dec each side on every 2-2.5-3 (3-3.5) cm / ¾"-⅞"-1⅛" (1⅛"-1¼") a total of 9-9-9 (10-10) times = 36-41-47 (51-56) hdc on row. When piece measures 22-24-30 (33-37) cm / 8¾"-9½"-11¾" (13"-14½") (dec are now complete) work 2 rows with sc (crochet 1 sc in each st). CROCHET NEXT ROW AS FOLLOWS: Crochet 2-1-1 (2-1) sc, * ch 2, skip 2 sc, 1 sc in next st *, repeat from *-* and finish with 1 sc in last sc (= eyelet row for ribbon). Continue with 1 sc in each st (on the row after eyelet row work 1 sc in each sc and 2 sc in each ch-loop) = 36-41-47 (51-56) sc on row. When piece measures 24-26-32 (36-40) cm / 9½"-10¼"-12½" (14¼"-15¾") dec 3-4-5 (5-6) sc each side for armhole – See DECREASING TIP-2 – and dec each side on every row as follows: 2 sc 1-1-1 (2-2) times and 1 sc 2 times = 22-25-29 (29-32) sc. When piece measures 29-31-38 (42-47) cm / 11⅜"-12¼"-15" (16½"-18½") insert a marker mid piece (in SIZE 6/9 MONTHS, 12/18 MONTHS and 2 YEARS insert maker in the middle sc on row). Now dec for neck as follows: Crochet from shoulder towards neck until 4-4-5 (5-7) sc remain before marker (for SIZE 6/9 MONTHS, 12/18 MONTHS and 2 YEARS this is BEFORE sc with marker). Turn piece. Dec for neck on every row from mid front: 2 sc 1 time and 1 sc 1 time = 4-5-6 (6-6) sc left on shoulder. When 3 rows remain before finished measurements make buttonholes on shoulder as follows: crochet 1-1-2 (2-2) sc, ch 2, skip 2 sc, 1 sc in each of the last 1-2-2 (2-2) sts. Work 2 rows sc (crochet 1 sc in each sc and 2 sc in each ch-loop from previous row) = 4-5-6 (6-6) sc. Cut and fasten thread, piece measures approx 33-36-43 (48-53) cm / 13"-14¼"-17" (19"-21"). Repeat on the other side of neck. BACK PIECE: Beg as described for front piece and dec for armhole as described for front piece = 22-25-29 (29-32) sc. When piece measures approx 31-34-41 (46-51) cm / 12¼"-13⅜"-16⅛" (18"-20") insert a marker mid piece (in SIZE 6/9 MONTHS, 12/18 MONTHS and 2 YEARS insert the marker in the middle sc on row). Now dec for neck as follows: Crochet from shoulder towards neck until 5-5-6 (6-8) sc remain before marker (for SIZE 6/9 MONTHS, 12/18 MONTHS and 2 YEARS this is BEFORE sc with marker). Turn piece. Dec 1 sc at the beg of the next 2 rows from mid front = 4-5-6 (6-6) sc left on shoulder. When piece measures 33-36-43 (48-53) cm / 13"-14¼"-17" (19"-21") insert a marker = mid shoulder. Crochet 3 rows sc for button band, cut and fasten thread. Repeat on the other side of neck. ASSEMBLY: Sew side seams edge to edge with neat sts. Sew on buttons to back piece in line with marker on shoulder. CROCHET BORDER: Crochet a border round armholes, along shoulder and round neckline in one with hook size 4.5 mm/US 7 and off-white as follows – beg at the side: 1 sc in first st, * ch 2, skip approx 2 sc/2 rows, 1 sc in next st *, repeat from *-* and finish with ch 2 and 1 sl st in first sc. Crochet a border along bottom edge of dress with hook size 4.5 mm/US 7 and off-white as follows – beg at the side: 1 sc in first st, * ch 3, 1 dc in first ch, skip approx 1.5 cm / ½", 1 sc in next st *, repeat from *-* and finish with 1 sl st in first sc. TIE RIBBON WITH FLAT POMPOMS: Crochet 1 pompom as follows: with hook size 4.5 mm and off-white ch 4 and form a ring with 1 sl st in first ch. NOTE: replace first sc at beg of round with ch 1 and finish each round with 1 sl st in ch from beg of round. ROUND 1: Crochet 4 sc in ring. ROUND 2: Crochet 2 sc in each sc = 8 sc. ROUND 3: * 1 sc in first sc, 2 sc in next sc *, repeat from *-* = 12 sc. ROUND 4-5: Crochet 1 sc in each sc = 12 sc. ROUND 6: * 1 sc in first sc, then crochet the next 2 sc tog – SEE ABOVE *, repeat from *-* = 8 sc. ROW 7: Place piece flat and crochet 1 sc in each sc through both layers = 4 sc. ROW 8: Crochet 2 sc tog 2 times = 2 sc. Crochet another pompom. Crochet 1 sl st in the middle of pompom where the 2 layers are crochet tog and now crochet a string of ch measuring approx 75-80-85 (95-100) cm / 29"-31"-33" (37"-39"). Thread string through eyelet row on dress (beg and finish mid front) and attach string to the other pompom with a sl st in the middle. Cut and fasten thread. --------------------------------------------------------- HAT: CROCHET INFO-1: Replace first hdc on row with ch 2. Finish each row with 1 hdc in 2nd ch from beg of previous row. CROCHET INFO-2: Replace first hdc at beg of round with ch 2. Finish each round with 1 sl st in 2nd ch from beg of round. INCREASING TIP: Inc 1 hdc by working 2 hdc in the last but one hdc. CROCHET 2 HDC TOG: Dec 1 hdc by crochet 2 hdc tog, i.e. crochet 1 hdc but wait with the last YO and pull through (= 3 sts on hook), crochet 1 hdc in next st and when doing the last pull-through pull thread through all 5 sts on hook. CROCHET 2 SC TOG: Crochet 2 sc tog to 1 sc as follows: Insert hook in the first st, pull thread though, insert hook in next st, pull thread through, make 1 YO and pull thread through all 3 sts on hook. --------------------------------------------------------- --------------------------------------------------------- EAR FLAP: With hook size 4.5 mm/US 7 andh light pink ch 5. Crochet 1 hdc in 3rd ch from hook, 1 hdc in the next 2 ch = 4 hdc, turn piece. See CROCHET INFO-1. Crochet 1hdc in each hdc, AT THE SAME TIME inc 1 hdc each side – See INCREASING TIP! Repeat the inc each side on every row a total of 6-7 (8) times = 16-18 (20) hdc. Continue with 1 hdc in each hdc until ear flap measures 6-7 (8) cm / 2⅜"-2¾" (3⅛"). Put piece aside and crochet 1 more ear flap. HAT: See CROCHET INFO-2! Ch 7-8 (9), crochet 1 hdc in each hdc on one ear flap, ch 18-20 (22) (= mid front), crochet 1 hdc in each hdc on the other ear flap, ch 7-8 (9) and finish with 1 sl st in first ch = 64-72 (80) hdc. Continue with 1 hdc in each hdc in the round. When piece measures 8-10 (11) cm / 3⅛"-4" (4⅜") from mid back crochet next round as follows: * 1 hdc in each of the first 6 hdc, then crochet the next 2 hdc tog – SEE ABOVE *, repeat from *-* (= 8-9-10 hdc dec on round). Crochet 1 round without dec and then next round like this: * 1 hdc in each of the first 5 hdc, then crochet the next 2 hdc tog, repeat from *-* around. Repeat the dec (with 1 less hdc between 2 hdc tog for each dec round) on every other round 3 more times = 24-27 (30) hdc on round. Crochet 2-2 (3) rounds without dec. Crochet next round as follows: * 1 hdc in first hdc, then crochet the next 2 hdc tog *, repeat from *-* = 16-18 (20) hdc on round. On next round crochet 2 hdc tog all the way round = 8-9 (10) hdc left on round. Cut the thread, pull it through remaining sts, tighten and fasten. Hat measures approx 17-19 (21) cm / 6¾"-7½" (8¼") from the top. CROCHET BORDER: Crochet a border with hook size 4.5 mm/US 7 and off-white round the opening as follows: * 1 sc in first st, ch 1, skip 1 st/row *, repeat from *-* and finish with 1 sl st in first sc. STRING WITH POMPOM: Beg with pompom: with hook size 4.5 mm/US 7 and off-white ch 4 and then form a ring with 1 sl st in first ch. NOTE: replace first sc on round with ch 1 and finish each round with 1 sl st in ch from beg of round. ROUND 1: Crochet 4 sc in ring. ROUND 2: Crochet 2 sc in each sc = 8 sc. ROUND 3: * 1 sc in first sc, 2 sc in next sc *, repeat from *-* = 12 sc. ROUND 4-5: Crochet 1 sc in each sc = 12 sc. ROUND 6: * 1 sc in first sc, the crochet the next 2 sc tog – SEE ABOVE *, repeat from *-* = 8 sc. ROW 7: Place piece flat and crochet 1 sc in each sc through both layers = 4 sc. ROW 8: Crochet 2 sc tog 2 times = 2 sc. Ch 22-26 (30) cm / 8¾"-10¼" (11¾") for string and fasten with 1 sl st at the point of one ear flap. Repeat on den other side. LACE BORDERS: Crochet approx 7 rounds with lace borders round the hat. Beg in the second round from the top and crochet 1 round as follows: 1 sc in first st, * ch 3, 1 dc in first ch, skip approx 1.5 cm / ½", 1 sc in next st *, repeat from *-* all the way round and finish with 1 sl st in first sc. Cut and fasten thread. Now crochet a further 6 rounds in the same way with approx 2-2.5 cm / ¾"-1" between each round. |
|
 |
|
Have you finished this pattern?Tag your pictures with #dropspattern #sweetlittlecupcakedress or submit them to the #dropsfan gallery. Do you need help with this pattern?You'll find 9 tutorial videos, a Comments/Questions area and more by visiting the pattern on garnstudio.com. © 1982-2026 DROPS Design A/S. We reserve all rights. This document, including all its sub-sections, has copyrights. Read more about what you can do with our patterns at the bottom of each pattern on our site. |
|


With over 40 years in knitting and crochet design, DROPS Design offers one of the most extensive collections of free patterns on the internet - translated to 17 languages. As of today we count 324 catalogs and 12290 patterns - 12280 of which are translated into English (US/in).
We work hard to bring you the best knitting and crochet have to offer, inspiration and advice as well as great quality yarns at incredible prices! Would you like to use our patterns for other than personal use? You can read what you are allowed to do in the Copyright text at the bottom of all our patterns. Happy crafting!
Post a comment to pattern DROPS Baby 20-20
We would love to hear what you have to say about this pattern!
If you want to leave a question, please make sure you select the correct category in the form below, to speed up the answering process. Required fields are marked *.