
Popular categories
Looking for a yarn?


Comments / Questions (37)
![]() Mia Christensen wrote:
Mia Christensen wrote:
HØJRE SKULDER BAGPÅ. 4.RÆKKE: skal lige høre om man skal tage ud på begge sider i samme række. Altså når man starter og slutter. Da jeg ikke gjorde det og kun gjorde det i slutningen af rækken så var der en række st mere på den ene side end på den anden side. Håber i kan hjælpe mig.
04.05.2014 - 22:24
![]() Mia Christensen wrote:
Mia Christensen wrote:
Det er et spørgsmål til det Tina Stormfeldt har skrevet. Der i række 4 når man skal tage ud skal man så tage ud på være ende af rækken. Altså når man starter og slutter? Hvis man ikke skal det så bliver det skævt det gjorde det første gang jeg prøvet. Jeg forstår det ikke helt. Håber i kan hjælper og forstår det jeg skriver
04.05.2014 - 22:15DROPS Design answered:
Du tager ud i slutningen af hver räkke, så det bliver i hver side (men IKKE udtagninger i hver side på samme räkke)Ja det bliver en räkke forskudt men det kan du ikke se ved det färdige resultat!
07.05.2014 - 10:27
![]() Basia wrote:
Basia wrote:
Proszę o przetłumaczenie na polski całej seri tych ubranek: bucików, czapeczki, kocyka, kamizelki i sweterka. są bardzo ładne.
01.05.2014 - 13:45
![]() Basia wrote:
Basia wrote:
Proszę również o prztłumaczenie kamizelki, czapeczki i kocyka. seria jest bardzo ładna a szkoda że nie ma jej po polsku. wogóle bardzo mało wzorów dla dzieci jest w języku polskim. moze czas to zmienic. pozdrawiam
01.05.2014 - 13:37
![]() Basia wrote:
Basia wrote:
Proszę o przetłumaczenie kamizelki na polski
01.05.2014 - 13:32
![]() Tina Stormfeldt wrote:
Tina Stormfeldt wrote:
HØJRE SKULDER BAGPÅ. 4.RÆKKE: I opskriften staar der at man til sidst skal have 50 masker. Men foelger man opskriften bliver det kun 43 masker 12+12+12+1+2+4 Hvad goer jeg saa her?
04.02.2014 - 22:11DROPS Design answered:
Hej Tina. Du skal tage ud i hver side, dvs, du har 36 st efter 4. raekke og tager ud til aermegab i hver side: 1+2+4 = 7 i hver side = 14 = 50 st.
05.02.2014 - 16:46
![]() Tina Stormfeldt wrote:
Tina Stormfeldt wrote:
Hvis jeg foelger opskriften faar jeg 30 og ikke 29 masker, som der staar i opskriften: HØJRE FORSTK: 10+1+5+7+1+2+4=30 Hvad goer jeg saa?
04.02.2014 - 21:39DROPS Design answered:
Hej Tina. Du skal tage ud som fölger: for hals 1 st totalt 5 gange og derefter 7 st 1 gang har du 22 st. Udtagning til aermegab er 1 st 1 gang, 2 st 1 gang og 4 st 1 gang = 7 st = saa skulle du have 29 st naar du er faerdig.
05.02.2014 - 16:39
![]() Tina wrote:
Tina wrote:
Hallo, ich will in Gr.62/68 häkeln. 2.Reihe Rückenteil re.Schulter: wie ist die Angabe gleichzeitig 2Stb. M. aufnehmen gemeint? Wenn ich den Tipp1 richtig verstehe, häkle ich am Ende der 2.Reihe 4 Lm, dann drehe ich die Arbeit, bin der 3.R und häkle in die 4.Lm 1 Stb (=2 Stb). Wie kann ich bekomme ich da in der 2.R bei der Gr. 12 Stb hin? Ich habe 10 Stb und 4 Lm und erst in der 3.R habe ich 12 Stb.
19.01.2014 - 12:41DROPS Design answered:
Liebe Tina, diese Anleitung wurde überprüft und sie ist korrket. Ich habe leider Ihre Frage auch nicht ganz verstehen, darf ich Sie bitten, sich zur genauen Erklärung der Anleitung an den Laden zu wenden, in dem Sie die Wolle gekauft haben?
20.01.2014 - 09:58
![]() GIANNONI wrote:
GIANNONI wrote:
Merci du renseignement très rapide bravo pour ce magnifique site.
18.06.2013 - 13:36
![]() GIANNONI wrote:
GIANNONI wrote:
Bonjour, je ne comprends pas comment faire la dernière augmentation de l'encolure (1 fois 7 B quand je le fais la forme me parait bizarre. merci de m'éclairer.
18.06.2013 - 10:43DROPS Design answered:
Bonjour Mme Giannoni, pour augmenter 1 fois 7B, montez 9 ml à la fin du rang, puis crochetez 1B dans la 4ème ml à partir du crochet et 1B dans les 5 ml suiv (les 3 premières ml = 1ère B). Bon crochet!
18.06.2013 - 11:21
|
|
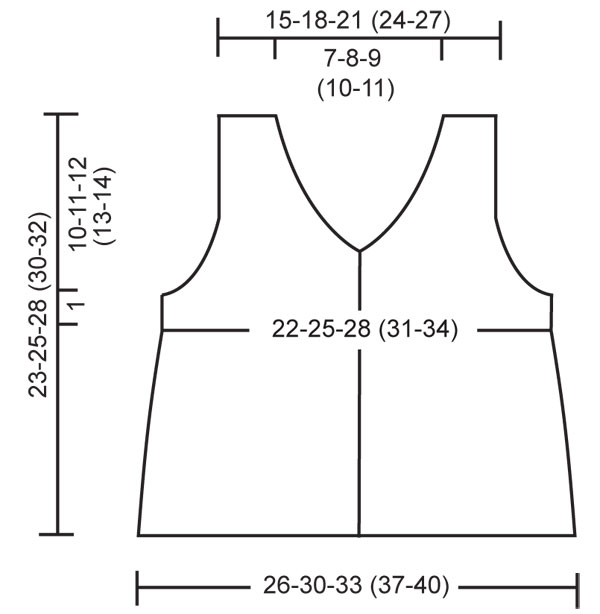
Sweet Buttercup Vest#sweetbuttercupvest |
|
|
|
|
Crochet waistcoat with fan pattern for baby and children in DROPS BabyMerino
DROPS Baby 19-7 |
|
|
WAISTCOAT: CROCHET INFO: Replace first dc on each row with ch 3. Finish each row with 1 dc in 3rd ch from beg of previous row. INCREASING TIP-1 (applies to armhole and neckline): When inc more than 1 dc crochet the same number of ch as dc to be inc + 2 extra ch at the end of the row, turn piece and crochet 1 dc in 4th ch from hook (= 2 dc), then crochet 1 dc in each of the remaining ch. Continue as before. INCREASING TIP-2: Inc 1 dc by working 2 dc in the same dc. BUTTONHOLES: Make buttonholes on right front band. 1 BUTTONHOLE = replace 3rd dc from mid front with ch 1. On next row crochet 1 dc in this ch. Make buttonholes when piece measures (measured from shoulder, the first buttonhole should be approx 1 cm / ⅜" after the last inc for neck): SIZE 1/3 MONTHS: 8, 11 and 14 cm / 3⅛", 4⅜" and 5½". SIZE 6/9 MONTHS: 9, 12 and 15 cm / 3½", 4¾" and 6". SIZE 12/18 MONTHS: 9, 13 and 17 cm / 3½", 5⅛" and 6¾". SIZE 2 YEARS: 10, 14 and 18 cm / 4", 5½" and 7". SIZE 3/4 YEARS: 11, 15 and 19 cm / 4½", 6" and 7½". --------------------------------------------------------- --------------------------------------------------------- Back piece and both front pieces are crochet separately from shoulder and down to below the armholes. Now pieces are sewn tog and the body piece is worked in one piece back and forth from mid front in fan pattern. RIGHT SHOULDER BACK PIECE: With hook size 3.5 mm/E/4 and Baby Merino ch 10-12-14 (16-18) LOOSELY. ROW 1: Crochet 1 dc in 4th ch from hook, then 1 dc in each ch = 8-10-12 (14-16) dc on row, turn piece. ROW 2: See CROCHET INFO! Now crochet 1 dc in each dc, AT THE SAME TIME inc 2 dc towards neckline – See INCREASING TIP-1 = 10-12-14 (16-18) dc, turn piece. Put piece aside and crochet left shoulder in the same way, turn piece. ROW 3: Crochet 1 dc in each dc on left shoulder, then ch 10-12-14 (16-18) (= neckline back), then 1 dc in each dc on right shoulder, turn piece. ROW 4: Crochet 1 dc in each dc and 1 dc in each ch on neckline = 30-36-42 (48-54) dc on row. Continue with dc on back piece. AT THE SAME TIME when piece measures 5-6-7 (8-9) cm / 2"-2⅜"-2¾" (3⅛"-3½") inc for armhole each side at the end of every row as follows – See INCREASING TIP-1: 1 dc 1 time, 2 dc 1 time and 4 dc 1 time = 44-50-56 (62-68) dc on row. When back piece measures 11-12-13 (14-15) cm / 4⅜"-4¾"-5⅛" (5½"-6") (= 1 cm / ⅜" after the last inc), put piece aside and crochet the front pieces. RIGHT FRONT PIECE: With hook size 3.5 mm/E/4 and Baby Merino ch 10-12-14 (16-18) LOOSELY. ROW 1: Crochet 1 dc in 4th ch from hook, then 1 dc in each ch = 8-10-12 (14-16) dc, turn piece. Now crochet 1 dc in each dc. When piece measures 2-3-2 (3-3) cm / ¾"-1⅛"-¾" (1⅛"-1⅛") inc 1 dc towards mid front for neckline – See INCREASING TIP-2. Repeat the inc on every row a total of 5-5-6 (6-7) times, then inc 6-7-7 (8-8) dc 1 time. AT THE SAME TIME when piece measures 5-6-7 (8-9) cm / 2"-2⅜"-2¾" (3⅛"-3½") inc for armhole at the side as described for back piece – remember buttonholes on front band – SEE ABOVE. When all inc are complete there are 26-29-32 (35-38) dc on row. When piece measures 11-12-13 (14-15) cm / 4⅜"-4¾"-5⅛" (5½"-6") – adjust length to back piece - put piece aside and crochet left front piece. LEFT FRONT PIECE: Crochet like right front piece but mirrored – NOTE: Do not make buttonholes! ASSEMBLY: Sew shoulder seams edge to edge with neat sts. Sew side seams edge to edge – there are now 96-108-120 (132-144) dc on row. FAN PATTERN: Continue back and forth for body piece from mid front as follows: ROW 1: Crochet 1 dc in each dc, AT THE SAME TIME inc 8 dc evenly (do not inc on 4 dc each side towards mid front = front bands) = 104-116-128 (140-152) dc on row. ROW 2: ch 3, 1 dc in each of the next 3 dc (= front band), * ch 2, skip approx 2 dc, 1 sc in next dc *, repeat from *-* so that you will have 30-34-38 (42-46) ch-loops and 6 or 7 dc remain, ch 2 and finish with 1 dc in each of the last 4 dc on row (= front band), turn piece. There are now 31-35-39 (43-47) ch-loops with 4 dc each side for front band. ROW 3: ch 3, 1 dc in each of the next 3 dc, skip first ch-loop, * 4 dc + ch 2 + 4 dc in next ch-loop, 1 dc in next ch-loop *, repeat from *-* until 2 ch-loops remain, crochet 4 dc + ch 2 + 4 dc in next ch-loop, skip last ch-loop and finish with 1 dc in each of the 4 dc on front band = 15-17-19 (21-23) fans with 4 dc each side towards mid front, turn piece. ROW 4: ch 3, 1 dc in each of the next 3 dc, * 4 dc + ch 2 + 4 dc in the middle of the next dc-group (i.e. in ch-loop in the dc-group), 1 dc in dc from previous row *, repeat from *-* until 1 dc-group remain, 4 dc + ch 2 + 4 dc in the middle of this dc-group and finish with 1 dc in each of the 4 dc on front band, turn piece. Now repeat row 4 until piece measures approx 18-20-23 (23-25) cm / 7"-8"-9" (9"-9¾") from shoulder. CROCHET NEXT ROW AS FOLLOWS: ch 4, 1 tr in each of the next 3 dc, * 4 tr + ch 2 + 4 tr in the middle of next dc-group, 1 tr in dc from previous row *, repeat from *-* until 1 dc-group remain, 4 tr + ch 2 + 4 tr in the middle of this dc-group and finish with 1 tr in each of the 4 dc on front band, turn piece. Repeat this row until piece measures approx 23-25-28 (30-32) cm / 9"-9¾"-11" (11¾"-12½") from shoulder. Cut and fasten threads. CROCHET BORDER: Crochet a border along the opening with hook size 3.5 mm/E/4 and Baby Merino as follows – beg at the bottom of right front piece and crochet up along front piece and neckline on front piece: * ch 3, skip approx 1 cm / ⅜", 1 sc in next st *, repeat from *-* up to the shoulder seam, * skip approx 2 cm / ¾", 3 dc + ch 2 + 3 dc in next st, skip approx 2 cm / ¾", 1 sc in next st *, repeat from *-* along neckline on back piece to the other shoulder seam, * ch 3, skip approx 1 cm / ⅜", 1 sc in next st *, repeat from *-* along neckline and front band on left front piece. ARMHOLE: Crochet 1 sc in first st, * skip approx 2 cm / ¾", 3 dc + ch 2 + 3 dc in next st, skip approx 2 cm / ¾", 1 sc in next st *, repeat from *-* and finish with 1 sl st in first st from beg of round. ASSEMBLY: Sew on buttons. |
|
 |
|
Have you finished this pattern?Tag your pictures with #dropspattern #sweetbuttercupvest or submit them to the #dropsfan gallery. Do you need help with this pattern?You'll find 6 tutorial videos, a Comments/Questions area and more by visiting the pattern on garnstudio.com. © 1982-2026 DROPS Design A/S. We reserve all rights. This document, including all its sub-sections, has copyrights. Read more about what you can do with our patterns at the bottom of each pattern on our site. |


With over 40 years in knitting and crochet design, DROPS Design offers one of the most extensive collections of free patterns on the internet - translated to 17 languages. As of today we count 324 catalogs and 12290 patterns - 12280 of which are translated into English (US/in).
We work hard to bring you the best knitting and crochet have to offer, inspiration and advice as well as great quality yarns at incredible prices! Would you like to use our patterns for other than personal use? You can read what you are allowed to do in the Copyright text at the bottom of all our patterns. Happy crafting!
Post a comment to pattern DROPS Baby 19-7
We would love to hear what you have to say about this pattern!
If you want to leave a question, please make sure you select the correct category in the form below, to speed up the answering process. Required fields are marked *.