
Popular categories
Looking for a yarn?


Comments / Questions (22)
![]() Joly Eveline wrote:
Joly Eveline wrote:
Dans le paragraphe « Empiècement « Continuer à glisser 1m en fin de rang tous les rangs côté dos 3 fois au total Vu le résultat je pense qu’il faut le faire aussi côté devant Est ce une erreur de votre part ou je n’ai pas compris les explications Merci d’avance
15.04.2026 - 16:41DROPS Design answered:
Bonjour Mme Joly, on va bien glisser ces mailles en attente côté dos, car les mailles de l'encolure devant ont déjà été indiquées: on met en attente de chaque côté 1 x 5 à 7 m (cf taille) puis 2 fois 10 à 15 m - ensuite on met en attente les 44 à 68 m centrales pour le dos et termine chaque côté séparément (continuez les diminutions de l'encolure devant si elles ne sont pas terminées) et, en même temps, on met en attente 3 x 1 m côté encolure dos. Bon tricot!
16.04.2026 - 08:30
![]() Carla wrote:
Carla wrote:
Como as mangas são feitas em idas e voltas, a costura das mangas é feita antes ou depois de as juntar no encaixe? Obrigado
09.07.2024 - 12:48DROPS Design answered:
Bom dia, Por norma, faz-se a costura das mangas antes, mas as duas opções são válidas. Bons tricôs!
10.07.2024 - 09:19
![]() Jill Rowlands wrote:
Jill Rowlands wrote:
I am doing the shaping for the yoke. Please can you clarify the instructions for me? The pattern says ‘now slip stitches on a stitch holder at the end of every row each side as follows..’ does this mean knit the row and slip stitches only at the end of that row i.e. slip five stitches at the end of the first row. Or does it mean slip the stitches at both ends of the row i.e. slip 5 stitches at each end of the first row (10 stitches altogether) ? Thank you in advance!
12.07.2023 - 21:57DROPS Design answered:
Hi Jill, You work the row, then slip the last 5 stitches onto the stitch holder, turn, work to the end of the row and slip the last 5 stitches onto another stitch holder. Happy knitting!
13.07.2023 - 07:04
![]() Erzsébet Michener wrote:
Erzsébet Michener wrote:
I`m knitting Drops 120-40.At the jacket part(page2, when we bind off for the armholes, regardless of the size, you have to bind off 5 on both side of each markers. I fin it strange, because this number should change with the size you`re knitting.
08.09.2013 - 18:02DROPS Design answered:
Dear Mrs Michener, you bind off here 5 sts for armhole for body in all sizes and 6 sts -because of seam - for sleeve in each size. Happy knitting!
09.09.2013 - 09:13
![]() DROPS Design NL wrote:
DROPS Design NL wrote:
Onder "PAS:" leest u hoe de pas gebreid moet worden. U zet hier de st van het vest + mouwen op één naald en plaatst de st op een hulpdraad zoals vermeld. Dit vest heeft geen raglan, maar een wijde pas/plooien bij de hals. Dit is ook te zien op de foto. Na het breien van de pas + voorbiezen breit u de hals in ribbelsteken. U mindert hier ook de st zodat de hals snel strakker en kleiner wordt. Bijv maat S begint u met 214 st op de hals en eindigt met 142 st. Ik hoop dat u hiermee verder kunt.
17.05.2011 - 11:33
![]() Jantje wrote:
Jantje wrote:
Terwijl de bedoeling lijkt dat de hals in 1x met alle resterende steken afgebreid moet worden. Het meest voor de hand liggend is dat het een raglan mouw moet worden, alleen die staat niet beschreven. Alle overige onderdelen die ik gebreid heb komen overeen met jullie aanwijzingen, dus ook steeds het aantal steken per onderdeel.
17.05.2011 - 11:27
![]() DROPS Design NL wrote:
DROPS Design NL wrote:
Via jullie site heb ik het patroon geprint. Alleen nu ik het breiwerk bijna af heb, en alleen de hals nog moet breien blijkt het patroon niet te kloppen. Het probleem is dat de beschrijving van de pas niet klopt. Er staat nergens wat je met de steken die je uiteindelijk op de naald overhoud moet doen. Als je alle steken opneemt die op de hulpdraden staan, en ook de steken van de pas, wordt je hals vele malen te groot.
17.05.2011 - 11:26
![]() DROPS Design wrote:
DROPS Design wrote:
Hej, Om du tycker det blir för stort mellanrum till maskorna på tråden, plocka upp fler maskor som du sedan justerar på nästa varv. Lycka till!
23.02.2011 - 13:43
![]() Gerd wrote:
Gerd wrote:
På halskanten står det att man ska plocka upp m man har satt på en tråd och extra m emellan. Det förstår jag men det står inget om stycket mellan sista m på tråden upp till maskorna på stickan. Verkar konstigt om det inte ska plockas upp m där också. Det är ca 8cm långt.
21.02.2011 - 17:55
![]() Tove wrote:
Tove wrote:
Enkel og elegant sommertopp.
20.01.2010 - 19:23
|
|
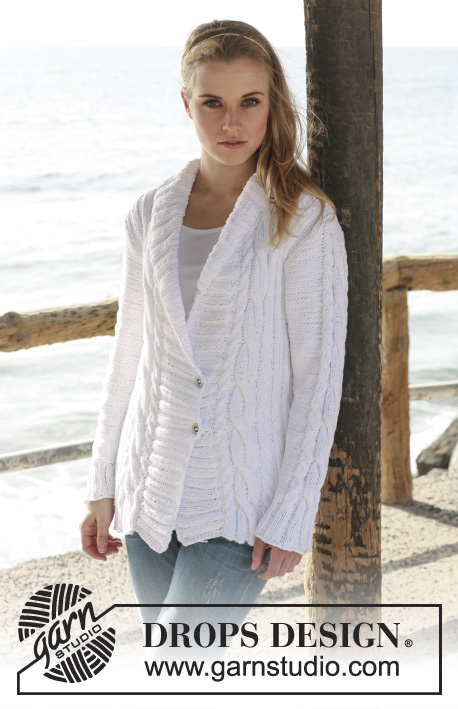
Young Rebecca#youngrebeccacardigan |
|
 |
 |
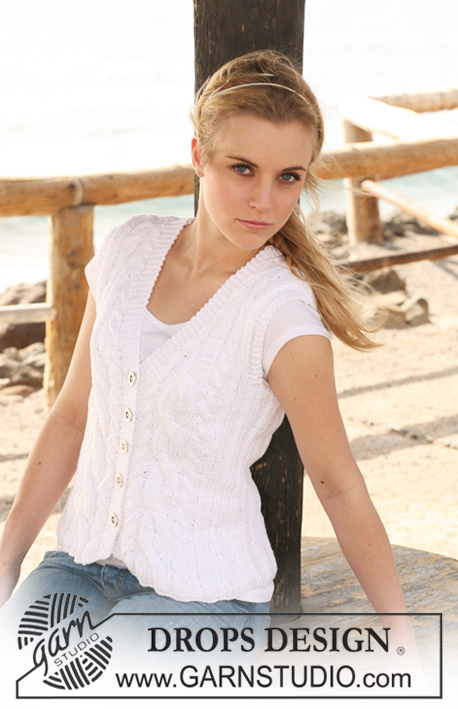
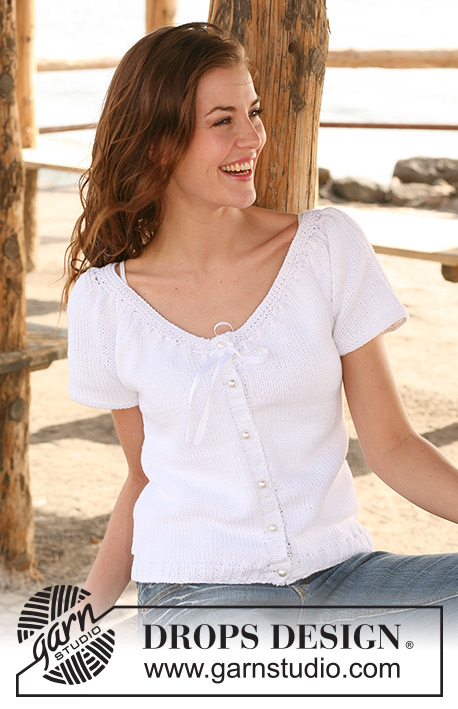
DROPS jacket in ”Paris” with short sleeves. Size S to XXXL.
DROPS 120-40 |
|
|
GARTER ST (back and forth on needle): K all rows. DECREASING TIP (applies to body piece): Make all dec from RS. Dec as follows BEFORE marker: K2 tog Dec as follows AFTER marker: slip 1 st as if to K, K1, psso. -------------------------------------------------------- -------------------------------------------------------- JACKET: Worked back and forth on circular needle from mid front. Cast on 140-152-168-184-204-220 sts (includes 1 edge st each side towards mid front) on circular needle size 4 mm / US 6 with Paris. Work rib as follows (first row = RS): 1 edge st in GARTER ST – see above, * K2, P2 *, repeat from *-*, finish with K2 and 1 edge st in garter st. When rib measures 3 cm / 1⅛" change to circular needle size 5 mm / US 8. Insert a marker 35-38-42-46-51-55 sts in from each side (= 70-76-84-92-102-110 sts between markers on back piece). Continue in stockinette st with 1 edge st each side in garter st. REMEMBER THE GAUGE! When piece measures 5 cm / 2" dec 1 st each side of both markers – SEE DECREASING TIP – and repeat dec on every 4 cm / 1½" a total of 3 times = 128-140-156-172-192-208 sts. When piece measures 16-17-18-19-20-21 cm / 6¼"-6¾"-7"-7½"-8"-8¼" inc (from RS) 1 st each side of both markers by K2 in 1 st, and repeat the inc on every 4 cm / 1½" a total of 3 times = 140-152-168-184-204-220 sts. When piece measures 29-30-31-32-33-34 cm / 11⅜"-11¾"-12¼"-12½"-13"-13⅜" bind off 5 sts each side of both markers for armhole = 120-132-148-164-184-200 sts left on needle. Put piece aside and knit the sleeves. SLEEVE: Worked back and forth on needle. Cast on 54-56-60-62-66-68 sts (includes 1 edge st each side) on needle size 4 mm / US 6 and work 4 rows garter st. Change to needle size 5 mm / US 8 and continue in stockinette st. When piece measures 5 cm / 2" bind off 6 sts each side (i.e. Bind off at the beg of the next 2 rows) = 42-44-48-50-54-56 sts left on needle. Put piece aside and knit the other sleeve. YOKE: Slip sleeves on the same circular needle as body piece where bind off for armholes = 204-220-244-264-292-312 sts. Work stockinette st back and forth on needle from mid front until piece measures 33-34-35-36-37-38 cm / 13"-13⅜"-13¾"-14¼"-14½"-15". Now slip sts on a stitch holder at the end of every row each side as follows: 5-5-6-6-7-7 sts 1 time, then 2 sts 10-11-12-13-14-15 times (= a total of 25-27-30-32-35-37 sts on each stitch holder). AT THE SAME TIME when piece measures 45-47-49-51-53-55 cm / 17¾"-18½"-19¼"-20"-21"-21⅝" slip the middle 44-48-54-58-64-68 sts on back piece on a stitch holder and complete each side separately. Continue to slip 1 st at the end of every row towards back piece on a stitch holder a total of 3 times. There are now 52-56-62-68-76-82 sts left on needle. Knit the other side in the same way. LEFT FRONT BAND: Pick up approx 64 to 80 sts (divisible by 4) on needle size 4 mm / US 6 with Paris. Work rib as follows (first row = WS): 1 garter st, * P2, K2 *, repeat from *-* and finish with K2 and 1 garter st. Bind off with K over K and P over P when front band measures 2.5 cm / ⅞". RIGHT FRONT BAND: Like left front band but after 1 cm / ⅜" make 5 buttonholes evenly distributed – 1 buttonhole = K2 tog and make 1 YO (for neatest result make buttonholes in P sections). Place the bottom buttonhole approx 2 cm / ¾" from bottom edge and the top one approx 5-6 cm / 2"-2⅜" from the top (the last buttonhole is made on neckline). NECKLINE: Worked back and forth on circular needle size 4 mm / US 6. Pick up 5 sts on right front band, work all sts from stitch holders back on needle - AT THE SAME TIME pick up 1 st between each time a st was slipped on stitch holder all the way round and K this st tog with next st (do this to avoid a hole in transition) – and pick up 5 sts on left front band = 214-230-254-274-302-322 sts. Work next row as follows (from WS): K5, K 19-19-17-16-13-12 sts, K2 tog 5-5-6-6-8-8 times, K3 tog 13-16-20-24-28-32 times, K2 tog 5-5-6-6-8-8 times, K 48-46-42-40-34-32 sts, K2 tog 5-5-6-6-8-8 times, K3 tog 13-16-20-24-28-32 times, K2 tog 5-5-6-6-8-8 times, K 19-19-17-16-13-12 sts and K5 = 142-146-150-154-158-162 sts. Now continue in garter st on all sts, AT THE SAME TIME on row 3 make 1 buttonhole in line with the others on front band. Bind off after 5 rows in garter st ASSEMBLY: Sew sleeve seams inside 1 edge st. Sew openings under sleeves and sew on buttons. Thread the silk ribbon through row just below garter sts on neckline – see picture. |
|
 |
|
Have you finished this pattern?Tag your pictures with #dropspattern #youngrebeccacardigan or submit them to the #dropsfan gallery. Do you need help with this pattern?You'll find 20 tutorial videos, a Comments/Questions area and more by visiting the pattern on garnstudio.com. © 1982-2026 DROPS Design A/S. We reserve all rights. This document, including all its sub-sections, has copyrights. Read more about what you can do with our patterns at the bottom of each pattern on our site. |
|


With over 40 years in knitting and crochet design, DROPS Design offers one of the most extensive collections of free patterns on the internet - translated to 17 languages. As of today we count 324 catalogs and 12290 patterns - 12280 of which are translated into English (US/in).
We work hard to bring you the best knitting and crochet have to offer, inspiration and advice as well as great quality yarns at incredible prices! Would you like to use our patterns for other than personal use? You can read what you are allowed to do in the Copyright text at the bottom of all our patterns. Happy crafting!
Post a comment to pattern DROPS 120-40
We would love to hear what you have to say about this pattern!
If you want to leave a question, please make sure you select the correct category in the form below, to speed up the answering process. Required fields are marked *.