
Popular categories
Looking for a yarn?


Comments / Questions (109)
![]() Marylea Scott wrote:
Marylea Scott wrote:
I have completed Drops 113.33 up through the first repeat of M.3. I have this twice and have both times found myself 67 stitches short on my needles. I have compared the work with the picture on the pattern and it looks fine. Hoping you can give solution.
05.10.2015 - 12:10DROPS Design answered:
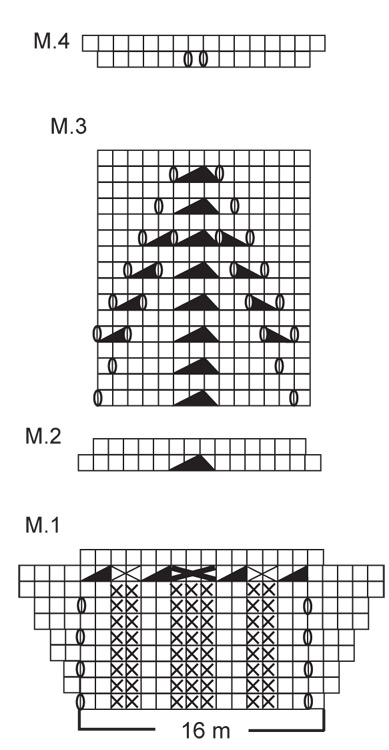
Dear Mrs Scott, after M.2 you have 151-165-179-207-221-235 sts on the needle, work then 5 sts in garter st, repeat M.3 (= 10-11-12-14-15-16 times 14 sts), 1 st in st st and 5 sts in garter st. Number of sts in M.3 should be constant. Happy knitting!
05.10.2015 - 16:18
![]() Conny wrote:
Conny wrote:
Snap minderen mouwkop niet. Als je doet wat in het patroon staat, houd je minder steken over aan het einde van de mouwkop dan aantal steken die je hebt opgezet voor de mouw.. Dus van boven smaller dan van onder. Dat kan toch niet?
06.08.2015 - 17:05DROPS Design answered:
Hoi Conny. Ja, dat klopt. Je sluit de naad van de mouw tot aan begin van de mouwkop, de mouwkop wordt in het vestje genaaid.
07.08.2015 - 14:43
![]() Kim Van Buskirk wrote:
Kim Van Buskirk wrote:
I need to be more clear...are the numbers on the schematic in cm or in? Sorry, don't mean to be so dense, just want to be sure. Thanks again.
10.04.2015 - 10:41DROPS Design answered:
See answer below. Happy knitting!
10.04.2015 - 14:05
![]() Patricia McKenna wrote:
Patricia McKenna wrote:
I'm loving this pattern but find that my yarn usage is really high. I'm knitting the XXL size and have not yet got to the divide stage but have used over half my yarn (400g). Has anyone else had an issue with this? I bought the yarn in a sale last year so will have to complete it using a different lot number which is disappointing.
08.04.2015 - 15:26DROPS Design answered:
Dear Mrs McKenna, remember to check and keep your tension, ie 21 sts x 28 rows in stocking st = 10 x 10 cm + 1 repeat of M.1 = width 7.5 cm + 1 repeat of M.3 = width 7 cm. Happy knitting!
08.04.2015 - 16:40
![]() Ana Emilia wrote:
Ana Emilia wrote:
En la sisa no entiendo lo de las cuatro filas apunto musgo gracias
08.04.2014 - 00:18DROPS Design answered:
Hola Ana Emilia. Las 4 filas en pt musgo se trabajan solamente en los 33-33-35-35-37-37 pts centrales de la espalda para formar la cenefa en la parte de la espalda. No se trabajan en la sisa.
10.04.2014 - 10:42
![]() Ana Emlia wrote:
Ana Emlia wrote:
No entiendo al disminuir la sisa porque me habla de 4 puntos musgo
08.04.2014 - 00:04
![]() Pat Johnson wrote:
Pat Johnson wrote:
What does the pattern mean by "an edge stitch?" (mentioned on sleeve pattern)
07.08.2012 - 00:58DROPS Design answered:
An edge st each side are worked for an example in garter st. Check the video linked from the pattern. Sew the sleeve together inside the edge sts.
24.08.2012 - 21:34
![]() Lori Synhorst wrote:
Lori Synhorst wrote:
Hello, perhaps you can help me.....I don't understand what the stitch between the last pattern repeat and the 5 stitch garter border is for? It doesn't fit in the pattern repeat that I can tell......help please!
28.04.2012 - 15:21DROPS Design answered:
This st is K on RS and P on WS, this is so that you will get 1 st in stockinette on each side of each button band. The chart starts with a st in stockinette, but doesn't end with one, so therefore it's added like this to make the pattern look the same each side.
30.04.2012 - 23:35
![]() Peter wrote:
Peter wrote:
Mooi patroon, ik ben er erg tevreden mee!
18.11.2009 - 17:47
![]() Anneli wrote:
Anneli wrote:
Jag har stickat denna i vitt och jag är helnöjd! Bra beskrivning helt utan krångel, mjukt garn med fin lyster, superb passform. Jag stickade den i stlk XL, jag brukar ha 44. Synd bara att den blev klar på hösten... Längtar till våren. :)
14.10.2009 - 13:58
|
|||||||||||||||||||||||||
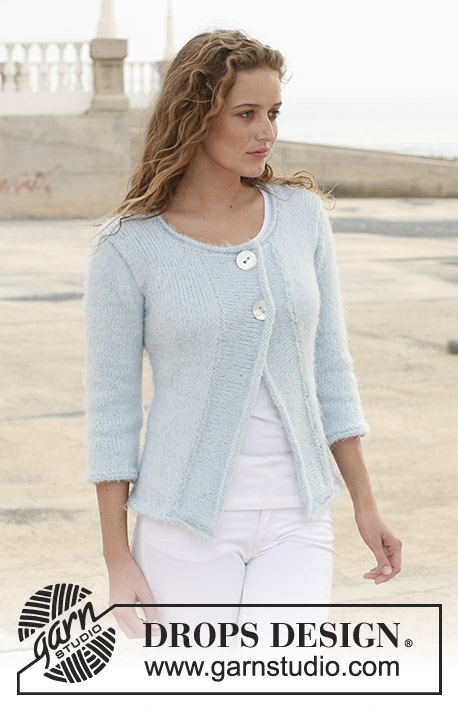
Salvia#salviacardigan |
|||||||||||||||||||||||||
|
|
|||||||||||||||||||||||||
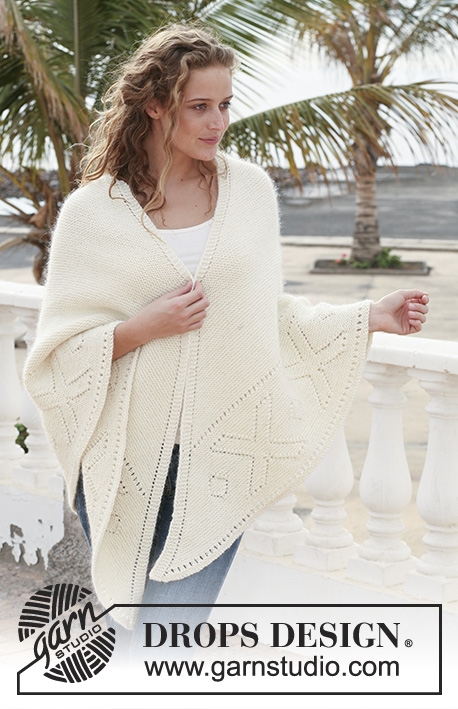
DROPS jacket with lace pattern in ”Muskat”. Size S - XXXL.
DROPS 113-33 |
|||||||||||||||||||||||||
|
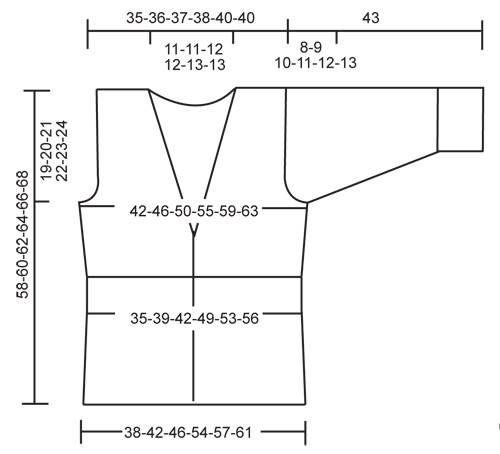
GARTER ST (back and forth on needle): K all rows. PATTERN: See diagram M.1 to M.4. Diagrams show the pattern from the RS. DECREASING TIP-1 (neckline): Dec inside 5 garter sts from RS. Dec as follows after 5 garter sts: slip 1 st as if to K, K1, psso Dec as follows before 5 garter sts: K2 tog. DECREASING TIP-2 (armhole): Dec inside 4 sts from RS. Dec as follows after 4 sts: slip 1 st as if to K, K1, psso Dec as follows before 4 sts: K2 tog. BUTTONHOLE: Make buttonholes on right front band. 1 buttonhole = bind off 3rd st from mid front and cast on 1 new st on return row. Make buttonholes when piece measures: SIZE S: 10, 16, 22, 28 and 34 cm / 4",6¼",8¾",11" and 13⅜". SIZE M: 11, 17, 23, 29 and 35 cm / 4⅜",6¾",9",11⅜" and 13¾". SIZE L: 9, 16, 23, 30 and 37 cm / 3½",6¼",9",11¾" and 14½" SIZE XL: 8, 14, 20, 26, 32 and 38 cm / 3⅛",5½",8",10¼",12½" and 15". SIZE XXL: 10, 16, 22, 28, 34 and 40 cm / 4",6¼",8¾",11",13⅜" and 15¾". SIZE XXXL: 11, 17, 23, 29, 35 and 41 cm / 4⅜",6¾",9",11⅜",13¾" and 16⅛". -------------------------------------------------------- BODY PIECE: Worked back and forth on circular needle from mid front. Cast on 171-187-203-235-251-267 sts (includes 5 front band sts each side towards mid front) on circular needle size 4 mm / US 6 with Muskat. Work first row as follows from RS: 5 front band sts in garter st – see above - M.1 (= 16 sts) across the row until 6 sts remain, K1, 5 front band sts in garter st. Remember BUTTONHOLES on right front band – see above. Work 3 vertical repeats of M.1 like this and now work next row as follows from RS: 5 front band sts in garter st, M.2 (= 16 sts) across the row until 6 sts remain, K1, 5 front band sts in garter st. After 1 vertical repeat of M.2 there are 151-165-179-207-221-235 sts on row. Continue as follows from RS: 5 front band sts in garter st, M.3 (= 14 sts) across the row until 6 sts remain, K1, 5 front band sts in garter st. After 2 vertical repeats of M.3 continue as follows from RS: 5 front band sts in garter st, M.4 (= 14 sts) across the row until 6 sts remain, K1, 5 front band sts in garter st. After 1 vertical repeat of M.4 there are 171-187-203-235-251-267 sts on row. Piece now measures approx 24 cm / 9½". Insert a marker after 45-49-53-61-65-69 sts and a marker after 126-138-150-174-186-198 sts (to mark the sides). Now measure piece from here! Continue in stockinette st with 5 garter sts each side towards mid front. When piece measures 3-3-3-4-4-4 cm / 1⅛"-1⅛"-1⅛"-1½"-1½"-1½" from markers inc 1 st on each side of both markers on every 3-3-4-10-11-12 cm / 1⅛"-1⅛"-1½"-4"-4⅜"-4¾" a total of 4-4-4-2-2-2 times. AT THE SAME TIME when piece measures 11-12-14-15-17-18 cm / 4⅜"-4¾"-5½"-6"-6¾"-7" from markers dec 1 st for neckline each side towards mid front – SEE DECREASING TIP-1 – on every other row a total of 10-9-10-9-10-9 times, then on every 4th row 3-4-4-5-5-6 times and then on every 6th row 3 times. AT THE SAME TIME when piece measures 15-16-17-18-19-20 cm / 6"-6¼"-6¾"-7"-7½"-8" from marker (piece measures approx 39-40-41-42-43-44 cm / 15¼"-15¾"-16⅛"-16½"-17"-17¼" from casting on row) bind off 8-8-8-10-12-12 sts each side for armhole (= 4-4-4-5-6-6 sts on each side of both markers) and now complete front and back pieces separately. LEFT FRONT PIECE: Continue dec for neck, AT THE SAME TIME bind off for armhole at the side – SEE DECREASING TIP-2: 1 st on every other row a total of 4-7-10-14-15-18 times. When all dec are complete there are 25-26-26-27-28-29 sts left on shoulder. When piece measures 34-36-38-40-42-44 cm / 13⅜"-14¼"-15"-15¾"-16½"-17 ¼" from marker (piece now measures approx 58-60-62-64-66-68 cm / 22¾"-23⅝"-24⅜"-25¼"-26"-26¾" from casting on row), bind off. RIGHT FRONT PIECE: Like left front piece, but mirrored. BACK PIECE: = 81-89-97-107-113-121 sts. Bind off for armhole each side as described for front piece = 73-75-77-79-83-85 sts. When piece measures 31-33-35-37-39-41 cm / 12¼"-13"-13¾"-14½"-15¼-16⅛" from markers work 4 rows garter st on the middle 33-33-35-35-37-37 sts (work remaining sts as before). Now bind off the middle 23-23-25-25-27-27 sts for neck = 25-26-26-27-28-29 sts left on each shoulder. Continue in stockinette st with 5 garter sts towards neckline until piece measures 34-36-38-40-42-44 cm / 13⅜"-14¼"-15"-15¾"-16½"-17 ¼" from marker (piece now measures approx 58-60-62-64-66-68 cm / 22¾"-23⅝"-24⅜"-25¼"-26"-26¾" from casting on row). Bind off. SLEEVE: Worked back and forth on needle. Cast on 50-66-66-66-82-82 sts (includes 1 edge st each side) on needle size 4 mm / US 6 with Muskat. Work M.1 with 1 edge st each side. After 3 vertical repeats of M.1 continue in stockinette st. When piece measures 12-13-13-13-13-14 cm / 4 ¾"-5⅛"-5⅛"-5⅛"-5⅛"-5½" inc 1 st each side on every 2-3.5-2.5-1.5-3-1.5 cm / ¾"-1¼"-⅞"-½"-1⅛"-½" a total of 11-6-8-12-6-9 times = 72-78-82-90-94-100 sts. When piece measures 35-34-33-32-31-30 cm / 13¾"-13⅜"-13"-12½"-12¼"-11¾" (less for the larger sizes because of longer sleeve cap and wider shoulder) bind off 3 sts each side for sleeve cap. Bind off to shape the sleeve cap each side on every other row: 2 sts 4-5-4-4-5-5 times and 1 st 0-0-3-6-5-5 times, then 2 sts each side until piece measures 42 cm / 16½", now bind off 3 sts each side 1 time and bind off remaining sts on next row. Piece measures approx 43 cm / 17". ASSEMBLY: Sew shoulder seams and set in sleeves. Sew sleeve seams inside 1 edge st and sew on buttons. |
|||||||||||||||||||||||||
Diagram explanations |
|||||||||||||||||||||||||
|
|||||||||||||||||||||||||
 |
|||||||||||||||||||||||||
 |
|||||||||||||||||||||||||
Have you finished this pattern?Tag your pictures with #dropspattern #salviacardigan or submit them to the #dropsfan gallery. Do you need help with this pattern?You'll find 25 tutorial videos, a Comments/Questions area and more by visiting the pattern on garnstudio.com. © 1982-2026 DROPS Design A/S. We reserve all rights. This document, including all its sub-sections, has copyrights. Read more about what you can do with our patterns at the bottom of each pattern on our site. |
|||||||||||||||||||||||||


With over 40 years in knitting and crochet design, DROPS Design offers one of the most extensive collections of free patterns on the internet - translated to 17 languages. As of today we count 324 catalogs and 12278 patterns - 12268 of which are translated into English (US/in).
We work hard to bring you the best knitting and crochet have to offer, inspiration and advice as well as great quality yarns at incredible prices! Would you like to use our patterns for other than personal use? You can read what you are allowed to do in the Copyright text at the bottom of all our patterns. Happy crafting!
Post a comment to pattern DROPS 113-33
We would love to hear what you have to say about this pattern!
If you want to leave a question, please make sure you select the correct category in the form below, to speed up the answering process. Required fields are marked *.