
Popular categories
Looking for a yarn?


Comments / Questions (109)
![]() Nina Wood wrote:
Nina Wood wrote:
Are the wrong sides to this pattern all purl rows or a repeat of the pattern reversing knits for purls please
20.02.2025 - 13:53DROPS Design answered:
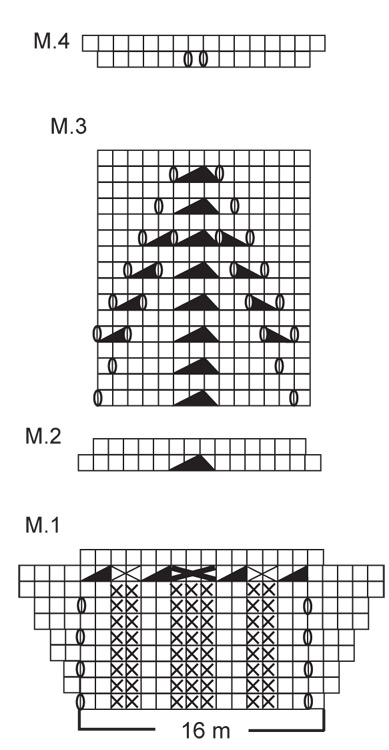
Dear Mrs Wood, in diagrams M.2, M.3 and M.4, wrong side rows will be purled (see 1st symbol under diagram key), but in M.1, you will either purl (white square) or knit (cross in the square) the stitches to keep the rib pattern on the first rows. Happy knitting!
21.02.2025 - 08:02
![]() Gisèle wrote:
Gisèle wrote:
C'est au sujet diminutions l'emmanchure. Je ne comprends pas. Merci.
24.08.2024 - 23:11DROPS Design answered:
Bonjour Gisèle, pour l'emmanchure, rabattez en début de rang sur l'endroit (devant gauche) / en début de rang sur l'envers (devant droit) / au début de chaque rang sur l'endroit puis sur l'envers (dos): 4-7-10-14-15-18 fois 1 m, vous aurez ainsi rabattu 8-14-20-28-30-36 mailles pour chaque devant et de chaque côté du dos. Bon tricot!
26.08.2024 - 08:00
![]() Lambert Jacqueline wrote:
Lambert Jacqueline wrote:
Pour les manches Je ne comprend pas les augmentations 9 fois tout les combien de rang
26.05.2024 - 17:27DROPS Design answered:
Bonjour Mme Lambert, en XXXL on augmente pour la manche 9 fois au total tous les 1,5 cm. Mesurez cette hauteur dans votre ouvrage pour calculer le nombre de rangs correspondant à cette hauteur. Bon tricot!
27.05.2024 - 08:48
![]() Lambert Jacqueline wrote:
Lambert Jacqueline wrote:
Je ne comprend plus le modele113 33 à partir des 24 cm mettre un marquer à 53 mailles et à 150
20.05.2024 - 15:13DROPS Design answered:
Bonjour Mme Lambert, quand l'ouvrage mesure 4 cm après les marqueurs, vous augmentez de chaque côté de chacun de ces marqueurs (4 augmentations à chaque fois) 4 fois tous les 4 cm = vous augmentez ainsi 16 mailles, en même temps, à 14 cm après les marqueurs, commencez à diminuer de chaque côté pour l'encolure. Bon tricot!
21.05.2024 - 13:31
![]() Cheryl Lobo wrote:
Cheryl Lobo wrote:
I am afraid to start knitting in the round. I have always knitted several sweaters but with 2 needles. I want to start knitting in the round but when I see the instructions they are like a continuous flow not like step by step. Please help.
13.05.2024 - 18:17DROPS Design answered:
Dear Mrs Lobo, this pattern is worked back and forth with circular needles to get enough room for all stitches, ie you work the bottom of the body back and forth on needle starting with right front piece from RS, then divide piece for armhole and finish each piece separately back and forth on needle. Sleeves are also worked back and forth on circular needles. Then sew all pieces together. Happy knitting!
14.05.2024 - 07:35
![]() Elisabeth wrote:
Elisabeth wrote:
Wunderschoene Jacke
05.05.2024 - 21:29
![]() Gisela Hohn wrote:
Gisela Hohn wrote:
Hallo und straveijte! Ich habe die ersten 9 Reihen im Muster M1 jetzt gestrickt, aber wie werden die vielen Zusammen-Maschen denn aufgelöst, sodass ich wieder auf die ursprüngliche Maschenzahl (Gr. M: 187 M) komme? Danke im Voraus und Grüße aus Bulgarien Gisela
24.04.2024 - 21:33DROPS Design answered:
Liebe Frau Hohn, bei der 9. Reihe wird man Maschen abnehmen - siehe die 5 letzten Symbol der Diagrambeschreibung, so werden insgesamt 8 Maschen abgenommen und wieder 16 M in jedem M..1 - siehe auch dieses Video, wo ein ähnliches Muster gestrickt wird. Viel Spaß beim Stricken!
25.04.2024 - 08:15
![]() Alison Walker wrote:
Alison Walker wrote:
Thank you for your answer but I am still unsure. Re sleeve cap 1st instruction is to cast off 2sts each side on every other row. I have taken that to mean cast off 2 sts at the beginning of each row as you can’t cast off at an end of a row. To do this would equal 8 rows for 1st size casting off 16sts in total. The next instruction is Cast of 2 sts each side every row, total of 4 sts per row so should I cast of 4 sts at the beginning of each row as I can not cast off at the end of a row.
24.04.2024 - 20:56DROPS Design answered:
Dear Alison, yes, that is the correct way, if the pattern says "cast of on bot side" you cast of the beginning of both RS and WS rows. If it says "cast of 2 stitches on both sides", then you cast off 2 stitches of the beginning of each row. I hope that helps. Happy Knitting!
24.04.2024 - 22:58
![]() Alison Walker wrote:
Alison Walker wrote:
I am very puzzled about the decrease instructions on the sleeve. It says to cast of on each side of every other row. It is not possible to cast off on each side so I thought I would do this on one side every row. But then I am told to cast off both sides on each row. So how do we do this. If I cast off just at the beginning of the row then it becomes every other row. Thank you for your help.
22.04.2024 - 21:35DROPS Design answered:
Hi Alison, Yes, you can cast off at the beginning of each row; just make sure the cast offs are the same on each side. Happy knitting!
23.04.2024 - 06:41
![]() Anette wrote:
Anette wrote:
Hallo, ich habe den ersten Papport M1 gestrickt. Nun kommt der 2.. Müssen die linken Manschen immer über denen vom vorherigen Rapport liegen oder verschiebt sich das Muster. Liebe Grüße Anette
07.03.2024 - 17:10DROPS Design answered:
Liebe Anette, am Ende M.1 sind es 16 M übrig; das Diagram wird man ab der 1. Reihe (= 16 Maschen) wiederholen, dh die linken Maschen im 2. Rapport werden über die vom 1 Rapport gestrickt. Viel Spaß beim Stricken!
08.03.2024 - 08:07
|
|||||||||||||||||||||||||
Salvia#salviacardigan |
|||||||||||||||||||||||||
|
|
|||||||||||||||||||||||||
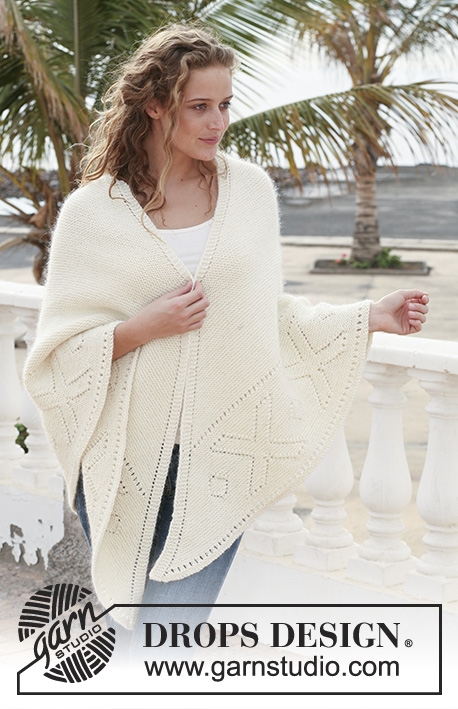
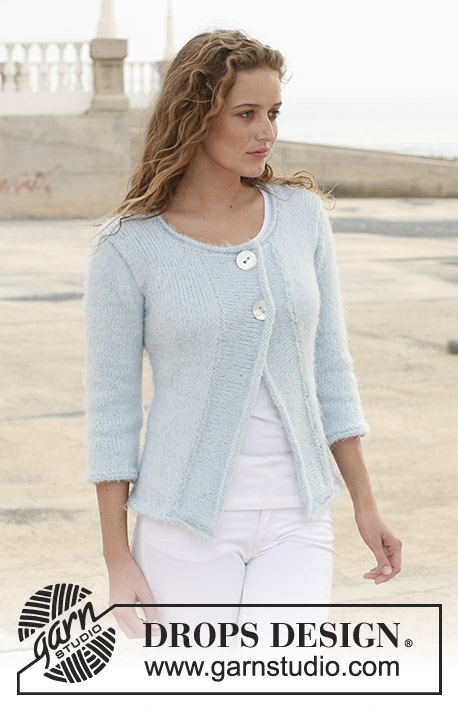
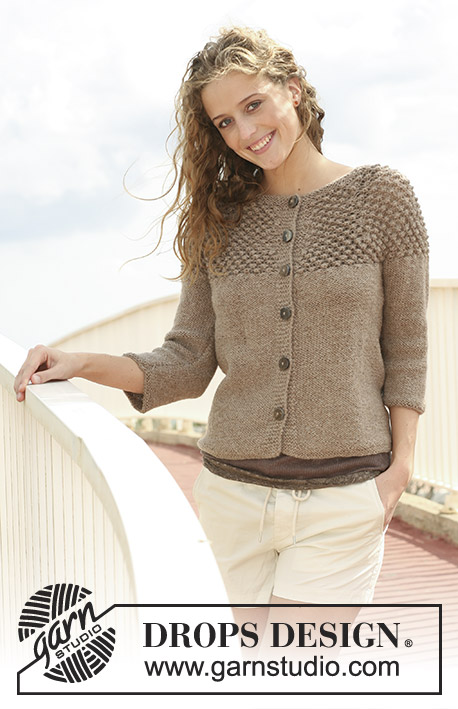
DROPS jacket with lace pattern in ”Muskat”. Size S - XXXL.
DROPS 113-33 |
|||||||||||||||||||||||||
|
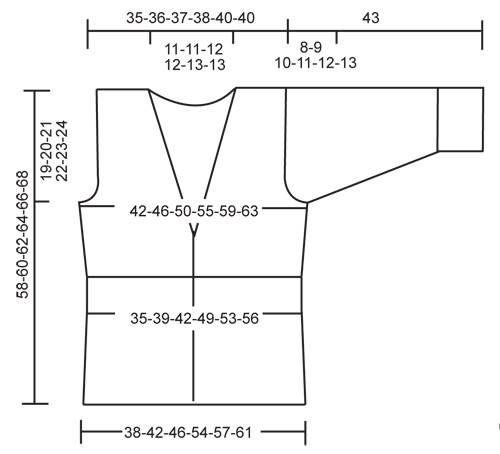
GARTER ST (back and forth on needle): K all rows. PATTERN: See diagram M.1 to M.4. Diagrams show the pattern from the RS. DECREASING TIP-1 (neckline): Dec inside 5 garter sts from RS. Dec as follows after 5 garter sts: slip 1 st as if to K, K1, psso Dec as follows before 5 garter sts: K2 tog. DECREASING TIP-2 (armhole): Dec inside 4 sts from RS. Dec as follows after 4 sts: slip 1 st as if to K, K1, psso Dec as follows before 4 sts: K2 tog. BUTTONHOLE: Make buttonholes on right front band. 1 buttonhole = bind off 3rd st from mid front and cast on 1 new st on return row. Make buttonholes when piece measures: SIZE S: 10, 16, 22, 28 and 34 cm / 4",6¼",8¾",11" and 13⅜". SIZE M: 11, 17, 23, 29 and 35 cm / 4⅜",6¾",9",11⅜" and 13¾". SIZE L: 9, 16, 23, 30 and 37 cm / 3½",6¼",9",11¾" and 14½" SIZE XL: 8, 14, 20, 26, 32 and 38 cm / 3⅛",5½",8",10¼",12½" and 15". SIZE XXL: 10, 16, 22, 28, 34 and 40 cm / 4",6¼",8¾",11",13⅜" and 15¾". SIZE XXXL: 11, 17, 23, 29, 35 and 41 cm / 4⅜",6¾",9",11⅜",13¾" and 16⅛". -------------------------------------------------------- BODY PIECE: Worked back and forth on circular needle from mid front. Cast on 171-187-203-235-251-267 sts (includes 5 front band sts each side towards mid front) on circular needle size 4 mm / US 6 with Muskat. Work first row as follows from RS: 5 front band sts in garter st – see above - M.1 (= 16 sts) across the row until 6 sts remain, K1, 5 front band sts in garter st. Remember BUTTONHOLES on right front band – see above. Work 3 vertical repeats of M.1 like this and now work next row as follows from RS: 5 front band sts in garter st, M.2 (= 16 sts) across the row until 6 sts remain, K1, 5 front band sts in garter st. After 1 vertical repeat of M.2 there are 151-165-179-207-221-235 sts on row. Continue as follows from RS: 5 front band sts in garter st, M.3 (= 14 sts) across the row until 6 sts remain, K1, 5 front band sts in garter st. After 2 vertical repeats of M.3 continue as follows from RS: 5 front band sts in garter st, M.4 (= 14 sts) across the row until 6 sts remain, K1, 5 front band sts in garter st. After 1 vertical repeat of M.4 there are 171-187-203-235-251-267 sts on row. Piece now measures approx 24 cm / 9½". Insert a marker after 45-49-53-61-65-69 sts and a marker after 126-138-150-174-186-198 sts (to mark the sides). Now measure piece from here! Continue in stockinette st with 5 garter sts each side towards mid front. When piece measures 3-3-3-4-4-4 cm / 1⅛"-1⅛"-1⅛"-1½"-1½"-1½" from markers inc 1 st on each side of both markers on every 3-3-4-10-11-12 cm / 1⅛"-1⅛"-1½"-4"-4⅜"-4¾" a total of 4-4-4-2-2-2 times. AT THE SAME TIME when piece measures 11-12-14-15-17-18 cm / 4⅜"-4¾"-5½"-6"-6¾"-7" from markers dec 1 st for neckline each side towards mid front – SEE DECREASING TIP-1 – on every other row a total of 10-9-10-9-10-9 times, then on every 4th row 3-4-4-5-5-6 times and then on every 6th row 3 times. AT THE SAME TIME when piece measures 15-16-17-18-19-20 cm / 6"-6¼"-6¾"-7"-7½"-8" from marker (piece measures approx 39-40-41-42-43-44 cm / 15¼"-15¾"-16⅛"-16½"-17"-17¼" from casting on row) bind off 8-8-8-10-12-12 sts each side for armhole (= 4-4-4-5-6-6 sts on each side of both markers) and now complete front and back pieces separately. LEFT FRONT PIECE: Continue dec for neck, AT THE SAME TIME bind off for armhole at the side – SEE DECREASING TIP-2: 1 st on every other row a total of 4-7-10-14-15-18 times. When all dec are complete there are 25-26-26-27-28-29 sts left on shoulder. When piece measures 34-36-38-40-42-44 cm / 13⅜"-14¼"-15"-15¾"-16½"-17 ¼" from marker (piece now measures approx 58-60-62-64-66-68 cm / 22¾"-23⅝"-24⅜"-25¼"-26"-26¾" from casting on row), bind off. RIGHT FRONT PIECE: Like left front piece, but mirrored. BACK PIECE: = 81-89-97-107-113-121 sts. Bind off for armhole each side as described for front piece = 73-75-77-79-83-85 sts. When piece measures 31-33-35-37-39-41 cm / 12¼"-13"-13¾"-14½"-15¼-16⅛" from markers work 4 rows garter st on the middle 33-33-35-35-37-37 sts (work remaining sts as before). Now bind off the middle 23-23-25-25-27-27 sts for neck = 25-26-26-27-28-29 sts left on each shoulder. Continue in stockinette st with 5 garter sts towards neckline until piece measures 34-36-38-40-42-44 cm / 13⅜"-14¼"-15"-15¾"-16½"-17 ¼" from marker (piece now measures approx 58-60-62-64-66-68 cm / 22¾"-23⅝"-24⅜"-25¼"-26"-26¾" from casting on row). Bind off. SLEEVE: Worked back and forth on needle. Cast on 50-66-66-66-82-82 sts (includes 1 edge st each side) on needle size 4 mm / US 6 with Muskat. Work M.1 with 1 edge st each side. After 3 vertical repeats of M.1 continue in stockinette st. When piece measures 12-13-13-13-13-14 cm / 4 ¾"-5⅛"-5⅛"-5⅛"-5⅛"-5½" inc 1 st each side on every 2-3.5-2.5-1.5-3-1.5 cm / ¾"-1¼"-⅞"-½"-1⅛"-½" a total of 11-6-8-12-6-9 times = 72-78-82-90-94-100 sts. When piece measures 35-34-33-32-31-30 cm / 13¾"-13⅜"-13"-12½"-12¼"-11¾" (less for the larger sizes because of longer sleeve cap and wider shoulder) bind off 3 sts each side for sleeve cap. Bind off to shape the sleeve cap each side on every other row: 2 sts 4-5-4-4-5-5 times and 1 st 0-0-3-6-5-5 times, then 2 sts each side until piece measures 42 cm / 16½", now bind off 3 sts each side 1 time and bind off remaining sts on next row. Piece measures approx 43 cm / 17". ASSEMBLY: Sew shoulder seams and set in sleeves. Sew sleeve seams inside 1 edge st and sew on buttons. |
|||||||||||||||||||||||||
Diagram explanations |
|||||||||||||||||||||||||
|
|||||||||||||||||||||||||
 |
|||||||||||||||||||||||||
 |
|||||||||||||||||||||||||
Have you finished this pattern?Tag your pictures with #dropspattern #salviacardigan or submit them to the #dropsfan gallery. Do you need help with this pattern?You'll find 25 tutorial videos, a Comments/Questions area and more by visiting the pattern on garnstudio.com. © 1982-2026 DROPS Design A/S. We reserve all rights. This document, including all its sub-sections, has copyrights. Read more about what you can do with our patterns at the bottom of each pattern on our site. |
|||||||||||||||||||||||||


With over 40 years in knitting and crochet design, DROPS Design offers one of the most extensive collections of free patterns on the internet - translated to 17 languages. As of today we count 324 catalogs and 12278 patterns - 12268 of which are translated into English (US/in).
We work hard to bring you the best knitting and crochet have to offer, inspiration and advice as well as great quality yarns at incredible prices! Would you like to use our patterns for other than personal use? You can read what you are allowed to do in the Copyright text at the bottom of all our patterns. Happy crafting!
Post a comment to pattern DROPS 113-33
We would love to hear what you have to say about this pattern!
If you want to leave a question, please make sure you select the correct category in the form below, to speed up the answering process. Required fields are marked *.