
Popular categories
Looking for a yarn?


Comments / Questions (87)
![]() Anna wrote:
Anna wrote:
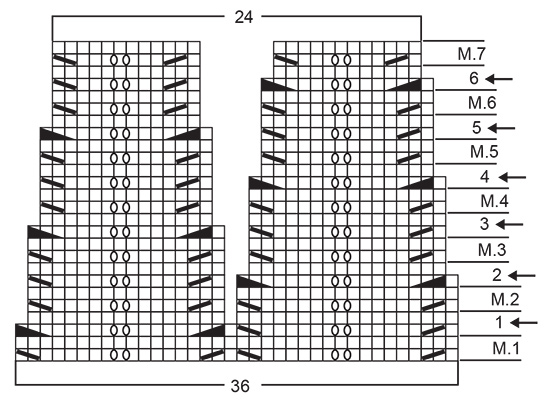
Buon giorno Ho una domanda da porre, sto lavorando m1 il disegno non mi viene come nella foto Non so dove sbaglio io faccio la seguente: giro i un diritto due mg assieme sei diritti un gettato un diritto un gettato sei diritti un accavallano un diritto due assieme e cosi via
10.10.2019 - 10:12DROPS Design answered:
Buongiorno Anna. Sì, il primo giro lo sta lavorando correttamente. La parte che sta lavorando è quella della gonna. Il motivo si definirà meglio proseguendo con i giri successivi. Il secondo giro è lavorato tutto diritto e nei giri successivi segua la legenda verificando di avere i buchi ben allineati. Buon lavoro!
10.10.2019 - 11:48
![]() Anna wrote:
Anna wrote:
Buon pomeriggio Sto lavorando la prima misura 216 mg ,non ho capito il diagramma m1 Sono di 36 mg? Grazie
09.10.2019 - 14:23DROPS Design answered:
Buongiorno Anna. Sì , il diagramma M1 è formato da 36 maglie. Le maglie sul giro sono 216. Quindi ripeterà il diagramma 6 volte così da lavorarlo su tutte le maglie del giro (216:36=6). Buon lavoro!
09.10.2019 - 14:46
![]() Jolanda wrote:
Jolanda wrote:
Fandt ude af det 🙈
25.09.2019 - 14:56
![]() Jolanda wrote:
Jolanda wrote:
Hej, når man starter på M1, hvordan starter man så? Skal der strikkes stolpemasker først? Oh så hvor mange evt. Ellers skal der lukkes til knaphullet i mønstret?
25.09.2019 - 14:04
![]() Rachelle wrote:
Rachelle wrote:
Hello, thank you for offering this free pattern! I love it! I have figured out as Kirsten did from a previous comment that there is an error in the M.9 diagram. The reply to her from DROPS said “it should work nicely”, but it doesn’t. The transitions do work, but the problem is in row 10 of the diagram. If you work the 10th row the same as the 4th row, the stitches will match and work up nicely. I do believe the diagram has an error. I am using the English USA pattern. Thank you
30.07.2019 - 14:49
![]() Ritva wrote:
Ritva wrote:
Ohjeen viimeisessä ruutupiirroksessa on virhe. Tällä piirroksella neulotaan mekon yläosa. Piirroksessa on 12 riviä ja rivi nro 10 on virheellinen. Siinä täytyy olla sama sisältö kuin rivillä 4, jolloin syntyy kaunis salmiakkikuvio. Kauan sitä pähkäilin, mutta keksin lopulta :) terv. Ritva
17.06.2019 - 17:00
![]() Andrea Boose wrote:
Andrea Boose wrote:
Vorderteil: in jeder Hinreihe abnehmen,aber ich verstehe nicht:innerhalb von 2 Randm abketten,wie soll das funktionieren stricke ich 1Randm,eine m abketten und dann wieder eine randm
19.05.2019 - 22:26DROPS Design answered:
Liebe Frau Boose, siehe Tipp für das Abnehmen (gilt für das Armloch und den Hals) am Anfang der schrifftlichen Anleitung, hier wird erklärt, wie man abnehmen wird. Viel Spaß beim stricken!
20.05.2019 - 12:48
![]() Andrea Boose wrote:
Andrea Boose wrote:
Ich weiß,das ich nerve.Diagramm 9 in hin und Rückreihe wie geschrieben oder in der rückreihe wie die maschen erscheinen Hinreihe von rechts nach links und rückreihe von links nach rechts
19.05.2019 - 21:56DROPS Design answered:
Liebe Frau Boose, die Diagramme zeigen alle Reihen = die Hin- sowie die Rückreihen, hier lesen Sie mehr über Diagramme. Viel Spaß beim stricken!
20.05.2019 - 12:49
![]() Andrea Boose wrote:
Andrea Boose wrote:
Sticke ich nach m8 schon geteilt oder strick ich erst 3cm von m9 bevor ich die arbeit teile und wie strick ich m9 auf rundstricknadel immer von rechts nach links im diagramm
15.05.2019 - 19:32DROPS Design answered:
Liebe Frau Boose, nach M.8 stricken Sie M.9, und 3 cm nach Anfang M.8 stricken Sie 4 Reihen wie zuvor aber mit 10 Maschen krausrechts über die beiden Seiten (unter den Ärmeln), nach diesen 4 Reihen (= 2 Krausrippe über diesen beiden 10 Maschen beidseitig) ketten Sie 6 Maschen für jedem Armloch (diese 10 M stricken Sie so: 2 M kraus rechts, 6 Maschen abketten, 2 M kraus rechts) dann jeden Teil separat stricken. Viel Spaß beim stricken!
16.05.2019 - 09:28
![]() Andrea Boose wrote:
Andrea Boose wrote:
Was mach ich wenn ich m8 fertig habe,fange ich dann gleich mit m9 an
14.05.2019 - 20:36DROPS Design answered:
Liebe Frau Boose, nach M.8 stricken Sie jetzt hin und zurück: Schlagen Sie 2 neuen Maschen am Ende der 1. Reihe und jetzt stricken Sie M.9 mit 5 Blendemaschen auf beiden Seiten. Viel Spaß beim stricken!
15.05.2019 - 08:13
|
||||||||||||||||||||||||||||||||||
Sweet Rosie#sweetrosiedress |
||||||||||||||||||||||||||||||||||
|
|
||||||||||||||||||||||||||||||||||
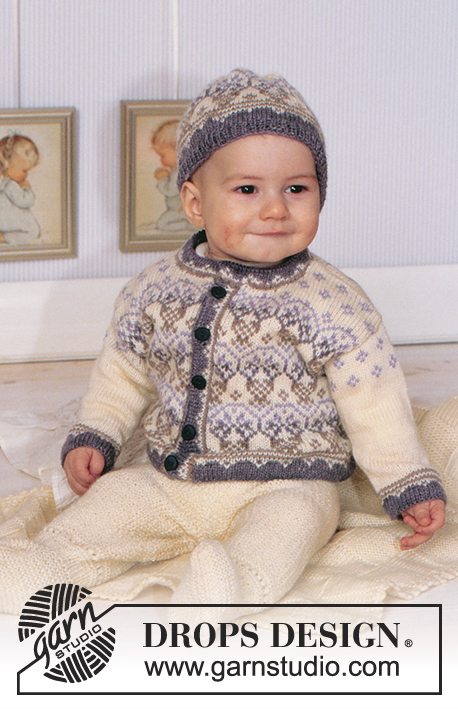
DROPS Dress and socks with pattern in BabyMerino.
DROPS Baby 11-4 |
||||||||||||||||||||||||||||||||||
|
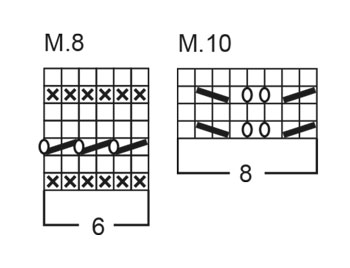
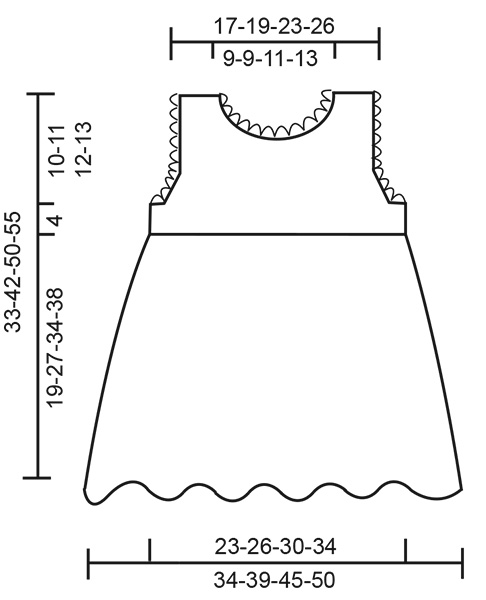
Knitting gauge: M.1 to M.7 and M.9: 32 sts x 34 rows on needle size 2.5 mm / US 1.5 = 10 x 10 cm / 4" x 4". Stockinette sts: 25 sts x 34 rows on needle size 2.5 mm / US 1.5 = 10 x 10 cm / 4" x 4". Garter sts (back and forth on needle: knit all rows. Garter sts (on circular needle): knit 1 round, purl 1 round. Pattern: See diagrams M.1 to M10. The diagrams are seen from the RS. -------------------------------------------------------------------- DRESS: Buttonhole: Make buttonholes on the right edge mid back from the RS. 1 buttonhole = bind off the 3rd and 4th sts from the edge and cast on 2 new sts in the same place on the return row. Make buttonholes as follows: Size 1/3 months: 2, 5, 8 and 11 cm Size 6/9 months: 2, 5, 9 and 12 cm Size 12/18 months: 2, 6, 10 and 13 cm Size 24 months: 2, 6, 10 and 14 cm Dec tips (apply to armhole and neckline): Dec inside 2 edge sts in garter sts from the RS. Dec as follows after 2 edge sts: slip 1 st as if to knit, K1, psso. Dec as follows before 2 edge sts: K2 tog. -------------------------------------------------------------------- Back and front piece: The dress is knitted round on circular needle from bottom edge up. Cast on 216-252-288-324 sts on circular needle size 2.5 mm / US 1.5 with pink. Knit 2 rounds in garter sts and continue in M.1. When piece measures 8-10-13-17 cm begin the dec. Dec 12-14-16-18 sts per round, i.e. dec 2 sts on every 2nd repeat across – see arrows in diagram. This means the size of the zig-zags in the pattern will decrease as you go along. Dec as follows: When piece measures 8-10-13-17 cm knit first 1 round with dec = 204-238-272-306 sts, continue in M.2. When piece measures 10-14-17-21 cm knit second round with dec = 192-224-256-288 sts, continue in M.3. When piece measures 12-17-21-25 cm knit third round with dec = 180-210-240-270 sts, continue in M.4. When piece measures 14-20-25-29 cm knit fourth round with dec = 168-196-224-252 sts, continue in M.5. When piece measures 16-23-29-33 cm knit fifth round with dec = 156-182-208-234 sts, continue in M.6. When piece measures 18-26-33-37 cm knit sixth round with dec = 144-168-192-216 sts, continue in M.7. When piece measures 19-27-34-38 cm knit M.8 (= row with holes), at the same time on the last round of M.8 dec 2 sts evenly = 142-166-190-214 sts. Now carry on measuring piece from the first round of M.8. Divide the piece mid back and finish the dress back and forth on circular needle. Cast on 2 new sts each side = 146-170-194-218 sts. Knit next row as follows form the RS: 5 edge sts in garter sts, M.9A (= 8 sts), M.9B over 120-144-168-192 sts, M.9C (= 8 sts) and 5 edge sts in garter sts. Continue in pattern whilst making buttonholes on right edge – see explanation above. When piece measures 3 cm / 1⅛" (from 1st round of M.8) knit next row as follows from the RS: 5 edge sts in garter sts, 28-34-40-46 sts of M.9, 10 sts in garter sts, 60-72-84-96 sts of M.9, 10 sts in garter sts, 28-34-40-46 sts of M.9, 5 edge sts in garter sts. Continue in pattern until there are 4 rows in garter sts over 10 sts each side. On the next row bind off 6 sts each side for armhole and finish each piece separately. Front piece: = 64-76-88-100 sts. Continue in M.9 with 2 sts in garter sts each side. At the same time dec 1 st for armhole – see Dec tips – on every other row a total of 5-8-8-8 times = 54-60-72-84 sts. P the sts (seen from the RS) not fitting into M.9. After the dec for armhole continue with 2 sts in garter sts + 1 st in stockinette st each side (i.e. 1 st in stockinette sts along armhole). When piece measures approx 9-10-10-11 cm – adjust after 1 full repeat of M.9 – knit 4 rows with garter sts over the middle 22-22-28-34 sts (M.9 over remaining sts). Now bind off the middle 18-18-24-30 sts for neck and dec 1 st towards neckline on every other row a total of 6 times – see Dec Tips = 12-15-18-21 sts left on each shoulder. Continue in M.9 with 2 sts in garter sts + 1 st in stockinette st towards the neckline. When piece measures approx 14-15-16-17 cm (= 33-42-50-55 cm full length) bind off remaining sts – adjust after a full pattern repeat. Left back piece: = 35-41-47-53 sts. Continue in M.9 with 2 sts in garter sts towards armhole and 5 edge sts in garter sts towards mid back. At the same time dec for armhole as described for front piece = 30-33-39-45 sts. When piece measures approx 12-13-14-15 cm – adjust after a full pattern repeat – knit 4 rows with garter sts over 18-18-21-24 sts towards mid back. Now bind off 16-16-19-22 sts towards mid back for neck and dec 1 st towards neckline on every other row 2 times – see Dec Tips = 12-15-18-21 sts left on shoulder. Continue in M.9 with 2 sts in garter sts + 1 st in stockinette st towards the neckline. When piece measures approx 14-15-16-17 cm (= 33-42-50-55 cm full length) bind off remaining sts – adjust after a full pattern repeat. Right back piece: = 35-41-47-53 sts. Knit as left back piece, but mirrored. Remember buttonholes! Assembly: Sew shoulder seams. Place right edge over left edge on back piece and sew at bottom. Sew on buttons. Crochet borders: Crochet round armholes and neckline with crochet hook size 2.5 mm /C with pink as follows (crochet round the 2 outermost sts in garter sts): 1 sc, *ch 3, 1 sc in first ch, skip 1 st, 1 sc in next st* , repeat from *-*. ------------------------------------------------------------------ SOCKS: Foot length: 10-11-12-14 cm Cast on 56-56-64-64 sts on double pointed needles size 2.5 mm / US 1.5 with white Alpaca. Knit 1 round and knit 2 cm / ¾" of diagram M.10. Knit 1 round, at the same time dec 16-16-20-20 sts evenly on round = 40-40-44-44 sts. Knit M.8. Now knit heel as follows: Knit 3-3.5-3.5-4 cm stockinette sts back and forth on needles over 18 sts mid back. Heel dec (1st row = RS): 1st row: Knit 10 sts, K2 tog into back of st, K1, turn. 2nd row: slip 1 st as if to P, P4, P2 tog, P1, turn. 3rd row: slip 1 st as if to K, K5, K2 tog into back of st, K1, turn. 4th row: slip 1 st as if to P, P6, P2 tog, P1, turn. 5th row: slip 1 st as if to K, K7, K2 tog into back of st, K1, turn. 6th row: slip 1 st as if to P, P8, P2 tog, P1, turn. 7th row: K2 tog, K8, K2 tog into back of st = 10 sts on needle (= total 32-32-36-36 sts). Now pick up 7-8-8-9 sts on each side of the heel = 46-48-52-54 sts. Continue in stockinette sts over all sts and dec 1 st on each side of the upper 18-20-22-24 sts on every other row a total of 7 times = 32-34-38-40 sts. When foot measures 8-9-11-12 cm (from the start of the heel dec) insert a marking thread each side and dec 1 st on each side of both threads on every round (4 dec per round) a total of 7-7-8-8 times. Cut the thread and pull through remaining sts. Sew tight. Crochet a chain with pink , approx 35 cm long, and pull through row with holes. |
||||||||||||||||||||||||||||||||||
Diagram explanations |
||||||||||||||||||||||||||||||||||
|
||||||||||||||||||||||||||||||||||
 |
||||||||||||||||||||||||||||||||||
 |
||||||||||||||||||||||||||||||||||
 |
||||||||||||||||||||||||||||||||||
Have you finished this pattern?Tag your pictures with #dropspattern #sweetrosiedress or submit them to the #dropsfan gallery. Do you need help with this pattern?You'll find 33 tutorial videos, a Comments/Questions area and more by visiting the pattern on garnstudio.com. © 1982-2026 DROPS Design A/S. We reserve all rights. This document, including all its sub-sections, has copyrights. Read more about what you can do with our patterns at the bottom of each pattern on our site. |
||||||||||||||||||||||||||||||||||


With over 40 years in knitting and crochet design, DROPS Design offers one of the most extensive collections of free patterns on the internet - translated to 17 languages. As of today we count 324 catalogs and 12290 patterns - 12280 of which are translated into English (US/in).
We work hard to bring you the best knitting and crochet have to offer, inspiration and advice as well as great quality yarns at incredible prices! Would you like to use our patterns for other than personal use? You can read what you are allowed to do in the Copyright text at the bottom of all our patterns. Happy crafting!
Post a comment to pattern DROPS Baby 11-4
We would love to hear what you have to say about this pattern!
If you want to leave a question, please make sure you select the correct category in the form below, to speed up the answering process. Required fields are marked *.