
Popular categories
Looking for a yarn?


Comments / Questions (65)
![]() Denise Boudreau wrote:
Denise Boudreau wrote:
Where do I find corrections?
12.02.2025 - 19:23DROPS Design answered:
Hi Denise! Any corrections that may need to be made are written directly into the text of the pattern instructions - so the pattern you see on the website is therefore always up-to-date. You can find a list of the corrections we have made at the bottom of the pattern text - see the red line. Happy knitting!
13.02.2025 - 08:03
![]() Heidi wrote:
Heidi wrote:
Hvor finner jeg rettelser for A2 ? Får ikke mønsteretvtil å stemme
02.01.2025 - 18:31DROPS Design answered:
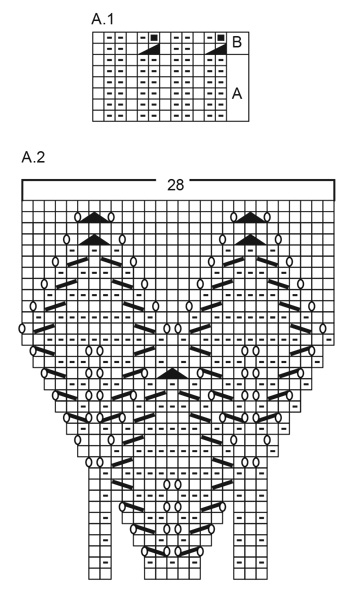
Hei Heidi. Diagram A.2 som ligger på nett er det riktige diagrammet. Siste rettelse ble oppdatert 08.10.2021. Om du mener det er noe mer feil i diagrammet, skriv hvor i diagrammet du mener det er feil + hvilken størrelse du strikker, så skal vi hjelpe deg så godt vi kan. mvh DROPS Design
07.01.2025 - 13:12
![]() Eda George wrote:
Eda George wrote:
C Would you please write out the pattern stitches for the wreath pattern (A.1, A.2). I'm having a difficult time reading the charts.
19.12.2024 - 01:58
![]() Eda George wrote:
Eda George wrote:
C Would you please write out the pattern stitches for the wreath pattern (A.1, A.2). I'm having a difficult time reading the charts.
19.12.2024 - 00:22DROPS Design answered:
Dear Mrs George, we only have diagrams to this pattern, but this lesson explains how to read diagrams and should help you to work them. Happy knitting!
20.12.2024 - 07:32
![]() Catalina wrote:
Catalina wrote:
Pueden dejar indicaciones en el esquema A2, hay espacios en blanco y no se cómo se teje… se empieza desde a bajo hasta arriba? Derecha a izquierda?
22.07.2024 - 18:07DROPS Design answered:
Hola Catalina, los patrones se leen de abajo arriba, a no ser que se indique lo contrario. Los huecos del patrón son para ayudar a alinear las filas del patrón posteriores, que contienen más puntos. A la hora de trabajar el diagrama no tienes que tener en cuenta estos espacios. Puedes leer más información sobre cómo trabajar los diagramas aquí: https://www.garnstudio.com/lesson.php?id=68&cid=23.
27.07.2024 - 19:36
![]() Anna wrote:
Anna wrote:
Czy schemat A2 czyta się zawsze od prawej do lewej tak jak w swetrze robionym na okrągło?
28.05.2024 - 21:11DROPS Design answered:
Witaj Aniu, w robótce wykonywanej w rzędach (jak ten kardigan) czytamy schemat od prawej do lewej na prawej stronie robótki, a od lewej do prawej na lewej stronie robótki. W robótce na okrągło schemat jest czytany zawsze od prawej do lewej strony, ponieważ w tym przypadku cały czas pracujemy na prawej stronie robótki, Więcej na ten temat znajdziesz TUTAJ. Pozdrawiamy!
29.05.2024 - 08:00
![]() Monika wrote:
Monika wrote:
Jak zamienić ilość oczek na włóczkę o grubości A do wzoru autumn wreath jacket? Dziękuję za pomoc
04.05.2024 - 00:22DROPS Design answered:
Witaj Moniko, zmiana grubości włóczki w zasadzie zmienia cały wzór. Niestety nie jesteśmy w stanie dopasowywać wszystkich naszych wzorów do indywidualnych potrzeb. Radzę kontakt ze sklepem, gdzie kupujesz włóczki, tam powinnaś uzyskać pomoc. Pozdrawiamy!
04.05.2024 - 09:54
![]() Anne wrote:
Anne wrote:
I have tried to follow your original line three question. I have now unpicked it numerous times as when I get to garter boarder plus one extra knit stitch I have two uncorked stitch. I am doing a L and I am starting with the correct number of stitches 93. I thought you read instructions from right hand side as your charts don’t have numbers up the side. Sorry I am beyond confused. I love this pattern but maybe I will have to find another. Regards Anne
04.03.2024 - 17:14DROPS Design answered:
Dear Anne, the rows from RS are read from the right towards the left and the rows from WS are worked from the left towards the right, in this lesson, we explain how to read diagrams, it should help you. Your DROPS store should be also able to assist you personally - even per mail or telephone to unblock you. Happy knitting!
05.03.2024 - 08:53
![]() Anne wrote:
Anne wrote:
Thank you for your previous answer. I hate to bother you but being a senior I am very confused following the chart. I am using drops air (lovely yarn). Any other pattern I have used has both written and chart. Is there anyway to get written instructions for the A2 chart. I realize this is an extremely big ask. Regards.
04.03.2024 - 12:52DROPS Design answered:
Dear Anne, sorry, we only have diagrams for this pattern, but to follow your previous answer and help you to understand how to read A.2 , here is the row 4 in A.2, read from the left towards the right = from wrong side: *P1, K1, P2, K1, P1, K1, P2, K1, P1, K1*, repeat from *-*. Note that from WS the white squares will be purled = these are stocking stitches, and the "-" are knitted = garter stitches. Hope it can help. Happy knitting!
04.03.2024 - 15:33
![]() Anne wrote:
Anne wrote:
Could you please put line 3 (right side) chart A2 Into words for me as I am extremely confused reading the chart. Than you so very much.
04.03.2024 - 01:21DROPS Design answered:
Dear Anne, sure, the 3rd row in A.2 will be worked as follows: K3, YO, slip 1 stitch as if to knit, knit 1 and pass the slipped stitch over the knitted stitch, YO, K1, YO, knit 2 together, YO, K2 = you have increased 2 sts = 12 sts in each A.2. Happy knitting!
04.03.2024 - 09:50
|
|||||||||||||||||||||||||
Autumn Wreath Jacket#autumnwreathjacket |
|||||||||||||||||||||||||
 |
 |
||||||||||||||||||||||||
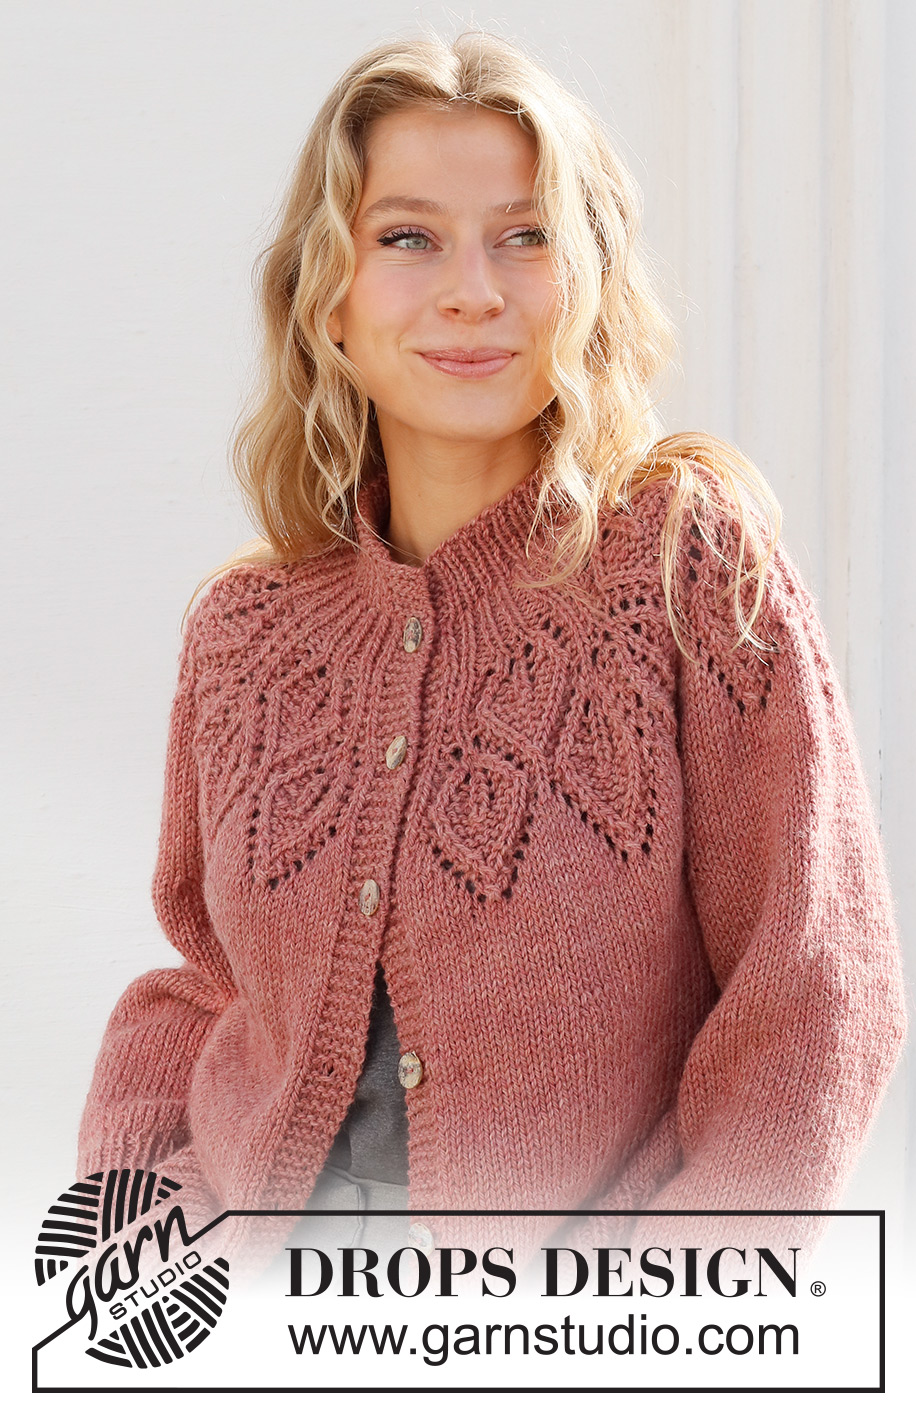
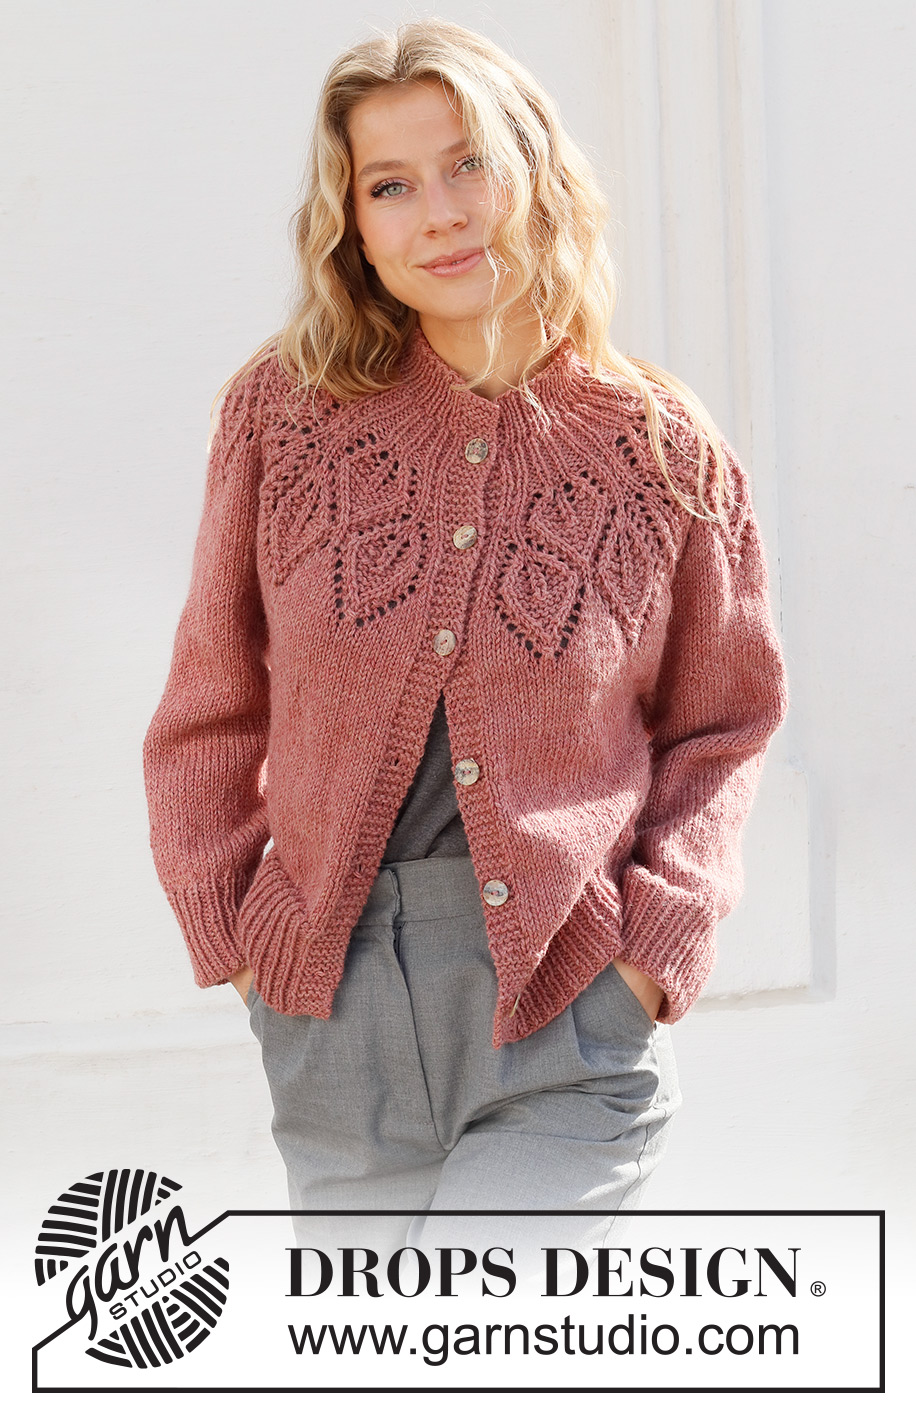
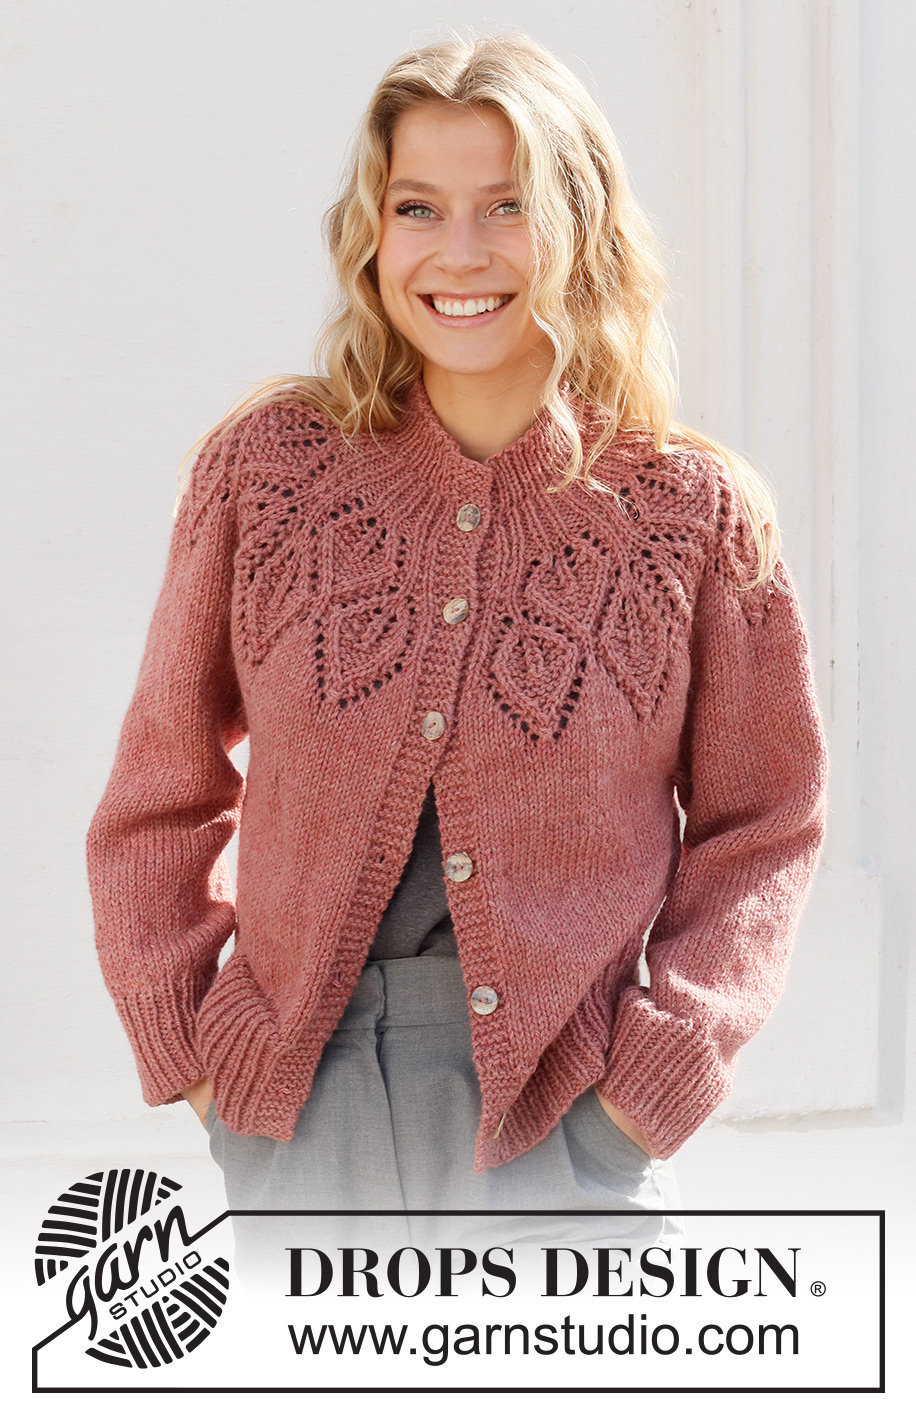
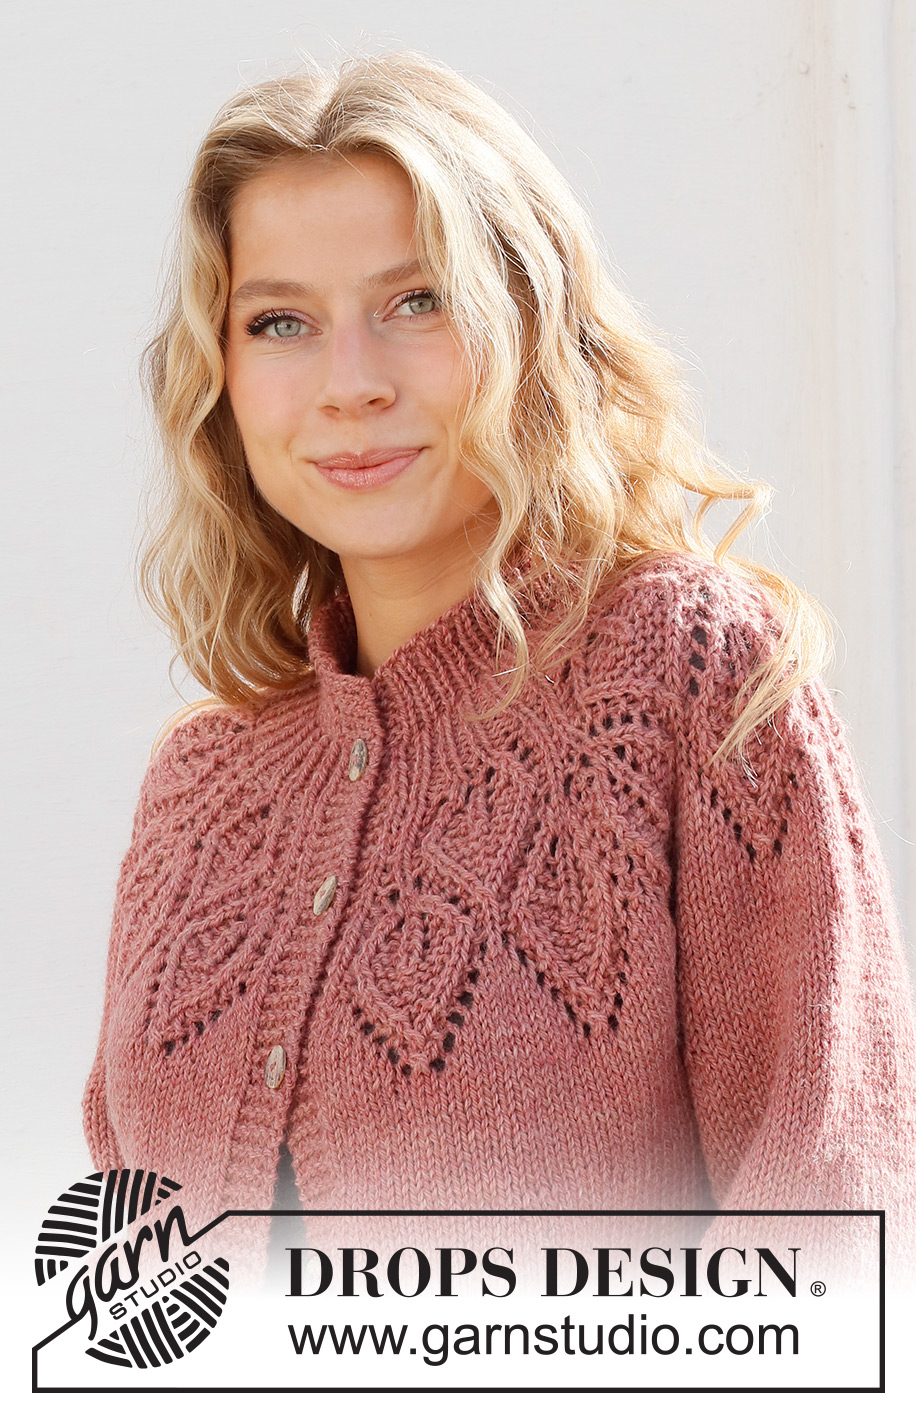
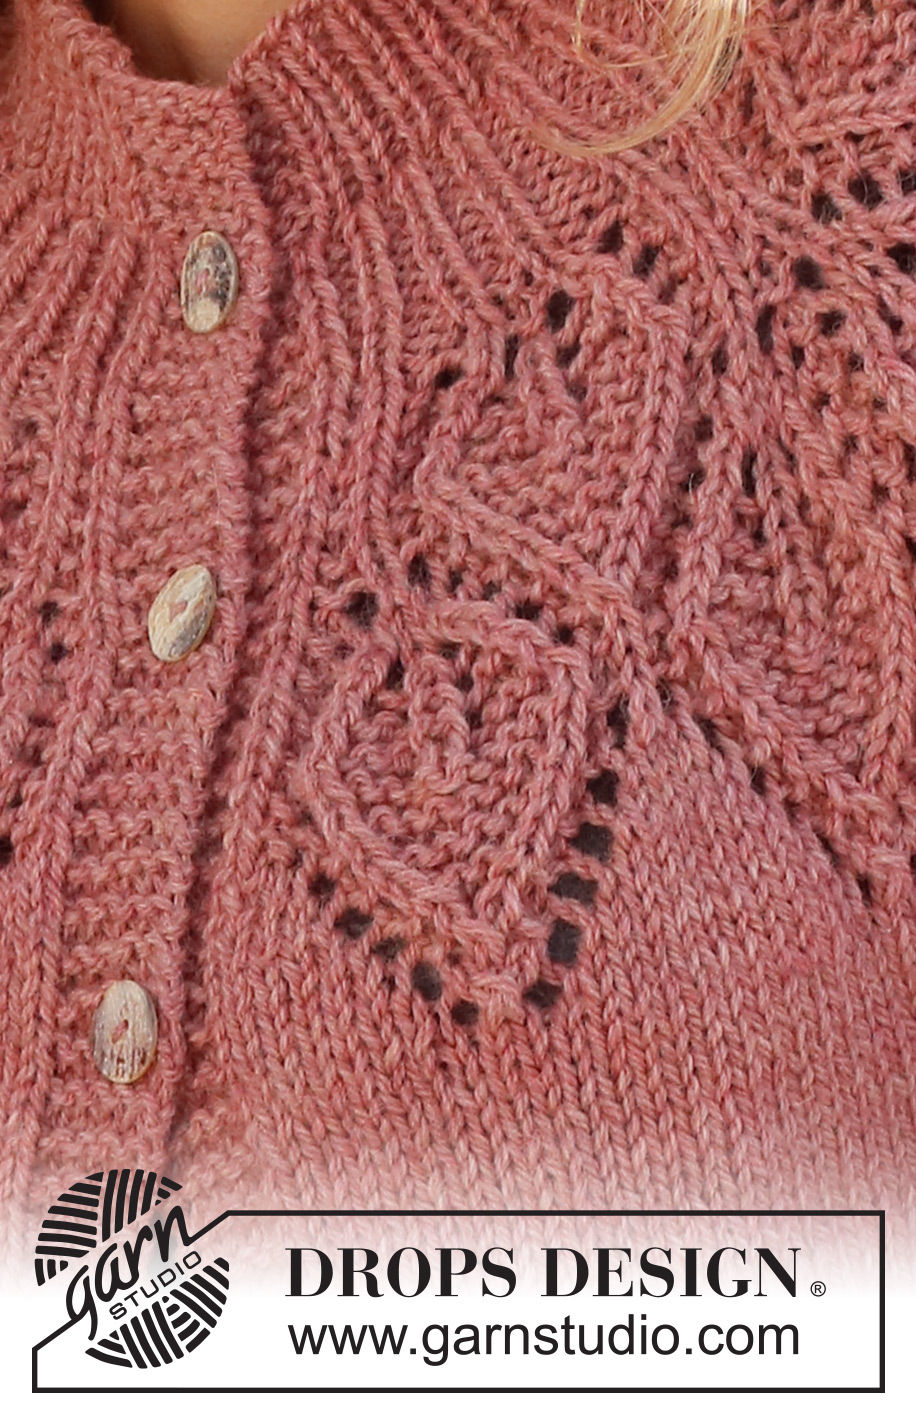
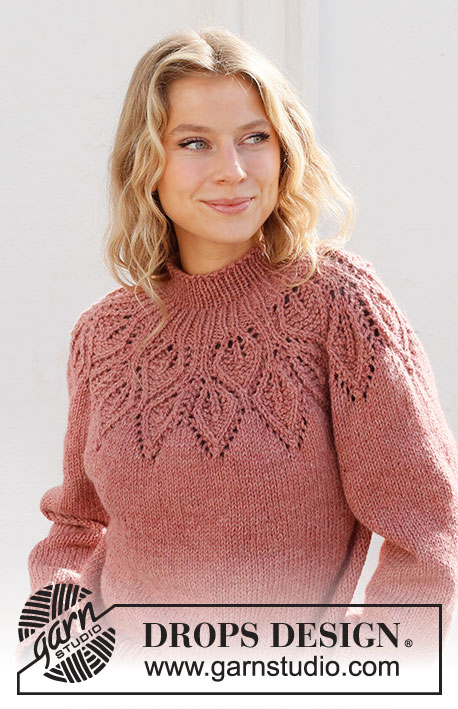
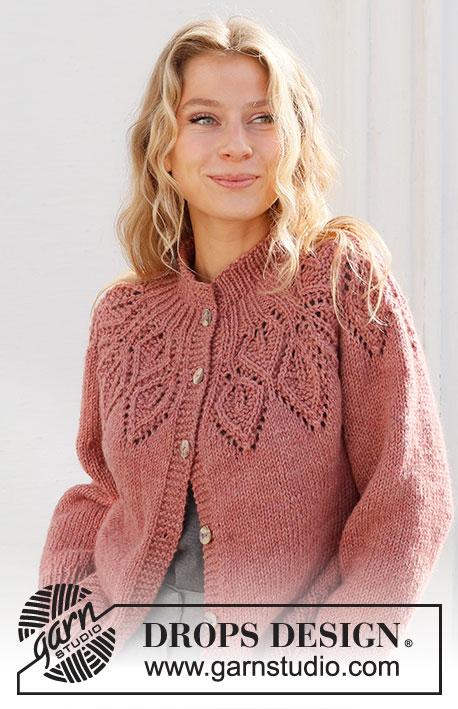
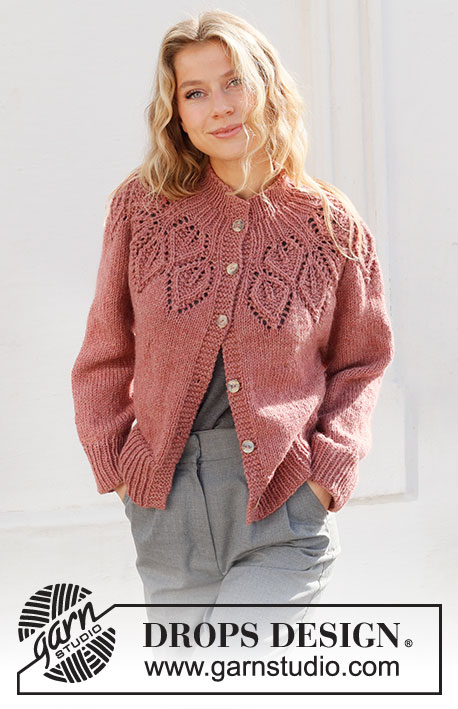
Knitted jacket in DROPS Nepal. The piece is worked top down, with round yoke and leaf pattern. Sizes S - XXXL.
DROPS 228-2 |
|||||||||||||||||||||||||
|
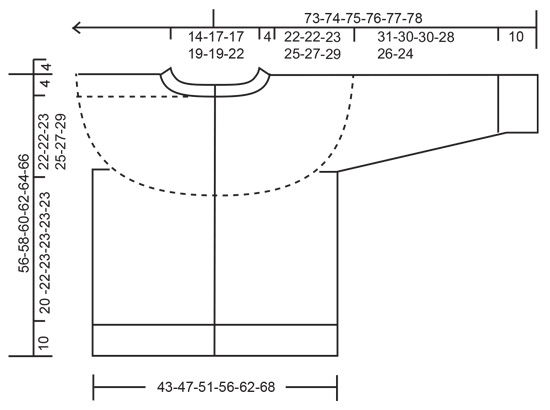
EXPLANATIONS FOR THE PATTERN: ------------------------------------------------------- RIDGE/GARTER STITCH (worked back and forth): Knit all rows. 1 ridge = knit 2 rows. PATTERN: See diagrams A.1 and A.2. The diagrams show all rows in the pattern from the right side INCREASE TIP (evenly spaced): To work out how to increase evenly, count the total number of stitches on the needle (e.g. 73 stitches) minus bands (e.g. 10 stitches) and divide the remaining stitches by the number of increases to be made (e.g. 25) = 2.5. In this example, increase by making 1 yarn over after alternately each 2nd and 3rd stitch. Do not increase on the bands. On the next row work the yarn overs twisted to avoid holes. BUTTONHOLES: Work buttonholes on the right band (when the garment is worn). Work from the right side when there are 3 stitches left on the row as follows: Make 1 yarn over, knit 2 together and knit 1. On the next row (wrong side), knit the yarn over to leave a hole. The first buttonhole is worked when the yoke measures 1 cm = ⅜". Then work the other 5 buttonholes with approx. 9-9-9-9½-9½-9½ cm = 3½"-3½"-3½"-3 5/9"-3⅝"-3⅝" between each one. DECREASE TIP (for sleeves): Decrease 1 stitch on either side of the marker thread as follows: Work until there are 3 stitches left before the marker thread, knit 2 together, knit 2 (marker thread sits between these 2 stitches), slip 1 stitch as if to knit, knit 1 and pass the slipped stitch over the knitted stitch (2 stitches decreased). BINDING-OFF TIP: To avoid the bind-off edge being tight you can bind off with a larger size needle. If the edge is still tight, make 1 yarn over after approx. each 6th stitch at the same time as binding off; the yarn overs are bind off as normal stitches. ------------------------------------------------------- START THE PIECE HERE: ------------------------------------------------------- JACKET – SHORT OVERVIEW OF THE PIECE. The neck and yoke are worked back and forth with circular needle, from mid front and top down. The yoke is divided for body and sleeves and the body continued back and forth with circular needle. The sleeves are worked in the round with double pointed needles/short circular needle, top down. NECK: Cast on 73-77-81-85-89-93 stitches (including 5 band stitches on each side towards mid-front) with circular needle size 4.5 MM = US 7 and DROPS Nepal. Purl 1 row (= wrong side). Then work as follows from the right side: 5 band stitches in GARTER STITCH – read description above, * knit 1, purl 1 *, work from *-* until there are 6 stitches left, knit 1 and 5 band stitches in garter stitch. Work this rib for 4 cm = 1½". Purl 1 row from the wrong side (band stitches in garter stitch), and increase 25-33-29-37-33-41 stitches evenly spaced – read INCREASE TIP = 98-110-110-122-122-134 stitches. Insert 1 marker after the band; the yoke is measured from this marker. Switch to circular needle size 5,5 mm = US 9. YOKE: The next row is worked as follows from the right side: 5 band stitches in garter stitch, knit 1, work A.1A until there are 8 stitches left (= 7-8-8-9-9-10 repeats of 12 stitches), work the first 2 stitches in A.1A (so the pattern is symmetrical), knit 1 and 5 band stitches in garter stitch. Remember the BUTTONHOLES – read description above. Continue this pattern for 4 cm = 1½", then work A.1B (= 2 rows). There are now 83-93-93-103-103-113 stitches. Now work pattern as follows from the right side: 5 band stitches in garter stitch, knit 1, work A.2 over A.1B (= 7-8-8-9-9-10 repeats of 10 stitches), work the first stitch in A.2, knit 1 and 5 band stitches in garter stitch. REMEMBER THE KNITTING GAUGE! When A.2 has been completed in height there are 209-237-237-265-265-293 stitches and the piece measures approx. 20 cm = 8" from the marker. Knit 1 row from the right side where you increase 15-8-24-24-44-39 stitches evenly spaced = 224-245-261-289-309-332 stitches. Continue with stockinette stitch and 5 band stitches in garter stitch on each side until the piece measures 22-22-23-25-27-29 cm = 8¾"-8¾"-9"-9¾"-10⅝"-11⅜" from the marker. Now divide for the body and sleeves on the next row from the wrong side as follows: Work the first 35-38-40-44-48-53 stitches as before (= right front piece), place the next 46-50-54-60-62-64 stitches on a thread for the sleeve, cast on 8-8-10-10-12-12 stitches (= in side under sleeve), work the next 62-69-73-81-89-98 stitches (= back piece), place the next 46-50-54-60-62-64 stitches on a thread for the sleeve, cast on 8-8-10-10-12-12 stitches (= in side under sleeve), work the last 35-38-40-44-48-53 stitches as before (= left front piece). The body and sleeves are finished separately. THE PIECE IS NOW MEASURED FROM HERE. BODY: = 148-161-173-189-209-228 stitches. Continue back and forth with stockinette stitch and 5 band stitches in garter stitch on each side until the piece measures 20-22-23-23-23-23 cm = 8"-8¾"-9"-9"-9"-9". There is approx. 10 cm = 4" left to finished length; try the jacket on and work to desired length. To avoid the following rib being tight, knit 1 row from the right side where you increase 22-24-27-29-33-35 stitches evenly spaced = 170-185-200-218-242-263 stitches. Change to circular needle size 4.5 MM = US 7 and work rib as follows from the right side: 5 band stitches in garter stitch, * knit 1, purl 2 *, work from *-* until there are 6 stitches left, knit 1 and 5 band stitches in garter stitch. When the rib measures 10 cm = 4", bind off with knit over knit and purl over purl – read BINDING-OFF TIP. The jacket measures approx. 56-58-60-62-64-66 cm = 22"-22¾"-23⅝"-24⅜"-25¼"-26" from the shoulder down. SLEEVES: Place the 46-50-54-60-62-64 stitches from the thread on the one side of the piece on double pointed needles/short circular needle size 5.5 MM = US 9 and knit up 1 stitch in each of the 8-8-10-10-12-12 stitches cast on under the sleeve = 54-58-64-70-74-76 stitches. Insert a marker thread in the middle of the new stitches under the sleeve and start the round at the marker thread. Work stockinette stitch in the round for 4 cm = 1½", then decrease 1 stitch on each side of the marker thread – read DECREASE TIP. Decrease like this every 3½-3-2-1½-1½-1 cm = 1¼"-1⅛"-¾"-½"-½"-⅜" a total of 8-9-11-13-15-15 times = 38-40-42-44-44-46 stitches. Continue with stockinette stitch until the sleeve measures 31-30-30-28-26-24 cm = 12¼"-11¾"-11¾"-11"-10¼"-9½". NOTE: Shorter measurements in larger sizes due to wider neck and longer yoke. Increase 4-5-6-7-7-8 stitches evenly spaced = 42-45-48-51-51-54 stitches. Change to double pointed needles size 4.5 MM = US 7 and work rib (knit 1, purl 2) for 10 cm = 4". Bind off with knit over knit and purl over purl - remember BINDING-OFF TIP. The sleeve measures approx. 41-40-40-38-36-34 cm = 16⅛"-15¾"-15¾"-15"-14¼"-13⅜" from the division. Work the other sleeve in the same way. ASSEMBLY: Sew the buttons onto the left band. |
|||||||||||||||||||||||||
Diagram explanations |
|||||||||||||||||||||||||
|
|||||||||||||||||||||||||
 |
|||||||||||||||||||||||||
 |
|||||||||||||||||||||||||
Have you finished this pattern?Tag your pictures with #dropspattern #autumnwreathjacket or submit them to the #dropsfan gallery. Do you need help with this pattern?You'll find 30 tutorial videos, a Comments/Questions area and more by visiting the pattern on garnstudio.com. © 1982-2026 DROPS Design A/S. We reserve all rights. This document, including all its sub-sections, has copyrights. Read more about what you can do with our patterns at the bottom of each pattern on our site. |
|||||||||||||||||||||||||


With over 40 years in knitting and crochet design, DROPS Design offers one of the most extensive collections of free patterns on the internet - translated to 17 languages. As of today we count 325 catalogs and 12291 patterns - 12281 of which are translated into English (US/in).
We work hard to bring you the best knitting and crochet have to offer, inspiration and advice as well as great quality yarns at incredible prices! Would you like to use our patterns for other than personal use? You can read what you are allowed to do in the Copyright text at the bottom of all our patterns. Happy crafting!
Post a comment to pattern DROPS 228-2
We would love to hear what you have to say about this pattern!
If you want to leave a question, please make sure you select the correct category in the form below, to speed up the answering process. Required fields are marked *.