
Looking for a yarn?


Comments / Questions (37)
![]() Christine wrote:
Christine wrote:
Wunderschön, die Farbe ist ein Traum,
05.07.2019 - 10:10
![]() Hillevi wrote:
Hillevi wrote:
Delikat og lekker, ikke for tjukk- ikke for tynn! denne skal jeg strikke!
04.07.2019 - 15:27
![]() Doris wrote:
Doris wrote:
Sehr schöne Jacke :-) Die könnte ich glatt nachstricken wollen
17.06.2019 - 10:24
![]() Gelske Jongsma wrote:
Gelske Jongsma wrote:
Schouders zijn te laag. Zou heel mooi zijn met passende schouders.
14.06.2019 - 15:44
![]() Ellis wrote:
Ellis wrote:
This could be nice if the shoulders would fit. I wonder why they allways hang 5 cm below the real shouldertop??
08.06.2019 - 20:46
![]() Elin wrote:
Elin wrote:
Very elegant tailored shape.
07.06.2019 - 09:59
![]() Danicic wrote:
Danicic wrote:
Belle proporzioni, carino il motivo, un vero jolly!
06.06.2019 - 14:31
|
||||||||||||||||||||||||||||||||||||||||
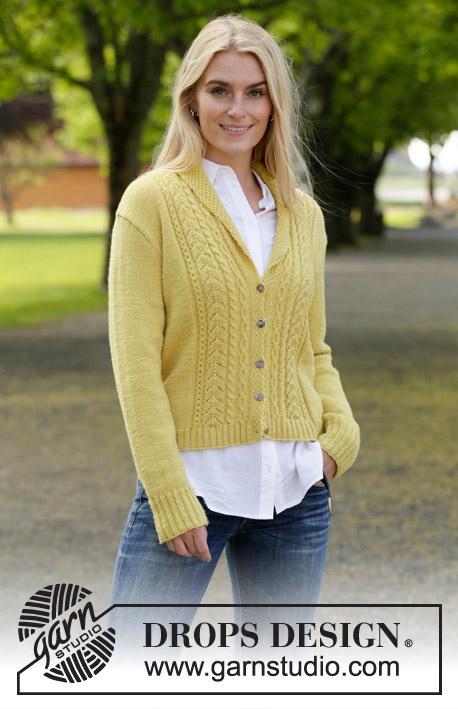
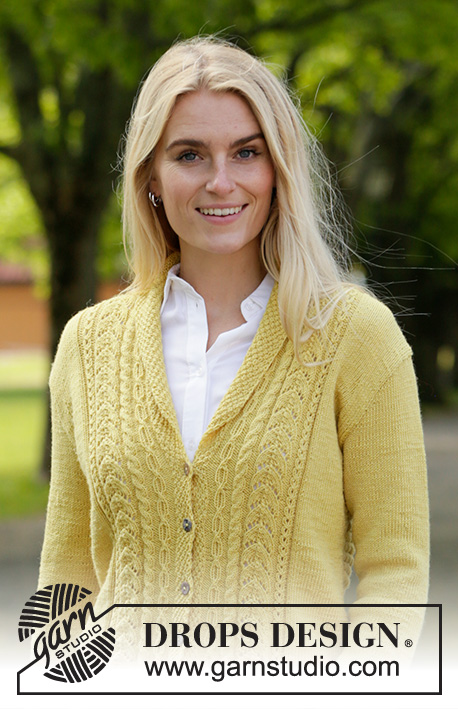
Marigold Sunshine#marigoldsunshinejacket |
||||||||||||||||||||||||||||||||||||||||
 |
 |
|||||||||||||||||||||||||||||||||||||||
Knitted jacket in DROPS BabyMerino. The piece is worked with cables, lace pattern and shawl collar. Sizes S - XXXL.
DROPS 207-4 |
||||||||||||||||||||||||||||||||||||||||
|
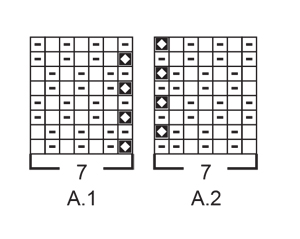
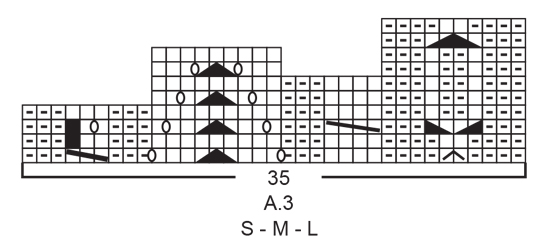
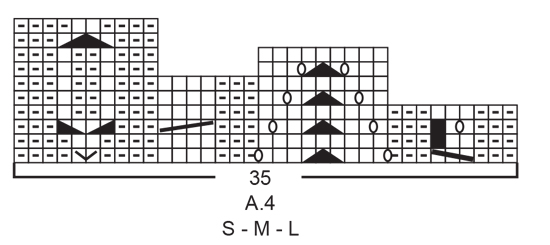
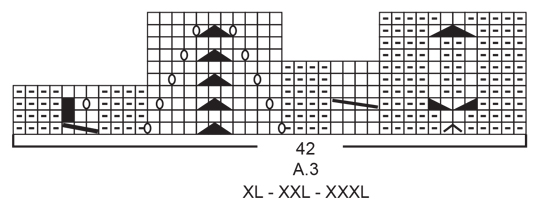
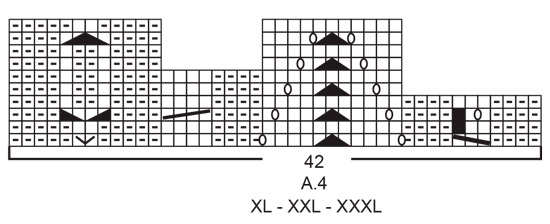
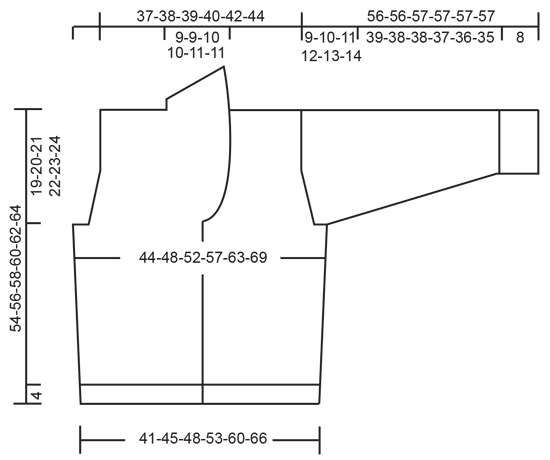
------------------------------------------------------- EXPLANATIONS FOR THE PATTERN: ------------------------------------------------------- RIDGE/GARTER STITCH (worked back and forth): Knit all rows. 1 ridge in height = Knit 2 rows. PATTERN: See diagrams A.1 to A.4. Choose diagram for your size (applies to A.3 and A.4). The diagrams show all rows in the pattern seen from the right side. NOTE: Both A.3 and A.4 show 1 repeat in height, but the diagrams differ in height because each cable/lace pattern covers different numbers of rows in height. And the smallest cable in A.3 and A.4 varies from 3 to 2 stitches. The number of stitches in the pattern can therefore vary by 1 stitch, depending on where you are in the cable. DECREASE TIP-1 (evenly spaced): All decreases are made from the right side! To work out how to decrease evenly, count the total number of stitches on needle (e.g. 252 stitches) minus the bands (e.g. 14 stitches) and divide the remaining stitches by the number of decreases to be made (e.g. 26) = 9.2. In this example decrease by knitting together approx. each 8th and 9th stitch together. Do not decrease on bands. DECREASE TIP-2 (for armholes): All decreases are worked from the right side! Decrease for the armholes on the inside of the 6 outermost stitches towards the armholes as described below. Decrease as follows after the 6 outermost stitches: Work 1 edge stitch in garter stitch, knit 5, slip 1 stitch as if to knit, knit 1 and pass the slipped stitch over the knitted stitch (= 1 stitch decreased). Decrease as follows before the 6 outermost stitches: Work until there are 8 stitches left on the row, knit 2 together, knit 5 and finish with 1 edge stitch in garter stitch (= 1 stitch decreased). INCREASE TIP-1 (for sides of body and mid under sleeves): All increases are worked from the right side! Start 3 stitches before the marker thread, make 1 yarn over, knit 6 (the marker thread sits in the middle of these 6 stitches), 1 yarn over (= 2 stitches increased). On the next row (wrong side) purl the yarn overs twisted to avoid holes. Then work the new stitches in stocking stitch. INCREASE TIP-2 (for shawl collar): All increases are worked from the right side! Increase for the collar on the inside of the outermost stitch towards mid front (i.e. on the inside of the slipped stitch). Increase 1 stitch by making 1 yarn over. On the next row work the yarn over twisted to avoid a hole. The increased stitches are worked into A.1/A.2 as you go. BUTTONHOLES: Work buttonholes on the right band. 1 BUTTONHOLE = Start from the right side and knit the 3rd and 4th stitch from the edge together, then make 1 yarn over. On the next row (wrong side) knit the yarn over (= hole). Work buttonholes when the piece measures: S: 2, 9, 15, 22 and 28 cm M: 2, 9, 16, 23 and 29 cm L: 2, 9, 16, 23 and 30 cm XL: 2, 8, 14, 20, 26 and 31 cm XXL: 2, 8, 14, 20, 26 and 32 cm XXXL: 2, 9, 15, 21, 27 and 33 cm ------------------------------------------------------- START THE PIECE HERE: ------------------------------------------------------- JACKET – SHORT OVERVIEW OF THE PIECE: The body is worked back and forth with circular needle from mid front, bottom up as far as the armholes. Then the back and front pieces are finished separately. The sleeves are worked in the round with double pointed needles/short circular needle, bottom up. BODY: Cast on 252-276-296-328-364-396 stitches (including 7 band stitches on each side towards mid front) with circular needle size 2.5 mm and BabyMerino. Purl 1 row (= wrong side). The next row is worked as follows from the right side: Work A.1 over the first 7 stitches (= band), * knit 2, purl 2 *, work from *-* until there are 9 stitches left on the row, knit 2 and finish with A.2 over the last 7 stitches (= band). Continue this rib for 4 cm – remember BUTTONHOLES on right band – read description above. Purl 1 row from the wrong side (bands worked in A.1/A.2) – AT THE SAME TIME decrease 26-30-34-36-40-44 stitches evenly spaced – read DECREASE TIP-1 = 226-246-262-292-324-352 stitches. Change to circular needle size 3 mm. Insert 1 marker thread 64-69-73-82-90-97 stitches in from each side (= 98-108-116-128-144-158 stitches between marker threads on back piece). Read PATTERN and work the next row from the right side as follows: 7 band stitches in A.1, work A.3 (= 35-35-35-42-42-42 stitches), work stocking stitch until there are 42-42-42-49-49-49 stitches left on the row, work A.4 (= 35-35-35-42-42-42 stitches) and finish with 7 band stitches in A.2. Continue this pattern. REMEMBER THE KNITTING TENSION! Now increase in the sides, increase for the shawl collar and decrease for the armholes as described below (increasing to shawl collar and decreasing for armholes will in some sizes occur simultaneously): INCREASING IN SIDES: When the piece measures 10 cm in all sizes increase 1 stitch on each side of both marker threads – read INCREASE TIP-1 (= 4 stitches increased). Increase like this every 7-7-7-8-8-8 cm a total of 4 times on each side (= a total of 16 stitches increased). SHAWL COLLAR: When the piece measures approx. 29-30-31-32-33-34 cm (you should have worked a couple of rows after the last buttonhole), increase 1 stitch on each side towards mid front – read INCREASE TIP-2. Increase for the collar like this every 2nd row (i.e. every row from the right side) a total of 8-8-10-10-12-12 times (after the final increase for the collar there are 15-15-17-17-19-19 stitches on the band/collar). ARMHOLES: When the piece measures 35-36-37-38-39-40 cm, cast off for the armholes on each side of the body; the next row is worked as follows from the wrong side: Work as before until there are 3-5-7-9-11-13 stitches left before the first marker thread, cast off 6-10-14-18-22-26 stitches for the armhole, work as before until there are 3-5-7-9-11-13 stitches left before the second marker thread, cast off 6-10-14-18-22-26 stitches for the armhole and work to end of row as before. Front and back pieces are now finished separately. RIGHT FRONT PIECE (when garment is worn): Continue back and forth as before with A.1 over the band/shawl collar, A.3 (= 35-35-35-42-42-42 stitches) and stocking stitch over the remaining stitches. AT THE SAME TIME on the first row from the right side decrease 1 stitch in the side for the armhole – read DECREASE TIP-2. Decrease for the armhole like this every 2nd row (i.e. each row from the right side) a total of 6-7-8-11-15-17 times. After all increases and decreases there are 67-69-72-76-80-83 stitches on the row. Continue the pattern. When the piece measures approx. 53-55-57-59-61-63 cm knit 1 row from the right side as before – AT THE SAME TIME on this row decrease 8-8-8-11-11-11 stitches evenly over the 35-35-35-42-42-42 stitches in A.3 = 59-61-64-65-69-72 stitches left. Knit 1 row from the wrong side over all stitches. The next row is worked as follows from the right side: Knit 26-26-29-29-32-32 stitches (= shawl collar) and cast off the 33-35-35-36-37-40 stitches on the shoulder. Cut the strand. Now work RIGHT COLLAR as described below. RIGHT COLLAR: Keep the 26-26-29-29-32-32 stitches on circular needle size 3 mm. The collar is worked in garter stitch with short rows towards the neck. Start from the wrong side and knit 1 row. Now work garter stitch back and forth as follows: * Work 1 ridge back and forth over all 26-26-29-29-32-32 stitches, work 1 ridge back and forth over the first 20-20-23-23-26-26 stitches *, work from *-* until the collar measures approx. 7-7-7-7-8-8 cm inside where shortest (measures approx. 14-14-14-14-16-16 cm outside where longest). Cast off with knit from the right side. LEFT FRONT PIECE (when garment is worn): Continue back and forth as before with stocking stitch, A.4 (= 35-35-35-42-42-42 stitches) and A.2 over the band/shawl collar. AT THE SAME TIME on the first row from the right side decrease 1 stitch in the side for the armhole – read DECREASE TIP-2. Decrease for the armhole like this every 2nd row (i.e. each row from the right side) a total of 6-7-8-11-15-17 times. After all increases and decreases there are 67-69-72-76-80-83 stitches on the row. Continue the pattern. When the piece measures 53-55-57-59-61-63 cm, work 1 row from the right side as before – AT THE SAME TIME on this row decrease 8-8-8-11-11-11 stitches evenly over the 35-35-35-42-42-42 stitches in A.4 = 59-61-64-65-69-72 stitches left. Knit 1 row from the wrong side over all stitches. The next row is worked as follows from the right side: Cast off 33-35-35-36-37-40 stitches for the shoulder and knit the remaining 26-26-29-29-32-32 stitches (= shawl collar). Now work LEFT COLLAR as described below. LEFT COLLAR: = 26-26-29-29-32-32 stitches. Start from the wrong side and work garter stitch back and forth as follows: * Work 1 ridge back and forth over all 26-26-29-29-32-32 stitches, work 1 ridge back and forth over the first 20-20-23-23-26-26 stitches *, work from *-* until the collar measures approx. 7-7-7-7-8-8 cm inside where shortest (measures approx. 14-14-14-14-16-16 cm outside where longest). Knit 1 row from the wrong side and cast off with knit from the right side. BACK PIECE: = 100-106-110-118-130-140 stitches. Continue with stocking stitch. AT THE SAME TIME on the first row from the right side decrease 1 stitch on each side for the armholes – read DECREASE TIP-2. Decrease for the armholes like this every 2nd row a total of 6-7-8-11-15-17 times = 88-92-94-96-100-106 stitches. Work until the piece measures 52-54-56-58-60-62 cm. Now cast off the middle 18-18-20-20-22-22 stitches for the neck and each shoulder is finished separately. Continue with stocking stitch and cast off at the beginning of each row from the neck as follows: Cast off 1 stitch 2 times = 33-35-35-36-37-40 stitches. Work until the piece measures 54-56-58-60-62-64 cm. Knit 1 row from the wrong side and cast off with knit from the right side. Work the other shoulder in the same way. SLEEVE: Cast on 68-72-72-76-76-80 stitches with double pointed needles size 2.5 mm and BabyMerino. Knit 1 round, then work rib in the round (= knit 2/ purl 2) for 8 cm. Change to double pointed needles size 3 mm and knit 1 round where you decrease 12-14-12-14-12-12 stitches evenly spaced = 56-58-60-62-64-68 stitches. Insert 1 marker thread at the beginning of the round = mid under sleeve and allow it to follow your work onwards; it will be used when increasing mid under sleeve. Work stocking stitch in the round. When the sleeve measures 9-9-9-9-10-10 cm from the cast-on edge, increase 2 stitches mid under the sleeve – read INCREASE TIP-1. Increase like this every 3½-3-2½-2-1½-1½ cm a total of 11-13-15-18-21-22 times = 78-84-90-98-106-112 stitches. Continue working until the sleeve measures 47-46-46-45-44-43 cm (there is 9-10-11-12-13-14 cm left to finished length; alternately, continue to desired length). NOTE; Shorter measurements in larger sizes due to broader shoulders and longer sleeve cap. The next round is worked as follows: Start 3 stitches before the marker thread, cast off 6 stitches (= mid under sleeve) and work stocking stitch to end of round = 72-78-84-92-100-106 stitches left. Now work stocking stitch back and forth and AT THE SAME TIME cast off stitches for the sleeve cap at the beginning of each row on both sides as follows: Cast off 3 stitches 1 time on each side, 2 stitches 2-2-2-3-3-3 times on each side and 1 stitch 5-7-9-9-11-12 times on each side. Then cast off 2 stitches on each side until the sleeve measures approx. 55-55-56-56-56-56 cm. Cast off 3 stitches 1 time on each side and then cast off the remaining stitches. The sleeve measures approx. 56-56-57-57-57-57 cm from the top down. Work the other sleeve in the same way. ASSEMBLY: Sew the shoulder seams inside the cast-off edge. Sew in the sleeves inside the 1 edge stitch. Sew the collar together mid back (make sure the seam turns towards the wrong side when the collar is turned down). Sew the collar to the neck at the back, with the seam on the wrong side. |
||||||||||||||||||||||||||||||||||||||||
Diagram explanations |
||||||||||||||||||||||||||||||||||||||||
|
||||||||||||||||||||||||||||||||||||||||
 |
||||||||||||||||||||||||||||||||||||||||
 |
||||||||||||||||||||||||||||||||||||||||
 |
||||||||||||||||||||||||||||||||||||||||
 |
||||||||||||||||||||||||||||||||||||||||
 |
||||||||||||||||||||||||||||||||||||||||
 |
||||||||||||||||||||||||||||||||||||||||
Have you finished this pattern?Tag your pictures with #dropspattern #marigoldsunshinejacket or submit them to the #dropsfan gallery. Do you need help with this pattern?You'll find 29 tutorial videos, a Comments/Questions area and more by visiting the pattern on garnstudio.com. © 1982-2025 DROPS Design A/S. We reserve all rights. This document, including all its sub-sections, has copyrights. Read more about what you can do with our patterns at the bottom of each pattern on our site. |
||||||||||||||||||||||||||||||||||||||||


With over 40 years in knitting and crochet design, DROPS Design offers one of the most extensive collections of free patterns on the internet - translated to 17 languages. As of today we count 320 catalogues and 12094 patterns translated into English (UK/cm). 12094
We work hard to bring you the best knitting and crochet have to offer, inspiration and advice as well as great quality yarns at incredible prices! Would you like to use our patterns for other than personal use? You can read what you are allowed to do in the Copyright text at the bottom of all our patterns. Happy crafting!
Post a comment to pattern DROPS 207-4
We would love to hear what you have to say about this pattern!
If you want to leave a question, please make sure you select the correct category in the form below, to speed up the answering process. Required fields are marked *.