
Looking for a yarn?


Comments / Questions (126)
![]() Simona Campus wrote:
Simona Campus wrote:
Buongiorno, è possibile avviare con tubolare e richiudere con tubulare per avere un bordo elastico più rifinito?
25.01.2020 - 20:24DROPS Design answered:
Buongiorno Simona. Sì, può avviare le maglie e chiuderle con un tubolare., o con il metodo che più la soddisfa. Buon lavoro!
27.01.2020 - 09:01
![]() Elena wrote:
Elena wrote:
Buongiorno, vorrei realizzare questa maglia con un filato estivo alternativo, Drops Belle oppure Drops Muskat. Quale dei due mi consigliate per ottenere un risultato più vicino a quello originale? Grazie
22.01.2020 - 11:26DROPS Design answered:
Buongiorno Elena. La scelta del filato è sempre molto personale. Muskat è un cotone un po' pesante; Belle è un misto cotone / lino, quindi più leggero e morbido. Per ogni ulteriore consiglio, può rivolgersi al suo rivenditore Drops di fiducia. Verifichi sempre la correttezza del campione. Buon lavoro!
22.01.2020 - 15:18
![]() Dprpta wrote:
Dprpta wrote:
Witam. Doszłam już do momentu kiedy dodajemy 8 oczek w rozmiarze S M i pojawił się problem, ponieważ nie wiem jak przerabiać dodane oczka. Wychodzi na to że będą to dwa prawe obok siebie lub dwa lewe aby były zgodne ze schematem A1. Pozdrawiam. Dorota
12.11.2019 - 14:20DROPS Design answered:
Witaj Doroto! W następnym okrążeniu (za okrążeniem z narzutami) przerabiać narzuty na prawo, powstaną otwory/dziurki. Dalej w trakcie robótki, gdy dodajemy oczka na reglan, przerabiać nowe oczka ściegiem fantazyjnym w miarę postępu robótki. Powodzenia!
12.11.2019 - 18:25
![]() Anna wrote:
Anna wrote:
Jak robię narzuty to w kolejnym okrążeniu wychodzą mi dwa oczka prawe lub lewe pod rząd, nie wiem jak sobie z tym poradzić.
10.11.2019 - 19:59DROPS Design answered:
Witaj Aniu! W następnym okrążeniu (za okrążeniem z narzutami) przerabiać narzuty na prawo, powstaną otwory/dziurki. Dalej w trakcie robótki, gdy dodajemy oczka na reglan, przerabiać nowe oczka ściegiem fantazyjnym w miarę postępu robótki. Powodzenia!
12.11.2019 - 18:23
![]() Ellen wrote:
Ellen wrote:
Upon the division of sleeves & body starts from " The next round is worked as follows ............" apparently there is some part of the description is missing. It is not understood that how many stitches are for sleeves and how many stitches for body. Is the counting start from the thread markers? (The English version) . Please check and help. Thank you very much.
19.10.2019 - 02:03DROPS Design answered:
Dear Ellen, the division row starts at the same place as previous rounds, ie you will work the 3 sts from Raglan line + some other stitches from the sleeve (except in size M) for the back piece, then slip the given number of sts for sleeve, and there will be some stitches from sleeve + raglan lines worked for front piece and so on. Happy knitting!
21.10.2019 - 09:00
![]() Catherine wrote:
Catherine wrote:
I am working on size L. According to the pattern, the thread markers are the dividers for sleeves, front piece and back piece. When it comes to the sleeves and body separation, should they be 72 stitches each for sleeves and 92 stitches each for front and back? Sleeve increase : 14 stitches + 4 stitches X 14 times + 2 stitches 1 time =72 stitches, front/back increase: 34 stitches+ 4 stitches X14 times + 2 stitches 1 time= 92 stitches . Please help. Thank you.
16.10.2019 - 15:04DROPS Design answered:
Dear Catherine, the markers are in the middle of the 6-sts-raglan lines, when dividing piece you keep the first 4 sts on raglan for back piece, sleeves are: 2 sts from raglan + 66 sts + 2 sts = 70 sts; front piece is: 4 sts from raglan + 86 sts + 4 sts from raglan = 94 sts and back piece = 4 sts from raglan + 86 sts + the first 4 sts worked = 94 sts. Happy knitting!
17.10.2019 - 09:44
![]() Catherine wrote:
Catherine wrote:
Please follow up the whole lot of the explanation part of raglan, stripes and pattern etc. Is missing in English but other languages are o.k. Thank you.
13.10.2019 - 00:34DROPS Design answered:
Dear Catherine, thanks for your feedback, English pattern has been now edited. Happy knitting!
14.10.2019 - 10:07
![]() Catherine wrote:
Catherine wrote:
The descriptions of raglans , stripes and pattern are missing. Please check. Thank you.
12.10.2019 - 04:07DROPS Design answered:
Dear Catherine, thanks for your feedback, the missing part has been now added. Happy knitting!
14.10.2019 - 09:18
![]() Riet Buth wrote:
Riet Buth wrote:
Hallo , klopt het wel dat de eerste parkeerdraad middenachter is ? wat ik ook wil vragen is als je de 26 cm van de raglan hebt gebreid dan staat er brei 5 steken ,waar begin je dan die 5 steken ?
07.10.2019 - 16:59DROPS Design answered:
Dag Riet,
Nadat je de hals hebt gebreid en begint met de pas wordt er eerst 1 markeerdraad ingevoegd vanaf waar je het werk meet en dit is ook het begin van elke toer. De volgende 4 markeerdraden die ingevoegd worden geven de raglanlijnen aan. De toer begint dus telkens 3 steken voor de eerste raglan-markeerdraad. Dit is dus niet midden achter maar naast de raglan.
Die 5 steken begin je aan het begin van de toer (3 steken voor de eerste raglan-markeerdraad). De toer begint op deze plek omdat het mooier is dat het streeppatroon daar verspringt in plaats van midden achter.
15.10.2019 - 19:01
![]() Marianne Aarrestad wrote:
Marianne Aarrestad wrote:
Jeg får ikke rett og vrang til å stemme overens etter at jeg har økt de siste 8 maskene på raglan. Hvordan gjøres dette?
25.09.2019 - 20:05DROPS Design answered:
Hej Marianne, jo du udgår fra de masker du allerede har, og fortsætter over de nye masker, så hver 2. maske er ret og hver 2. maske er vrang. God fornøjelse!
26.09.2019 - 08:08
|
|||||||
Sjøbris#sjoebrissweater |
|||||||
 |
 |
||||||
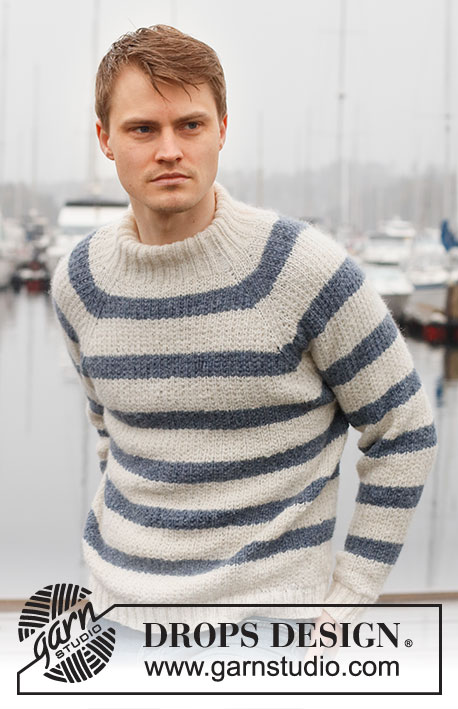
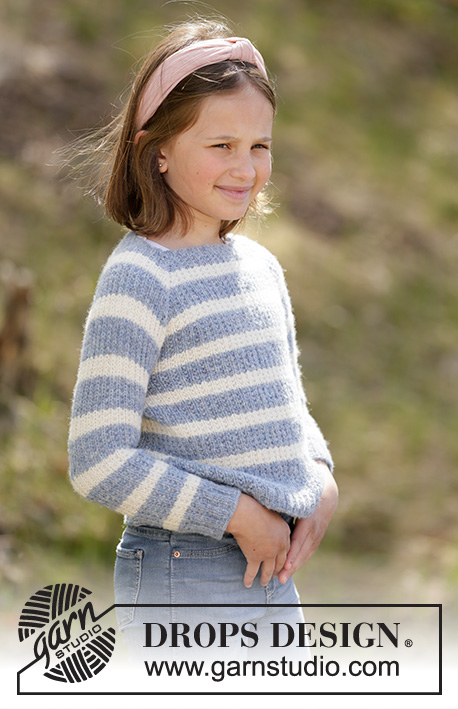
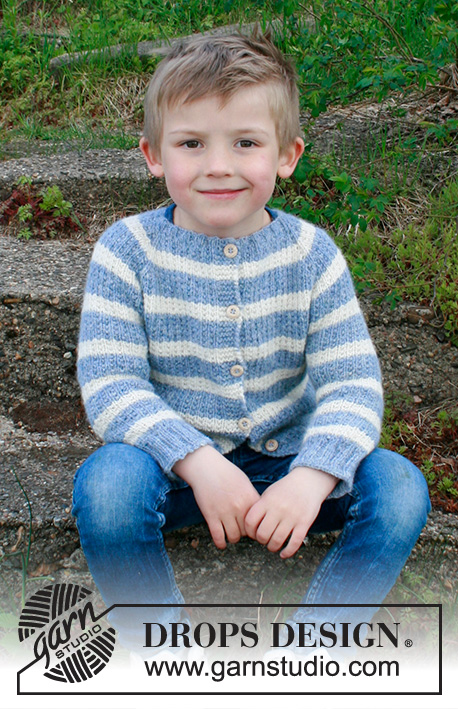
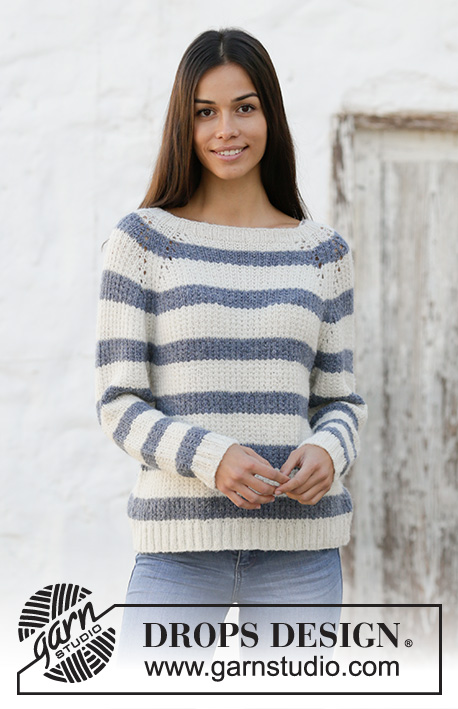
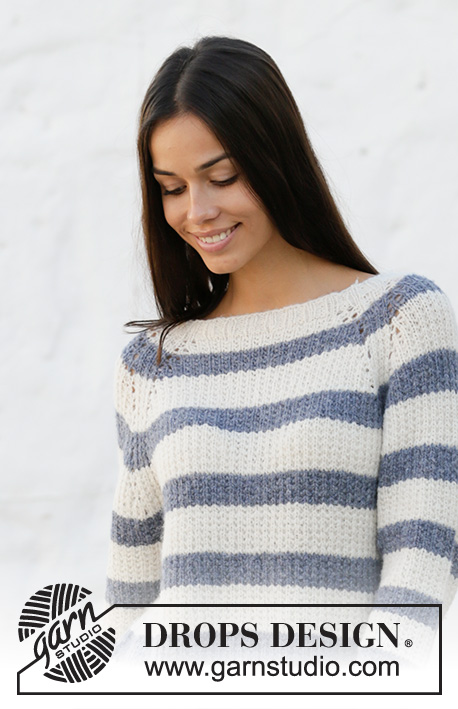
Knitted jumper with raglan and stripes in DROPS Sky. The piece is worked top down. Sizes S - XXXL.
DROPS 199-1 |
|||||||
|
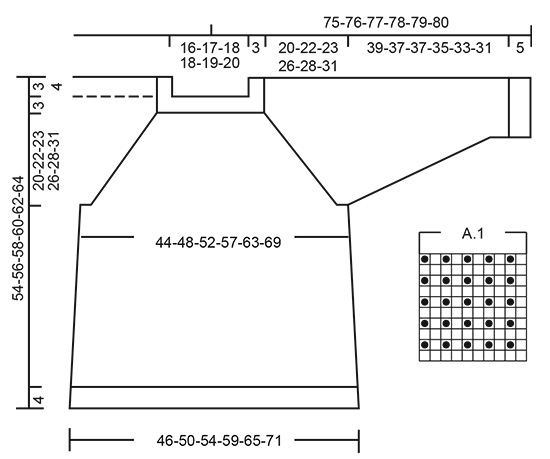
------------------------------------------------------- EXPLANATIONS FOR THE PATTERN: ------------------------------------------------------- DECREASE/INCREASE TIP (evenly spaced): To work out how to decrease/increase evenly, count the total number of stitches to be decreased/increased over (e.g. 96 stitches), and divide by the number of decreases/increases to be made (e.g. 8) = 12. In this example, decrease by knitting each 11th and 12th stitch together. When increasing make 1 yarn over after each 12th stitch. On the next round, knit the yarn overs twisted to avoid holes. RAGLAN: Increase 4 stitches in each transition between body and sleeves as follows: Work until there are 4 stitches left before the marker thread, 1 yarn over, knit 1, 1 yarn over, work 6 stitches in pattern (the marker thread sits in the middle of these 6 stitches), 1 yarn over, knit 1, 1 yarn over. On the next round knit the yarn overs to leave holes. Then work the new stitches in stripes and pattern. INCREASE TIP (for sides of body): Work until there are 2 stitches left before the marker thread, 1 yarn over, knit 4 (marker thread sits in the middle of these 4 stitches), 1 yarn over. On the next round knit the yarn overs twisted to avoid holes. Then work the new stitches in stripes and pattern. DECREASE TIP (for sleeves): Decrease 1 stitch on each side of the marker thread as follows: Work until there are 3 stitches left before the marker thread, knit 2 together, knit 2 (marker thread sits between these 2 stitches), slip 1 stitch as if to knit, knit 1 and pass the slipped stitch over the knitted stitch. STRIPES AND PATTERN: * Work 5 cm in white (including neck) and then 3 cm jeans blue * – repeat these stripes at the same time as the whole piece is worked in pattern – see diagram A.1; when increasing to raglan work the new stitches into the pattern as you go. ------------------------------------------------------- START THE PIECE HERE: ------------------------------------------------------- JUMPER - SHORT OVERVIEW OF THE PIECE: The piece is worked in the round with circular needle, top down. After the yoke the body is continued in the round with circular needle. The sleeves are worked in the round with short circular needle/double pointed needles. NECK: Cast on 96-100-104-112-120-124 stitches with circular needle size 3.5 mm and white. Knit 1 round. Then work rib (= knit 2 / purl 2) for 3 cm. Knit 1 round where you decrease 8-8-8-12-12-12 stitches evenly spaced – read DECREASE/INCREASE TIP = 88-92-96-100-108-112 stitches. Change to circular needle size 4.5 mm. Now continue with STRIPES AND PATTERN - see description above. YOKE: Insert 1 marker - THE PIECE IS NOW MEASURED FROM HERE! Insert 4 marker threads in the piece at the same time as you work stripes and pattern in the round as follows: Knit 3 stitches (= 3 stitches on back piece), insert 1 marker thread, work the next 12-12-14-14-16-16 stitches (= sleeve), insert 1 marker thread, work the next 32-34-34-36-38-40 stitches (= front piece), insert 1 marker thread, work 12-12-14-14-16-16 stitches (= sleeve), insert 1 marker thread, work the last 29-31-31-33-35-37 stitches (= back piece) after the last marker thread (there are 3 stitches left to the first marker thread). The next round is worked as follows: 6 stitches in pattern (marker thread sits in the middle of these 6 stitches), make 1 yarn over, knit 1, make 1 yarn over, 4-4-6-6-8-8 stitches in pattern (= sleeve), 1 yarn over, knit 1, make 1 yarn over, 6 stitches in pattern (marker thread sits in the middle of these 6 stitches), 1 yarn over, knit 1, make 1 yarn over, 24-26-26-28-30-32 stitches in pattern (= front piece), 1 yarn over, knit 1, make 1 yarn over, 6 stitches in pattern (marker thread sits in the middle of these 6 stitches), 1 yarn over, knit 1, make 1 yarn over, 4-4-6-6-8-8 stitches in pattern (= sleeve), 1 yarn over, knit 1, make 1 yarn over, 6 stitches pattern (marker thread sits in the middle of these 6 stitches), 1 yarn over, knit 1, make 1 yarn over, work 24-26-26-28-30-32 stitches in pattern (= back piece), 1 yarn over, knit 1, make 1 yarn over. The first increase to RAGLAN – read description above, is now finished (= 16 stitches increased on the round). Continue to increase to raglan every 4th round a total of 11-13-14-16-17-19 times (including the first increase described above) = 264-300-320-356-380-416 stitches on needle Size XL and XXL: The increase for raglan is complete. Size S, M, L and XXXL: The next round is worked as follows: 6 stitches in pattern (marker thread sits in the middle of these 6 stitches), make 1 yarn over, work pattern until 3 sts remain before the next marker thread (= sleeve), 1 yarn over, 6 stitches in pattern (marker thread sits in the middle of these 6 stitches), 1 yarn over, work pattern until 3 sts remain before the next marker thread (= front piece), 1 yarn over, 6 stitches in pattern (marker thread sits in the middle of these 6 stitches), 1 yarn over, work pattern until 3 sts remain before the next marker thread (= sleeve), 1 yarn over, 6 stitches in pattern (marker thread sits in the middle of these 6 stitches), 1 yarn over, work pattern until 3 sts remain before the next marker thread (= back piece), 1 yarn over = 8 stitches increased. All sizes: After the last increase to raglan there are 272-308-328-356-380-424 stitches on the needle. Continue with stripes and pattern without increasing until the piece measures 20-22-23-26-28-31 cm from the marker at the beginning of the yoke. The next round is worked as follows: Work 4-3-4-5-7-7 stitches (= on back piece), place the next 56-66-70-74-76-86 stitches on 1 thread for sleeve, cast on 8-8-10-10-12-12 new stitches on needle (= in side under sleeve), work the next 80-88-94-104-114-126 stitches (= front piece), place the next 56-66-70-74-76-86 stitches on 1 thread for sleeve, cast on 8-8-10-10-12-12 new stitches on needle (= in side under sleeve) and work the last 76-85-90-99-107-119 stitches (= back piece). Body and sleeves are finished separately. THE PIECE IS NOW MEASURED FROM HERE! BODY: = 176-192-208-228-252-276 stitches. Insert 1 marker thread in the middle of the 8-8-10-10-12-12 new stitches cast on under each sleeve. Start the round by one of these marker threads and allow the marker threads to follow your work onwards; continue with stripes and pattern. When the piece measures 8 cm from the division, increase 1 stitch on each side of both marker threads – read INCREASE TIP (= 4 stitches increased). Repeat this increase when the piece measures 17 cm from the division = 184-200-216-236-260-284 stitches. When the piece measures 27-27-28-26-26-25 cm from the division (approx. 50-52-54-56-58-60 cm from shoulder) knit 1 round where you increase 36-40-44-48-52-56 stitches evenly spaced = 220-240-260-284-312-340 stitches. Change to circular needle size 3.5 mm and work rib (= knit 2 / purl 2) for 4 cm. Loosely cast off with knit over knit and purl over purl - to avoid the cast-off edge being tight you can cast off with needle size 4.5 mm. The jumper measures approx. 54-56-58-60-62-64 cm from the shoulder. SLEEVE: Place the 56-66-70-74-76-86 stitches from the thread on the one side of the piece on short circular needle/double pointed needles size 4.5.mm and knit up 1 stitch in each of the 8-8-10-10-12-12 stitches cast on under the sleeve = 64-74-80-84-88-98 stitches. Insert 1 marker thread in the middle of the 8-8-10-10-12-12 stitches. Work stripes and pattern in the round. When the piece measures 2 cm from the division decrease 2 stitches mid under sleeve – read DECREASE TIP. Decrease like this every 7th-5th-4th-4th-3rd-3rd round a total of 13-17-19-20-21-25 times = 38-40-42-44-46-48 stitches. Continue working until the sleeve measures 39-37-37-35-33-31 cm from the division (shorter measurements in larger sizes due to longer yoke). Knit 1 round where you increase 6-4-6-8-6-8 stitches evenly spaced = 44-44-48-52-52-56 stitches. Change to double pointed needles size 3.5 mm and work rib (= knit 2 / purl 2) for 5 cm. The sleeve measures approx. 44-42-42-40-38-36 cm from the division. Loosely cast off with knit over knit and purl over purl - to avoid the cast-off edge being tight you can cast off with needle size 4.5 mm. Work the other sleeve in the same way. |
|||||||
Diagram explanations |
|||||||
|
|||||||
 |
|||||||
Have you finished this pattern?Tag your pictures with #dropspattern #sjoebrissweater or submit them to the #dropsfan gallery. Do you need help with this pattern?You'll find 24 tutorial videos, a Comments/Questions area and more by visiting the pattern on garnstudio.com. © 1982-2025 DROPS Design A/S. We reserve all rights. This document, including all its sub-sections, has copyrights. Read more about what you can do with our patterns at the bottom of each pattern on our site. |
|||||||


With over 40 years in knitting and crochet design, DROPS Design offers one of the most extensive collections of free patterns on the internet - translated to 17 languages. As of today we count 320 catalogues and 12093 patterns translated into English (UK/cm). 12093
We work hard to bring you the best knitting and crochet have to offer, inspiration and advice as well as great quality yarns at incredible prices! Would you like to use our patterns for other than personal use? You can read what you are allowed to do in the Copyright text at the bottom of all our patterns. Happy crafting!
Post a comment to pattern DROPS 199-1
We would love to hear what you have to say about this pattern!
If you want to leave a question, please make sure you select the correct category in the form below, to speed up the answering process. Required fields are marked *.