
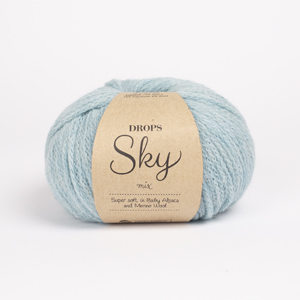
Looking for a yarn?


Comments / Questions (126)
![]() Doreen wrote:
Doreen wrote:
Hallo, ich verstehe die Raglanzunahmen überhaupt nicht. Haben den Kragen gestrickt und weiter komme ich nicht.
01.09.2021 - 20:22DROPS Design answered:
Liebe Doreen, die nächste Runde wird mit Muster gestrickt, dh bei der 1. Reunde stricken Sie alle maschen rechts wie im A.1 gezeig, bei der Runde setzen Sie Markierungen für den Raglan. Die 3 Maschen beidseitig jeder Markierung sind für Raglanlinien = 6 Maschen Raglan; die in A.1 gestrickt werden. Die Maschen für Ärmel, Vorder- und Rückenteil stricken Sie auch in A.1, aber diese Maschenanzahl wird dann am Anfang/Ende wegen Raglanzunahmen zunehmen. Bei der 2. Runde sollen Sie genauso wie beschrieben zunehmen = 16 M werden zugenommen; dann nehmen Sie nur 8 M (= 1 Zunahme, 6 M Raglan mit Markierung in der Mitte, 1 Zunahme). Kann das Ihnen helfen?
02.09.2021 - 08:34
![]() Amelita wrote:
Amelita wrote:
Én nem értem a raglán szaporításokat. Hogyan kell kiszámolni hogy az egyes szaporításoknál hányadik szemnél kell szaporítani?
31.08.2021 - 10:18DROPS Design answered:
Kedves Amelita! Úgy számoljuk ki, az egyenletesen elosztott szaporításokhoz/ fogyasztásokhoz hol kell a sorban a szaporítást / fogyasztást elkészítenünk, hogy vesszük a kötőtűn lévő szemek számát (vagyis ebben a példában 96 szemet), és a szemek számát elosztjuk azzal a számmal, ahány szemet kell szaporítanunk / fogyasztanunk (ebben a példában 8) = 12. Más szóval, ebben a példában, minden 11. és 12. szemet kell összedolgoznunk. Amikor szaporításokat készítünk, minden 12. szem után készítünk ráhajtást. A következő sorban/körben a ráhajtást csavartan kötjük, így a helyükön nem keletkezik lyuk. Sikeres Kézimunkázást!
31.08.2021 - 17:00
![]() Nadège wrote:
Nadège wrote:
Bonjour je tricote la taille M. Je n'ai pas eu de souci avec les augmentations mais là j'arrive sur la dernière, celle de 8 mailles et cela décale tout le motif. Pouvez vous m'aider ? merci
22.07.2021 - 08:18DROPS Design answered:
Bonjour Nadège, vous devez maintenant augmenter juste de part et d'autre des 6 mailles à chaque marqueur ainsi: tricotez jusqu'à ce qu'il reset 3 mailles avant le marqueur, faites 1 jeté, tricotez les 6 m suivantes comme avant (= raglan, le fil marqueur est au milieu de ces 6 mailles), 1 jeté. Répétez à chaque marqueur = vous augmentez 1 m de chaque côté de chaque marqueur/de chaque côté des 6 mailles du raglan soit 8 mailes au total. Au tour suivant, tricotez ces jetés en les intégrant au dos/devant/manches et non aux 6 mailles des raglans (= comme avant). Bon tricot!
22.07.2021 - 10:16
![]() Stephanie wrote:
Stephanie wrote:
Hello, I've done the first raglan increase plus the first 3 rows after that and am ready to do the second raglan increase. I'm not exactly sure which part to follow. Do I still knit the first 6 stitches (with the marker in the middle) and increase there, and then knit until 4 stitches before the next marker and follow on from there? The pattern sometimes mentions the first 6 stitches and sometimes it does not. Thank you!
18.07.2021 - 02:16DROPS Design answered:
Dear Stephanie, you will now increase on either side of the 6 stitches as explained under RAGLAN, ie at the end of the round start with these 6 sts, YO, K1, YO, then repeat the increase before/after the 6 next sts at the next 3 markers, and end round increasing before the first 6 sts of the round with YO, K1, YO. Happy knitting!
19.07.2021 - 08:36
![]() Hannele wrote:
Hannele wrote:
Hei, ei pääse eteenpäin raglanlisäysten jälkeen. Kun M-koon työhön on yksitellen lisätty 8 silmukkaa langankierrolla eri paikkoihin, pitäisi seuraavaksi jatkaa mallineuletta ilman lisäyksiä. Kun oikean ja nurin neulotun silmukan väliin on tullut langankierrolla lisäsilmukka, miten neulon sen ja sitä seuraavan silmukan (nurin, oikein, lisäys, nurin, oikein...) niin, että saan kuvion täsmäävän seuraavan kerran kun neulon vuorotellen oikein ja nurin?
28.06.2021 - 13:36
![]() Marja wrote:
Marja wrote:
Hallo, Ik wil deze trui breien in maat M. Er staat dat ik 100 steken moet opzetten voor de boord en daarna 8 steken moet minderen. Als ik het gecorrigeerde patroon(18-03-2019) voor de pas bekijk lijkt het dat ik minder steken moet opzetten, nl een voor- en achterpand van slechts 26 steken in plaats van 34. Klopt dat?
20.06.2021 - 23:49DROPS Design answered:
Dag Marja,
In het online patroon zijn alle correcties doorgevoerd. Het aantal op te zetten steken voor maat M is dus 100 en het aantal steken op het voor- en achterpand is inderdaad 26 steken.
24.06.2021 - 10:20
![]() Marieke wrote:
Marieke wrote:
Ik ben een beginner en het is voor mij onduidelijk of ik de meerderingen bij de PAS op de rechte naald of de naald in patroon moet maken. Ik ging er van uit op de 2e naald in patroon, omdat de naald daarvoor, met de markeringen aanbrengen, recht is. Maar dat gaat niet goed. Ik hoor graag van jullie!
01.05.2021 - 08:22DROPS Design answered:
Dag Marieke,
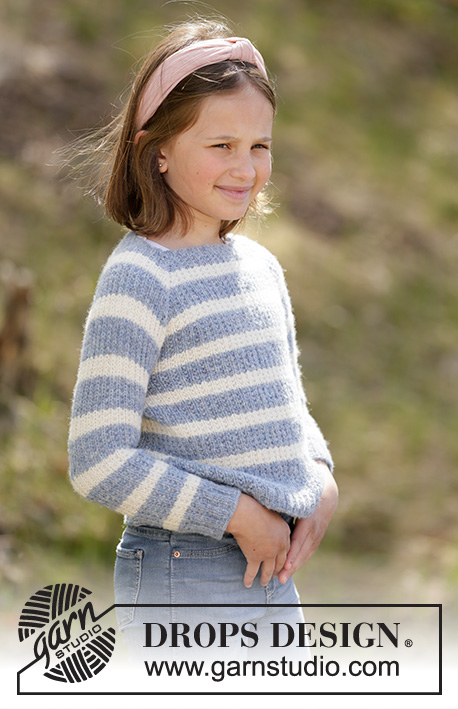
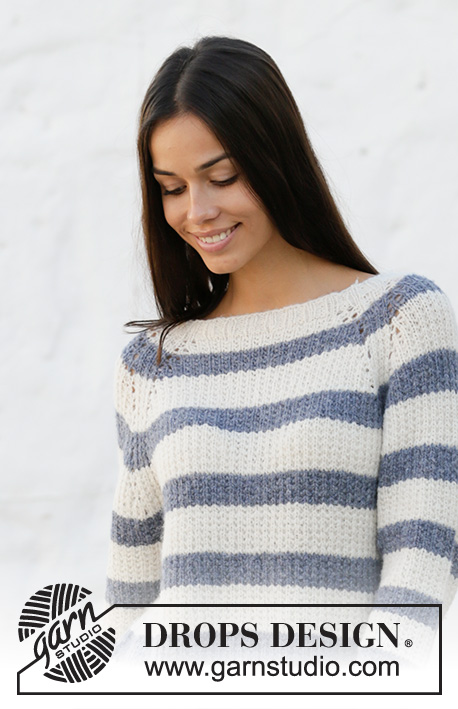
Het maakt niet uit uit of je op een naald meerdert met alleen rechte steken of een naald met recht/averecht., als je maar om de 4 naalden meerdert. Op de volgende naald brei je de omslagen in patroon op de mouwen en de panden. Zie ook de laatste foto hoe de raglanlijn eruit ziet.
05.05.2021 - 08:48
![]() Anita Andersen wrote:
Anita Andersen wrote:
Kan man strikke denne trøje i kids silk. jeg har forsøgt med omregneren.
14.04.2021 - 06:27DROPS Design answered:
Hej Anita, DROPS Kid-Silk tilhører ikke samme garngruppe som DROPS Sky, derfor finder du den ikke som alternativ i omregneren. Du kan lave en strikkeprøve i 1 tråd eller med 2 tråde så kan du se hvilken af dem (med 20 masker på 10 cm) som passer dig bedst. :)
14.04.2021 - 15:03
![]() Inger wrote:
Inger wrote:
Følger oppskrift i XL. Setter merker som beskrevet, 3, 16, 38, 16, 35. Får ikke merkene til å stemme når jeg skal lage raglan. Da skal jeg strikke 30 masker på forstykket og bakstykket. Da stemmer ikke maskemerkene midt i de 6 maskene som beskrevet. Noen som kan hjelpe?
01.04.2021 - 13:31DROPS Design answered:
Hei Inger, Du har 38 masker på både for- og bakstykket mellom merkene. Du skal strikke fram til det gjenstår 3 masker før merketråden, lage 1 kast, 1 rett, lage 1 kast og strikke 6 masker i mønster (da har du merketråden i midten av disse 6 maskene). God fornøyelse!
09.04.2021 - 07:55
![]() Sharon Harper wrote:
Sharon Harper wrote:
Thank you the answer to my question but it does not help. I have done the increase of 16 stitches per row and then I increase in the small size from 264 to 272. The pattern says s remain before the next marker thread (= back piece), 1 yarn over = 8 stitches increased. All sizes: After the last increase to raglan there are 272-308 I don’t understand how I can do the 8 stitches where instructed without messing up the k1 p1 pattern. Your help is appreciated.
28.10.2020 - 21:33DROPS Design answered:
Dear Mrs Harper, when you increase only 8 stitches, on the round = 1 stitch on either side of the 6 sts raglan line, just work the new stitch in pattern, ie if the previous stitch was a st in stocking stitch work the new stitch as a stitch in garter stitch, if it was a stitch in garter stitch, work it as a stocking st. And if the next stitch after the new stitch is a stitch in garter st, work it as a stocking st and if it's a stitch in stocking st, work it as a stitch in garter st. The pattern should continue on body/sleeve, these increase do not affect the 6 sts for raglan line, only the sleeves/front/back piece. Hope this helps Happy knitting!
29.10.2020 - 08:41
|
|||||||
Sjøbris#sjoebrissweater |
|||||||
 |
 |
||||||
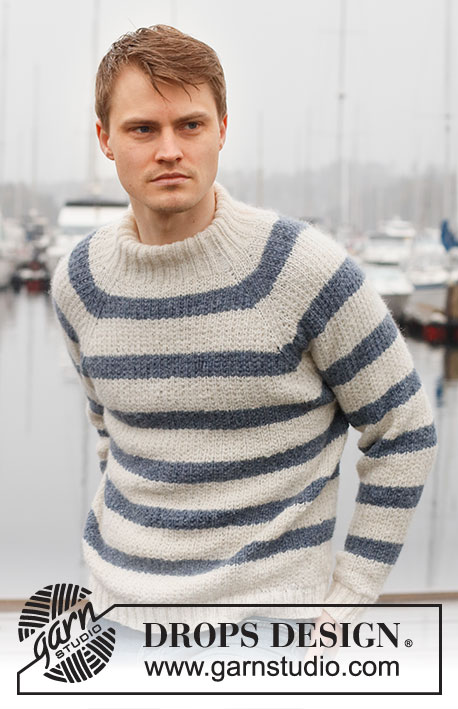
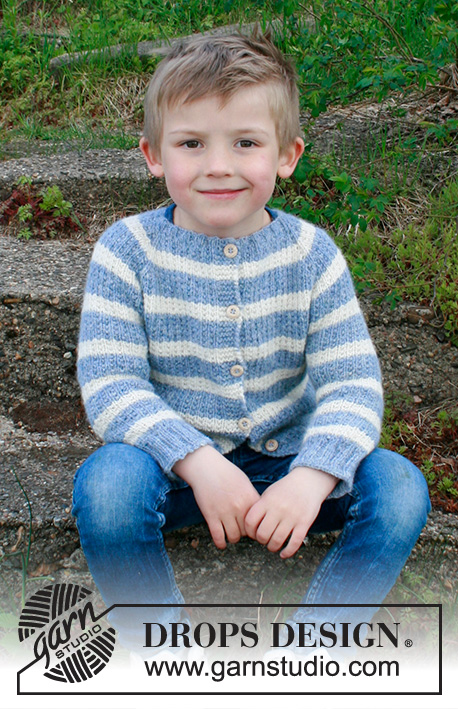
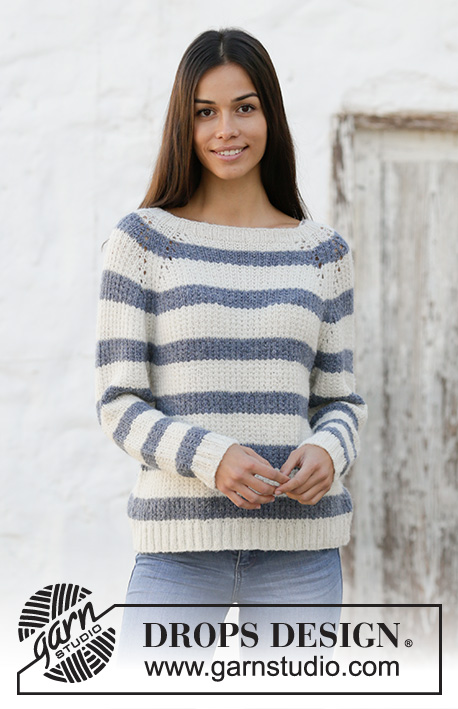
Knitted jumper with raglan and stripes in DROPS Sky. The piece is worked top down. Sizes S - XXXL.
DROPS 199-1 |
|||||||
|
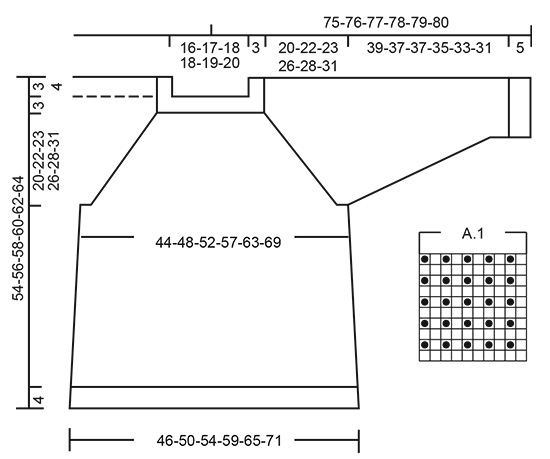
------------------------------------------------------- EXPLANATIONS FOR THE PATTERN: ------------------------------------------------------- DECREASE/INCREASE TIP (evenly spaced): To work out how to decrease/increase evenly, count the total number of stitches to be decreased/increased over (e.g. 96 stitches), and divide by the number of decreases/increases to be made (e.g. 8) = 12. In this example, decrease by knitting each 11th and 12th stitch together. When increasing make 1 yarn over after each 12th stitch. On the next round, knit the yarn overs twisted to avoid holes. RAGLAN: Increase 4 stitches in each transition between body and sleeves as follows: Work until there are 4 stitches left before the marker thread, 1 yarn over, knit 1, 1 yarn over, work 6 stitches in pattern (the marker thread sits in the middle of these 6 stitches), 1 yarn over, knit 1, 1 yarn over. On the next round knit the yarn overs to leave holes. Then work the new stitches in stripes and pattern. INCREASE TIP (for sides of body): Work until there are 2 stitches left before the marker thread, 1 yarn over, knit 4 (marker thread sits in the middle of these 4 stitches), 1 yarn over. On the next round knit the yarn overs twisted to avoid holes. Then work the new stitches in stripes and pattern. DECREASE TIP (for sleeves): Decrease 1 stitch on each side of the marker thread as follows: Work until there are 3 stitches left before the marker thread, knit 2 together, knit 2 (marker thread sits between these 2 stitches), slip 1 stitch as if to knit, knit 1 and pass the slipped stitch over the knitted stitch. STRIPES AND PATTERN: * Work 5 cm in white (including neck) and then 3 cm jeans blue * – repeat these stripes at the same time as the whole piece is worked in pattern – see diagram A.1; when increasing to raglan work the new stitches into the pattern as you go. ------------------------------------------------------- START THE PIECE HERE: ------------------------------------------------------- JUMPER - SHORT OVERVIEW OF THE PIECE: The piece is worked in the round with circular needle, top down. After the yoke the body is continued in the round with circular needle. The sleeves are worked in the round with short circular needle/double pointed needles. NECK: Cast on 96-100-104-112-120-124 stitches with circular needle size 3.5 mm and white. Knit 1 round. Then work rib (= knit 2 / purl 2) for 3 cm. Knit 1 round where you decrease 8-8-8-12-12-12 stitches evenly spaced – read DECREASE/INCREASE TIP = 88-92-96-100-108-112 stitches. Change to circular needle size 4.5 mm. Now continue with STRIPES AND PATTERN - see description above. YOKE: Insert 1 marker - THE PIECE IS NOW MEASURED FROM HERE! Insert 4 marker threads in the piece at the same time as you work stripes and pattern in the round as follows: Knit 3 stitches (= 3 stitches on back piece), insert 1 marker thread, work the next 12-12-14-14-16-16 stitches (= sleeve), insert 1 marker thread, work the next 32-34-34-36-38-40 stitches (= front piece), insert 1 marker thread, work 12-12-14-14-16-16 stitches (= sleeve), insert 1 marker thread, work the last 29-31-31-33-35-37 stitches (= back piece) after the last marker thread (there are 3 stitches left to the first marker thread). The next round is worked as follows: 6 stitches in pattern (marker thread sits in the middle of these 6 stitches), make 1 yarn over, knit 1, make 1 yarn over, 4-4-6-6-8-8 stitches in pattern (= sleeve), 1 yarn over, knit 1, make 1 yarn over, 6 stitches in pattern (marker thread sits in the middle of these 6 stitches), 1 yarn over, knit 1, make 1 yarn over, 24-26-26-28-30-32 stitches in pattern (= front piece), 1 yarn over, knit 1, make 1 yarn over, 6 stitches in pattern (marker thread sits in the middle of these 6 stitches), 1 yarn over, knit 1, make 1 yarn over, 4-4-6-6-8-8 stitches in pattern (= sleeve), 1 yarn over, knit 1, make 1 yarn over, 6 stitches pattern (marker thread sits in the middle of these 6 stitches), 1 yarn over, knit 1, make 1 yarn over, work 24-26-26-28-30-32 stitches in pattern (= back piece), 1 yarn over, knit 1, make 1 yarn over. The first increase to RAGLAN – read description above, is now finished (= 16 stitches increased on the round). Continue to increase to raglan every 4th round a total of 11-13-14-16-17-19 times (including the first increase described above) = 264-300-320-356-380-416 stitches on needle Size XL and XXL: The increase for raglan is complete. Size S, M, L and XXXL: The next round is worked as follows: 6 stitches in pattern (marker thread sits in the middle of these 6 stitches), make 1 yarn over, work pattern until 3 sts remain before the next marker thread (= sleeve), 1 yarn over, 6 stitches in pattern (marker thread sits in the middle of these 6 stitches), 1 yarn over, work pattern until 3 sts remain before the next marker thread (= front piece), 1 yarn over, 6 stitches in pattern (marker thread sits in the middle of these 6 stitches), 1 yarn over, work pattern until 3 sts remain before the next marker thread (= sleeve), 1 yarn over, 6 stitches in pattern (marker thread sits in the middle of these 6 stitches), 1 yarn over, work pattern until 3 sts remain before the next marker thread (= back piece), 1 yarn over = 8 stitches increased. All sizes: After the last increase to raglan there are 272-308-328-356-380-424 stitches on the needle. Continue with stripes and pattern without increasing until the piece measures 20-22-23-26-28-31 cm from the marker at the beginning of the yoke. The next round is worked as follows: Work 4-3-4-5-7-7 stitches (= on back piece), place the next 56-66-70-74-76-86 stitches on 1 thread for sleeve, cast on 8-8-10-10-12-12 new stitches on needle (= in side under sleeve), work the next 80-88-94-104-114-126 stitches (= front piece), place the next 56-66-70-74-76-86 stitches on 1 thread for sleeve, cast on 8-8-10-10-12-12 new stitches on needle (= in side under sleeve) and work the last 76-85-90-99-107-119 stitches (= back piece). Body and sleeves are finished separately. THE PIECE IS NOW MEASURED FROM HERE! BODY: = 176-192-208-228-252-276 stitches. Insert 1 marker thread in the middle of the 8-8-10-10-12-12 new stitches cast on under each sleeve. Start the round by one of these marker threads and allow the marker threads to follow your work onwards; continue with stripes and pattern. When the piece measures 8 cm from the division, increase 1 stitch on each side of both marker threads – read INCREASE TIP (= 4 stitches increased). Repeat this increase when the piece measures 17 cm from the division = 184-200-216-236-260-284 stitches. When the piece measures 27-27-28-26-26-25 cm from the division (approx. 50-52-54-56-58-60 cm from shoulder) knit 1 round where you increase 36-40-44-48-52-56 stitches evenly spaced = 220-240-260-284-312-340 stitches. Change to circular needle size 3.5 mm and work rib (= knit 2 / purl 2) for 4 cm. Loosely cast off with knit over knit and purl over purl - to avoid the cast-off edge being tight you can cast off with needle size 4.5 mm. The jumper measures approx. 54-56-58-60-62-64 cm from the shoulder. SLEEVE: Place the 56-66-70-74-76-86 stitches from the thread on the one side of the piece on short circular needle/double pointed needles size 4.5.mm and knit up 1 stitch in each of the 8-8-10-10-12-12 stitches cast on under the sleeve = 64-74-80-84-88-98 stitches. Insert 1 marker thread in the middle of the 8-8-10-10-12-12 stitches. Work stripes and pattern in the round. When the piece measures 2 cm from the division decrease 2 stitches mid under sleeve – read DECREASE TIP. Decrease like this every 7th-5th-4th-4th-3rd-3rd round a total of 13-17-19-20-21-25 times = 38-40-42-44-46-48 stitches. Continue working until the sleeve measures 39-37-37-35-33-31 cm from the division (shorter measurements in larger sizes due to longer yoke). Knit 1 round where you increase 6-4-6-8-6-8 stitches evenly spaced = 44-44-48-52-52-56 stitches. Change to double pointed needles size 3.5 mm and work rib (= knit 2 / purl 2) for 5 cm. The sleeve measures approx. 44-42-42-40-38-36 cm from the division. Loosely cast off with knit over knit and purl over purl - to avoid the cast-off edge being tight you can cast off with needle size 4.5 mm. Work the other sleeve in the same way. |
|||||||
Diagram explanations |
|||||||
|
|||||||
 |
|||||||
Have you finished this pattern?Tag your pictures with #dropspattern #sjoebrissweater or submit them to the #dropsfan gallery. Do you need help with this pattern?You'll find 24 tutorial videos, a Comments/Questions area and more by visiting the pattern on garnstudio.com. © 1982-2025 DROPS Design A/S. We reserve all rights. This document, including all its sub-sections, has copyrights. Read more about what you can do with our patterns at the bottom of each pattern on our site. |
|||||||


With over 40 years in knitting and crochet design, DROPS Design offers one of the most extensive collections of free patterns on the internet - translated to 17 languages. As of today we count 320 catalogues and 12093 patterns translated into English (UK/cm). 12093
We work hard to bring you the best knitting and crochet have to offer, inspiration and advice as well as great quality yarns at incredible prices! Would you like to use our patterns for other than personal use? You can read what you are allowed to do in the Copyright text at the bottom of all our patterns. Happy crafting!
Post a comment to pattern DROPS 199-1
We would love to hear what you have to say about this pattern!
If you want to leave a question, please make sure you select the correct category in the form below, to speed up the answering process. Required fields are marked *.