
Looking for a yarn?


Comments / Questions (190)
![]() Valérie wrote:
Valérie wrote:
Hallo! Gerade ist meine Wolle angekommen und ich freue mich auf den Start! Da habe ich nun gleich zu Beginn eine Frage: wie stricke ich denn Reihen mit einer Rundstricknadel - was ist damit gemeint? Die Beine werden jeweils in Runden gestrickt, oder? Das heißt ohne Naht. Herzlichen Dank für eine Antwort und beste Grüße Valérie
17.09.2019 - 18:00DROPS Design answered:
Liebe Valérie, die ganze Arbeit wird in Hin- und Rückreihen gestrickt. Dieses Video zeigt, wie man glatt rechts mit einer Rundnadel strickt. Viel Spaß beim stricken!
18.09.2019 - 07:42
![]() Mona wrote:
Mona wrote:
1/3 Monate: was bedeutet beim Vorderteil: ... wie folgt abketten: 2 Maschen 1 x und 1 Masche 2-2 x? Danke für Eure Hilfe!
10.09.2019 - 20:13DROPS Design answered:
Liebe Mona, wenn Sie die ersten 9 Maschen für den Halsausschnitt stillgelegt haben, dann werden Sie jetz für den Halsausschnitt Maschen abketten und zwar am Anfang jeder Reihe, die am Halsrand beginnt (= in jeder 2. Reihe, dh beim rechten Vorderteil bei jeder Hinreihe) werden 2 Maschen 1x und dann 1 Masche 1 Mal abgekettet = es sind nur noch 53 M übrig. Viel Spaß beim stricken!
11.09.2019 - 07:48
![]() Bente Beck Jensen wrote:
Bente Beck Jensen wrote:
Jeg strikker størrelse 6/9 mdr. og sidder nu og mangler ca. 1/2 nøgle. Vil foreslå at i ændrer 300 til 350 g Jeg håber, at jeg er heldig med bestilling af ekstra nøgle.
31.08.2019 - 10:48
![]() Nadira Kilim wrote:
Nadira Kilim wrote:
Hej! Strl 6/9 mån. Jag har problem med bredden på armen som är hos mig 9cm istället för 11cm. Allt annat stämmer. Längden 62cm. 51 cm tills jag började med armarna. Vad gjorde jag för fel. Första tre raden ökade jag med 17+14+14 och gjorde precis som i beskrivningen. Men ändå blev det smalare.
23.08.2019 - 07:55DROPS Design answered:
Hej Nadira, om du började med ärmet vid 51 cm och du nu har stickat 62 cm, så bör du ha 11 cm... du kanske kan sticka 2 cm till.. ? Eller förstår jag inte din fråga kanske :)
10.09.2019 - 15:06
![]() Diana Sjöblom wrote:
Diana Sjöblom wrote:
Jag stickade också 6-9 mån och garnet räckte inte till huvan! Måste köpa ett nystan till! 🙁
29.07.2019 - 09:17
![]() Bjørg wrote:
Bjørg wrote:
Jeg strikka str 6-9 md og fikk for lite garn, måtte kjøpe et ekstra nøste.
12.07.2019 - 23:27
![]() May Britt wrote:
May Britt wrote:
Helt i bunnen står det bare to linjer. Det neste som kommer opp hos meg er spørsmål og kommentarer.
11.07.2019 - 08:51
![]() May Britt wrote:
May Britt wrote:
Helt i bunnen står det bare to linjer. Det neste som kommer opp hos meg er spørsmål og kommentarer.
11.07.2019 - 08:37DROPS Design answered:
Hei May Britt. Diagrammer og målskisser ligger nederst på siden. Om du ikke ser dem, forsøk å bytte enhet til PC/MAC, eller eventuelt print ut oppskriften. God fornøyelse
11.07.2019 - 11:33
![]() May Britt wrote:
May Britt wrote:
Ut fra det jeg kan se så mangler diagrammet for denne oppskriften.
10.07.2019 - 19:39DROPS Design answered:
Hei May Britt, Diagrammene er helt i bunnen av oppskriften. God fornøyelse!
11.07.2019 - 07:28
![]() May Britt wrote:
May Britt wrote:
Hvor finner jeg diagrammet til denne oppskriften? Den mangler ut fra det jeg kan se.
10.07.2019 - 19:36
|
|||||||
Truly Wooly#trulywoolyonesie |
|||||||
 |
 |
||||||
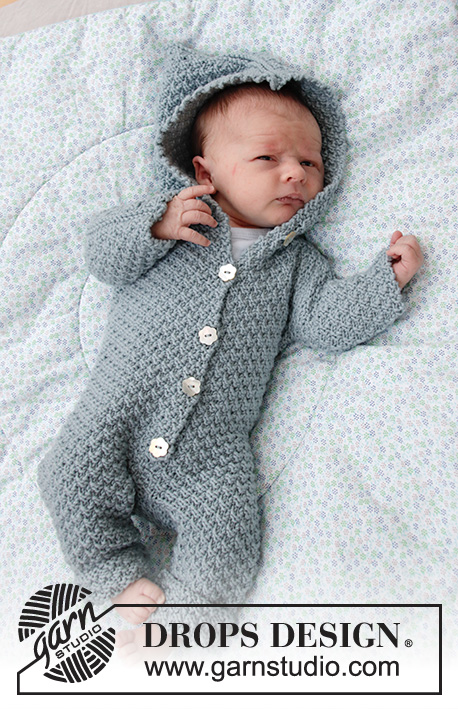
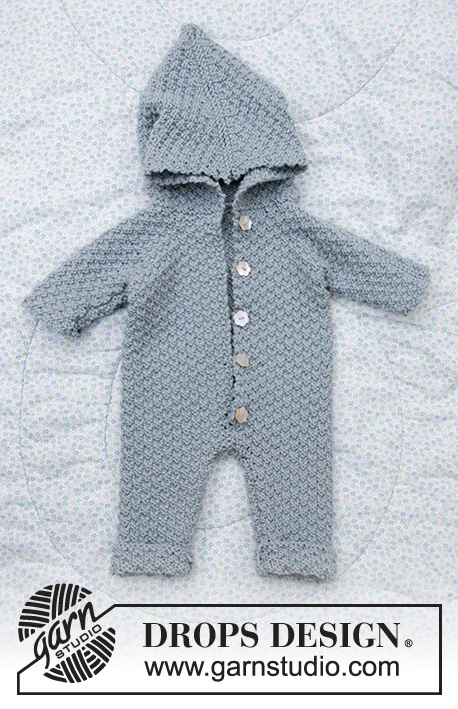
Knitted suit for baby in DROPS Merino Extra Fine. Piece is knitted with textured pattern and hood. Size premature - 4 years
DROPS Baby 33-8 |
|||||||
|
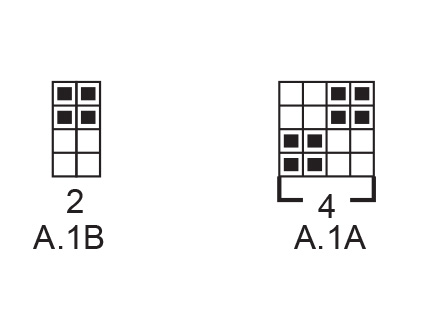
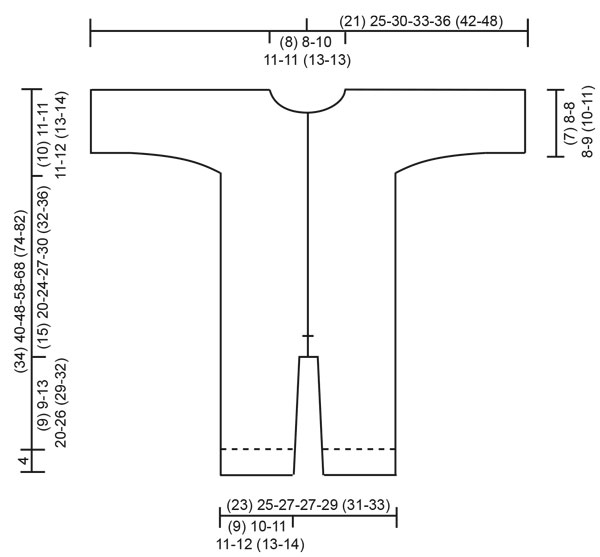
---------------------------------------------------------- EXPLANATION FOR THE PATTERN: ---------------------------------------------------------- GARTER STITCH (back and forth): 1 ridge = knit 2 rows. 1 edge stitch in garter stitch = knit stitch from right side and knit stitch from wrong side. PATTERN: See diagram A.1. Diagrams show all rows in pattern seen from the right side. INCREASE TIP-1: Increase 1 stitch inside 1 edge stitch in garter stitch by making 1 yarn over. On next row work yarn overs twisted to avoid holes. Work the increased stitches in A.1. INCREASE TIP-2 (evenly): To calculate how to increase evenly, use the total number of stitches on row (e.g. 44 stitches) and divide stitches by number of increases to be done (e.g. 14) = 3.1. In this example increase by making 1 yarn over after approx. every 3rd stitch. On next row knit yarn overs twisted to avoid holes. BUTTONHOLES (bottom up): Decrease for buttonholes on right band. 1 BUTTONHOLE = knit third and fourth stitch from edge together and make 1 yarn over. On next row purl or knit yarn over (depending on where in the diagram you are) to make holes. Decrease for buttonholes when piece measures (measured from where legs where put together): (premature): 5, 10, 15 and 20 cm 0/1 months: 6, 11, 16, 21 and 26 cm 1/3 months: 5, 10, 15, 20, 25 and 30 cm. 6/9 months: 6, 12, 17, 22, 27 and 32 cm. 12/18 months: 6, 12, 18, 24, 30 and 36 cm. 2 years: 9, 15, 21, 27, 33 and 39 cm. 3/4 years: 7, 13, 19, 25, 31, 37 and 43 cm ---------------------------------------------------------- START THE PIECE HERE: ---------------------------------------------------------- SUIT - SHORT OVERVIEW OF THE PIECE: Work each leg back and forth on circular needle, bottom up. Place legs together and work back and forth on circular needle from mid front up to sleeves. Then cast on new stitches for sleeves in each side and finish front pieces and back piece separately. Sew piece together on the shoulder. Finish by picking up stitches around the neck and work a hood. RIGHT LEG (when suit is worn): Cast on (40) 44-48-48-52 (56-60) stitches on circular needle size 4 mm with Merino Extra Fine. Work first row as follows from right side: 1 edge stitch in GARTER STITCH – read explanation above, work A.1A until 3 stitches remain on row (= 9-10-11-11-12 (13-14) repetitions of 4 stitches), work A.1B (= 2 stitches) and finish with 1 edge stitch in garter stitch. Continue pattern like this. REMEMBER THE KNITTING TENSION! When piece measures 4 cm, insert 1 marker in piece (marks fold). When piece measures (5) 5-7-8-10 (12-14) cm increase 1 stitch in each side – read INCREASE TIP-1. Repeat increase when piece measures (8) 8-12-18-20 (22-24) cm = (44) 48-52-52-56 (60-64) stitches on needle. Work until piece measures (12) 12-16-23-31 (32-35) cm from cast-on edge, adjust so that next row is worked from right side. Cast off 1 stitch at beginning of the next 2 rows (i.e. cast off edge stitches) = (42) 46-50-50-54 (58-62) stitches. Then work the next 2 rows as follows, begin from right side: Work as before over all stitches and cast on 3 new stitches at the end of row (= mid back). Turn piece, work A.1 as before over all stitches, but make sure to continue pattern correctly, then cast on (4) 4-4-4-4 (4-4) stitches at the end of row from wrong side (= mid front). There are now (49) 53-57-57-61 (65-69) stitches on needle and piece measures approx. (13) 13-17-24-30 (33-36) cm from cast-on edge. Put piece aside and work left leg as explained below. LEFT LEG (when suit is worn): Cast on (40) 44-48-48-52 (56-60) stitches on circular needle size 4 mm and work first row as follows from right side: 1 edge stitch in garter stitch, work A.1A until 3 stitches remain on row (=9-10-11-11-12 (13-14) repetitions of 4 stitches), work A.1B (= 2 stitches) and finish with 1 edge stitch in garter stitch. Continue pattern like this. When piece measures 4 cm, insert 1 marker in piece (marks fold). When piece measures (5) 5-7-8-10 (12-14) cm increase 1 stitch in each side – remember INCREASE TIP-1. Repeat increase when piece measures (8) 8-12-18-20 (22-24) cm = (44) 48-52-52-56 (60-64) stitches on needle. Work until piece measures (12) 12-16-23-31 (32-35) cm from cast-on edge, adjust so that next row is worked from right side. Cast off 1 stitch at beginning of the next 2 rows (i.e. cast off edge stitches) = (42) 46-50-50-54 (58-62) stitches. Then work the next 2 rows as follows, begin from right side: Work as before over all stitches and cast on 4 new stitches at the end of row (= mid front). Turn piece, work A.1 as before over all stitches, but make sure to continue pattern correctly, then cast on 3 stitches at the end of row from wrong side (= mid back). There are now (49) 53-57-57-61 (65-69) stitches on needle and piece measures approx. (13) 13-17-24-30 (33-36) cm from cast-on edge. Cut the yarn. Now place the parts together as explained below. BODY: Place right leg and left leg on same circular needle with right leg first. Begin from right side on right leg, work 1 edge stitch in garter stitch, continue A.1 as before over the remaining stitches on right leg (make sure to continue pattern correct according to finish on leg), then continue pattern over the first (48) 52-56-56-60 (64-68) stitches on left leg (make sure to continue pattern correct) and finish with 1 edge stitch in garter stitch = (98) 106-114-114-122 (130-138) stitches on needle. Insert another marker in piece! NOW MEASURE PIECE FROM THIS MARKER! Continue A.1 back and forth with 1 edge stitch in garter stitch in each side towards mid front. When piece measures (3) 3-3-3-4 (5-5) cm from marker (adjust to work next row from right side) cast off 1 stitch at beginning of the next 2 rows (i.e. cast off edge stitches). Then work the next 2 rows as follows, begin from right side: Work as before over all stitches and cast on 4 new stitches at the end of row (= left band at the front). Turn piece, work A.1 as before over all stitches (make sure to continue pattern correctly) and cast on 4 new stitches at the end of row from wrong side (= right band at the front). There are now (104) 112-120-120-128 (136-144) stitches on needle. Continue A.1 back and forth over all stitches (i.e. do not work edge stitches in garter stitch). Remember BUTTONHOLES on right band - read explanation above. When piece measures (15) 20-24-27-30 (32-36) cm from the new marker, i.e. (28) 33-41-51-60 (65-72) cm from cast-on edge, divide the piece in each side. Finish front pieces and back piece separately as explained below. RIGHT FRONT PIECE: Begin from right side and work as before over the first (27) 29-31-31-33 (35-37) stitches, then cast on (7) 13-13-17-17 (21-25) new stitches for sleeve. Slip the remaining stitches on 1 stitch holder for back piece and left front piece. Continue A.1 back and forth as before but make sure that pattern fits over all stitches. AT THE SAME TIME cast on (6) 7-11-12-14 (18-21) new stitches for sleeve at the end of the next 2 rows from right side = (46) 56-66-72-78 (92-104) stitches on needle. Continue pattern back and forth over all stitches until piece measures (22) 28-32-35-38 (41-45) cm from marker, i.e. (35) 41-49-59-68 (74-81) cm from cast-on edge. At the beginning of next row from right side slip the first (8) 8-9-11-11 (12-12) stitches on 1 stitch holder for neck but to avoid cutting the yarn work them before slipping them on the stitch holder. Continue pattern back and forth as before and cast off for neck at the beginning of every row from mid front as follows: Cast off 2 stitches 1 time and 1 stitch (1) 1-2-2-2 (3-3) times = (35) 45-53-57-63 (75-87) stitches remain on needle. Then work until the entire suit measures approx. (24) 30-34-37-41 (44-49) cm from marker, i.e. (37) 43-51-61-71 (77-85) cm from cast-on edge, but adjust so that next row is worked from right side. Work 1 ridge back and forth over all stitches. Then cast off by knitting from the right side. The entire suit measures approx. (38) 44-52-62-72 (78-86) cm from cast-on edge. Now work back piece as explained below. BACK PIECE: Slip the first (50) 54-58-58-62 (66-70) stitches on stitch holder (seen from right side) on circular needle size 4 mm and continue A.1 back and forth over these stitches as before. AT THE SAME TIME cast on new stitches for sleeves at the end of every row in each side as follows: Cast on (7) 13-13-17-17 (21-25)stitches 1 time in each side and then (6) 7-11-12-14 (18-21) stitches 2 times in each side = (86) 106-126-138-150 (178-202) stitches on needle. Continue pattern back and forth over all stitches until piece measures (23) 29-33-36-40 (43-48) cm from marker). On next row cast off the middle (14) 14-18-22-22 (26-26) stitches for neck and finish each shoulder/sleeve separately. Then cast off 2 stitches on next row from neck = (35) 45-53-57-63 (75-87) stitches remain on needle for shoulder/sleeve. Then work until the entire suit measures approx. (24) 30-34-37-41 (44-49) cm from marker, but adjust according to front piece and make sure that next row is from right side. Work 1 ridge back and forth over all stitches. Then cast off by knitting from the right side. Work the other shoulder/sleeve the same way. Then work left front piece as explained below. LEFT FRONT PIECE: Slip the remaining (27) 29-31-31-33 (35-37) stitches on stitch holder back on needle size 4 mm. Begin from right side and continue A.1 back and forth as before. AT THE SAME TIME cast on new stitches for sleeve at the end of the next 3 rows from wrong side as follows: Cast on (7) 13-13-17-17 (21-25) stitches 1 time and then (6) 7-11-12-14 (18-21) stitches 2 times = (46) 56-66-72-78 (92-104) stitches on needle. Continue pattern back and forth over all stitches until piece measures (22) 28-32-35-36 38 (41-45) cm from marker, i.e. (35) 41-49-59-68 (74-81) cm from cast-on edge. At the beginning of next row from wrong side slip the first (8) 8-9-11-11 (12-12) stitches on 1 stitch holder for neck but to avoid cutting the yarn work them before slipping them on the stitch holder. Continue pattern back and forth as before and cast off for neck at the beginning of every row from mid front as follows: Cast off 2 stitches 1 time and 1 stitch (1) 1-2-2-2 (3-3) times = (35) 45-53-57-63 (75-87) stitches remain on needle. Then work until the entire suit measures approx. (24) 30-34-37-41 (44-49) cm from marker, i.e. (37) 43-51-61-71 (77-85) cm from cast-on edge, but measure so that next row is worked from right side. Work 1 ridge back and forth over all stitches. Then cast off by knitting from the right side. The entire suit measures approx. (38) 44-52-62-72 (78-86) cm from cast-on edge. ASSEMBLY: Sew shoulder seams inside cast-off edges. Sew the seams under the sleeve. Sew seam on inside of both legs inside 1 edge stitch in each side. Sew seam mid front from bottom of band and down inside 1 edge stitch in each side. Sew together the opening between the legs. Fold the end of legs at the marker. Sew the buttons on to the left band. HOOD: Pick up from right side approx. 44 to 70 stitches around the neck (including stitches on stitch holders at the front). Knit 1 row from wrong side while increasing evenly to (58) 70-74-74-78 (86-86) stitches – read INCREASE TIP-2. Knit 1 row from right side and knit 1 row from wrong side. Work next row as follows from right side: Work A.1A until 2 stitches remain on needle and finish with A.1B (= 2 stitches). Continue pattern like this until piece measures (17) 18-19-20-21 (22-23) cm from ridge in the neck, but adjust so that next row is from right side. Work 1 ridge back and forth over all stitches. Then cast off by knitting from the right side. Place the hood double and sew seam at the top inside cast-off edge. |
|||||||
Diagram explanations |
|||||||
|
|||||||
 |
|||||||
 |
|||||||
Have you finished this pattern?Tag your pictures with #dropspattern #trulywoolyonesie or submit them to the #dropsfan gallery. Do you need help with this pattern?You'll find 28 tutorial videos, a Comments/Questions area and more by visiting the pattern on garnstudio.com. © 1982-2025 DROPS Design A/S. We reserve all rights. This document, including all its sub-sections, has copyrights. Read more about what you can do with our patterns at the bottom of each pattern on our site. |
|||||||


With over 40 years in knitting and crochet design, DROPS Design offers one of the most extensive collections of free patterns on the internet - translated to 17 languages. As of today we count 320 catalogues and 12094 patterns translated into English (UK/cm). 12094
We work hard to bring you the best knitting and crochet have to offer, inspiration and advice as well as great quality yarns at incredible prices! Would you like to use our patterns for other than personal use? You can read what you are allowed to do in the Copyright text at the bottom of all our patterns. Happy crafting!
Post a comment to pattern DROPS Baby 33-8
We would love to hear what you have to say about this pattern!
If you want to leave a question, please make sure you select the correct category in the form below, to speed up the answering process. Required fields are marked *.