
Looking for a yarn?


Comments / Questions (114)
![]() Karina Jensen wrote:
Karina Jensen wrote:
Venstre skulder bagstykket. Der er en fejl? 9 masker - 3 indtagninger = 9??
24.08.2019 - 21:29DROPS Design answered:
Hej. Det var fel i den danska översättningen (vänster skulder på framstycke och bakstycke hade blandats om), men detta är nu rättat. Beklagar det och lycka till vidare!
26.08.2019 - 08:21
![]() Karina Jensen wrote:
Karina Jensen wrote:
Har svær ved at gennemskue skuldre på Bagstykket. Der må altså være en fejl. Str 68/74: luk de midterste 22 masker. 9 tilbage på hver skulder. Luk 1 maske på hver pind fra halsen 3 gange =9 masker? 9-3=9??
24.08.2019 - 21:27DROPS Design answered:
Hej. Se svar ovan. Mvh DROPS Design
26.08.2019 - 08:40
![]() Erika wrote:
Erika wrote:
Ich habs gefunden... es stand ganz oben...
15.08.2019 - 02:05
![]() Erika wrote:
Erika wrote:
Ich habe 68/74-80/86 A2a zu ende gestrickt... im nächsten Absatz steht, im Muster weiterstricken, aber in welchem Muster? A2b?
14.08.2019 - 20:59DROPS Design answered:
Liebe Erika, ja genau, in diesen Größen sollen Sie zuerst A.2a dann A.2b stricken. Viel Spaß beim stricken!
15.08.2019 - 10:12
![]() Lena Bergqvist wrote:
Lena Bergqvist wrote:
Tecken på mönstret har försvunnit i diagramet?
05.08.2019 - 14:26
![]() Birgit Jørgensen wrote:
Birgit Jørgensen wrote:
Jeg er ved at strikke denne kjole i str 3/4 år men der er ikke nok garn i det der står i opskriften. Strikkefasthed passer har lavet en strikkeprøve. Hvad har jeg gjort forkert mon ??????
29.07.2019 - 18:07DROPS Design answered:
Hej Birgit, det er svært at svare på.... vi har ikke fået kommentarer om det tidligere. Men har du samme mål som i måleskitsen? Hvor mange nøgler har du brugt i størrelse 3/4 år- så skal vi skrive en kommentar og få lagt en rettelse ud.
01.08.2019 - 15:27
![]() Anita wrote:
Anita wrote:
Hur många maskor ska stickas upp runt halskanten i respektive storlek. Står bara angivet 46-70. Det verkar fattas information om detta.
04.07.2019 - 22:40DROPS Design answered:
Hej Anita, det beror på vilken storlek du stickar. Det brukar stämma med ca 46 m i minsta storleken, men det är bara att sticka upp flere maskor om du tycker det blir för tight i halsen. Lycka till :)
05.07.2019 - 13:04
![]() PetitPanda wrote:
PetitPanda wrote:
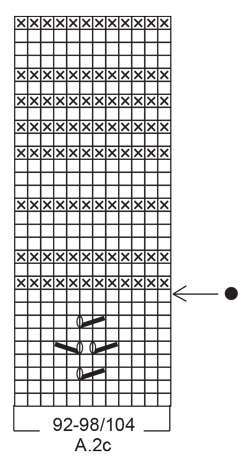
Merci pour votre réponse! Je parle au niveau du 24e rang sur le diagramme A2 92-98/104. On voit que c’est décalé pour que le dessin soit bien aligné mais je ne sais pas si cela signifie que je dois glisser la première maille de mon rang et la tricoter à la fin pour bien respecter le dessin. Merci encore de m’éclairer!
01.07.2019 - 08:47DROPS Design answered:
Bonjour PetitPanda, pardon vous avez raison, sur ce tour, glissez la 1ère m du début du tour (= le "trou" dans le diagramme) et répétez le diagramme en largeur (= les 2 dernières m de chaque motif se tricote avec la 1ère m du motif suivant), au dernier motif du tour, tricotez les 2 dernières m du dernier motif avec la 1ère m du tour (le dernier jeté du tour est maintenant la 1ère m du tour). Bon tricot!
01.07.2019 - 12:14
![]() PetitPanda wrote:
PetitPanda wrote:
Bonjour ! Pourriez-vous m’expliquer pourquoi dans A2 il y a un décalage à un moment et ce qu’il implique sur le début de mon rang? Merci beaucoup !
30.06.2019 - 08:41DROPS Design answered:
Bonjour PetitPanda, je ne vous pas de décalage dans A.2, en revanche, quand on tricote A.2 on va diminuer aux rangs/tours avec une étoile ou un point noir, et par conséquent, si on a toujours suffisamment de mailles pour répéter les diagrammes en largeur, ils ne vont pas s'aligner en hauteur en raison des diminutions. Bon tricot!
01.07.2019 - 07:32
![]() Donatella Sega wrote:
Donatella Sega wrote:
Buonasera! Nella correzione dite di Intrecciare 1 maglia su ogni ferro dal collo 3 volte in totale = 9 maglie (taglia 6/9 mesi) ma come fanno ad essere nove? E' ancora errato o sono io che non capisco? Vi ringrazio anticipatamente per la risposta!
23.06.2019 - 00:21DROPS Design answered:
Buongiorno Donatella. Abbiamo corretto il testo. La correzione riguarda la spalla sinistra del davanti e non del dietro come erroneamente scritto in precedenza. La ringraziamo per la segnalazione. Buon lavoro!
23.06.2019 - 08:35
|
|||||||||||||||||||||||||
Serafina#serafinadress |
|||||||||||||||||||||||||
 |
 |
||||||||||||||||||||||||
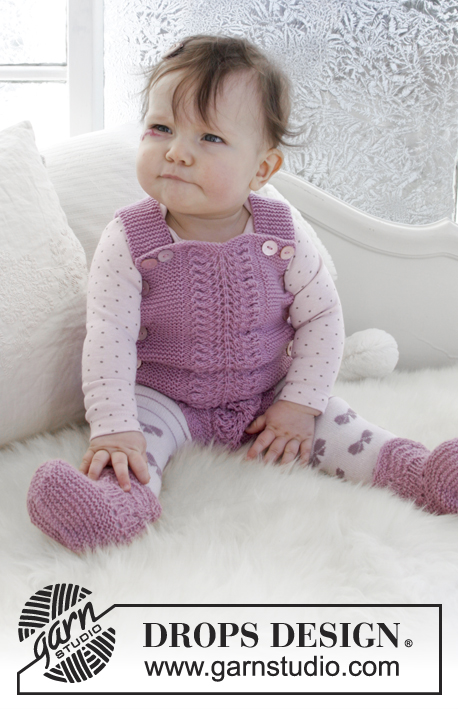
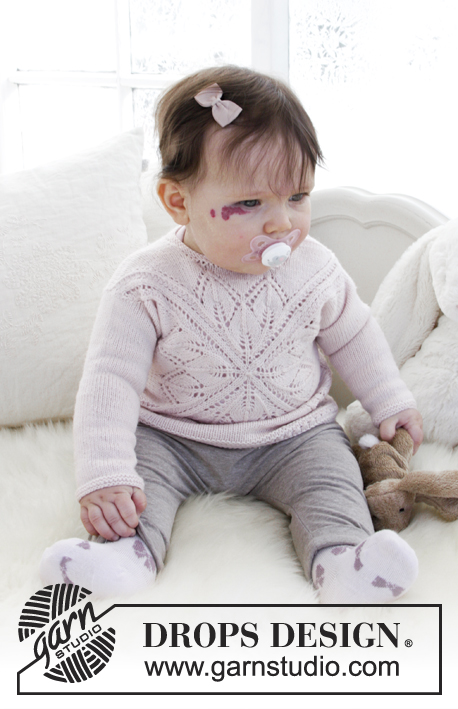
Knitted dress with lace pattern and garter stitch for baby. Size 0 - 4 years Piece is knitted in DROPS Alpaca.
DROPS Baby 31-17 |
|||||||||||||||||||||||||
|
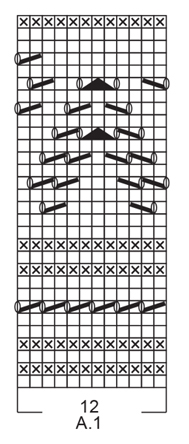
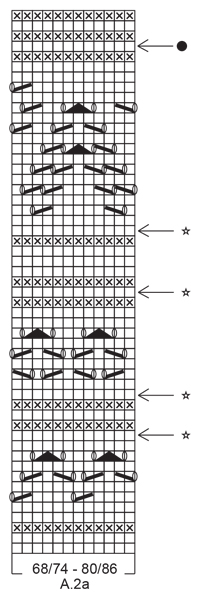
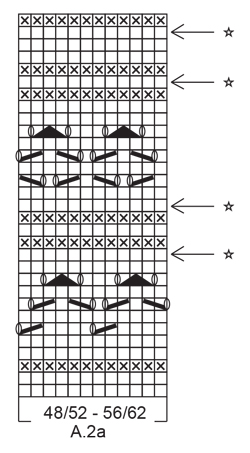
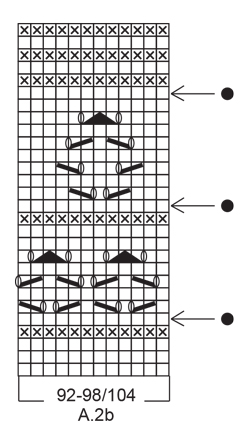
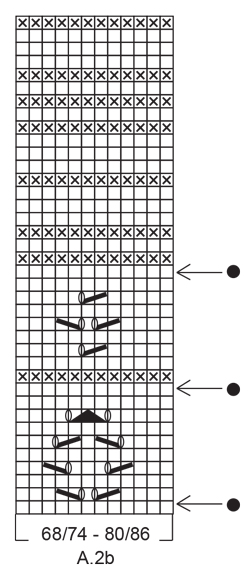
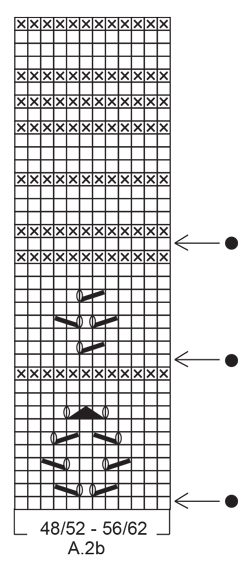
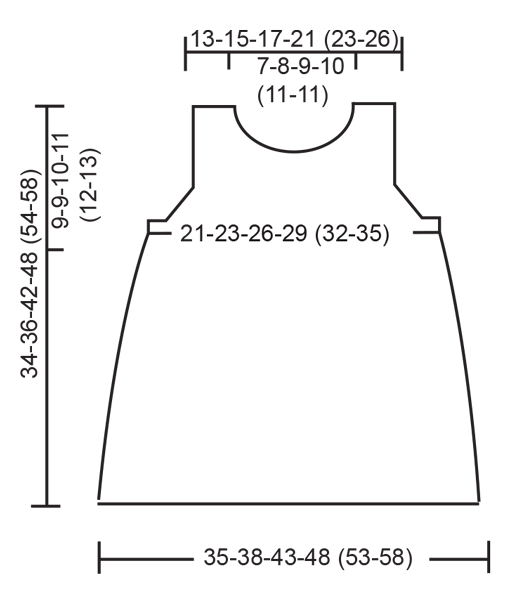
INFORMATION FOR PATTERN: GARTER STITCH (worked in the round): 1 ridge = 2 rounds. Knit 1 round and purl 1 round. GARTER STITCH (back and forth): 1 ridge = knit 2 rows. PATTERN: See diagrams A.1 and A.2 (first A.2a, then A.2b and A.2c). Choose diagram for your size. Diagrams show all rows in pattern seen from the right side. DECREASE TIP-1 (applies evenly spaced decrease): To calculate how to decrease evenly, use the total number of stitches on row (e.g. 168 stitches) and divide stitches by number of decreases to be done (e.g. 6) = 28. In this example work approx. every 27th and 28th stitch together. DECREASE TIP-2 (applies to armholes): Decrease inside 3 edge stitches in garter stitch. All decreases are done from the right side. Decrease before 3 edge stitches as follows: Knit 2 together. Decrease after 3 edge stitches as follows: Slip 1 stitch knitwise, knit 1, pass slipped stitch over stitch worked. ---------------------------------------------------------- DRESS: Worked in the round on circular needle up to armhole, then work front and back piece back and forth separately. Neck edge is worked back and forth on needle. BODY: Cast on 168-180-204-228 (252-276) stitches on circular needle size 3 mm with Alpaca. Insert 1 marker at beginning of round and 1 marker after 84-90-102-114 (126-138) stitches, markers indicates side of garment. Then work A.1 (= 12 stitches) over all stitches (= 14-15-17-19 (21-23) times in width). REMEMBER THE KNITTING TENSION! When A.1 has been worked 1 time vertically, piece measures approx. 8 cm. Then work A.2 (= 12 stitches) over all stitches (= 14-15-17-19 (21-23) times in width). On rounds marked with arrow decrease stitches evenly - read DECREASE TIP-1. For every time 12 stitches are decreased in total, work 1 repetition less of A.2 in width. When all decreases are done, there are 108-120-132-156 (156-180) stitches on needle (= 54-60-66-78 (78-90) stitches on each side of marker). READ ALL OF THE FOLLOWING SECTION BEFORE CONTINUING! WORK PATTERN WHILE AT THE SAME TIME DECREASING FOR ARMHOLE THE SIDE AS FOLLOWS: PATTERN: Continue with pattern. When A.2 has been worked vertically, continue in GARTER STITCH - see explanation above. Piece measures approx. 27-27-33-33 (39-39) cm. ARMHOLE: When piece measures 24-26-31-36 (41-44) cm, continue as follows: Work 9 stitches in garter stitch, work pattern/garter stitch as before, but decrease 4-4-4-8 (2-6) stitches evenly until 9 stitches remain before next marker, work 18 stitches in garter stitch, work pattern/garter stitch as before, but decrease 4-4-4-8 (2-6) stitches evenly until 9 stitches remain on round, finish with 9 stitches in garter stitch = 100-112-124-140 (152-168) stitches in total (= 50-56-62-70 (76-84) stitches on each side of markers). Continue like this until piece measures 25-27-32-37 (42-45) cm. Now cast off stitches for armhole as follows: Cast off the first 6 stitches, work 3 stitches in garter stitch, work pattern until 9 stitches remain before next marker, work 3 stitches in garter stitch, cast off the next 12 stitches, work 3 stitches in garter stitch, work pattern as before until 9 stitches remain, work 3 stitches in garter stitch and cast off the last 6 stitches. Now finish front and back piece separately. BACK PIECE: Now work back and forth. = 38-44-50-58 (64-72) stitches. Continue with pattern and 3 stitches in garter stitch in each side of piece. Then decrease 1 stitch for armhole inside 3 stitches in garter stitch in each side of piece - read DECREASE TIP-2! Decrease like this on every other row 3-4-5-4 (4-5) times in total = 32-36-40-50 (56-62) stitches. When piece measures 32-34-40-46 (52-56) cm, cast off the middle 16-18-22-24 (26-26) stitches for neck = 8-9-9-13 (15-18) stitches on each shoulder. Now finish each shoulder separately. LEFT SHOULDER: Continue in stocking stitch with 3 stitches in garter stitch out towards armhole as before until piece measures 34-36-42-48 (54-58) cm in total. Cast off by purling from wrong side. This shoulder is sewn together with left shoulder on front piece later. RIGHT SHOULDER: Continue in stocking stitch with 3 stitches in garter stitch out towards armhole as before until piece measures 34-36-42-48 (54-58) cm in total. Cast off by knitting from wrong side. On this shoulder sew on buttons later. FRONT PIECE: Work as on back piece until piece measures 30-32-37-42 (48-51) cm. Now cast off the middle 10-12-16-16 (18-18) stitches for neck = 11-12-12-17 (19-22) stitches on each shoulder. Now finish each shoulder separately. RIGHT SHOULDER: Cast off 1 stitch on every row from neck 3-3-3-4 (4-4) times in total = 8-9-9-13 (15-18) stitches. When piece measures 32-34-40-46 (52-56) cm, work in stocking stitch with 3 stitches in garter stitch out towards armhole. When piece measures 34-36-42-48 (54-58) cm, decrease for 2 buttonholes from right side as follows: Knit 1-1-1-2 (3-3), knit 2 together, make 1 yarn over (= 1 buttonhole), knit 2-2-2-4 (5-8), knit 2 together, make 1 yarn over (= 1 buttonhole), finish with 1-2-2-3 (3-3) stitches in garter stitch. Cast off by knitting on next row from wrong side. LEFT SHOULDER: Cast off 1 stitch on every row from neck 3-3-3-4 (4-4) times in total = 8-9-9-13 (15-18) stitches. Continue in stocking stitch with 3 stitches in garter stitch out towards armhole as before until piece measures 34-36-42-48 (54-58) cm in total. Cast off by purling from wrong side. This shoulder is sewn together with left shoulder on back piece later. ASSEMBLY: Sew buttons on to right shoulder on back piece. Sew left shoulder together with grafting/kitchener stitches. NECK EDGE: Worked back and forth. Begin at right shoulder on back piece and pick up 46-70 stitches around the neck from right side. Knit 3 rows, cast off by knitting, make sure to avoid a tight cast-off edge, cast off with 1 larger needle size if needed. |
|||||||||||||||||||||||||
Diagram explanations |
|||||||||||||||||||||||||
|
|||||||||||||||||||||||||
 |
|||||||||||||||||||||||||
 |
|||||||||||||||||||||||||
 |
|||||||||||||||||||||||||
 |
|||||||||||||||||||||||||
 |
|||||||||||||||||||||||||
 |
|||||||||||||||||||||||||
 |
|||||||||||||||||||||||||
 |
|||||||||||||||||||||||||
 |
|||||||||||||||||||||||||
Have you finished this pattern?Tag your pictures with #dropspattern #serafinadress or submit them to the #dropsfan gallery. Do you need help with this pattern?You'll find 28 tutorial videos, a Comments/Questions area and more by visiting the pattern on garnstudio.com. © 1982-2025 DROPS Design A/S. We reserve all rights. This document, including all its sub-sections, has copyrights. Read more about what you can do with our patterns at the bottom of each pattern on our site. |
|||||||||||||||||||||||||


With over 40 years in knitting and crochet design, DROPS Design offers one of the most extensive collections of free patterns on the internet - translated to 17 languages. As of today we count 320 catalogues and 12094 patterns translated into English (UK/cm). 12094
We work hard to bring you the best knitting and crochet have to offer, inspiration and advice as well as great quality yarns at incredible prices! Would you like to use our patterns for other than personal use? You can read what you are allowed to do in the Copyright text at the bottom of all our patterns. Happy crafting!
Post a comment to pattern DROPS Baby 31-17
We would love to hear what you have to say about this pattern!
If you want to leave a question, please make sure you select the correct category in the form below, to speed up the answering process. Required fields are marked *.