
Looking for a yarn?


Comments / Questions (169)
![]() Marianne wrote:
Marianne wrote:
Kan dere forklare hvordan A2 strikkes. Rettmaskene forsvinner helt og dette partiet på 40 m blir ikke pent
17.12.2022 - 22:10
![]() ROSA CARUSO wrote:
ROSA CARUSO wrote:
Vorrei capire come riempire le righe del diagramma A3+ A1 PERCE INVECE IL DIAGRAMMA A2 HA 20 GIRI A DIFFERENZA DEL DIAGRAMMA A3 E A1 CHE NE HA 18
02.12.2022 - 10:35DROPS Design answered:
Buonasera Rosa, una volta finito il diagramma, deve ricominciare dal 1° ferro. Si ricordi di scrivere in minuscolo la prossima volta. Buon lavoro!
03.12.2022 - 16:20
![]() Winter wrote:
Winter wrote:
Hi, for the Front piece, I have CO 2 stitches from the neck. After that, what do I do? Continue with 35 stitches until piece measure 61 cm? The neck line looks very squarish if I do that. Or CO 2 stitches on each row until I reach 61 cm? Thank you.
23.11.2022 - 08:25DROPS Design answered:
Dear Winter, for the neckline on front piece you just cast off 2 stitches 1 time, then continue asb efore and cast off when piece measures 61 cm. You will then work the 2nd shoulder the same way. The neckline will be worked whole around piece (see chart): along top of sleeves as well as along the neck on front piece so that it won't look squarish anymore but nicely rounded just as on the picture. Happy knitting!
23.11.2022 - 09:19
![]() Dorothée wrote:
Dorothée wrote:
Bonjour J'ai un problème pour les diminutions de l'arrondi de la manche. On nous dit qu'il reste 41m dans toutes les tailles. Pourtant en S, j'ai 83m-6m au marqueur = 77m. Ensuite j'ai (4x2m) + (10x1m) = 18m de diminutions. Mais 77m-18m = 59m mais pas 41m. Que faire ? Diminuer de 6m+18m, ou obtenir 41m? Merci d'avance !
01.11.2022 - 13:26DROPS Design answered:
Bonjour Dorothée, vous avez 83 mailles et rabattez 3 m de chaque côté (= 83-6=77 m), vous rabattez ensuite 4 x 2 m (soit 8 m x 2 côtés = 16 m) et 10 x 1 m (soit 10 m x 2 côtés = 20 m) de chaque côté (=77-16-20=41 mailles). Bon tricot!
01.11.2022 - 15:46
![]() Solange wrote:
Solange wrote:
Bonjour Si j’ai bien compris j’arrête les mailles du dos et je commence le devant idem à 65 cm total avec les cotes La vidéo ne s’ouvre pas Merci
01.11.2022 - 10:27DROPS Design answered:
Bonjour Solange, en taille L, vous rabattez les mailles du dos en diminuant en même temps (le lien a été corrigé, il fonctionne désormais), pour le devant, vous tricotez de la même façon mais vous devrez former l'encolure à 62 cm et terminer chaque épaule séparément, puis rabattre chaque épaule à 65 cm (comme pour le dos). Bon tricot!
01.11.2022 - 10:43
![]() Solange wrote:
Solange wrote:
Bonjour Pourriez-vous m’aider pour le dos taille L j’ai fait le modèle dos et devant séparés lorsque l’on a diminué les 22 mailles après les emmanchures qd l’ouvrage fait 61 cm Soit 27m jersey 22 A1 3 x10 A2 22 A3 et 27m qu’est-ce que je fais des 102 m restantes? Faut il les arrêter ou les mettre en attente ? Merci pour l’aide précieuse
28.10.2022 - 18:54DROPS Design answered:
Bonjour Solange, vous tricotez les 124 mailles (après les diminutions des emmanchures) jusqu'à ce que le dos mesure 65 cm de hauteur totale puis vous rabattez ces mailles en diminuant en même temps 22 mailles dans les diagrammes - Cette vidéo montre comment diminuer dans une torsade en même temps que l'on rabat. Bon tricot!
31.10.2022 - 08:11
![]() Jude Foster wrote:
Jude Foster wrote:
Love the sweater but how do I print the pattern so I can follow it - the layout is all weird and the chart and schematic won’t print ?
24.10.2022 - 21:19DROPS Design answered:
Dear Mrs Forster, click on the print button then choose "pattern" to launch printing - a new window should open, make sure to adjust the settings so that all pages will be printed. Happy knitting!
25.10.2022 - 09:02
![]() Solange wrote:
Solange wrote:
Bonjour « L'ÉCHANTILLON! Continuer ainsi. Quand l'ouvrage mesure 9 cm, augmenter 1 maille de chaque côté des marqueurs des côtés » Est-ce que les 9 cm sont après les 5 cm de cote Merci
15.10.2022 - 13:09DROPS Design answered:
Bonjour Solange, les 9 cm sont mesurés depuis le rang de montage, autrement dit, ce sont bien 9 cm de hauteur totale, soit 4 cm après les côtes. Bon tricot!
17.10.2022 - 09:14
![]() Solange wrote:
Solange wrote:
Bonsoir Pouvez-vous m’expliquer, pour le dos, dans la phrase « Quand l’ouvrage mesure 49-59-61-63-65-67-69 cm, rabattre en diminuant EN MÊME TEMPS 20-20-20-22-18-24-24 mailles à intervalles réguliers » et «AU-DESSUS des mailles des diagrammes A.1, A.2 et A.3 »la partie en majuscules. Je ne comprends pas combien de mailles et quand il faut diminuer dans la partie centrale Merci pour votre aide Solange
15.09.2022 - 23:06DROPS Design answered:
Bonjour Solange, comme les torsades requièrent plus de mailles que le jersey, on va diminuer les mailles des torsades des diagrammes A.1, A.2 et A.3 lorsque l'on diminue - cette vidéo montre comment procéder. Bon tricot!
16.09.2022 - 09:41
![]() Solange wrote:
Solange wrote:
Bonjour Sur la base de 21 m pour 10cm, Il me semble qu’il y ait une erreur dans le ratio :exemple pour la taille M on explique que 246 m doivent donner 49x2 cm hors en appliquant la règle de trois je trouve 58cm x2 Il semblerait qu’on retrouve ce même écart sur les différentes mesures proposées pour une même taille Merci et cordialement Solange
15.09.2022 - 14:53DROPS Design answered:
Bonjour Solange, l'échantillon indiqué est en jersey, vous devez donc bien avoir 21 m x 28 rangs jersey = 10 x10 cm, mais, pour les torsades, il faut davantage de mailles que pour le jersey. L'important est de bien respecter votre tension, c'est la meilleure garantie de réussite pour obtenir les mesures indiquées pour la taille. Pensez à effectuer une recherche sur la base de votre tension, vous pourrez peut-être alors trouver l'inspiration, retrouvez par ex. ici tous les modèles homme avec 25-23 m pour 10 cm. Bon tricot!
15.09.2022 - 15:37
|
||||||||||||||||||||||
Siberia#siberiasweater |
||||||||||||||||||||||
 |
 |
|||||||||||||||||||||
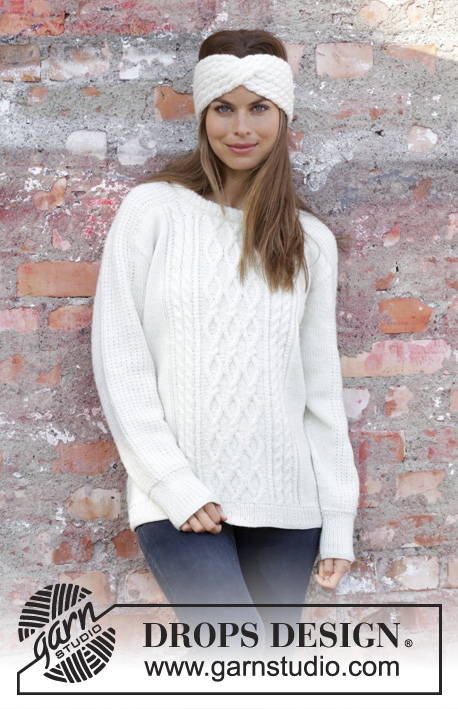
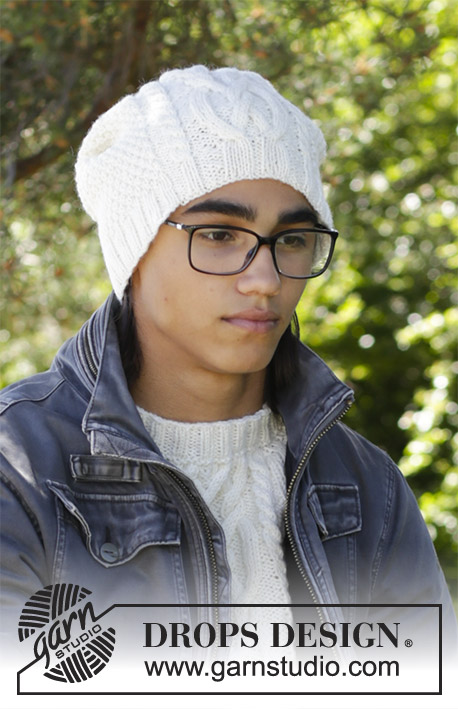
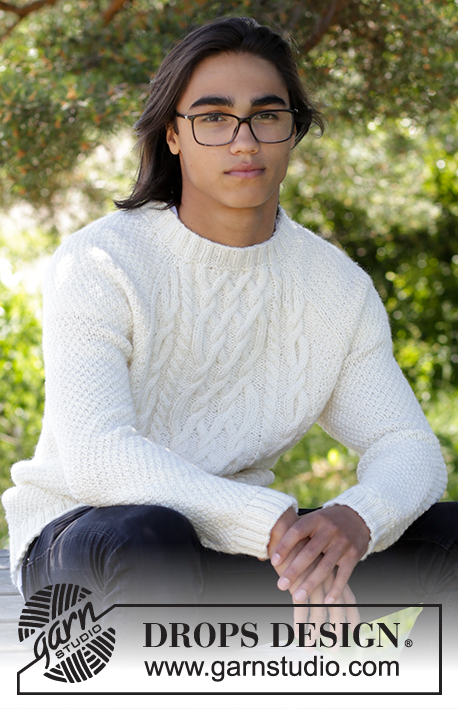
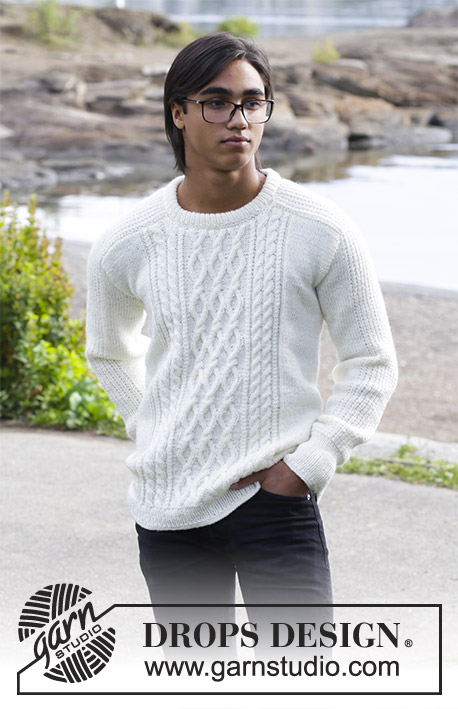
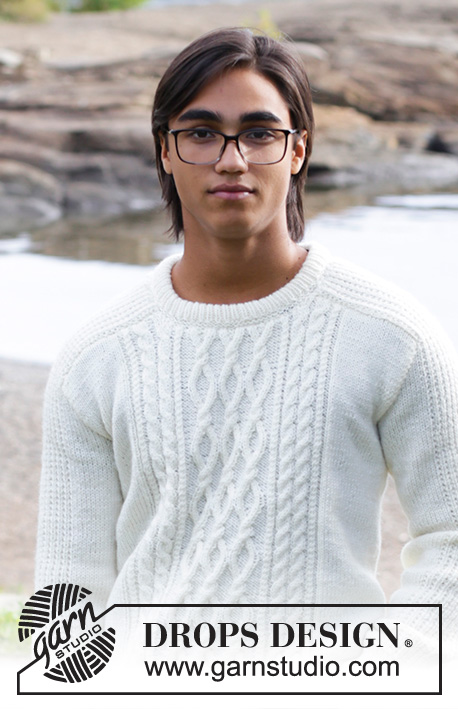
Men’s knitted jumper with cables. Sizes 13/14 years – XXXL. The piece is worked in DROPS Merino Extra Fine.
DROPS 185-2 |
||||||||||||||||||||||
|
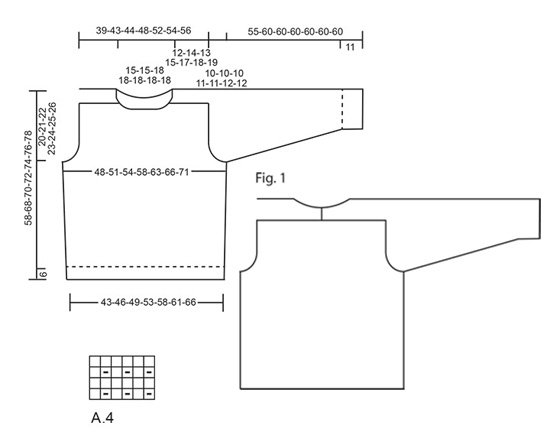
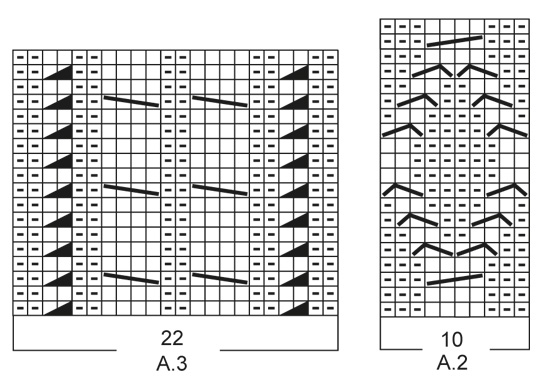
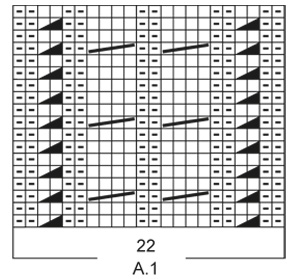
INFORMATION FOR THE PATTERN: RIDGE/GARTER STITCH (worked in the round): 1 ridge = 2 rounds. Knit 1 round and purl 1 round. PATTERN: See diagrams A.1 to A.4. The diagrams show all the rows in the pattern seen from the right side. INCREASE/DECREASE TIP (evenly spaced): To work out how to increase/decrease evenly, count the total number of stitches on the needle (e.g. 218 stitches) and divide by the number of increases/decreases to be made (e.g. 10) = 21.8. In this example, increase alternately after approx. every 21st and 22nd stitch by making 1 yarn over. On the next round, work the yarn overs twisted to avoid holes. If you are decreasing (in this example) knit together alternately approx. every 20th and 21st stitch and every 21st and 22nd stitch. INCREASE TIP (for sides in body and sleeves): Start 1 stitch before the marker, make 1 yarn over, knit 2 (the marker sits in the middle of these two stitches), make 1 yarn over. On the next round knit the yarn overs twisted to avoid holes. The new stitches are subsequently worked in stocking stitch. CASTING OFF TIP: Decrease 1 stitch at the same time as casting off as follows: Knit 2 stitches together, knit 1 stitch, pass over (cast off) (= 1 extra stitch decreased). ---------------------------------------------------------- JUMPER – SHORT OVERVIEW OF THE PIECE: The sleeve is worked upwards, continued onto the shoulder and along the neck, top back. The neck-stitches at the top of the sleeve are decreased towards the front piece and a small section of the sleeve is continued along the top of the back piece and later sewn together mid-back, so the neck is higher at the back than at the front – see Fig.1. ---------------------------------------------------------- JUMPER: The piece is worked in the round with circular needle as far as the armholes, then the front and back pieces are worked back and forth separately. The sleeves are worked in the round with double pointed needles as far as the armholes, then the sleeves are worked back and forth. To finish, the sleeves are sewn into the armhole and shoulders on front and back pieces. BODY: Cast on 218-230-246-264-280-298-314 stitches with circular needle size 3.5 mm and Merino Extra Fine. Work 2 RIDGES – see description above! Then work rib (knit 1 /purl 1). When the piece measures 5 cm work 1 ridge, AT THE SAME TIME as you increase 10-10-10-12-12-14-14 stitches evenly on the first round – read INCREASE/DECREASE TIP= 228-240-256-276-292-312-328 stitches. Insert 2 markers in the piece, one at the beginning of the round and one after 114-120-128-138-146-156-164 stitches (= in each side). Change to circular needle size 4 mm and work PATTERN as follows – see description above: * Work 20-23-27-27-31-31-35 stitches stocking stitch, A.1 (= 22 stitches), A.2 (= 10 stitches) over the next 30-30-30-40-40-50-50 stitches (= 3-3-3-4-4-5-5 repeats in width), A.3 (= 22 stitches), 20-23-27-27-31-31-35 stitches stocking stitch, the marker sits here *, work from *-* 1 more time. REMEMBER THE KNITTING TENSION! Continue the pattern and repeat the charts in height. When the piece measures 9 cm increase 1 stitch on both sides of the markers in each side – read INCREASE TIP (= 4 stitches increased). Increase in this way every 6-8-8-9-9-9-10 cm a total of 5 times = 248-260-276-296-312-332-348 stitches. When the piece measures 38-47-48-49-50-51-52 cm cast off 6 stitches for the armhole in each side (cast off 3 stitches on both side of the markers in each side) and continue each piece separately. BACK PIECE: = 118-124-132-142-150-160-168 stitches. The piece is worked back and forth with circular needle. Continue with pattern, stocking stitch and 1 edge stitch in garter stitch in each side, AT THE SAME TIME continue to cast off for armhole at the beginning of each row in each side as follows: 2 stitches 3-3-4-4-4-4-5 times and 1 stitch 1-0-1-1-2-2-2 times = 104-112-114-124-130-140-144 stitches. When the piece measures 49-59-61-63-65-67-69 cm cast off, AT THE SAME TIME as you decrease 20-20-20-22-18-24-24 stitches evenly over the stitches in diagrams A.1, A.2 and A.3 – read CASTING OFF TIP. FRONT PIECE: = 118-124-132-142-150-160-168 stitches. Continue with pattern, stocking stitch and 1 edge stitch in garter stitch, AT THE SAME TIME as cast off for armhole as for back piece = 104-112-114-124-130-140-144 stitches. When the piece measures 46-56-58-60-62-64-66 cm decrease 10-10-10-12-12-12-12 stitches evenly over the middle 40-40-40-48-48-48-48 stitches before these stitches are placed on a thread for the neck (= 30-30-30-36-36-36-36 stitches on thread). The shoulders are now finished separately. On the next row from the neck cast off 2 stitches = 30-34-35-36-39-44-46 stitches. When the piece measures 49-59-61-63-65-67-69 cm (adjust to match the back piece) cast off, AT THE SAME TIME as you decrease 5-5-4-5-3-6-6 stitches evenly over the 15-15-15-16-16-21-21 stitches towards the neck – remember CASTING OFF TIP. Work the other shoulder in the same way. RIGHT SLEEVE: The piece is worked in the round with double pointed needles. Cast on 56-58-60-62-64-66-68 stitches with double pointed needles size 3.5 mm and Merino Extra Fine. Work 2 ridges. Then work rib (= knit 1 /purl 1) until the piece measures 10 cm. Work 1 ridge, AT THE SAME TIME as you decrease 5 stitches evenly on row = 51-53-55-57-59-61-63 stitches. Insert 1 marker at the beginning of the round. Change to double pointed needles size 4 mm and work pattern on the next round as follows: Stocking stitch over the first 4-5-6-7-8-9-10 stitches, work A.4 over the next 42 stitches, work the first stitch in A.4, 4-5-6-7-8-9-10 stitches stocking stitch. Continue this pattern upwards. AT THE SAME TIME when the piece measures 13-12-13-12-12-14-13 cm increase 1 stitch on each side of the marker – remember INCREASE TIP! Increase in this way every 2-2½-2-2-2-1½-1½ cm a total of 14-15-16-17-18-19-20 times = 79-83-87-91-95-99-103 stitches. When the piece measures 45-50-50-49-49-48-48 cm cast off 6 stitches mid under the sleeve (cast off 3 stitches on each side of the marker). Then work back and forth on the needle AT THE SAME TIME as you cast off for sleeve cap at the beginning of each row in each side as follows: 2 stitches 2-4-6-7-9-10-12 times and 1 stitch 12-10-8-8-6-6-4 times = 41 stitches left in all sizes. The piece measures 55-60-60-60-60-60-60 cm. NOW YOU MEASURE THE PIECE FROM HERE! Continue with pattern over the remaining stitches until the piece measures 12-14-13-15-17-18-19 cm. Then you cast off at the beginning of each row from the right side as follows: 19 stitches 1 time AT THE SAME TIME as 8 of these 19 stitches are knitted together 2 and 2 before they are cast off, 3 stitches 1 time, 2 stitches 1 time. Work 3 rows without decreases. Cast off 1 stitch on the next row = 16 stitches left in all sizes. Continue working until the piece measures 19-21-22-24-26-27-28 cm. The whole sleeve measures approx. 74-81-82-84-86-87-88 cm. LEFT SLEEVE: Worked as for right sleeve, but decreases at top are worked in opposite side, i.e. at the beginning of every row from the wrong side. ASSEMBLY: Sew the sleeves together mid back inside the cast off edge of each sleeve. Sew the sleeves to front and back piece on body in the outermost stitch as follows: Sew from the armhole and up along shoulder on back piece to mid back. Repeat on the other side. Sew in that same way from armhole and up along shoulder to the neck on the front piece. Repeat on the other side. NECKLINE: Knit up 94-94-108-108-108-108-108 stitches around the neck (including the stitches from the thread) with short circular needle size 3.5 mm and Merino Extra Fine. Work 2 ridges, AT THE SAME TIME as you increase on the last round 22-22-26-26-26-26-26 stitches evenly = 116-116-134-134-134-134-134 stitches. Then work rib (= knit 1 /purl 1). When the rib measures 8 cm work 1 ridge. Cast off. Fold the neck double and fasten on the inside, ridge to ridge. |
||||||||||||||||||||||
Diagram explanations |
||||||||||||||||||||||
|
||||||||||||||||||||||
 |
||||||||||||||||||||||
 |
||||||||||||||||||||||
 |
||||||||||||||||||||||
Have you finished this pattern?Tag your pictures with #dropspattern #siberiasweater or submit them to the #dropsfan gallery. Do you need help with this pattern?You'll find 29 tutorial videos, a Comments/Questions area and more by visiting the pattern on garnstudio.com. © 1982-2025 DROPS Design A/S. We reserve all rights. This document, including all its sub-sections, has copyrights. Read more about what you can do with our patterns at the bottom of each pattern on our site. |
||||||||||||||||||||||


With over 40 years in knitting and crochet design, DROPS Design offers one of the most extensive collections of free patterns on the internet - translated to 17 languages. As of today we count 320 catalogues and 12094 patterns translated into English (UK/cm). 12094
We work hard to bring you the best knitting and crochet have to offer, inspiration and advice as well as great quality yarns at incredible prices! Would you like to use our patterns for other than personal use? You can read what you are allowed to do in the Copyright text at the bottom of all our patterns. Happy crafting!
Post a comment to pattern DROPS 185-2
We would love to hear what you have to say about this pattern!
If you want to leave a question, please make sure you select the correct category in the form below, to speed up the answering process. Required fields are marked *.