
Popular categories
Looking for a yarn?


Comments / Questions (41)
![]() El wrote:
El wrote:
... A.3 en los lados y 5 puntos de la cenefa en punto musgo a cada lado hacia el centro del delantero y los aumentos en la 7ª y 15ª vueltas del diagrama A.3 (= cada 8ª vuelta del diagrama) hasta que la labor mida 31-32-32-32-32-32 cm desde la división de la labor. No entiendo si esto es para debajo de las mangas sólo o si hay que repetir esos 5 puntos por todo el contorno.
30.01.2018 - 17:42DROPS Design answered:
Hola. El patrón está corregido. A.3 se trabaja sobre los 5 puntos centrales a cada lado.
31.01.2018 - 20:36
![]() El wrote:
El wrote:
La labor mide ahora aprox 20-21-23-25-27-29 cm desde el borde de montaje (medido en el centro del delantero). ¿Podrían explicar en el esquema del jersey dónde es ese punto desde el que hay que empezar a medir?
30.01.2018 - 16:58DROPS Design answered:
Hola. El jersey se mide desde la punta superior del centro del delantero hacia abajo.
31.01.2018 - 20:25Elena wrote:
Hello again! Also will you please explain this - "Beginning of round is after the 7-7-7-9-9-9 new stitches". Isn't the beginning of round in the middle stitch under sleeve, where the marker thread is? Thank you!
26.01.2018 - 01:34DROPS Design answered:
Dear Elena, beg of round should be after these new sts picked up, since you will now work A.5 over the middle 5 sts under sleeve. Happy knitting!
26.01.2018 - 08:17Elena wrote:
Hello! I do not quite understand this line "and pick in addition up 1 stitch in each side of the 7-7-7-9-9-9 stitches cast on under sleeve " in the description of the sleeve. In particular, what does the phrase "in each side" mean here? Please explain in more details. Thank you!
26.01.2018 - 01:11DROPS Design answered:
Dear Elena, it looks like the word "side" should be deleted here, you knit up 1 stitch in each of the new sts cast on on body mid under sleeve. Happy knitting!
26.01.2018 - 08:15
![]() Nicole wrote:
Nicole wrote:
Bonjour, Je tricote la taille M. J’ai très bien suivi le diagramme, mais à la fin de A 2, je n’ai que 254m... y a-t-il une erreur ? comment corriger ? J’augmente 16 m au lieu de 6 ? Merci d’avance. Vos modèles sont magnifiques ,
14.12.2017 - 20:48DROPS Design answered:
Bonjour Nicole, à la fin de A.2 vous devez avoir 22 m dans chacun de ces diagrammes, soit (A.1 = 2 m, A.2 = 22 m) x 11 = 264 m. On augmente un total de 15 m dans A.2 (7 x 2 m + 1 x 1 m dans chaque motif). Bon tricot!
15.12.2017 - 08:19
![]() BARON wrote:
BARON wrote:
Merci pour votre réponse. Je viens de terminer ce modèle en Big Merinos bleu marine. J'ai rallongé les manches et ainsi il est parfait (pour moi). Un immense merci à toute l'équipe et à vos stylistes.
10.12.2017 - 20:01
![]() Liliane Baron wrote:
Liliane Baron wrote:
Bonjour. Je souhaite avoir des précisions concernant A3 qui s'arrête après deux augmentations ce qui correspond à 16 rangs en tout. J'ai répété tous les rangs en augmentant à 16 + 7 puis à 16+ 15. Mais j'arrive à bien plus de mailles que nécessaire sans avoir atteint la hauteur de 31 cm (pour la taille XS). Vous serait-il possible de préciser comment se répète le diagrammeA3 ainsi que les augmentations correspondantes ? Avec mes remerciements chaleureux.
25.11.2017 - 21:22DROPS Design answered:
Bonjour Mme Baron, on augmente 2 fois au total dans chaque A.3, pour augmenter 8 fois, on va répéter 4 fois A.3 au total soit 156 m en taille S + (4 augmentations x 2 côtés x 4 fois A.3 en hauteur) = 188 m. Bon tricot!
27.11.2017 - 09:53
![]() Lise wrote:
Lise wrote:
Bonjour, peut-on réaliser ce pull qu'avec qu'un seul fil ? Merci pour votre réponse
29.10.2017 - 12:36DROPS Design answered:
Bonjour Lise, on peut remplacer 2 fils du groupe A (ici Baby Merino et Kid-Silk) par 1 fil du groupe C - n'oubliez pas que des fils de compositions différentes auront un rendu différent, trouvez plus d'informations sur les alternatives possibles ici. Bon tricot!
30.10.2017 - 09:49
![]() Milli wrote:
Milli wrote:
Buongiorno, finito il carre, sono 184 maglie come prescritto, diviso due fa 92. Come si mette un segno al centro delle 7 maglie aggiunte sotto kle maniche? Lo metto dopo 3 maglie o dopo 4. Come possono essere 91 maglie per dav e dietro se 184:2 fa 92? Grazie
05.10.2017 - 19:45DROPS Design answered:
Buonasera Milli. Deve mettere il segno nella maglia centrale: avrà così 3 maglie, maglia con il segno, 3 maglie. Abbiamo corretto il testo. Grazie e buon lavoro!
05.10.2017 - 21:24
![]() Marise wrote:
Marise wrote:
Après avoir terminer les motifs du haut A2, on dit de tricoter le tour suivant ainsi : tricoter les 16 premières mailles, glisser 58 m, etc. Est-ce que je commnce le rang au centre du dos ( début de mon tricot) ou au début du premier motif que j'ai tricoté. Je vous remercie grandement.
15.09.2017 - 03:01DROPS Design answered:
Bonjour Marise, ces 16 m sont comptées depuis le début des tours, soit au même niveau où vous avez commencer à tricoter A.1 et A.2. Bon tricot!
15.09.2017 - 08:53
|
|||||||||||||||||||||||||
Nineveh Jumper#ninevehjumper |
|||||||||||||||||||||||||
 |
 |
||||||||||||||||||||||||
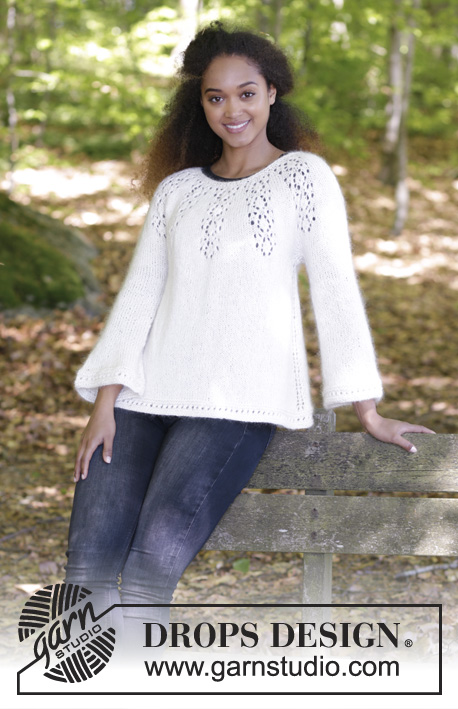
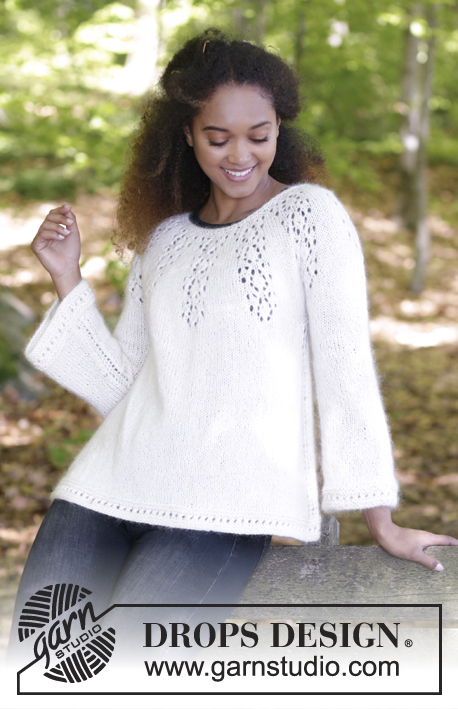
Jumper with round yoke, lace pattern and A-shape, knitted top down. Size: S - XXXL Piece is worked in DROPS BabyMerino and DROPS Kid-Silk.
DROPS 179-8 |
|||||||||||||||||||||||||
|
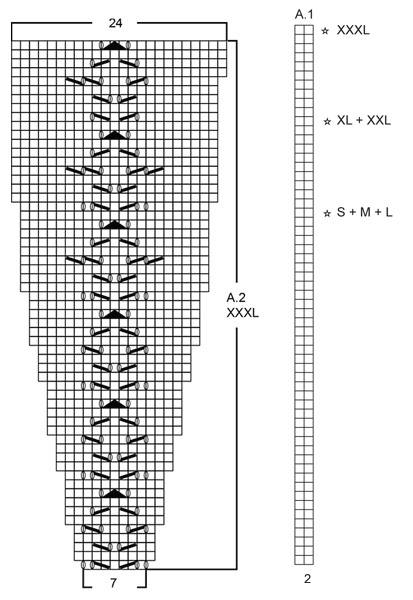
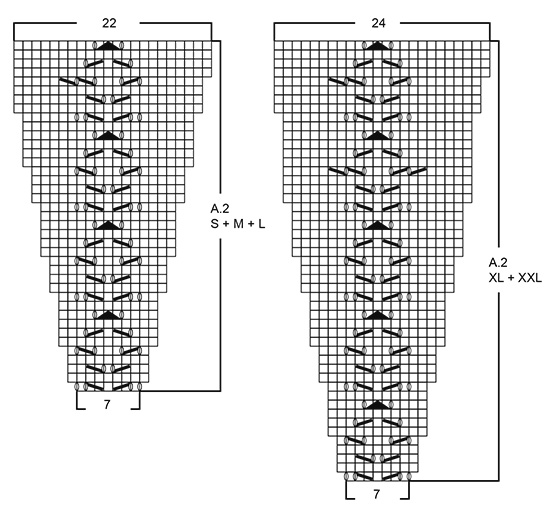
INFORMATION FOR PATTERN: GARTER STITCH (worked in the round): 1 ridge = 2 rounds. Knit 1 round and purl 1 round. ELEVATION: Knit over the next 8-9-10-10-10-11, turn, tighten yarn and knit 16-18-20-20-20-22, turn, tighten yarn and knit 24-27-30-30-31-33, turn, tighten yarn and knit 32-36-40-40-42-44, turn, tighten yarn and knit 40-45-50-50-53-55, turn, tighten yarn and knit 48-54-60-60-64-66, turn, tighten yarn and knit until beginning of round. PATTERN: See diagrams A.1 to A.5. Diagrams show all rows in pattern seen from the right side. Choose diagram for your size (applies to diagram A.2). INCREASE TIP: To calculate how to increase evenly, use the total number of stitches on row (e.g. 84 stitches) and divide number of stitches by number of increases to be done (e.g. 6) = 14. In this example increase after approx. every 14th stitch. Increase 1 stitch by making 1 yarn over. On next round work yarn over twisted to avoid hole. DECREASE TIP (applies to mid under sleeve): Begin 4 stitches before stitch with marker, knit 2 together, A.5 (= 5 stitches), slip 1 stitch knitwise, knit 1, pass slipped stitch over stitch worked (= 2 stitches decreased). ---------------------------------------------------------- JUMPER: Worked in the round on circular needle from mid back. Work top down. Work sleeves in the round on double pointed needles/a short circular needle. YOKE: Cast on 84-88-92-96-102-108 stitches on a short circular needle size 4.5 mm with 1 strand Baby Merino + 1 strand Kid-Silk (= 2 strands). Work 2 ridges in GARTER STITCH - see explanation above. Knit 1 round while increasing 6-11-16-12-15-18 stitches evenly - read INCREASE TIP = 90-99-108-108-117-126 stitches. Insert a marker thread at beginning of round (i.e. between first and last stitch on round) = mid back. Purl 1 round. For better fit work a small ELEVATION at the back of neck - see explanation above. When elevation has been worked, switch to circular needle size 5 mm. Now displace beginning of round as follows: Knit 4-8-4-4-8-4 and insert a new marker thread before next stitch. This is now the new beginning on round, and this is done to make the lace pattern symmetrical mid front! Work PATTERN in the round as follows: * A.1 (= 2 stitches), A.2 (= 7 stitches) *, work from *-* the entire round (= 10-11-12-12-13-14 times). Continue pattern like this and increase as shown in diagram. When A.1/A.2 has been worked 1 time vertically, there are 240-264-288-312-338-364 stitches on round. Work 1-3-7-1-5-1 rounds in stocking stitch and increase AT THE SAME TIME 2-6-10-2-4-2 stitches evenly on first round. NOTE! To make the pattern symmetrical mid front it is important to increase the same number of stitches in each side between mid back and mid front (mid front is the middle stitch in 5th-5th-6th-6th-6th-7th repetition A.2 on round) = 242-270-298-314-342-366 stitches. Piece measures now approx. 20-21-23-25-27-29 cm from cast-on edge (measured mid front). If this measurements is not correct, work in stocking stitch until piece has correct measurement. Work next round as follows: Work the first 25-16-32-34-26-44 stitches, slip the next 50-58-64-66-70-72 stitches on 1 stitch holder (= right sleeve), cast on 7-7-7-9-9-9 new stitches (= in the side under sleeve), work the next 71-77-85-91-101-111 stitches in stocking stitch as before (= front piece), slip the next 50-58-64-66-70-72 stitches on 1 stitch holder (= left sleeve), cast on 7-7-7-9-9-9 new stitches (= in the side under sleeve) and work the remaining 46-61-53-57-75-67 stitches on round. Finish body and sleeves separately. NOW MEASURE PIECE FROM HERE! BODY: = 156-168-184-200-220-240 stitches. Insert 1 marker thread in the middle of the new stitches cast on under each sleeve in each side (= 77-83-91-99-109-119 stitches between stitches with marker thread in on front piece and back piece). Work in stocking stitch in the round, AT THE SAME TIME on next round work A.3 over the middle 5 stitches in each side (i.e. over stitches with marker thread + 2 stitches on each side of these). Continue with stocking stitch, A.3 in the sides and increase on 7th and 15th round in diagram A.3 (= every 8th round in diagram) until piece measures 31-32-32-32-32-32 cm from division. Increase should have been done approx. 8 times in each side = approx. 188-200-216-232-252-272 stitches on round. Switch to circular needle size 4.5 mm. Work next round as follows: Work A.4 in the round. When A.4 has been worked vertically, cast off whit knit. To avoid a tight cast-off edge use a larger needle or make a yarn over that is casted off after approx. every 4th stitch. Jumper measures approx. 58-60-62-64-66-68 cm from shoulder and down. SLEEVE: Slip the 50-58-64-66-70-72 stitches from stitch holder on double pointed needles/short circular needle size 5 mm and pick in addition up 1 stitch in each of the 7-7-7-9-9-9 stitches cast on under sleeve (= 57-65-71-75-79-81 stitches). Insert a marker thread in the middle stitch under sleeve. Beginning of round is after the 7-7-7-9-9-9 new stitches. Work in stocking stitch in the round but over the middle 5 stitches under sleeve (= stitch with marker thread + 2 stitches on each side of this stitch) work A.5. When piece measures 3 cm in all sizes, decrease 2 stitches mid under sleeve - read DECREASE TIP. Decrease like this every 8th-5th-4th-3rd-3rd-2nd round 6-9-11-11-11-10 times in total = 45-47-49-53-57-61 stitches. When piece measures 22-22-21-19-17-15 cm from transition between yoke and sleeve, insert 3 marker threads in piece (without working stitches) as follows: Insert 1st marker thread at beginning of round, insert 2nd marker thread after 15-16-17-18-19-21 stitches, insert 3rd marker thread after 15-16-16-18-19-20 stitches = 15-15-16-17-19-20 stitches remain on round after 3rd marker thread. On next round increase 1 stitch after every marker thread by making 1 yarn over (= 3 stitches increased – knit yarn overs twisted to avoid holes). Increase like this every 4th round 6 times in total = 63-65-67-71-75-79 stitches on needle. Work in stocking stitch and A.5 mid under sleeve until piece measures 31-31-30-28-26-24 cm from transition between yoke and sleeve. Switch to double pointed needles size 4.5 mm. Work A.4 in the round and decrease 1 stitch on first round = 62-64-66-70-74-78 stitches. When A.4 has been worked, cast off by knitting. To avoid a tight cast-off edge use a larger needle or make a yarn over that is casted off after approx. every 4th stitch. Sleeve measures approx. 35-35-34-32-30-28 cm from transition between yoke and sleeve. Work the other sleeve the same way. |
|||||||||||||||||||||||||
Diagram explanations |
|||||||||||||||||||||||||
|
|||||||||||||||||||||||||
|
|||||||||||||||||||||||||
|
|||||||||||||||||||||||||

|
|||||||||||||||||||||||||

|
|||||||||||||||||||||||||
Have you finished this pattern?Tag your pictures with #dropspattern #ninevehjumper or submit them to the #dropsfan gallery. Do you need help with this pattern?You'll find 32 tutorial videos, a Comments/Questions area and more by visiting the pattern on garnstudio.com. © 1982-2025 DROPS Design A/S. We reserve all rights. This document, including all its sub-sections, has copyrights. Read more about what you can do with our patterns at the bottom of each pattern on our site. |
|||||||||||||||||||||||||


With over 40 years in knitting and crochet design, DROPS Design offers one of the most extensive collections of free patterns on the internet - translated to 17 languages. As of today we count 314 catalogues and 11821 patterns translated into English (UK/cm). 11821
We work hard to bring you the best knitting and crochet have to offer, inspiration and advice as well as great quality yarns at incredible prices! Would you like to use our patterns for other than personal use? You can read what you are allowed to do in the Copyright text at the bottom of all our patterns. Happy crafting!
Post a comment to pattern DROPS 179-8
We would love to hear what you have to say about this pattern!
If you want to leave a question, please make sure you select the correct category in the form below, to speed up the answering process. Required fields are marked *.