
Popular categories
Looking for a yarn?


Comments / Questions (284)
DROPS Design wrote:
Hej Anette. Jeg er enig. Jeg faar det heller ikke til at stemme i XL. Jeg har nu videresendt det til kontrol. Jeg kan desvaerre ikke sige noget om hvor lang tid det tager.
24.05.2016 - 12:35
![]() Anette Henningsen wrote:
Anette Henningsen wrote:
Jeg har prøvet at strikke XL men kan ikke få maskeantal og mønster til at passe
23.05.2016 - 15:33DROPS Design answered:
Hej Anette. Vi har kigget paa det og talt igennem igen, og nu faar vi det til at stemme. Du har 178 m og strikker: 1 kantm, A.6 (14 m), A.4 (10 m), A.3 (36 m), 2 vr, 2 r, *3 vr, 2 r* gentages i alt 10 gange, 2 vr, A.3 (36 m), A.4 (10 m), A.5 (14 m) og 1 kantm: 1+14+10+36+4+50+2+36+10+14+1 = 178 m i alt.
30.08.2016 - 09:42
![]() Thérèse wrote:
Thérèse wrote:
Bonjour, le gilet est fini, je suis contente du résultat, merci pour votre aide. Salutations. Thérèse.
30.04.2016 - 12:54
![]() Suzanne Brannan wrote:
Suzanne Brannan wrote:
Do you suggest wet block or steam blocking prior to assembly?
25.04.2016 - 16:28DROPS Design answered:
Dear Mrs Brannan, rather wet block because of yarn content and pattern - read more here. Happy knitting!
25.04.2016 - 16:53
![]() Suzanne wrote:
Suzanne wrote:
I am starting the left front piece. After casting on 102 stitches do I start with A10,A9 P2, A3, A4, A6 reading charts from right to left or left to right? I am confused by the wording "reversed"' What is being revised? Thank you
14.04.2016 - 07:31DROPS Design answered:
Dear Suzanne, read diagrams as before, ie from the right towards the left from RS and from the left towards the right fromm WS. Work reversed means there you will work from RS from the side (1 edge st, sewn to back piece) towards the mid front (front band sts). Happy knitting!
14.04.2016 - 09:38
![]() Thérèse wrote:
Thérèse wrote:
Bonjour, Je commence le dos gauche taille L, je ne vois pas où vous mettez les 2 mailles envers qui se trouve sur le dos droit après A2, pouvez vous me le préciser SVP. Merci, salutations. Thérèse Le verrier.
12.04.2016 - 10:18DROPS Design answered:
Bonjour Thérèse, pour le dos on tricote A.3-A.5 (A.2 = devant droit) - cette info a été transférée à notre équipe Design. Merci. Bon tricot!
14.04.2016 - 11:22
![]() LEVERRIER Th wrote:
LEVERRIER Th wrote:
Décidément je n'arrive pas à démarrer le dos pour la taille L. Mes douze rangs sont fait, j' ai bien les 138 mailles , maintenant avec l'aiguille n 4 est - ce bien À 8 pour les 24 mailles, pouvez vous SVP m'éclairer. 1maille lisière A2 nombre de mailles ... A6 nombre de mailles. ... A8 A6 A2 1maille lisière Je trouve 118 mailles Merci. Salutations.
01.04.2016 - 22:44DROPS Design answered:
Bonjour Mme Leverrier, tricotez ainsi sur les 138 m (vu sur l'endroit): les 57 premières m comme avant (= 1 m lis, A6 (=13m), A.4 (=8 m,), A.3 (=34 m), 1 m env) puis les 24 m centrales en A.8 (= 6 fois les 4 m de A.8), et tricotez les 57 dernières m comme avant (=1 m env, A.3 (= 34 m), A.4 (= 8m), A.5 (= 13 m)) et 1 m lis. Bon tricot!
02.04.2016 - 18:01
![]() Suzanne wrote:
Suzanne wrote:
Regarding the displacement, is the Dec1 the last stitch of A1 or the first stitch in A2? Thank you
30.03.2016 - 09:41DROPS Design answered:
Dear Suzanne, dec are done after A.1, ie work tog the next 2 sts after A.1 (= the first/next 2 sts worked in A.2) - read also "Decrease tip". Happy knitting!
30.03.2016 - 09:43
![]() Suzanne wrote:
Suzanne wrote:
After adding YO to front shawl collar when knitting the wrong side what stitch do I use on the YO and then on the right side which stitch.
30.03.2016 - 06:23DROPS Design answered:
See answer below :)
30.03.2016 - 09:41
![]() Suzanne wrote:
Suzanne wrote:
After adding YO to front shawls collar when knitting the wrong side what stitch do I use on the YO and then on the right side.
30.03.2016 - 05:23DROPS Design answered:
Dear Suzanne, the inc sts towards mid front (= the YO's worked before A.1 on right front piece) are worked in garter st - remember to work the YO's into back of loop to avoid holes. Happy knitting!
30.03.2016 - 09:39
|
|||||||||||||||||||
Finnley |
|||||||||||||||||||
 |
 |
||||||||||||||||||
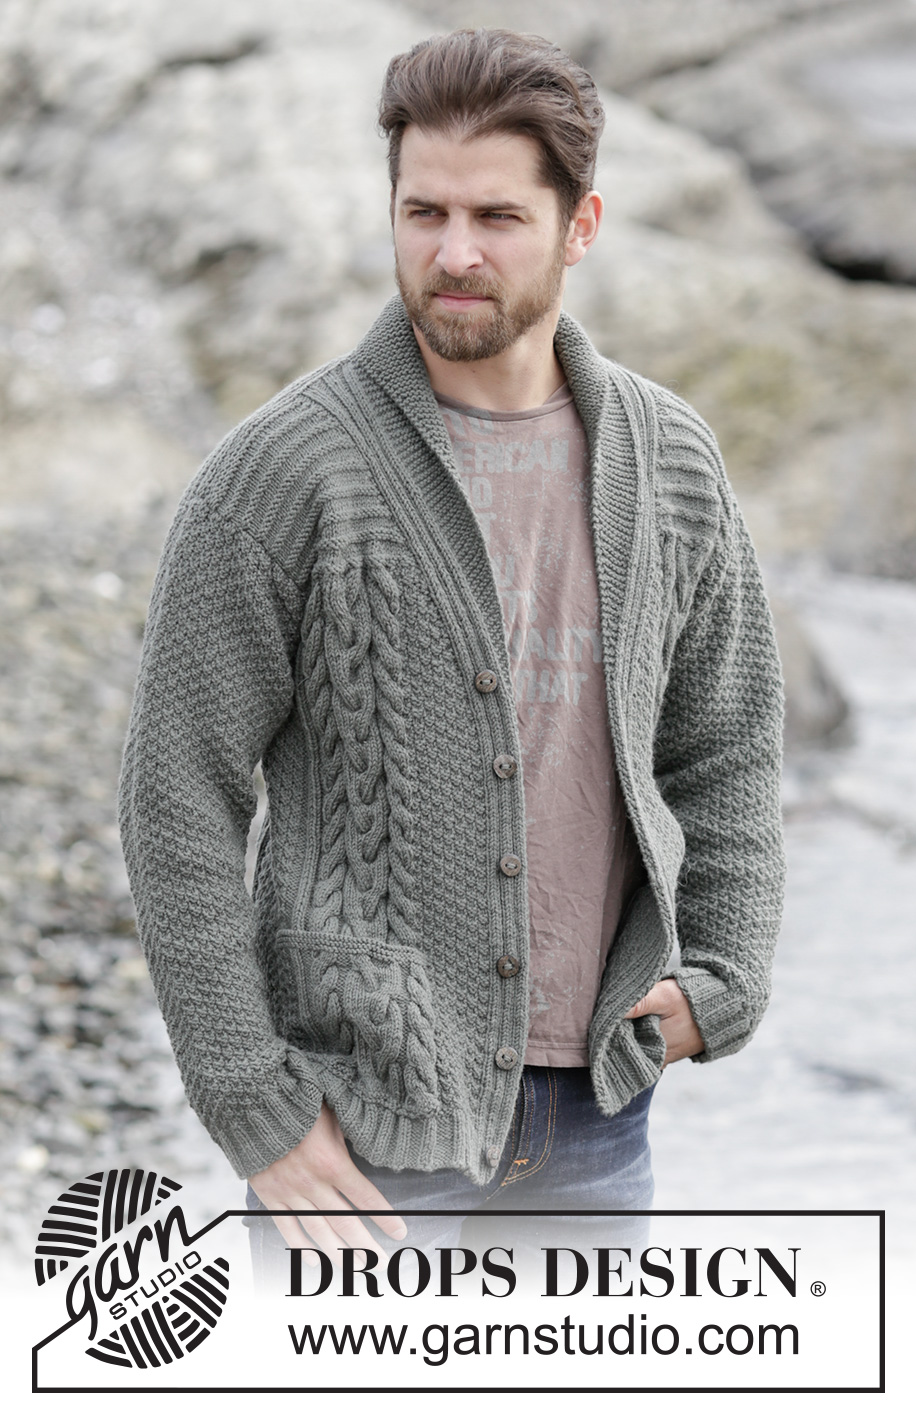
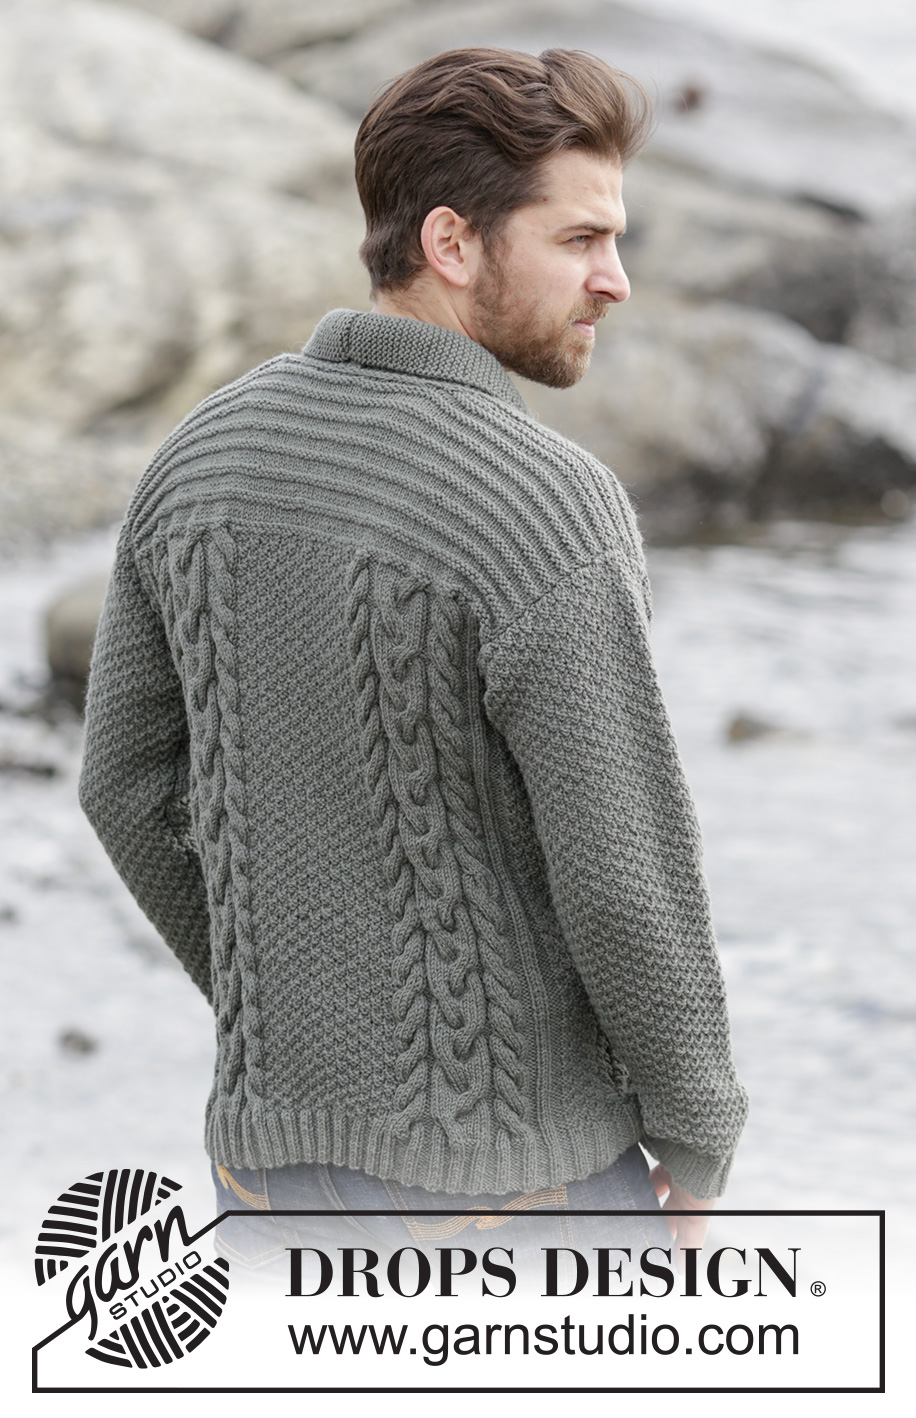
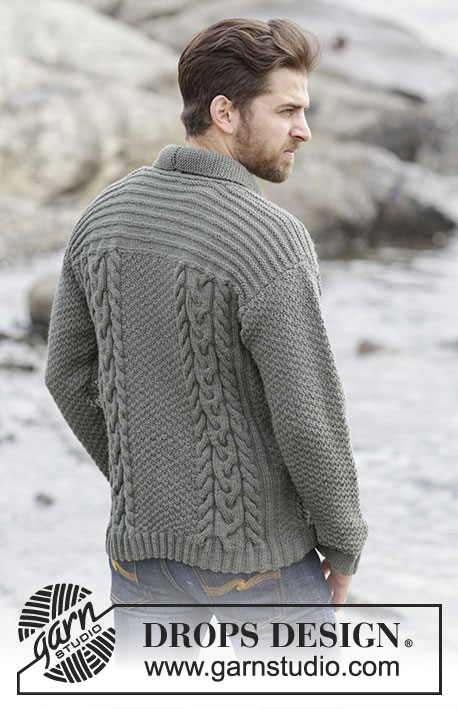
Men's knitted jacket in DROPS Lima, with cables and shawl collar. Size: S - XXXL.
DROPS Extra 0-1132 |
|||||||||||||||||||
|
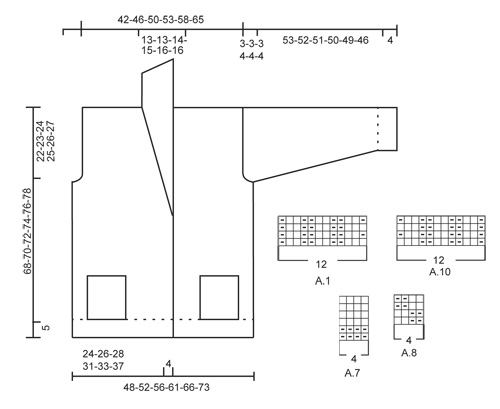
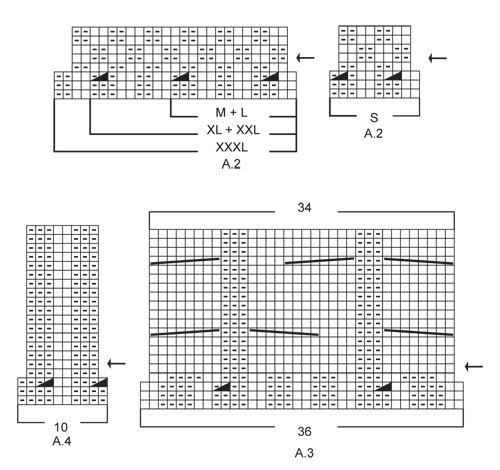
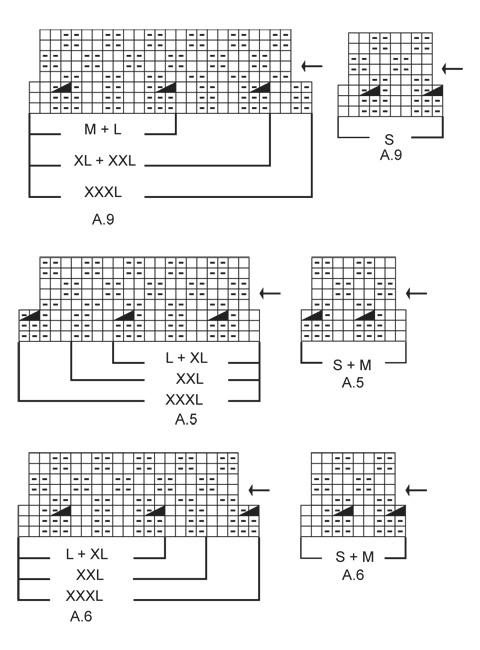
GARTER ST (back and forth): K all rows. 1 ridge = 2 rows K. PATTERN: See diagrams A.1-A.10. The diagrams show all rows in pattern seen from RS. INCREASE TIP: Inc 1 st by making 1 YO, on next row work YO twisted (i.e. work in the back loop of st instead front) to avoid holes. DECREASE TIP: All dec are done from RS! Dec as follows after A.1: P 2 tog Dec as follows before A.1: Work until 2 sts remain before A.1, P 2 tog. BUTTONHOLES: Dec for buttonholes on left band. 1 buttonhole = K tog sixth and seventh st from edge and make 1 YO. Dec for buttonholes when piece measures: SIZE S: 2, 9, 17, 25, 33 and 41 cm. SIZE M: 2, 10, 18, 26, 34 and 42 cm. SIZE L: 3, 11, 19, 27, 35 and 43 cm. SIZE XL: 3, 12, 20, 28, 36 and 44 cm. SIZE XXL: 4, 13, 21, 29, 37 and 45 cm. SIZE XXXL: 5, 14, 22, 30, 38 and 46 cm. SHORT ROWS (applies to shawl collar): Work short rows over sts in garter st from mid front as follows: For every 14th row work as follows (beg from RS): Work over all sts in garter st, turn piece, tighten yarn and K back, turn piece and work as before over all sts. That way the ridges in collar will not contract as much. On left front piece work reversed, i.e. beg short rows from WS. ---------------------------------------------------------- JACKET: Worked back and forth and sewn tog when finished. BACK PIECE: Cast on 145-150-158-178-186-206 sts on circular needle size 3.5 mm with Lima. Work rib as follows: 1 edge st in GARTER ST - see explanation above, A.6 (find diagram for correct size), A.4, A.3, P 2, K 2, * P 3, K 2 *, repeat from *-* 4-5-5-9-9-11 more times, P 2, A.3, A.4, A.5 (find diagram for correct size), 1 edge st in garter st. Continue like this and repeat the first 2 rows in A.3-A.6 until 12 rows have been worked. Now continue pattern from 3rd row in diagram and work as follows: Work the first 59-59-63-63-67-72 sts as before, work the next 27-32-32-52-52-62 sts AT THE SAME TIME dec 11-8-8-12-12-14 sts evenly in sections with P, continue as before over the remaining 59-59-63-63-67-72 sts = 122-130-138-154-162-178 sts. Work 1 row. Now switch to circular needle size 4 mm and continue with pattern but work A.8 over the middle 16-24-24-40-40-48 sts. NOTE: Now repeat A.3- A.6 from arrow in diagram. REMEMBER THE KNITTING TENSION When piece measures 46-47-48-49-50-51 cm, cast off 3-3-3-4-4-4 sts at beg of the next 4 rows for armholes = 110-118-126-138-146-162 sts on needle. When piece measures 53-54-55-56-57-58 cm, work A.7 over all sts inside 1 edge st in garter st in each side AT THE SAME TIME on first row dec 20-20-18-24-22-24 sts evenly in all sizes = 90-98-108-114-124-138 sts. Repeat A.7 until finished measurements. When piece measures 66-68-70-72-74-76 cm, work as follows: Work the first 32-36-40-42-46-53 sts, cast off the next 26-26-28-30-32-32 sts and work the remaining 32-36-40-42-46-53 sts. Then finish each shoulder separately as follows: On next row from the neck, dec 1 st = 31-35-39-41-45-52 sts remain on each shoulder. When piece measures 68-70-72-74-76-78 cm, work 1 ridge over all sts. Cast off. Work the other shoulder the same way. RIGHT FRONT PIECE: Cast on 81-85-89-98-102-111 sts on circular needle size 3.5 mm with Lima. Work rib as follows: A.1 (= 12 sts), A.2 (find diagram for correct size), P 2, A.3, A.4, A.5 (find diagram for correct size), 1 edge st in garter st. Continue like this and repeat the first 2 rows in A.2-A.5 until 12 rows have been worked. Switch to circular needle size 4 mm and continue with pattern = 73-77-81-89-93-101 sts. NOTE: Now repeat diagram from arrow. When piece measures 40-41-42-43-44-46 cm, beg shawl collar while AT THE SAME TIME working shoulder as explained below: READ ALL OF THE FOLLOWING SECTION BEFORE CONTINUING! SHAWL COLLAR: Work first st in A.1, 1 YO, work the remaining 11 sts in A.1, dec 1 st - READ DECREASE TIP, continue over the remaining sts on needle as before. Repeat displacement over A.1 every 1½ cm 0-2-3-3-3-4 times in total and every cm 26-24-23-24-25-24 times = 26-26-26-27-28-28 sts (incl the first st in A.1). Work the inc sts towards mid front in garter st, AT THE SAME TIME work SHORT ROWS - see explanation above. SHOULDER: When piece measures 46-47-48-49-50-51 cm, cast off 3-3-3-4-4-4 sts at beg of the next 2 rows from WS = 67-71-75-81-85-93 sts on needle. When piece measures 53-54-55-56-57-58 cm, work collar sts in garter st and A.1 as before, then work A.7 over the remaining sts on needle, AT THE SAME TIME dec 10-10-10-13-12-13 sts evenly = 57-61-65-68-73-80 sts. Continue pattern until finished measurements. Then work as follows from RS: When piece measures 68-70-72-74-76-78 cm - adjust after back piece - work the first 26-26-26-27-28-28 sts before slipping them on a stitch holder, then work a ridge over the remaining 31-35-39-41-45-52 sts. Cast off. Slip sts back on needle. Then work short rows in garter st as follows, beg from WS: Work over all 26-26-26-27-28-28 sts, * 2 rows back and forth over the first 13-13-14-14-15-15 sts, 2 rows over all sts *, repeat from *-* until piece measures 7-7-7-8-8-8 cm on the shortest. Cast off. LEFT FRONT PIECE: Work as right front piece but reversed. I.e. work A.10 instead of A.1, A.9 instead of A.2 and A.6 instead of A.5. Remember BUTTONHOLES on left band - see explanation above. SLEEVE: The sleeve is worked back and forth on circular needle. Cast on 59-64-64-69-69-74 sts (incl 1 edge st in garter st in each side) on circular needle size 3.5 mm with Lima. Work rib as follows: 1 edge st in garter st, * K 2, P 3 *, repeat from *-* until 3 sts remain, K 2, 1 edge st in garter st. Continue like this until rib measures 4 cm. Switch to circular needle size 4 mm and work 1 row in stocking st while AT THE SAME TIME dec 9-10-10-11-11-12 sts evenly = 50-54-54-58-58-62 sts. Continue with A.8 inside 1 edge st in garter st in each side. When piece measures 14-13-8-8-13-11 cm, inc 1 st inside edge st in garter st in each side - read INCREASE TIP. Repeat inc approx. every 2-2-1½-1½-1½-1½ cm 20-20-22-22-25-25 more times = 92-96-100-104-110-114 sts. When piece measures 57-56-55-54-53-50 cm, cast off at beg of every row in each side: 3 sts 1-1-1-2-2-2 times, 2 sts 1 time and 3 st 2-2-2-3-3-3 times. Cast off. Sleeve measures approx. 60-59-58-58-57-54 cm. Knit another sleeve. POCKETS: Worked back and forth on circular needle. Cast on 42 sts on circular needle size 4 mm with Lima. Work 1 ridge in garter st AT THE SAME TIME inc 6 sts evenly on row from RS = 48 sts. On next row from RS work pattern as follows: NOTE: Beg and repeat pattern in A.3 and A.4 from 5th row in A.3 and A.4. 1 edge sts in garter st, A.3, A.4, A.8, 1 edge st in garter st. Continue like this back and forth until A.3 and A.4 have been worked 2 times vertically. Then continue with the first 6 rows from arrows in diagram 1 more time. Then work and dec as follows: 1 edge st in garter st, K the next 4 sts tog 2 by 2 (= 2 sts dec), continue as before over the next 7 sts, K the next 4 sts tog 2 by 2, continue with pattern as before over the next 15 sts, K the next 4 sts tog 2 by 2, Work remaining sts as before and finish with 1 edge st in garter st. Then switch to needle 3.5 mm and work 2 ridges over all sts, beg from WS. Cast off from WS. Work another pocket the same way but reversed. ASSEMBLY: Sew the shoulder seams tog. Sew sleeves in body. Sew underarm and side seams in one inside 1 edge st in garter st. Sew the buttons on to the right band. Sew cast-off edge on collars tog mid back, sew collar to the back of neck. Fasten pockets on front pieces so that pattern on pocket is placed over pattern on front piece. Sew pocket neatly through both layers in edge st in garter st in each side and at the bottom of pocket. Cut the yarn and fasten. |
|||||||||||||||||||
Diagram explanations |
|||||||||||||||||||
|
|||||||||||||||||||
 |
|||||||||||||||||||
 |
|||||||||||||||||||
 |
|||||||||||||||||||
Have you finished this pattern?Tag your pictures with #dropspattern or submit them to the #dropsfan gallery. Do you need help with this pattern?You'll find 24 tutorial videos, a Comments/Questions area and more by visiting the pattern on garnstudio.com. © 1982-2026 DROPS Design A/S. We reserve all rights. This document, including all its sub-sections, has copyrights. Read more about what you can do with our patterns at the bottom of each pattern on our site. |
|||||||||||||||||||


With over 40 years in knitting and crochet design, DROPS Design offers one of the most extensive collections of free patterns on the internet - translated to 17 languages. As of today we count 324 catalogues and 12285 patterns translated into English (UK/cm). 12285
We work hard to bring you the best knitting and crochet have to offer, inspiration and advice as well as great quality yarns at incredible prices! Would you like to use our patterns for other than personal use? You can read what you are allowed to do in the Copyright text at the bottom of all our patterns. Happy crafting!
Post a comment to pattern DROPS Extra 0-1132
We would love to hear what you have to say about this pattern!
If you want to leave a question, please make sure you select the correct category in the form below, to speed up the answering process. Required fields are marked *.