
Looking for a yarn?


Comments / Questions (45)
![]() Silvia wrote:
Silvia wrote:
Sto facendo quesro vestito in tg 5/6 anni. Alla fine dite che deve misurare 43 cm... questa misura va presa dal girocollo, dalla spalla o da dove dite che il lavoro deve iniziare ad essere misurato?
30.08.2018 - 23:00DROPS Design answered:
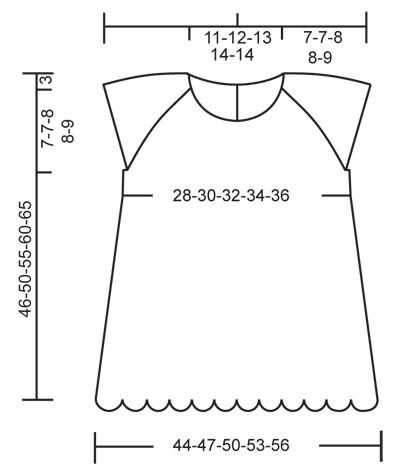
Buongiorno Silvia. I 43 cm vanno presi da dove dice: ora misurare il lavoro da qui. Nel grafico in fondo alle spiegazioni, trova le misure complete del vestito. Buon lavoro!
31.08.2018 - 06:58
![]() Silvia wrote:
Silvia wrote:
Buonasera sono alle prime armi con la realizzazione dei vestiti non ne ho mai fatto uno Sto provando a fare questo modello in taglia 5/6 anni...sono solo all'inizio sto facendo lo sprone e sono alla fine dell'ottavo giro di aumenti per il raglan mi trovo sul diritto del lavoro al termine del dell'ottavo raglan... lo schema e richiede di continuare a lavorare sul diritto del lavoro come devo fare?Devo tagliare il filo e ricominciare da capo e come faccio a riconoscere Quale' il dritto?
29.08.2018 - 18:59
![]() Loredana wrote:
Loredana wrote:
Grazie per il suggerimento ma continuo a non capire. Finisco l'ultimo ventaglio della riga. Come chiudo e comincio il giroi successivo?
20.07.2018 - 10:31DROPS Design answered:
Buongiorno Loredana. Dopo l'ultimo ventaglio nell'ultimo arco di catenelle del giro, lavora maglie bassissime fino al primo arco di catenelle e poi riprende con i ventagli. Buon lavoro!
20.07.2018 - 10:57
![]() Loredana wrote:
Loredana wrote:
Buongiorno, domanda da principiante: per chiudere il giro quando incomincio la lavorazione con il punto a ventaglio come faccio? io ci sto provando ma mi viene tutto storto. Dopo l'ultimo punto a ventaglio chiudo con una maglia bassissima alla base del primo punto a ventaglio, continuo con 1 p.to bassissimo per ogni catenella del primo ventaglio fino ad arrivare alla prima asola. Ma così facendo la "cucitura" è tutta obliqua. Grazie mille
20.07.2018 - 09:11DROPS Design answered:
Buongiorno Loredana. Provi a non lavorare la maglia bassissima alla base del primo punto a ventaglio. Buon lavoro!
20.07.2018 - 10:27
![]() Sue wrote:
Sue wrote:
The stitch counts are the same for size 5/6 and size 7/8. That doesn’t make any sense to me. Can you help clarify this?
13.03.2018 - 15:36DROPS Design answered:
Dear Sue, the number of sts to cast on ie to start with is the same in these both sizes but you will increase more times in the larger size so that the total number of sts at the end of yoke will be larger and yoke will be longer in size 7/8 than in size 5/6. Happy crocheting!
13.03.2018 - 15:56Lena Chan wrote:
Thank you so much for this lovely pattern! I made it for my Daughter as her Chinese New Year dress and even though I unknowingly ended up with 4 more stitches at the end of the yoke, the dress still turned out well 😆 I did however add another row to the yoke before the crochet in a round step in order to make the arm hole bigger as I thought it would be too tight. I also sewed a lining and sewed a row of lace at the bottom of the lining to make it similar to the photo.
08.03.2018 - 08:17
![]() Heather wrote:
Heather wrote:
Is the white underneath crocheted or just fabric lining? Do you have a tutorial on how to make that part? And I just missing it? Thanks!
30.07.2017 - 21:03DROPS Design answered:
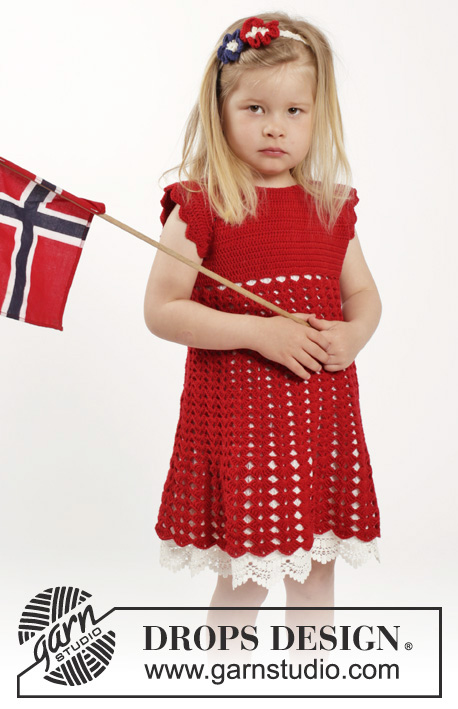
Dear Heather, that white lace edge is the endge of a white underskirt the little girl is wearing in one of the pictures (you can see in the picture with the bike, where is is not wearing it underneath, that there is no white lace edge. However, if you want to try, you can crochet into each stitch in the row before the last (with the white yarn), a treble in each stitch and add any crochet edging you like.Thus it would look like two separate layers. I hope this helps. Happy Crocheting!
30.07.2017 - 23:22
![]() Anette Sommer wrote:
Anette Sommer wrote:
Sidder og hækler fra kataloget, der er fejl i . Kan nu se opskriften online er rettet.
25.05.2016 - 06:53
![]() Anette Sommer wrote:
Anette Sommer wrote:
Der må være fejl i kjolen str 2 år. 76 m op + udt 7 x 16 = 188 m ialt og ikke 200 m !!! Der mangler 12 m , Der er ikke 28 m til hø forstyk, men kun 26 m. Så er spørgsmålet om man skal tage ud en gang mere eller ??
25.05.2016 - 06:47DROPS Design answered:
Hej Anette. Du har 76 og tager ud förste gang som beskrevet = 88 st på rækken. Saa tager du ud 7 gange totalt: 7 x 16 m = 112 = 200 st i alt.
25.05.2016 - 13:52Noha Ahmed wrote:
Thank u for you patterns but when i made first size(2 years size) i Work 77 Then inc & repeat inc on every row 6 more times (= 7 times in total) to check stitches number you write it should be Work 1 dc in each of the first 28- dc (= right back piece) but i have only 26 dc on the yoke and i checked all steps many times are there any corrections in this pattern??!!
18.05.2016 - 22:30DROPS Design answered:
Dear Mrs Ahmed, have you checked the number of sts after all inc for raglan? you should have 200 sts= 28 sts for each back piece, 44 sts for each sleeve, 56 sts for front piece (28+44+56+44+28=200). Happy crocheting!
19.05.2016 - 09:07
|
|
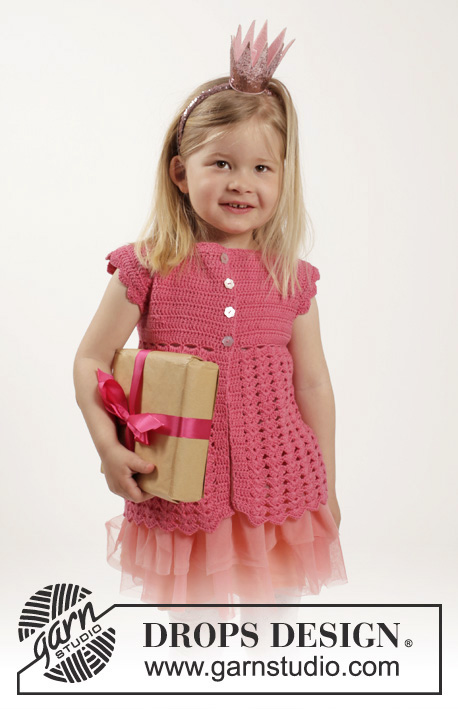
Princess Matilde#princessmatildedress |
|
 |
 |
Crochet dress worked top down with raglan, short sleeves and fan pattern plus hair band with flowers in DROPS BabyMerino, DROPS Safran or DROPS ♥ You #7. Size children 2 - 10 years
DROPS Children 26-5 |
|
|
CROCHET INFO: Replace first tr at beg of every tr round/row with 3 ch. Finish round with 1 sl st in 3rd ch from beg of round. Finish row with 1 tr in 3rd ch from beg of previous row. INCREASE TIP: Inc 1 tr by working 2 tr in same st. ---------------------------------------------------------- DRESS: The piece is worked top down. Work back and forth from mid back to after vent mid back, then work piece in the round. YOKE: Work 77-81-85-85-89 loose ch (incl 1 ch to turn with) on hook size 3.5 mm with Baby Merino, Safran or DROPS ♥ You #7. Work 1 dc in 2nd ch from hook, then work 1 dc in every ch the entire row = 76-80-84-84-88 dc on row. Now insert 4 markers in piece for raglan as follows (beg mid back – NOTE: Do NOT work while inserting markers): Skip 12-13-14-14-15 dc (= right back piece), insert 1 marker in next dc, skip 12 dc (= sleeve), insert 1 marker in next dc, skip 24-26-28-28-30 dc (= front piece), insert 1 marker in next dc, skip 12 dc (= sleeve) and insert last marker in next dc (there are now 12-13-14-14-15 dc on left back piece after last marker). READ ALL OF THE FOLLOWING SECTION BEFORE CONTINUING: READ CROCHET INFO and work next row as follows from RS: Work 1 tr in every dc but in every dc with marker work 2 tr + 2 ch + 2 tr = 88-92-96-96-100 tr on row (= 12 tr inc). Then inc for raglan: Continue with tr, and work 2 tr + 2 ch + 2 tr in every ch-space in every raglan line (= 16 tr inc on row). Repeat inc on every row 6-6-7-8-9 more times (= 7-7-8-9-10 times in total) = 200-204-224-240-260 tr on row. REMEMBER THE CROCHET TENSION! Work next row as follows from RS: Work 1 tr in each of the first 28-29-32-34-37 tr (= right back piece), skip the next 44-44-48-52-56 tr (= sleeve), work 8 ch, work 1 tr in each of the next 56-58-64-68-74 tr (= front piece), skip the next 44-44-48-52-56 tr (= sleeve), work 8 ch and work 1 tr in each of the last 28-29-32-34-37 tr (= left back piece). Sleeve caps are now done and piece is worked in the round. BODY: Put piece tog mid back with RS out and work 1 round with tr (work 1 tr in every tr from previous round and 1 tr in every ch under each sleeve – remember CROCHET INFO) = 128-132-144-152-164 sts on round. NOW MEASURE PIECE FROM HERE! Continue with 1 tr in every tr until piece measures 4-4-4-5-5 cm, on last round inc 2-3-1-3-1 tr evenly - READ INCREASE TIP = 130-135-145-155-165 tr. Now work fan pattern as follows: ROUND 1: 1 dc in first tr, *4 ch, skip 4 tr, 1 dc in next tr *, repeat from *-* the entire round and finish with 4 ch, skip 4 tr and 1 sl st in first dc = 26-27-29-31-33 ch-spaces. ROUND 2: 3 tr + 2 ch + 3 tr in every ch-space. ROUND 3: Work sl sts until first ch-space, then work 3 tr + 2 ch + 3 tr in every ch-space. Repeat 3rd round until piece measures 15-17-18-20-21 cm WORK NEXT ROUND AS FOLLOWS: Work sl sts until first ch-space, then work 4 tr + 2 ch + 4 tr in every ch-space. Repeat this round until piece measures 25-28-31-34-36 cm WORK NEXT ROUND AS FOLLOWS: Work sl sts until first ch-space, then work 4 dtr + 2 ch + 4 dtr in every ch-space. Repeat this round until piece measures 35-39-43-48-52 cm Fasten off. ADJUSTING NECKLINE: For better fit work a small elevation at the back of neck. Insert 1 marker in st in each corner in neck, i.e. at beg of every raglan line and 1 marker mid front. Work on hook size 3.5 mm as follows: Beg mid back, work 1 dc in every st until 1 st remains before st with marker, work 1 htr in next st, 1 tr in st with marker and 1 htr in next st, then work 1 dc in every st until 1 st remains before next st with marker, 1 htr in next st, 1 tr in st with marker and 1 htr in next st, the work 1 dc in every st until 4-4-5-5-5 sts remain before marker mid front. Turn piece and work 1 dc in every dc back to mid back but at every marker work 3 dc tog, i.e. work 1 dc in htr but wait with last YO and pull through, work 1 dc in st with marker but wait with last YO and pull through, work 1 dc in next htr but now pull last YO through all 4 sts on hook (= 2 dc dec). Cut the yarn and repeat from mid back to mid front in the other side. BUTTON BAND AT THE BACK: Work along left opening mid back as follows: Work 2 dc in every tr-row and 1 dc in every dc-row. Work 4 rows in total with dc back and forth, fasten off. Along right opening mid back work buttonholes as follows (beg from RS at neck line): Work 4 dc (2 dc in the first two tr-rows), 4 ch (= 1 buttonhole), skip approx. 1 cm, work dc until approx. mid on band, 4 ch, skip approx. 1 cm, work dc until 1 cm remains on band, 4 ch and fasten with 1 dc in last st. Fasten off. Sew the buttons on to button band in the left side. NECK EDGE: Work around the neck as follows: 1 dc in first st, * 2 ch, skip 2 sts, 1 dc in next st *, repeat from *-* the entire row, fasten off. FAN EDGE AROUND SLEEVE CAPS: Work as follows: Work 1 dc in each of the 8 sts mid under sleeve, then work fan edge around the sleeve opening as follows: * Skip approx. 2 cm, in next st work 3 tr + 2 ch + 3 tr, skip approx. 2 cm, 1 dc in next st *, repeat from *-* and finish with 1 sl st in first dc from beg of round (= approx. 9-9-10-10-11 fans along sleeve cap). Fasten off. Repeat at the bottom around the other sleeve cap. ---------------------------------------------------------- HAIR BAND: Work 6 ch on hook size 3.5 mm with off white. Work first row as follows: Work 1 dc in 4th ch from hook, work 1 dc in each of the next 2 ch, turn piece = 3 dc + 3 ch on row. ROW 2: 3 ch, 1 dc in each of the 3 dc from previous row, turn piece. Repeat 2nd row until hair band measures approx. 42-44-46-48 cm (or desired length, subtract approx. 6-8 cm according to the head's circumference). Cut the yarn and sew the 2 short sides tog edge to edge with small stitches. LARGE CROCHET FLOWER: Work 7 ch on hook size 3.5 mm with off white and form a ring with 1 sl st in first ch. ROUND 1: 3 ch (= 1 tr), 2 tr in ch-ring, * 6 ch, 1 dc in last tr made, 3 tr in ch-ring *, repeat from *-* a total of 6 times and finish with 6 ch and 1 sl st in 3rd ch from beg of round = 7 ch-spaces with 3 tr between each. Fasten off. ROUND 2: Switch to red. Work 1 dc in the middle of the first 3 tr on round, * 12 tr in ch-space, skip 1 tr, 1 dc in next tr, skip 1 tr *, repeat from *-* the entire round and finish with 1 sl st in first dc from beg of round. Fasten off. SMALL CROCHET FLOWER: Work 6 ch on hook size 3.5 mm with off white and form a ring with 1 sl st in first ch. ROUND 1: 2 ch (= 1 htr), 2 htr in ch-ring, * 5 ch, 1 dc in last htr made, 3 htr in ch-ring *, repeat from *-* a total of 5 times and finish with 5 ch and 1 sl st in 2nd ch from beg of round = 6 ch-spaces with 3 htr between each. Fasten off. ROUND 2: Switch to blue. Work 1 dc in the middle of the first 3 htr on round, * 10 tr in ch-space, skip 1 htr, 1 dc in next htr, skip 1 htr *, repeat from *-* the entire round and finish with 1 sl st in first dc from beg of round. Fasten off. ASSEMBLY: Sew flowers on hair band with small sts. |
|
 |
|
Have you finished this pattern?Tag your pictures with #dropspattern #princessmatildedress or submit them to the #dropsfan gallery. Do you need help with this pattern?You'll find 14 tutorial videos, a Comments/Questions area and more by visiting the pattern on garnstudio.com. © 1982-2025 DROPS Design A/S. We reserve all rights. This document, including all its sub-sections, has copyrights. Read more about what you can do with our patterns at the bottom of each pattern on our site. |
|


With over 40 years in knitting and crochet design, DROPS Design offers one of the most extensive collections of free patterns on the internet - translated to 17 languages. As of today we count 320 catalogues and 12094 patterns translated into English (UK/cm). 12094
We work hard to bring you the best knitting and crochet have to offer, inspiration and advice as well as great quality yarns at incredible prices! Would you like to use our patterns for other than personal use? You can read what you are allowed to do in the Copyright text at the bottom of all our patterns. Happy crafting!
Post a comment to pattern DROPS Children 26-5
We would love to hear what you have to say about this pattern!
If you want to leave a question, please make sure you select the correct category in the form below, to speed up the answering process. Required fields are marked *.