
Looking for a yarn?


Comments / Questions (167)
![]() Barbara wrote:
Barbara wrote:
This is a gorgeous jumper - really cosy and the neck sits beautifully. I knitted the back & front on a circular needle ( having started with a bit of extra rib for the back) because I hate having side seams. . As a result I had no luck whatsoever with the English rib so just did a muddled variation of standard rib - absolutely love it. Probably my favourite Drops pattern so far.
21.03.2023 - 01:20
![]() Camilla wrote:
Camilla wrote:
Hur rekommenderar ni att man blockar Rain chain? Ska man göra det före eller efter montering och ska man ha något i vattnet?
20.03.2023 - 20:06DROPS Design answered:
Hei Camilla. Syns ikke at man skal behøve å blokke Rain Chain genseren. Monter ermene på før evnt vask. Og om du ønsker å vaske genseren (god lufting av ull plagg er ofte godt nok), så følg vaskeanvisningen evnt les mer om vasking av plagg under Tips & Hjelp / Vaskeanvisning / Generelle Tips / mvh DROPS Design
27.03.2023 - 09:38
![]() Isabel Decombel wrote:
Isabel Decombel wrote:
Ik heb een vraag over het breien van deze trui voor iemand anders in ruil voor een vergoeding. Waar kan ik uw contactgegevens vinden?
01.03.2023 - 16:35DROPS Design answered:
Dag Isabel,
Je kunt contact opnemen via het formulier op deze pagina.
01.03.2023 - 20:19
![]() Joan wrote:
Joan wrote:
Je tricote le modèle DROPS 236-9 Et je m’aperçois après avoir tricoter mon dos en côtes 1/1 pendant 10 cm comme l’indique le patron et tout le reste mon dos est terminé,…pour le devant on fait comme le dos …mais à 34 cm on rabat pour faire l’emmanchure??? Ça marche pas!!!
28.02.2023 - 14:29DROPS Design answered:
Bonjour Joan, si tout à fait, c'est bien ainsi que le pull photographié est aussi fait, le devant et le dos se tricotent de la même façon mais le devant est plus court, les côtes et le point mousse/les côtes anglaises seront donc en léger décalage - comme on peut un peu le voir sur la 1ère photo. Bon tricot!
28.02.2023 - 17:50
![]() Jannie wrote:
Jannie wrote:
I skriver ved halsen : incl opsamlede masker? De er jo lukket af. I skriver slidse ved ærmer ? Mvh.
27.02.2023 - 20:54DROPS Design answered:
Hej Jannie, de midterste masker foran er sat på en tråd til hals ifølge opskriften. Men det er samme antal masker du skal bruge uanset :)
28.02.2023 - 14:40
![]() Gilly M Mills wrote:
Gilly M Mills wrote:
Hi there - I am confused about the A2 diagram. In your tip video on how to read a diagram you say to read it from right to left and bottom right corner but in the instructions for this jumper you say from left to right. Also is it from the bottom right corner or the top left corner?! Manythanks. (I am also curious as to why you don't knit this garment on ordinary needles, given it is knitted flat on circular?
25.02.2023 - 15:22DROPS Design answered:
Dear Gilly, since you are working back and forth, every other row will be worked from the right side (read right to left, starting on the bottom right corner) and every other row will be worked from the wrong side; these rows are read from left to right, knit stitches are purled, and purl stitches are knit etc (as specificied in the symbol definition). You can check this lesson for more information: https://www.garnstudio.com/lesson.php?id=68&cid=19 We use circular needles for more confort when knitting but you may use straight needles for the body pieces (although you will need other needles for the sleeves worked in the round). Happy knitting!
26.02.2023 - 20:52
![]() Monica wrote:
Monica wrote:
Salve, è possibile sapere quante maglie/ferri diminuire per l'arrotondamento della manica? grazie
24.02.2023 - 16:42DROPS Design answered:
Buongiorno Monica, a quale parte del modello sta facendo riferimento?
25.02.2023 - 13:55
![]() Andrea Moldenhauer wrote:
Andrea Moldenhauer wrote:
Wo ist denn das Diagramm A1 und A2 zu sehen???
24.02.2023 - 15:49DROPS Design answered:
Liebe Frau Moldenhauer, beide Diagramme finden Sie nach der schriftlichen Anleitung, über die Maßskizze. Viel Spaß beim stricken!
27.02.2023 - 09:07
![]() Andrea wrote:
Andrea wrote:
Guten Tag, werden bei diesem Pulli gar keine Randmaschen gestrickt? Wird die erste bzw. letzte Masche in der Reihe einfach rechts gestrickt? Herzlichen Gruß
21.02.2023 - 15:45DROPS Design answered:
Liebe Andrea, doch schon und diese Maschen sind auch in der Anleitung beschrieben. Viel Spaß beim stricken!
21.02.2023 - 18:05
![]() Caroline Werdefroy wrote:
Caroline Werdefroy wrote:
J'ai commandé la quantité indiquée pour faire ce pull en XXL soit 12 pelotes. En cours d'ouvrage j'ai constaté que c'était insuffisant, j'ai réussi à trouver 3 pelotes du même bain et il ne m'en reste déjà plus que 2 pour les manches... J'ai donc recommandé 4 pelotes supplémentaires mais cette fois ci c'est en snow (avant c'était eskimo mais il n'y en a plus) et ce que j'ai reçu est fort différent... Comment faire?
31.01.2023 - 12:49
|
||||||||||||||||
Rain Chain#rainchainsweater |
||||||||||||||||
 |
 |
|||||||||||||||
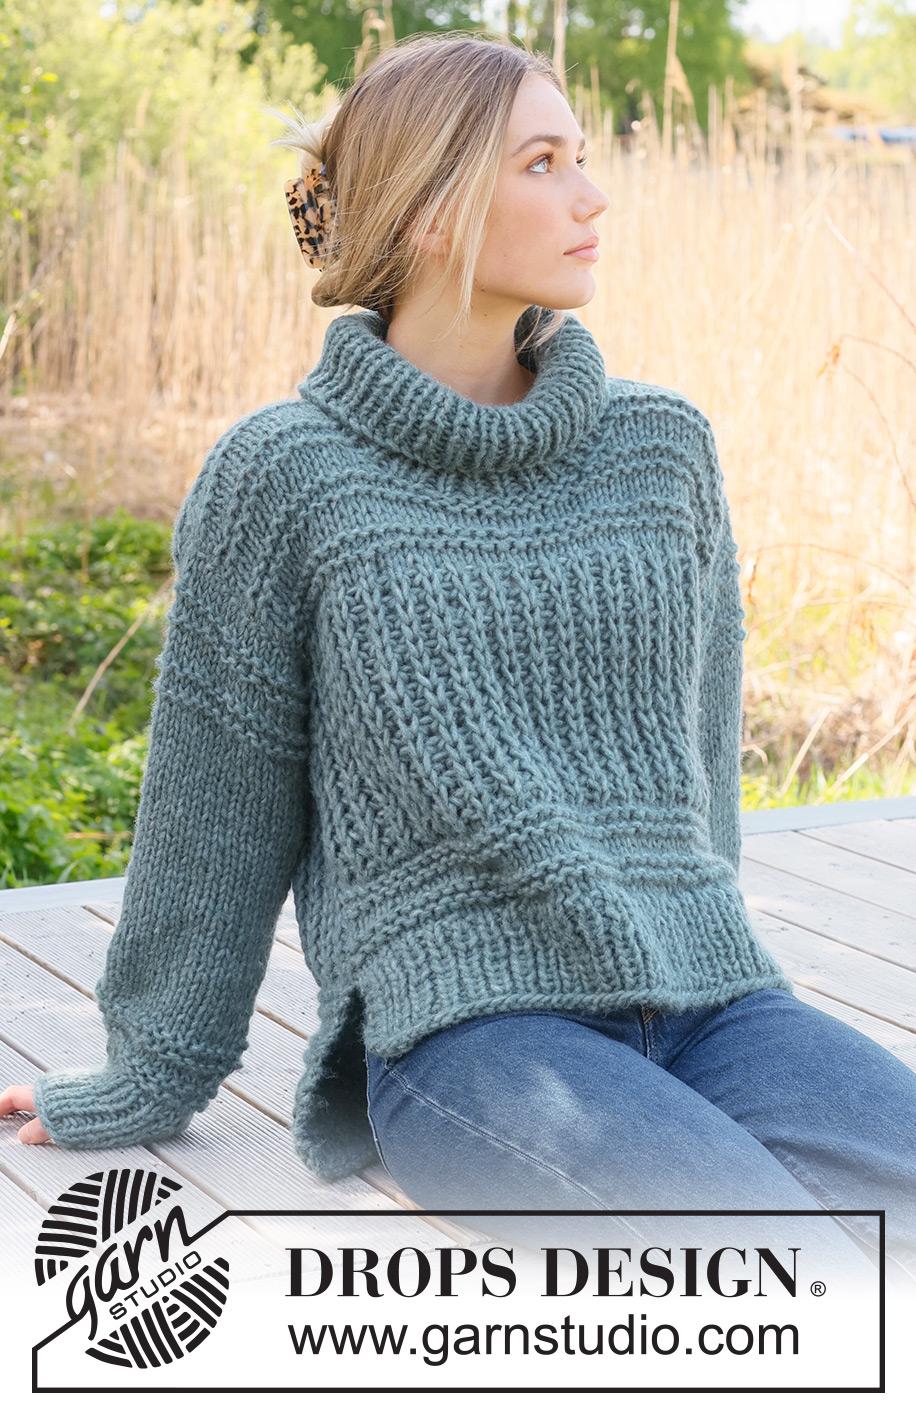
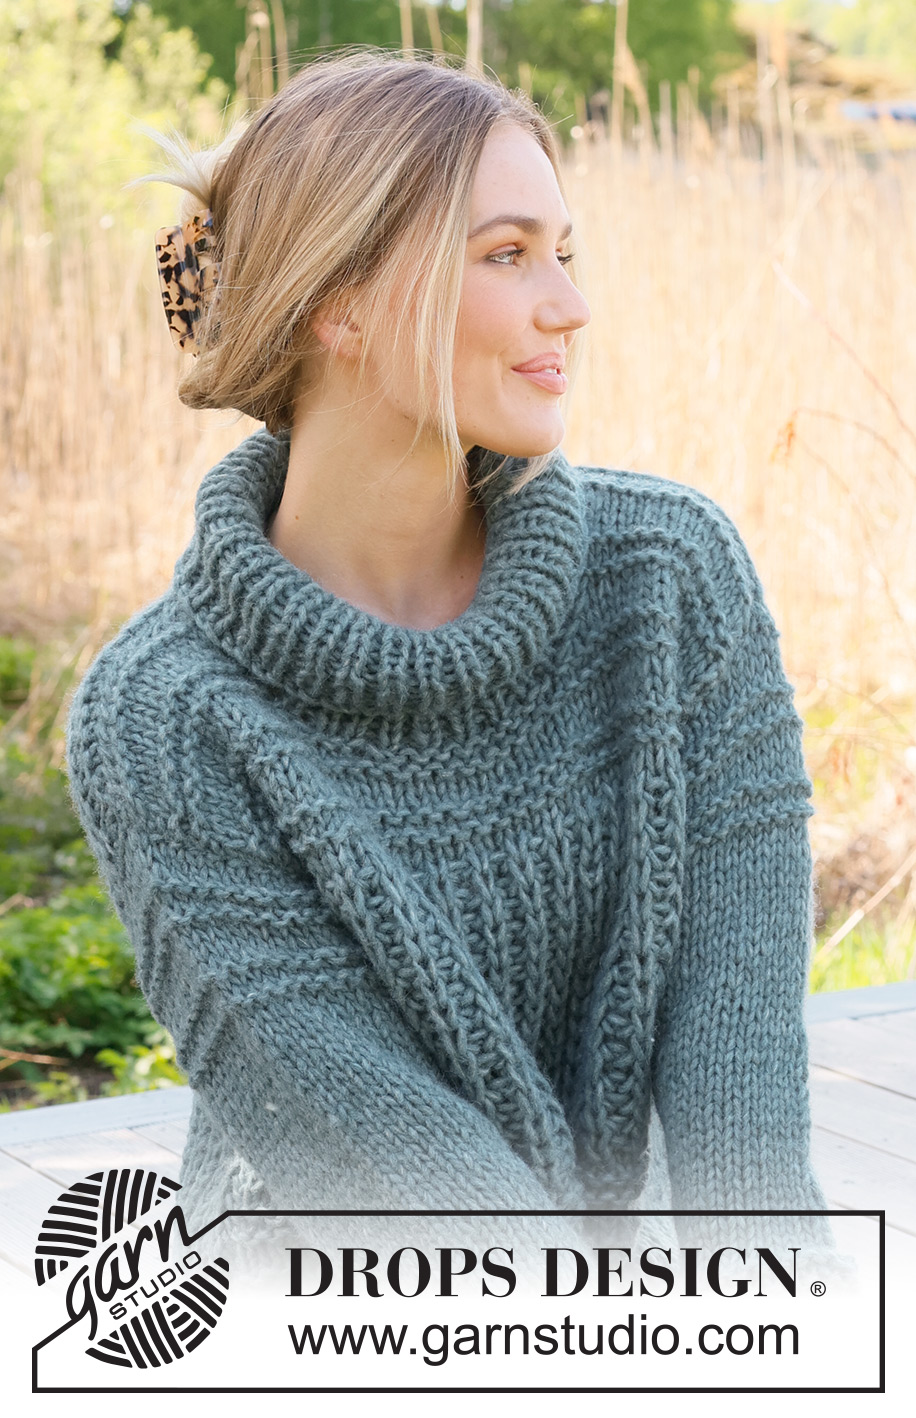
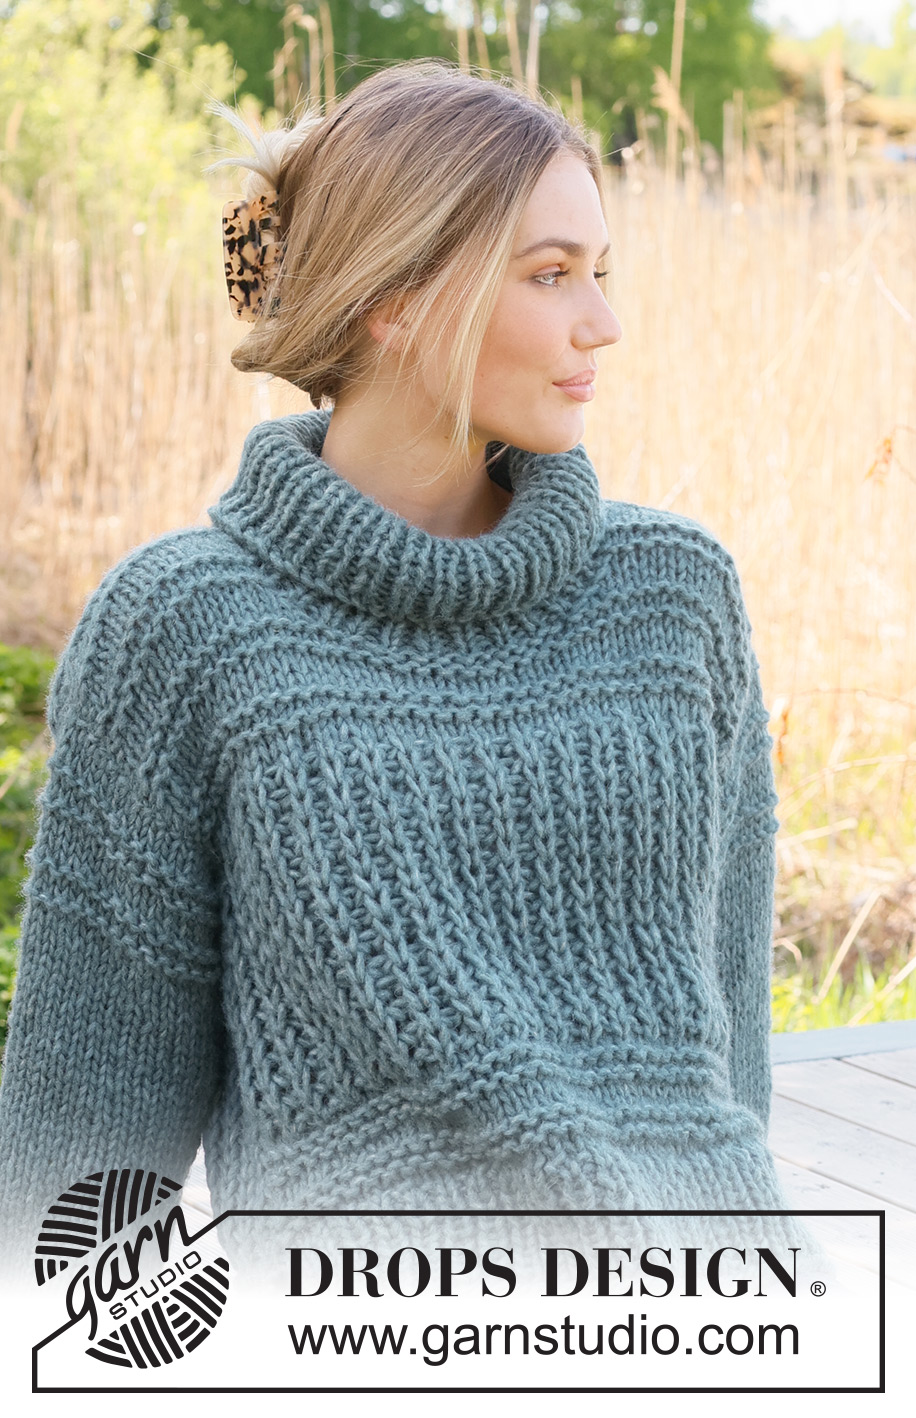
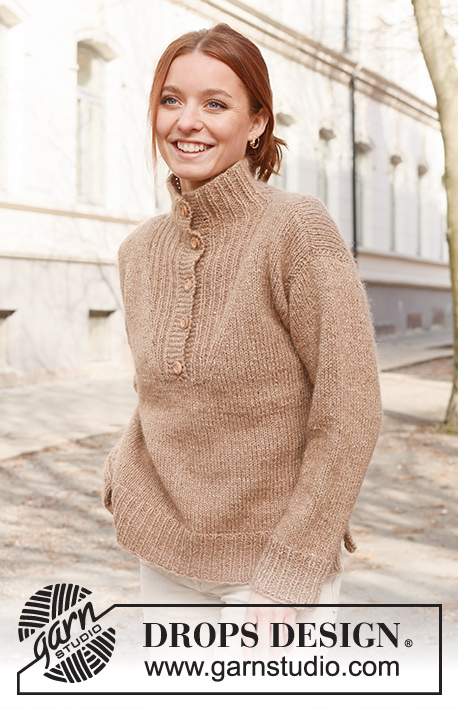
Knitted jumper in 1 strand DROPS Wish or 2 strands DROPS Air. The piece is worked bottom up with English rib, open garter stitch and split in the sides. Sizes S - XXXL.
DROPS 236-9 |
||||||||||||||||
|
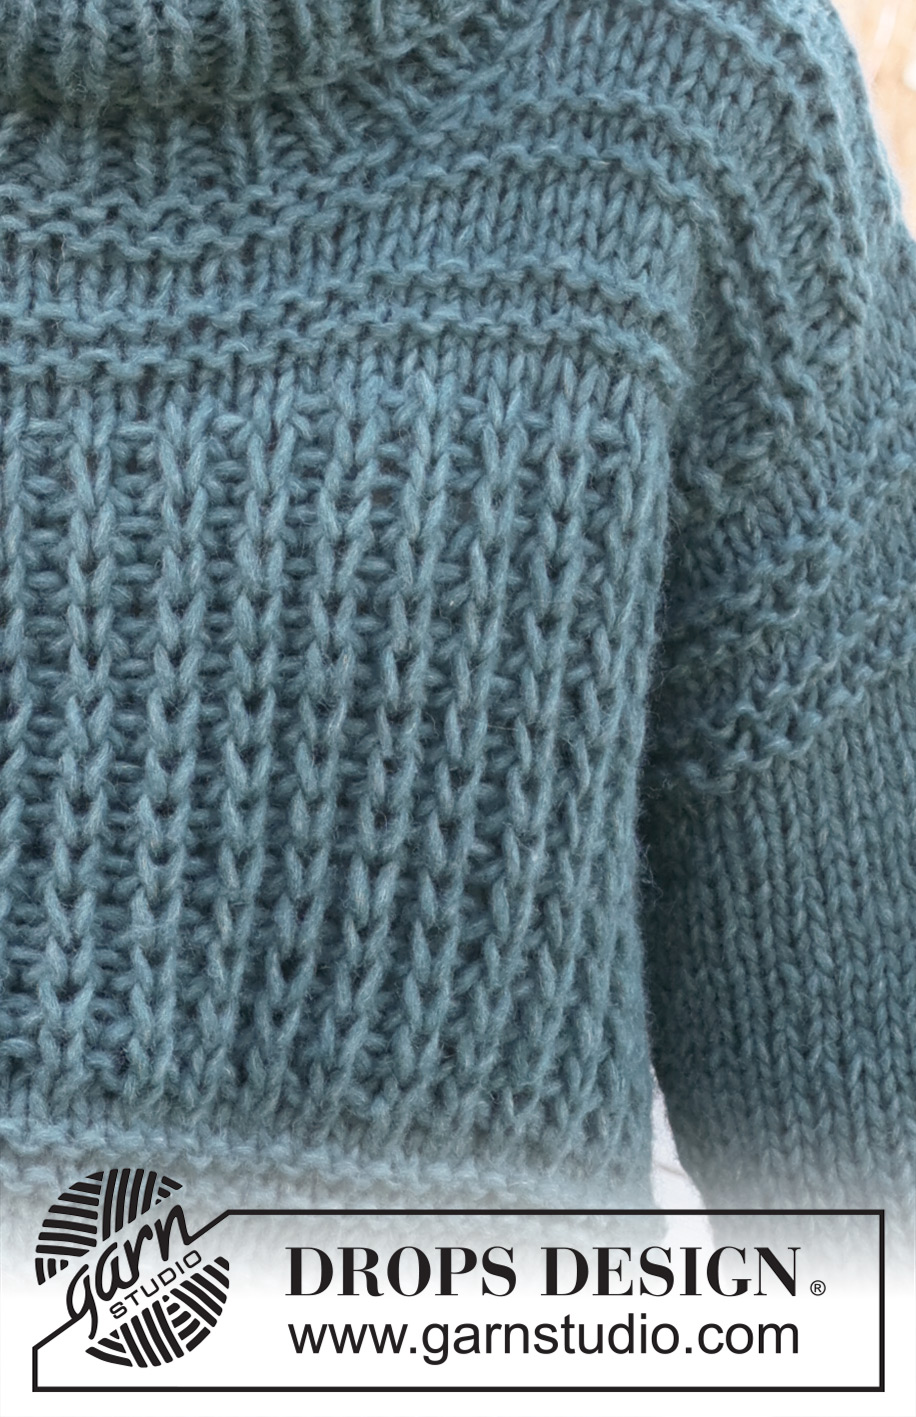
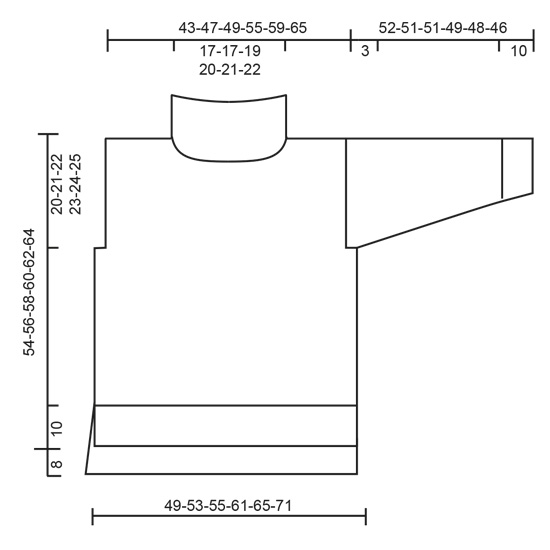
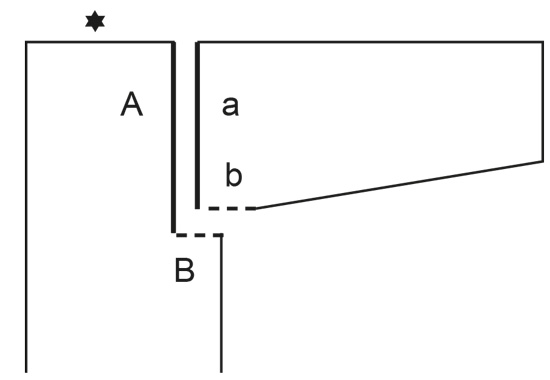
------------------------------------------------------- EXPLANATIONS FOR THE PATTERN: ------------------------------------------------------- PATTERN: See diagrams A.1 and A.2. The diagrams show all rows in the pattern from the right side. RIDGE/GARTER STITCH (worked back and forth): Knit all rows. 1 ridge = knit 2 rows. INCREASE TIP (for sleeves): Work until there is 1 stitch left before the marker thread, 1 yarn over, knit 2 (marker thread sits between these stitches), 1 yarn over. On the next round knit the yarn overs twisted to avoid holes. Then work the new stitches in stocking stitch. ------------------------------------------------------- JUMPER – SHORT OVERVIEW OF THE PIECE: The piece is worked in sections, back and forth and bottom up, then sewn together. The sleeves are worked in the round with double pointed needles/short circular needle bottom up. The back piece is 8 cm longer than the front. BACK PIECE: Cast on 59-63-67-73-79-85 stitches with circular needle size 8 mm and 1 strand DROPS Wish or 2 strands DROPS Air. Purl 1 row from the wrong side then work rib as follows from the right side: 2 edge stitches in GARTER STITCH – read description above, * knit 1, purl 1 *, work from *-* until there are 3 stitches left, knit 1 and 2 edge stitches in garter stitch. Continue this rib for 10 cm. Purl 1 row from the wrong side and decrease 10-10-12-12-14-14 stitches evenly spaced = 49-53-55-61-65-71 stitches. Change to circular needle size 9 mm. REMEMBER THE KNITTING TENSION! Work A.1, 2-2-2-3-3-3 times in height. Now work 1 row as follows from the right side: 1 edge stitch in garter stitch, * knit 1, purl 1 *, work from *-* until there are 2 stitches left, knit 1 and 1 edge stitch in garter stitch. Work A.2 (first row from the wrong side, reading the diagram from left to right and the pattern beginning and ending with 1 knitted stitch in English rib inside 1 edge stitch in garter stitch, seen from the right side). Continue A.2 onwards. When the piece measures 42-43-44-45-46-47 cm, cast off 3 stitches at the beginning of the next 2 rows for the armholes = 43-47-49-55-59-65 stitches. Continue A.2. When the piece measures 44-46-48-50-52-54 cm, purl the next row from the wrong side. Then work according to A.1. When the piece measures 60-62-64-66-68-70 cm, cast off the middle 13-13-15-15-17-17 stitches for the neck and finish each shoulder separately. Cast off 1 stitch on the next row from the neck = 14-16-16-19-20-23 stitches on the shoulder. Cast off when the piece measures 62-64-66-68-70-72 cm. Work the other shoulder in the same way. FRONT PIECE: Cast on and work in the same way as the back piece until the front measures 34-35-36-37-38-39 cm. Cast off 3 stitches at the beginning of the next 2 rows for the armholes = 43-47-49-55-59-65 stitches. Continue A.2. When the piece measures 36-38-40-42-44-46 cm, purl the next row from the wrong side. Then work according to A.1. When the piece measures 47-49-51-53-55-57 cm, work the neck as follows: Place the middle 9-9-11-11-13-13 stitches on a thread and finish each shoulder separately. Cast off for the neck every 2nd row as follows: 2 stitches 1 time, 1 stitch 1 time = 14-16-16-19-20-23 stitches on the shoulder. Cast off when the piece measures 54-56-58-60-62-64 cm. Work the other shoulder in the same way. SLEEVES: Cast on 30-32-32-34-34-36 stitches with double pointed needles size 8 mm and 1 strand DROPS Wish or 2 strands DROPS Air. Insert 1 marker-thread at the beginning of the round (mid-under sleeve). Knit 1 round, then work rib in the round (knit 1, purl 1) for 10 cm. Knit 1 round and decrease 3-3-3-3-3-3-3 stitches evenly spaced = 27-29-29-31-31-33 stitches. Change to double pointed needles size 9 mm. Work A.1, 2 times in height then continue with stocking stitch. AT THE SAME TIME when the sleeve measures 12 cm, increase 1 stitch on each side of the marker-thread – read INCREASE TIP. Increase like this every 5½-5½-5-4-3½-3½ cm a total of 7-7-7-8-9-9 times = 41-43-43-47-49-51 stitches. When the sleeve measures 43-42-42-40-39-37 cm, continue with A.1. When the sleeve measures 49-48-48-46-45-43 cm, work the sleeve cap back and forth (from mid-under sleeve) to finished length. Cast off when the sleeve measures 52-51-51-49-48-46 cm. Work the other sleeve in the same way. ASSEMBLY: Sew the shoulder seams. Sew in the sleeves, inside the 1 edge stitch and sew the bottom of the armholes – see sketch. Sew the side seams as far as the rib (= 10 cm split on the front piece, 18 cm on the back), sew in the outermost loop of the outermost stitch so the seam is flat. NECK: Start at the top of the right shoulder and knit up (including the stitches on the thread) 60 to 72 stitches with short circular needle size 8 mm and 1 strand DROPS Wish or 2 strands DROPS Air. The number of stitches should be divisible by 2. Work rib in the round (knit 1, purl 1) for 20-20-20-22-22-22 cm. Cast off. |
||||||||||||||||
Diagram explanations |
||||||||||||||||
|
||||||||||||||||
 |
||||||||||||||||
 |
||||||||||||||||
 |
||||||||||||||||
Have you finished this pattern?Tag your pictures with #dropspattern #rainchainsweater or submit them to the #dropsfan gallery. Do you need help with this pattern?You'll find 34 tutorial videos, a Comments/Questions area and more by visiting the pattern on garnstudio.com. © 1982-2025 DROPS Design A/S. We reserve all rights. This document, including all its sub-sections, has copyrights. Read more about what you can do with our patterns at the bottom of each pattern on our site. |
||||||||||||||||


With over 40 years in knitting and crochet design, DROPS Design offers one of the most extensive collections of free patterns on the internet - translated to 17 languages. As of today we count 320 catalogues and 12094 patterns translated into English (UK/cm). 12094
We work hard to bring you the best knitting and crochet have to offer, inspiration and advice as well as great quality yarns at incredible prices! Would you like to use our patterns for other than personal use? You can read what you are allowed to do in the Copyright text at the bottom of all our patterns. Happy crafting!
Post a comment to pattern DROPS 236-9
We would love to hear what you have to say about this pattern!
If you want to leave a question, please make sure you select the correct category in the form below, to speed up the answering process. Required fields are marked *.