
Looking for a yarn?


Comments / Questions (201)
![]() Helena wrote:
Helena wrote:
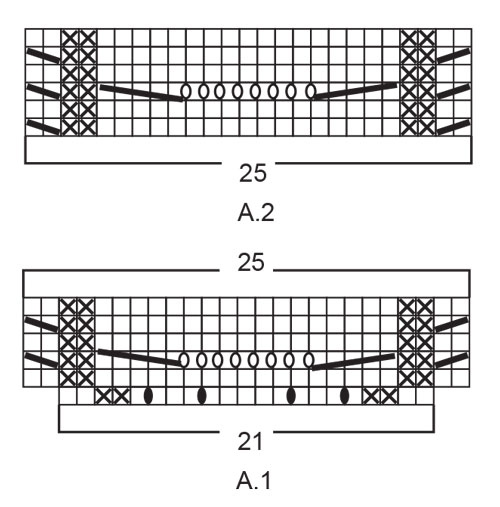
När jag stickar A1 varv 1 har jag 21 maskor till ärmen. Med raglan ökar jag till 23 inom ärmen, men enligt mönstret ska jag ha 25. Det går inte ihop. Har sett att ni svarat någon ovan att man ökar 4 maskor på varv 1, men två av dem hamnar på fram resp bakstycket, inte ärmen.
15.02.2024 - 13:12DROPS Design answered:
Hej Helena, de 4 masker du tager ud ifølge A.1 havner i A.1 så der nu er 25 masker :)
23.02.2024 - 10:57
![]() Sofie Beyers wrote:
Sofie Beyers wrote:
Na het breien van rij 1 van telpatroon A1 eindig je met een R. Je moet echter ook met een R beginnen in rij2. Maar dan komen de R over elkaar en de AR ook. Volgens het telpatroon is dit niet. Verder zit je dan al met 17 steken tussen de 2 AR steken. Je meerdert in het midden van het patroon maar de steken moeten er langst de buitenkant bij?
24.01.2024 - 21:04DROPS Design answered:
Dag Sofie,
In de eerste naald van A.1 meerder je 4 steken in totaal, waardoor je op 25 steken komen. De 2 averecht van de volgende naald aan beide kanten, komen boven de averechte steken van de eerste naald.
28.01.2024 - 19:17
![]() Karin wrote:
Karin wrote:
Hei Jeg har strikket i mange år og føler med dreven, men på møsnter A1 forstår jeg ikke hvordan det skal gjøres. Det mangler jo masker for å få andre omgang til å gå opp. Blir ikke klok av forklaringen som er gitt de andre med samme spørsmål heller. Håper dere kan gi en god beskriveles i str. M og kanskje endre på oppskriften da mange ikke forstår hva som menes. Mvh Karin
13.01.2024 - 20:24DROPS Design answered:
Hej Karin, jo, på første (nederste) pind i A.1 laver du 4 omslag ifølge diagrammet, så du får 25 masker, så du kan fortsætte diagrammet ned over ærmet. Plus at du samtidig tager ud til raglan, det gør du før og efter hver raglan overgang = 8 udtagninger til raglan.
16.01.2024 - 12:13
![]() Minna Avrin wrote:
Minna Avrin wrote:
Jag har från början 98 maskor, stlk L. Att öka 8 vartannat varv ger 24 m under A1 plus de 4 som ska ökas på första varvet i A1, ger totalt 126 maskor. Men enligt mönstret ska jag ha 130 maskor när A1 stickats en gång. Vad har jag missat?
16.12.2023 - 17:20DROPS Design answered:
Hei Minna. Har du husket de 4 maskene du satte de 4 merkene i? Tell 13 masker, sett 1 merketråd i neste maske, tell 21 masker (= erme), sett 1 merketråd i neste maske, tell 26 masker (= forstykke), sett 1 merketråd i neste maske, tell 21 masker (= erme), sett 1 merketråd i neste maske, det er 13 masker på pinnen etter siste merketråd. 13+1+21+1+26+1+21+1+13= 98 masker. Så 4 + 4 masker i første omgang i A.1 + 24 raglansmasker = 98+8+24=130 masker. mvh DROPS Design
18.12.2023 - 09:07
![]() Saija wrote:
Saija wrote:
Mistä langasta tämä kannattaisi tehdä, jos ei haluaisi niin helposti nyppyyntyvää, kuin Air, mutta kuitenkin mielellään kevyen/ilmavan? Sain yhden paidan Air-langasta ja olin yllättynyt miten nopeasti (1-2 käyttökerran jälkeen) paita oli nyppyyntynyt.
01.12.2023 - 21:42DROPS Design answered:
Voit vaihtaa esim. DROPS Alpaca Bouclé -lankaan tai DROPS Brushed Alpaca Silk -lankaan.
05.12.2023 - 18:02
![]() Jenny wrote:
Jenny wrote:
Jeg strikk Str: M .Etter strikk A.1. Maske blir 16+1+33+1+32+1+33+1+16, total er 134, er ikke 126, hvor har jeg strikk feil?
31.10.2023 - 10:26DROPS Design answered:
Hej Jenny, str M: 94 m = 12,1,21,1,24,1,21,1,12. Du tager 4 masker ud i A.1x2=8m og 8 masker ud til raglan 3 gange = 24=126 masker (15,1,3,25,3,1,30,1,3,25,3,1,15=126m)
31.10.2023 - 11:34
![]() Jenny wrote:
Jenny wrote:
Takk for svar! Strikker 1. omgang av A.1 øker du med 4 x 2 masker iflg. A.1. Men strikk A.1. først omgang da blir 25 masker på A1. Hva har jeg gjørt feil?
30.10.2023 - 11:48DROPS Design answered:
Hej Jenny, hver udtagning på 1.pind i A.1 er en ny maske, du starter med 21 masker, tager ud på første omgang og har nu 25 masker. Diagrammet på hvert ærme strikkes nu over 25 masker :)
31.10.2023 - 08:44
![]() Jenny wrote:
Jenny wrote:
Hi, BÆRESTYKKE, Videre strikkes det glattstrikk over maskene på forstykket og på bakstykket, og A.1 (= 21 masker) over maskene på hvert erme, SAMTIDIG på første omgang starter økning til RAGLAN i hver overgang mellom bol og ermer – les forklaring over. Fortsett med økning til raglan på hver 2. omgang. Når A.1 er strikket 1 gang i høyden er det 122-126-130-134-138-142 masker , er det masker rett? Hvorfor jeg strikk erme er mer masker? Erme er 25+8 masker.
29.10.2023 - 13:17DROPS Design answered:
Hei Jenny. Ja, dette maske antallet er riktig = 122-126-130-134-138-142 masker. I f.eks str S har du 90 masker og når du strikker 1. omgang av A.1 øker du med 4 x 2 masker iflg. A.1. Dvs når du starter på 2. omgang har du 98 masker, så starter du med raglan økninger. Du øker på hver 2. omgang = 3 økeomganger når A.1 er strikket 1 gang i høyden. På hver økeomgang økes det med 8 masker. 8 masker x 3 økeomganger = 24 masker + de 98 maskene man hadde = 122 masker, som det står i oppskriften. mvh DROPS Design
30.10.2023 - 11:12
![]() Klaudia wrote:
Klaudia wrote:
Ik vroeg me af of de kleine kabels aan het begin en eind van A.1 en A.2 op de ander mouw in spiegelbeeld gebreid moeten worden? A.2: Je begint met een steek breien met de kabelnld achter het werk en je eindigd met een steek breien met de kabelnld voor het werk en dan achterpand en de andere mouw. Begin ik dan een steek breien met de kabelnld voor het werk? En eindig ik met de kabelnld achter het werk?
28.09.2023 - 01:08
![]() Fontaine wrote:
Fontaine wrote:
Bonjour, au début du 3 ème rang de A1, j’ai des difficultés pour faire la torsade sur 2 mailles car il me manque une maille. A partir du marqueur, j’ai le jeté du raglan ( c’est ma 2éme augmentation du raglan) et une maille endroit puis les 2 mailles envers. Merci pour votre réponse.
27.08.2023 - 09:19
|
|||||||||||||||||||||||||
Bronze Summer Sweater#bronzesummersweater |
|||||||||||||||||||||||||
 |
 |
||||||||||||||||||||||||
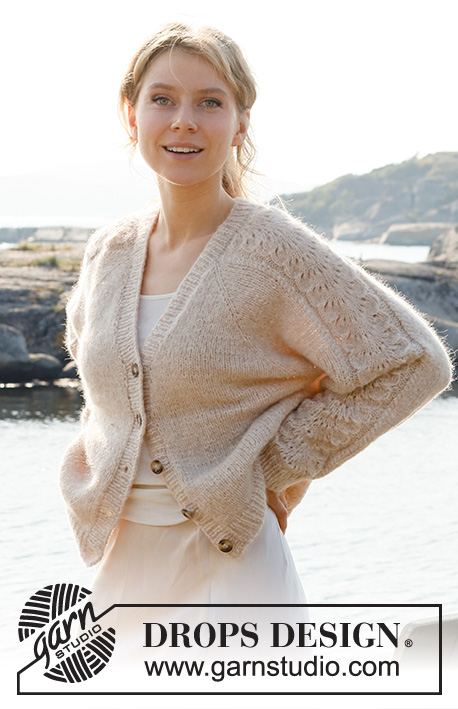
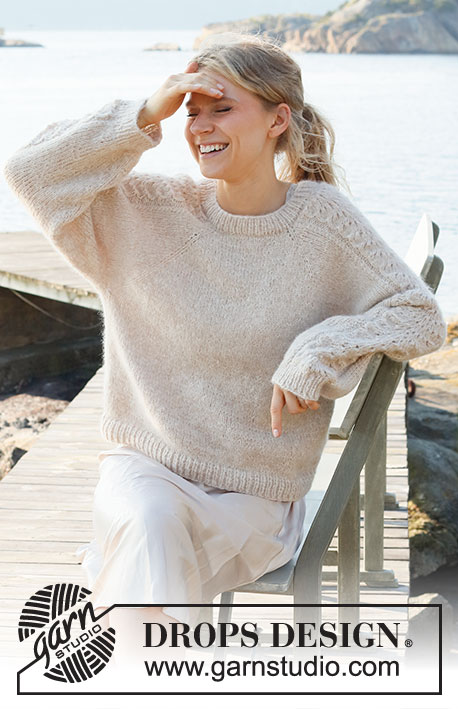
Knitted jumper in DROPS Air. Piece is knitted top down with raglan and lace pattern on sleeves. Size: S - XXXL
DROPS 221-3 |
|||||||||||||||||||||||||
|
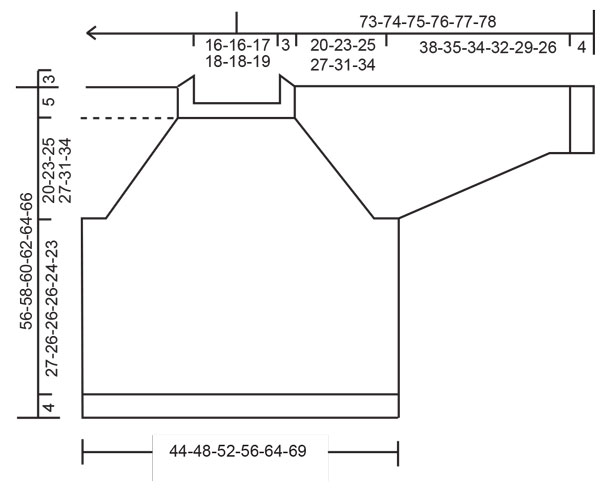
------------------------------------------------------- EXPLANATION FOR THE PATTERN: ------------------------------------------------------- PATTERN: See diagrams A.1 and A.2. RAGLAN: Increase 1 stitch on each side of 1 stitch in stocking stitch (stitch with marker) in every transition between body and sleeves (= 8 stitches increased on round). Increase 1 stitch by making 1 yarn over. On next round work yarn overs twisted to avoid holes. Then work the new stitches in stocking stitch. DECREASE TIP (applies to sleeves): Decrease 1 stitch on each side of marker thread as follows: Work until 3 stitches remain before marker thread and knit 2 together, knit 2 (marker thread is between these stitches), slip 1 stitch knitwise, knit 1, pass slipped stitch over stitch worked. CAST-OFF TIP: To avoid a tight cast-off edge you may use a larger needle size. If this also is too tight, work a 1 yarn over after approx. every 4th stitch while casting off (cast off yarn overs as regular stitches). ------------------------------------------------------- START THE PIECE HERE: ------------------------------------------------------- JUMPER - SHORT OVERVIEW OF THE PIECE: Work yoke in the round on circular needle from mid back, top down. AT THE SAME TIME increase for raglan. Now divide yoke for body and sleeves. Body is worked in the round on circular needle, top down. Work sleeves in the round on double pointed needles/short circular needle, top down. YOKE: Cast on 90-94-98-102-106-110 stitches on circular needle size 4 mm with Air. Knit 1 round. Work rib (= knit 1/purl 1) over all stitches for 3 cm. Switch to circular size 5 mm and insert 1 marker here, now measure piece from here. Insert 4 marker threads in piece as follows (without working the stitches): Count 11-12-13-14-15-16 stitches (= half back piece), insert 1 marker thread in next stitch, count 21 stitches (= sleeve), insert 1 marker thread in next stitch, count 22-24-26-28-30-32 stitches (= front piece), insert 1 marker thread in next stitch, count 21 stitches (= sleeve), insert 1 marker thread in next stitch, 11-12-13-14-15-16 stitches remain on row after last marker thread (= half back piece). Work in stocking stitch over stitches on front piece and on back piece, and A.1 (= 21 stitches) over stitches on each sleeve, AT THE SAME TIME on first round start increase for RAGLAN in every transition between body and sleeves – read explanation above. Continue increases for raglan every other round. When A.1 has been worked 1 time vertically there are 122-126-130-134-138-142 stitches on round. Continue with A.2 (= 25 stitches) over stitches in A.1 with stocking stitch over front piece and back piece, and continue with increase for raglan every other round until increase has been done 22-25-27-29-33-36 times in total on each side of the 4 stitches with marker threads = 274-302-322-342-378-406. REMEMBER THE KNITTING TENSION! After last increase in raglan work without increases until piece measures 20-23-25-27-31-34 cm from marker. Work next round as follows: Work the first 34-38-41-44-49-53 stitches (= half back piece), slip the next 69-75-79-83-91-97 stitches on a stitch holder for sleeve, cast on 6-6-6-8-10-12 new stitches on needle (= in the side under sleeve), work the next 68-76-82-88-98-106 stitches (= front piece), slip the next 69-75-79-83-91-97 stitches on a stitch holder (= sleeve), cast on 6-6-6-8-10-12 new stitches on needle (= in the side under sleeve), work the remaining 34-38-41-44-49-53 stitches (= half back piece). NOW MEASURE PIECE FROM HERE! BODY: = 148-164-176-192-216-236 stitches. Continue in stocking stitch until piece measures 27-26-26-26-24-23 cm from division. Switch to circular needle size 4 mm. Work rib (= purl 1/knit 1) over all stitches. Continue rib like this for 4 cm. Loosely cast off with knit over knit and purl over purl, read CAST-OFF TIP. Jumper measures approx. 56-58-60-62-64-66 cm from shoulder. SLEEVE: Slip the 69-75-79-83-91-97 stitches from stitch holder in one side of piece on a short circular needle/double pointed needles size 5 mm and pick in addition up 1 stitch in each of the 6-6-6-8-10-12 stitches cast on in the side under sleeve = 75-81-85-91-101-109 stitches. Insert 1 marker thread in the middle of the 6-6-6-8-10-12 stitches under sleeve and move the marker thread upwards when working, it is used for decrease later. Begin round at the marker thread and continue with A.2 and stocking stitch in the round. When piece measures 3 cm from division, decrease 2 stitches mid under sleeve - read DECREASE TIP. Decrease like this every 3½-3-2-1½-1-1 cm 10-11-13-16-19-21 times in total = 55-59-59-59-63-67 stitches. Continue until piece measures 38-35-34-32-29-26 cm from division - or desired length (shorter measurements in the larger sizes because of longer yoke). Work 1 round while decreasing 11 stitches evenly over stitches in A.2 = 44-48-48-48-52-56 stitches. Switch to double pointed needles size 4 mm and work rib in the round = knit 1/purl 1 for 4 cm. Cast off with knit over knit and purl over purl (to avoid a tight cast-off edge use double pointed needles size 4 mm). Work the other sleeve the same way. |
|||||||||||||||||||||||||
Diagram explanations |
|||||||||||||||||||||||||
|
|||||||||||||||||||||||||
 |
|||||||||||||||||||||||||
 |
|||||||||||||||||||||||||
Have you finished this pattern?Tag your pictures with #dropspattern #bronzesummersweater or submit them to the #dropsfan gallery. Do you need help with this pattern?You'll find 30 tutorial videos, a Comments/Questions area and more by visiting the pattern on garnstudio.com. © 1982-2025 DROPS Design A/S. We reserve all rights. This document, including all its sub-sections, has copyrights. Read more about what you can do with our patterns at the bottom of each pattern on our site. |
|||||||||||||||||||||||||


With over 40 years in knitting and crochet design, DROPS Design offers one of the most extensive collections of free patterns on the internet - translated to 17 languages. As of today we count 320 catalogues and 12094 patterns translated into English (UK/cm). 12094
We work hard to bring you the best knitting and crochet have to offer, inspiration and advice as well as great quality yarns at incredible prices! Would you like to use our patterns for other than personal use? You can read what you are allowed to do in the Copyright text at the bottom of all our patterns. Happy crafting!
Post a comment to pattern DROPS 221-3
We would love to hear what you have to say about this pattern!
If you want to leave a question, please make sure you select the correct category in the form below, to speed up the answering process. Required fields are marked *.