
Popular categories
Looking for a yarn?


Comments / Questions (85)
![]() Maya wrote:
Maya wrote:
Now work A.2, but continue with K and P as in A.1 in the orange section. Can you please explain this? There are no x for P on diagram A.2. Thank you!
17.11.2025 - 12:17DROPS Design answered:
Hi Maya, Across the orange stitches in A.2 (the open squares, you continue the knit and purl pattern from A.1 (knit above knit and purl above purl. But when working with colour green you just knit. By the 5th row in A.2 there are no longer any purled stitches. These purled stitches are not drawn into A.2. Regards, Drops Team.
18.11.2025 - 06:59
![]() Carla wrote:
Carla wrote:
Hei, Hvordan kan man overføre til en voksen hode? Hvor mange masker hadde dåkke tenkt for et hodet med 54cm omfang? Mvh Carla
12.11.2025 - 12:21DROPS Design answered:
Hei Carla. Sjekk oppskriftens strikkefasthet og regn ut hvor mange masker du trenger, og så må maskeantallet stemme med mønstret og fellingene. Evnt legg til 6 masker og strikk luen lengre, bare husk å ha et maskeantall som stemmer med diagram A.2 når det skal strikkes. amvh DROPS Design
17.11.2025 - 14:43
![]() Tina wrote:
Tina wrote:
Jeg er ved at strikke sweet pumpkin, jeg er usikker på det at tage ind når arbejdet måler 9 cm(strikker str.2-4 år). Er det kun 2 ret sammen eller også drejet ret sammen?
03.11.2025 - 09:59DROPS Design answered:
Hei Tina. Det felles bare jevnt fordelt (2 rett sammen) over rettmasker. mvh DROPS Design
03.11.2025 - 10:50
![]() Michaela Garbotz wrote:
Michaela Garbotz wrote:
Mir hat es sehr gefallen, das Modell nachzuarbeiten. Auf den Stiel habe ich jedoch verzichtet. Dake für dietolle Idee
25.10.2025 - 20:21
![]() Silvia wrote:
Silvia wrote:
Cuando la pieza mida 7-8-9-10-12 cm, dism 3-0-6-3-0 pts distribuidos equitativamente = 81-90-90-99-108 pts. No entiendo lo de las disminuciones
07.10.2025 - 02:11DROPS Design answered:
Hola Silvia, quiere decir que montas 84-90-96-102-108 cm y cuando la labor mida 7-8-9-10-12 cm, dism 3-0-6-3-0 pts distribuidos equitativamente = 81-90-90-99-108 pts. Por lo tanto, disminuyes 3 o 6 puntos (según la talla, en algunas tallas no disminuyes) repartidos. Puedes leer aquí cómo calcular para disminuir puntos repartidos.
12.10.2025 - 12:11
![]() Dorothea wrote:
Dorothea wrote:
Nach A2 in jeder 2. Reihe abnehmen? Das wird viel zu hoch.
10.09.2025 - 17:24DROPS Design answered:
Hi Dorothea, yes, you have to decrease every other round after diagram A.2 > one round is with decreases, another round without decreases, etc. Happy knitting!
26.09.2025 - 10:27
![]() Catherine wrote:
Catherine wrote:
Bonjour, j ai acheté la laine karisma pour tricoter ce joli bonnet! mais je me pose une question, sur la pelote on préconise des aiguilles 4, or, vous demandez de tricoter avec des aiguilles 3,5...que dois je faire? merci pour votre réponse Catherine
06.11.2024 - 12:06DROPS Design answered:
Bonjour Catherine, avec les aiguilles 4, on a en général une tension de 21 mailles pour 10 cm, ici, on veut une tension un peu plus serrée: 22 mailles pour 10 cm, on a utilisé pour cela des aiguilles 3,5. Pensez à bien vérifier votre tension et adaptez la taille des aiguilles si besoin. Bon tricot!
06.11.2024 - 12:23
![]() Marina wrote:
Marina wrote:
Does the decreasing start after I finish the A2 pattern ? Hope so, because I just struggled through it without decreasing.
20.10.2024 - 22:54DROPS Design answered:
Dear Marina, after finishing A.2, work only in forest green and it's here that you start decreasing. Happy knitting!
20.10.2024 - 23:08
![]() Anne wrote:
Anne wrote:
Can you please let me know what the gague is for this hat? I don't know if my yarn is the same if I don't know how many stitches you are getting to the inch. Thank you
11.10.2024 - 19:31DROPS Design answered:
Dear Anne, the gauge is indicated in the materials section, where the needle sizes are stated: DROPS DOUBLE POINTED NEEDLES and CIRCULAR NEEDLE (40 cm / 16") SIZE 3.5 mm/ US 4 - or size needed to get 22 sts x 30 rows = 4" x 4" (10 x 10 cm). So the gauge would be: 22 sts x 30 rows = 4" x 4" (10 x 10 cm). Happy knitting!
13.10.2024 - 20:37
![]() Bev Jarvis wrote:
Bev Jarvis wrote:
Seems like the stem could be worked as an I-cord?
20.09.2024 - 03:11DROPS Design answered:
Dear Mrs Jarvis, there might be too much stitches to work as an I-Cord, see in this video how to work the stem. Happy knitting!
20.09.2024 - 08:55
|
||||||||||
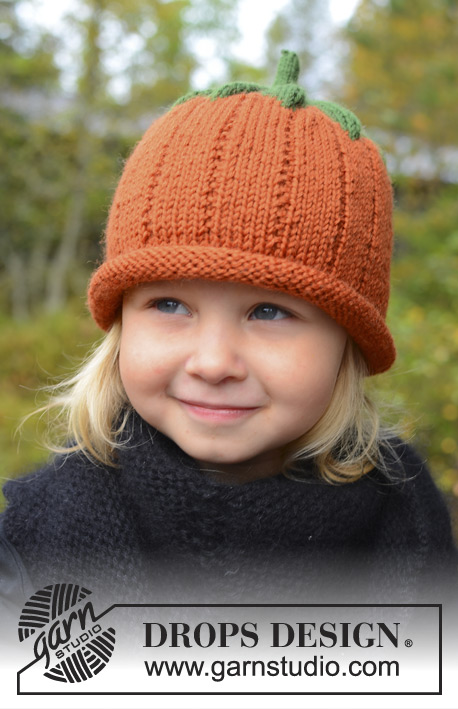
Sweet Pumpkin#sweetpumpkinhat |
||||||||||
 |
 |
|||||||||
Knitted hat for baby and children in DROPS Karisma. Sizes 0 - 8 years. Theme: Halloween
DROPS Extra 0-966 |
||||||||||
|
PATTERN: See diagrams A.1 and A.2. Pattern in diagrams are seen from RS. ---------------------------------------------------------- HAT: Cast on 84-90-96-102-108 sts with orange on double pointed or circular needles size 3.5 mm / US 4. P 1 round, then work in stockinette st. REMEMBER THE GAUGE! When piece measures 6 cm / 2½", insert 1 marker (= rolling edge), now measure the piece from here and work according to diagram A.1. When piece measures 7-8-9-10-12 cm / 2¾"-3"-3½"-4"-4¾", dec 3-0-6-3-0 sts evenly = 81-90-90-99-108 sts. Then insert 9-10-10-11-12 markers in the piece 9 sts apart. First st after first marker = first st in A.2. Now work A.2, but continue with K and P as in A.1 in the orange section. After A.2 work with forest green until finished - AT THE SAME TIME dec every other round: 1 st on right side of all markers until 9-10-10-11-12 sts remain on needle. Switch to double pointed needles size 2 mm and work 3 cm / 1" over these sts for stem. Pull yarn through the remaining sts and fasten. |
||||||||||
Diagram explanations |
||||||||||
|
||||||||||
 |
||||||||||
Have you finished this pattern?Tag your pictures with #dropspattern #sweetpumpkinhat or submit them to the #dropsfan gallery. Do you need help with this pattern?You'll find 10 tutorial videos, a Comments/Questions area and more by visiting the pattern on garnstudio.com. © 1982-2026 DROPS Design A/S. We reserve all rights. This document, including all its sub-sections, has copyrights. Read more about what you can do with our patterns at the bottom of each pattern on our site. |
||||||||||


With over 40 years in knitting and crochet design, DROPS Design offers one of the most extensive collections of free patterns on the internet - translated to 17 languages. As of today we count 324 catalogs and 12290 patterns - 12280 of which are translated into English (US/in).
We work hard to bring you the best knitting and crochet have to offer, inspiration and advice as well as great quality yarns at incredible prices! Would you like to use our patterns for other than personal use? You can read what you are allowed to do in the Copyright text at the bottom of all our patterns. Happy crafting!
Post a comment to pattern DROPS Extra 0-966
We would love to hear what you have to say about this pattern!
If you want to leave a question, please make sure you select the correct category in the form below, to speed up the answering process. Required fields are marked *.