
Looking for a yarn?


Comments / Questions (28)
![]() Navkiran wrote:
Navkiran wrote:
Good
11.01.2025 - 23:31
![]() Anki Jansson wrote:
Anki Jansson wrote:
Lek.
24.04.2024 - 11:36
![]() Anki Jansson wrote:
Anki Jansson wrote:
Hej, jag tänker sticka min första tröja men vart ser jag bröstkorgsmåttet, jag har 112 cm vilken storlek motsvarar detta ? Jag ser bara mått nedtill respektive upptill på tröjan, jag vill ej att den ska vara för liten. Jag uppskattar er sida, har ni någon nybörjarvänlig kortärmad tröja ?
23.04.2024 - 11:23
![]() Leya wrote:
Leya wrote:
Hur hittar jag stickorna till detta mönster?
10.04.2024 - 23:04
![]() Glynne wrote:
Glynne wrote:
This was the first jersey pattern I ever made. The instructions were easy to follow and the neckline was simple yet effective. Highly recommend. Thank you. Ngā mihi nui
01.04.2024 - 10:19
![]() Eva wrote:
Eva wrote:
Hi, it is such a beautiful tunic, l have knitted two of this last year . However, the amount of drops snow l ordered seems to be too much . The pattern states 850 g so l ordered 17 balls and ended up with 6 extra . That is the same with alpaca silk, l ordered 6 balls as the pattern asked for 150 g. What am l doing wrong? I follow all instructions, gauge same as pattern. Thank you for your advice.
25.01.2024 - 12:01DROPS Design answered:
Dear Eva, thanks for your feedback, this has been forwarded to our designer team. Happy knitting!
26.01.2024 - 08:25
![]() Melody Parkes wrote:
Melody Parkes wrote:
Thank you for your response. Please note that the diagram that I can now see was not included on my pattern.
18.08.2023 - 16:50
![]() Melody Parkes wrote:
Melody Parkes wrote:
Your pattern DROPS 213-30refers to the diagram showing A1 can you please clarify, is this garter stitch or is it Moss stitch as it doesn't show on the diagram or in the abbreviations. A super quick response would be much appreciated
18.08.2023 - 10:47DROPS Design answered:
Dear Mrs Parkes, diagram A.1 is worked in moss stitch - please find more explanations about diagrams in this lesson. Happy knitting!
18.08.2023 - 16:07
![]() Marie wrote:
Marie wrote:
La grosseur des aiguilles recommandées me paraissent énormes ! Faut-il vraiment du 12 et 15 ,,? Et où les trouver ,? Sur le site où j’achète les laines (Kalidou) il n’y a pas ces grosseurs ; merci de votre aide
23.01.2022 - 19:40DROPS Design answered:
Bonjour Marie, On tricote ici effectivement avec 1 fil Snow (groupe E) + 1 fil Brushed Alpaca Silk (groupe C), pour obtenir l'échantillon, nous avons utilisé des aiguilles 15; vous pourrez en trouver en version circulaire bouleau ou bien DROPS Classic, interchangeables. Bon tricot!
24.01.2022 - 10:00
![]() Audrey wrote:
Audrey wrote:
Ah mais oui ! J'ai mal calculé après le nombre de mailles à rabattre. Merci de votre réponse.
09.11.2021 - 13:45
|
|||||||
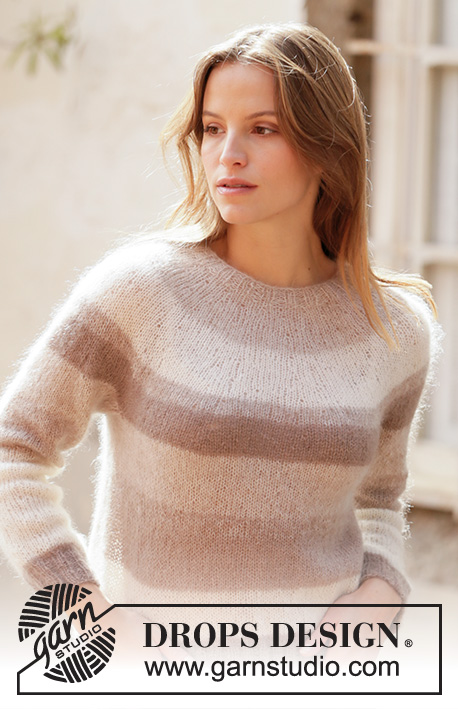
White Comfort Sweater#whitecomfortsweater |
|||||||
 |
 |
||||||
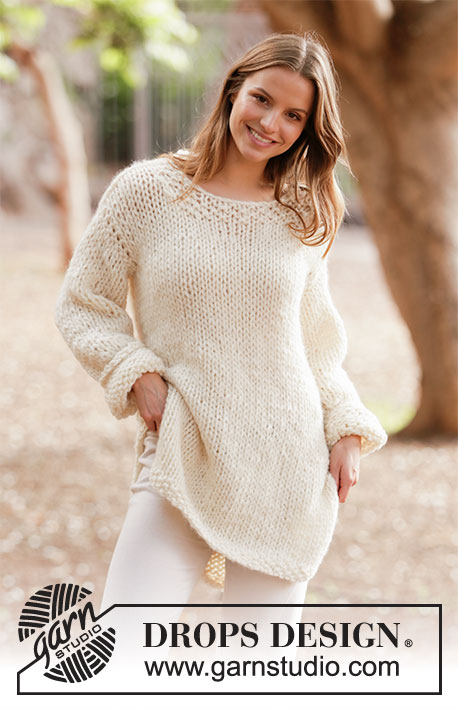
Knitted sweater with split in sides in DROPS Snow and DROPS Brushed Alpaca Silk. Sizes XS - XXL.
DROPS 213-30 |
|||||||
|
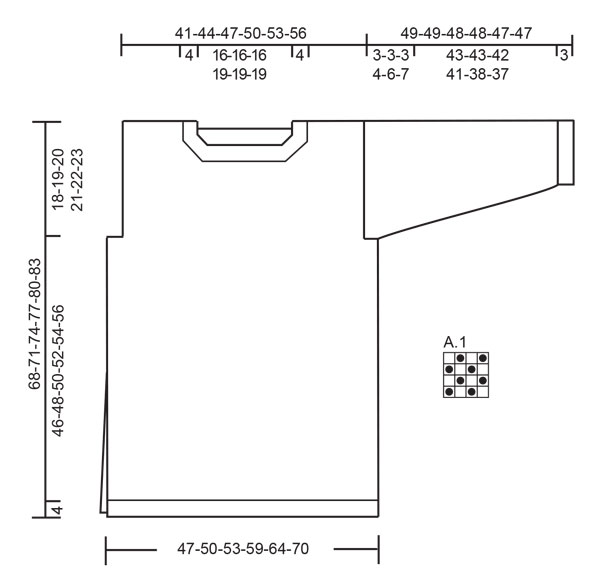
------------------------------------------------------- EXPLANATIONS FOR THE PATTERN: ------------------------------------------------------- RIDGE/GARTER STITCH (worked back and forth): Knit all rows. 1 ridge in height = Knit 2 rows. PATTERN: See diagram A.1. The diagram shows all rows in the pattern seen from the right side. MEASURING TIP: All width-measurements are taken with the piece lying flat and without stretching. All length-measurements are taken holding the piece up or the sweater will be too long when worn. . DECREASE TIP (for neck-line): Decrease for the neck on the inside of the 4 edge stitches in moss stitch (A.1). All decreases are worked from the right side! Decrease as follows before the 4 edge stitches: Start 2 stitches before A.1, knit 2 together, work 4 edge stitches in A.1 as before (= 1 stitch decreased). Decrease as follows after the 4 edge stitches: Work 4 edge stitches in A.1 as before, slip 1 stitch as if to knit, knit 1 and pass the slipped stitch over the knitted stitch (= 1 stitch decreased). INCREASE TIP (for sleeves): Increase on the inside of the 1 edge stitch in garter stitch, alternately at the beginning and end of the row as described in the text. Increase 1 stitch by making 1 yarn over. On the next row work the yarn over twisted to avoid a hole. ------------------------------------------------------- START THE PIECE HERE: ------------------------------------------------------- SWEATER – SHORT OVERVIEW OF THE PIECE: The back and front pieces and the sleeves are worked back and forth, bottom up. The piece is sewn together at the shoulders, the sleeves are sewn in and the underarm and side seams are sewn in one go, as far as the split on each side. BACK PIECE: Cast on 33-35-37-41-45-49 stitches with needle size 12 mm = US 17 and 1 strand of each quality (= 2 strands). Work A.1 back and forth for 4 rows (row 1 = right side). Change to needle size 15 mm = US 19 and continue with stockinette stitch with 1 edge stitch in GARTER STITCH on each side – read description above. REMEMBER THE KNITTING GAUGE! When the piece measures 50-52-54-56-58-60 cm = 19¾"-20½"-21¼"-22"-22¾"-23⅝" – read MEASURING TIP, bind off 2-2-2-3-4-5 stitches at the beginning of the next 2 rows for the armholes = 29-31-33-35-37-39 stitches left. Continue with stockinette stitch and 1 edge stitch in garter stitch on each side. When the piece measures 61-64-67-70-73-76 cm = 24"-25¼"-26⅜"-27½"-28¾"-30", work A.1 over the middle 17-17-17-19-19-19 stitches (the other stitches are worked in stockinette stitch with 1 edge stitch in garter stitch on each side as before). When the piece measures 65-68-71-74-77-80 cm = 25½"-26¾"-28"-29⅛"-30⅜"-31½", bind off the middle 9-9-9-11-11-11 stitches for the neck and each shoulder is finished separately. Continue as before with 4 edge stitches in A.1 towards the neck, stockinette stitch and 1 edge stitch in garter stitch towards the side. AT THE SAME TIME decrease 1 stitch for the neck on the next row from the neck – read DECREASE TIP = 9-10-11-11-12-13 stitches left on shoulder. When there is 1 row left before the piece measures 68-71-74-77-80-83 cm = 26¾"-28"-29⅛"-30⅜"-31½"-32¾", knit the next row from the wrong side, then bind off with knit from the right side. Work the other shoulder in the same way. The back piece measures approx. 68-71-74-77-80-83 cm = 26¾"-28"-29⅛"-30⅜"-31½"-32¾" from the shoulder down. FRONT PIECE: Cast on and work in the same way as the back piece until the piece measures 58-61-63-66-68-71 cm = 22¾"-24"-24¾"-26"-26¾"-28". Now work A.1 over the middle 15-15-15-17-17-17 stitches (the other stitches are worked in stockinette stitch with 1 edge stitch in garter stitch on each side as before). When the piece measures 62-65-67-70-72-75 cm = 24⅜"-25½"-26⅜"-27½"-28⅜"-29½", bind off the middle 7-7-7-9-9-9 stitches for the neck and each shoulder is finished separately. Continue with 4 edge stitches in A.1 towards the neck, stockinette stitch and 1 edge stitch in garter stitch towards the side. AT THE SAME TIME decrease 1 stitch for the neck every 2nd row a total of 2 times – remember DECREASE TIP = 9-10-11-11-12-13 stitches left on the shoulder. When there is 1 row left before the piece measures 68-71-74-77-80-83 cm = 26¾"-28"-29⅛"-30⅜"-31½"-32¾", knit the next row from the wrong side, then bind off with knit from the right side. Work the other shoulder in the same way. The front piece measures approx. 68-71-74-77-80-83 cm = 26¾"-28"-29⅛"-30⅜"-31½"-32¾" from the shoulder down. SLEEVE: Cast on 17-17-18-19-19-20 stitches with needle size 10 mm = US 15 and 1 strand of each quality (= 2 strands). Work A.1 back and forth with 1 edge stitch in garter stitch on each side for 3 cm = 1⅛". Change to needle size 15 mm = US 19 and work stockinette stitch back and forth with 1 edge stitch in garter stitch on each side. When the piece measures 6-6-6-8-9-9 cm = 2⅜"-2⅜"-2⅜"-3⅛"-3½"-3½", increase 1 stitch at the beginning of the row – read INCREASE TIP. Repeat the increase, alternately at the end and beginning of the row, every 5½-4-4-3½-2½-2½ cm = 2⅛"-1½"-1½"-1¼"-1¼"-⅞"-⅞" a total of 4-5-5-5-6-6 times on each side = 25-27-28-29-31-32 stitches. Continue working until the sleeve measures 46-46-45-44-41-40 cm = 18"-18"-17¾"-17¼"-16⅛"-15¾" (shorter measurements in larger sizes due to broader shoulders and longer sleeve cap). Insert 1 marker on each side of the sleeve – they mark the bottom of the armhole. Continue working with 1 edge stitch in garter stitch on each side until the sleeve measures 49-49-48-48-47-47 cm = 19¼"-19¼"-19"-19"-18½"-18½". Loosely bind off with knit from the right side. Work the other sleeve in the same way. On the picture the sleeves are slightly turned up. ASSEMBLY: Sew the shoulder seams inside the bind-off edge. Sew in the sleeves and sew the bottom of the armhole – the markers on the sleeve should match with the sides of the body. Sew the underarm and side seams in one go – sew in the outermost loop of the outermost stitch so the seam is flat; stop when there is 25 to 30 cm = 9¾" to 11¾" left for the split on each side. |
|||||||
Diagram explanations |
|||||||
|
|||||||
|
|||||||
Have you finished this pattern?Tag your pictures with #dropspattern #whitecomfortsweater or submit them to the #dropsfan gallery. Do you need help with this pattern?You'll find 22 tutorial videos, a Comments/Questions area and more by visiting the pattern on garnstudio.com. © 1982-2025 DROPS Design A/S. We reserve all rights. This document, including all its sub-sections, has copyrights. Read more about what you can do with our patterns at the bottom of each pattern on our site. |
|||||||


With over 40 years in knitting and crochet design, DROPS Design offers one of the most extensive collections of free patterns on the internet - translated to 17 languages. As of today we count 314 catalogs and 11821 patterns - 11811 of which are translated into English (US/in).
We work hard to bring you the best knitting and crochet have to offer, inspiration and advice as well as great quality yarns at incredible prices! Would you like to use our patterns for other than personal use? You can read what you are allowed to do in the Copyright text at the bottom of all our patterns. Happy crafting!
Post a comment to pattern DROPS 213-30
We would love to hear what you have to say about this pattern!
If you want to leave a question, please make sure you select the correct category in the form below, to speed up the answering process. Required fields are marked *.