
Looking for a yarn?


 " loading="lazy"/>


 " loading="lazy"/>


Comments / Questions (26)
![]() Karen Dainter wrote:
Karen Dainter wrote:
The filled in square is meant to be worked from the wrong side but I’m in the right side. What do I do?
23.02.2025 - 15:07DROPS Design answered:
Dear Karen, the filled in square is only worked on wrong side rows: you can check that this symbol is only worked on even rows: row 2, row 4, row 6, e.t.c. in the charts. Since you start working the charts on a right side row (as indicated at the end of the neck) the even rows of the charts will be worked always on the wrong side. Happy knitting!
23.02.2025 - 23:26
![]() Karen Dainter wrote:
Karen Dainter wrote:
You have just stated the second row of neck. I’ve already done this. I’m on the first row of the yoke now and the issue is as stated below. Please help Thanks
23.02.2025 - 14:27DROPS Design answered:
Dear Karen, if you had 87 stitches at the neck you would have 87 stitches now as well. In the first row of the yoke you work A.1b over A.1a (both are only 1 stitch), A.2b over A.2a (so a 3 stitch pattern over a 3 stitch pattern) and A.3b over A.3a (so a 5-stitch pattern over a 5-stitch pattern). The number of stitches doesn't change between the end of the neck and the yoke; the increases start from this round onwards. Happy knitting!
23.02.2025 - 23:25
![]() Karen wrote:
Karen wrote:
Hi 87 stitches. Just started yoke. There is one more stitch than the instructions. I have 87 as stated but the instructions actually require one less 86. Please help
12.02.2025 - 15:15
![]() Karen Dainter wrote:
Karen Dainter wrote:
Hi 87 stitches. Just started yoke. There is one more stitch than the instructions. I have 87 as stated but the instructions actually require one less 86. Please help
12.02.2025 - 15:14DROPS Design answered:
Dear Mrs Dainter, work the 87 sts as follows: 5 sts garter stitch, A.1a (= 1 st), then work *A.2a (= 3 sts), A.3a (= 5 sts) a total of 9 times (= 8 sts x 9 )=72 sts, then work A.2a (3 sts), A.1a (1 st) and 5 sts in garter stitch = 5+1+72+3+1+5=87 sts. Happy knitting!
12.02.2025 - 16:18
![]() Karen wrote:
Karen wrote:
Both really. I’m from the UK and our instructions are very different. I’m starting the cardigan September story and am not getting very far even though I’ve knitted all my life. When you say continue this pattern after the first two rows am I to think I just repeat the second row? If I included the first row it wouldn’t look like a rib. I can see that this will take me some time. Help
06.02.2025 - 20:40DROPS Design answered:
Dear Karen, after you have worked Row 2 with first row diagrams A.1a to A.3a continue like this means read the digrams from the left towards the right from WS: 5 front band sts in gartrer st, A.1a, A.2a, repeat (A.3a, A.2a) and finish with A.1a and 5 sts garter stitch - reading diagrams from the left towards the right from WS. Happy knitting!
07.02.2025 - 15:39
![]() Fiona wrote:
Fiona wrote:
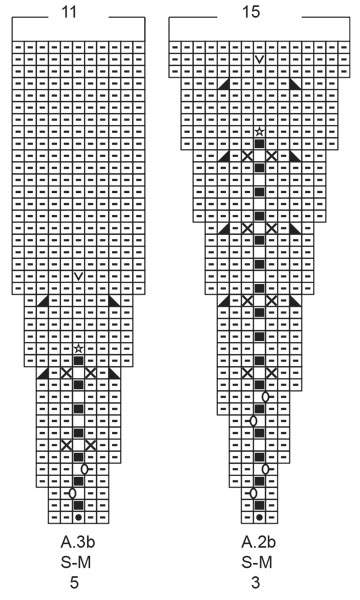
Grid A2b & A3b 1 box with 0 on the line of next stitch but there is no instruction for this. The last instruction on diagram says between 2 stitches make 1 yarn over but no matching symbol on grid A2b or A3b. What do these symbols mean, please. Thank you
19.11.2024 - 18:42DROPS Design answered:
Dear Fiona, the 0 is matching the last symbol => yarn over to increase the number of stitches in each repeat, so that you can see on next row there is one extra stitch on the same side of middle stitch as you made this yarn over. Happy knitting!
20.11.2024 - 07:47
![]() Fiona wrote:
Fiona wrote:
Grid A2b & A3b 1 box with 0 on the line of next stitch but there is no instruction for this. The last instruction on diagram says between 2 stitches make 1 yarn over but no matching symbol on A2b or A3b. Thank you
18.11.2024 - 12:01DROPS Design answered:
Dear Fiona, the 0 = between 2 stitches make 1 yarn over; yarn over is worked twisted on next row to avoid a hole. It's the same oval; when the 0 is not worked twisted then it's drawn as a black-filled 0 (which is not used in these charts). So you make 1 yarn over between the symbol of the square to the right and the symbol of the square to the left of the 0 (or inversed when you work from the wrong side: first the left square and then the right square). Happy knitting!
24.11.2024 - 18:18
![]() Fiona wrote:
Fiona wrote:
I am following Medium pattern Thank you
17.11.2024 - 21:15
![]() Fiona wrote:
Fiona wrote:
For row 3 "continue this pattern? what exactly do you mean ? what pattern? If you mean the grids what grid. Thank you
17.11.2024 - 21:11DROPS Design answered:
Dear Fiona, it means that you work as established in row 2, with the garter stitches on each side and the charts. Work garter stitch over garter stitch, row 2 of A.1a over row 1 of A.1a, row 2 of A.2a over row 1 of A.2a and row 2 of A.3a over row 2 of A.3a. Happy knitting!
18.11.2024 - 00:15
![]() Fiona wrote:
Fiona wrote:
Could you explain these instructions please ,Work A.1b over A.1a, A.2b over A.2a and A.3b over A.3a. Thank you
09.11.2024 - 19:16DROPS Design answered:
Dear Fiona, it means that, over the stitches that were worked according to chart A.1a you will now work A.1b; the stitches worked according to chart A.2a will now be worked according to chart A.2b and the stitches worked according to chart A.3a will now be worked according to chart A.3b. Happy knitting!
10.11.2024 - 19:59
|
|||||||||||||||||||||||||||||||
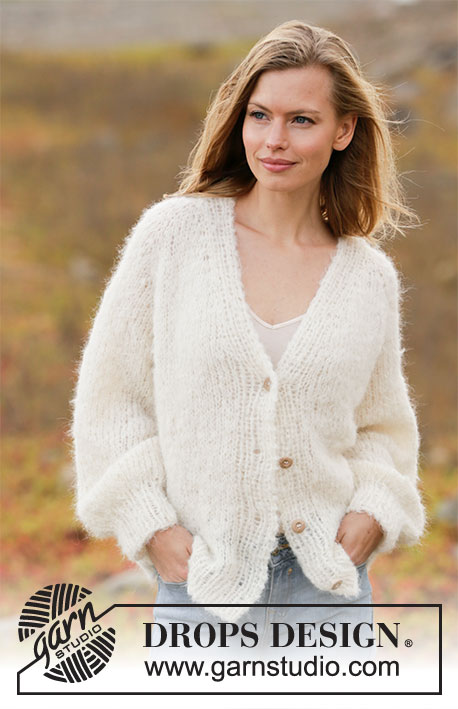
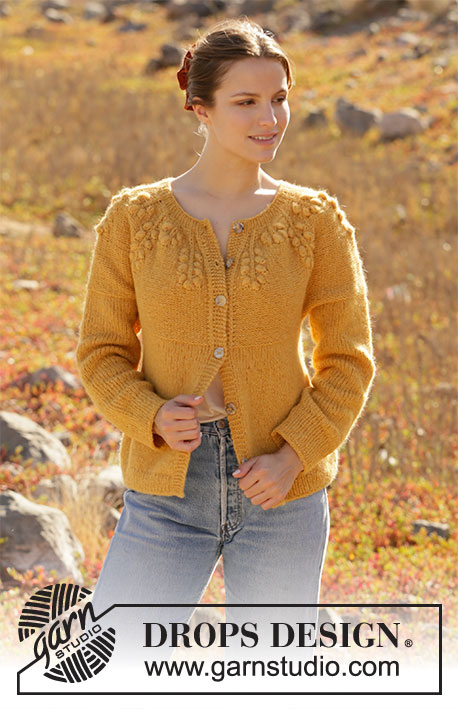
September Story#septemberstorycardigan |
|||||||||||||||||||||||||||||||
 |
 |
||||||||||||||||||||||||||||||
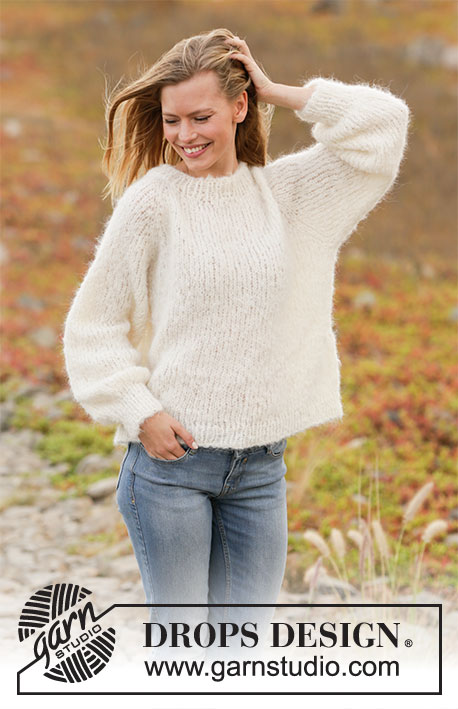
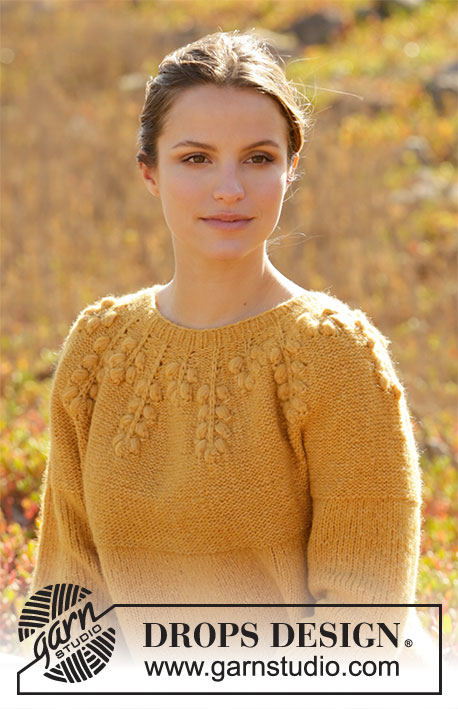
Knitted jacket with round yoke in DROPS Air. The piece is worked top down with bobbles. Sizes S - XXXL.
DROPS 213-26 |
|||||||||||||||||||||||||||||||
|
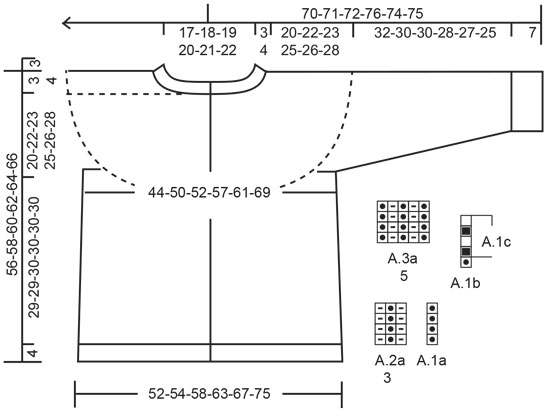
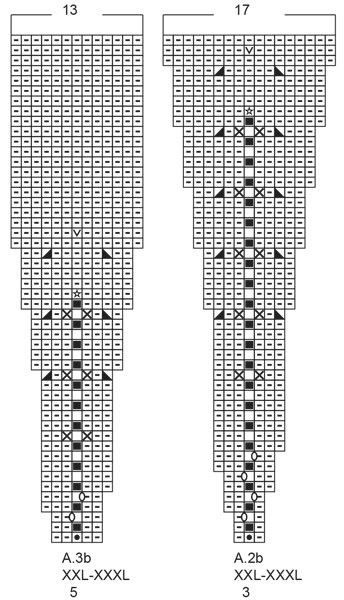
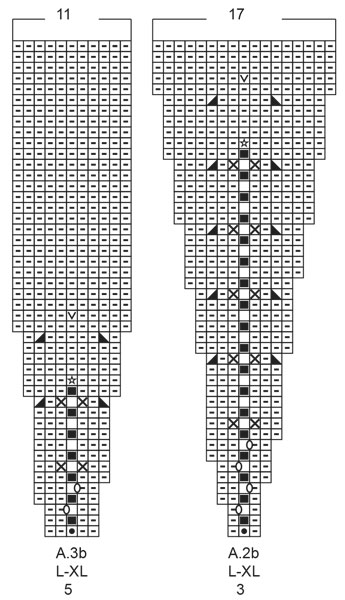
------------------------------------------------------- EXPLANATIONS FOR THE PATTERN: ------------------------------------------------------- RIDGE/GARTER STITCH (worked back and forth): Knit all rows. 1 ridge in height = Knit 2 rows. PATTERN: See diagrams A.1 to A.3. Choose diagram for your size. The diagrams show all rows in the pattern from the right side. INCREASE TIP (for sides of body): Work until there are 2 stitches left before the marker thread, make 1 yarn over, knit 4 (marker thread sits between these 4 stitches) make 1 yarn over (= 2 stitches increased). On the next row work the yarn overs twisted to avoid holes. The new stitches are then worked in stockinette stitch. DECREASE TIP (for sleeves): Decrease 1 stitch on each side of the marker thread as follows: Work until there are 3 stitches left before the marker thread, knit 2 together, knit 2 (marker thread sits between these 2 stitches), slip 1 stitch as if to knit, knit 1 and pass the slipped stitch over the knitted stitch (= 2 stitches decreased). BINDING-OFF TIP: To avoid the bind-off edge being tight you can bind off with a larger size needle. If the edge is still tight, make 1 yarn over after approx. each 4th stitch at the same time as binding off and the yarn overs are bind off as normal stitches. BUTTONHOLES: Work buttonholes on right band (when garment is worn). Work from the right side when there are 3 stitches left on row as follows: Make 1 yarn over, knit 2 together and knit the last stitch. On the next row knit the yarn over to leave a hole. The first buttonhole is worked when the neck measures 1½-2 cm = ½"-¾". Then work the other 5-5-6-6-7-7 buttonholes with approx. 8½-8½-8-8-7-7½ cm = 3¼"-3¼"-3⅛"-3⅛"-2¾"-2⅞" between each one. ------------------------------------------------------- START THE PIECE HERE: ------------------------------------------------------- JACKET – SHORT OVERVIEW OF THE PIECE: The piece is worked back and forth with circular needle from mid front and top down. The sleeves are worked in the round with double pointed needles, top down. NECK: Cast on 79-87-87-95-95-103 stitches (including 5 band stitches on each side) with circular needle size 4.5 mm = US 7 and Air. ROW 1 (= wrong side): Work 5 band stitches in GARTER STITCH – read description above, purl 69-77-77-85-85-93 and work 5 band stitches in garter stitch. ROW 2 (= right side): Work 5 band stitches in garter stitch, A.1a (= 1 stitch), * A.2a (= 3 stitches), A.3a (= 5 stitches) *, work from *-* until there are 9 stitches left (= 8-9-9-10-10-11 times in width), A.2a over 3 stitches, A.1a over 1 stitch and finish with 5 band stitches in garter stitch. Continue this pattern. Remember the BUTTONHOLES on the right band – read description above. When the piece measures 3-3-3-3-4-4 cm = 1⅛"-1⅛"-1⅛"-1⅛"-1½"-1½", adjust so the next row is from the right side, change to circular needle size 5.5 mm = US 9. Insert 1 marker after the band at the beginning of the row; the yoke will be measured from this marker! YOKE: Work A.1b over A.1a, A.2b over A.2a and A.3b over A.3a. The bands are worked in garter stitch to finished length. When A.1b has been worked 1 time in height, repeat A.1c. REMEMBER THE KNITTING GAUGE! When A.2b and A.3b have been completed 1 time in height there are 235-261-281-309-329-359 stitches on the needle. Knit from the wrong side and purl from the right side, with 5 band stitches in garter stitch on each side until the piece measures 20-22-23-25-26-28 cm = 8"-8¾"-9"-9¾"-10¼"-11" from the marker. The yoke is now divided for body and sleeves as follows: Knit 37-42-44-48-51-57, place the next 48-52-58-64-68-70 stitches on 1 thread for the sleeve, cast on 6 new stitches on the needle (= in side under the sleeve), knit 65-73-77-85-91-105 (= back piece), place the next 48-52-58-64-68-70 stitches on 1 thread for the sleeve, cast on 6 new stitches on the needle (= in side under the sleeve) and knit the remaining 37-42-44-48-51-57 stitches. Body and sleeves are finished separately. THE PIECE IS NOW MEASURED FROM HERE! BODY: = 151-169-177-193-205-231 stitches. Insert 1 marker thread 40-45-47-51-54-60 stitches in from each side (= sides of body). There are 71-79-83-91-97-111 stitches between the threads on the back piece. Allow the threads to follow your work onwards; they will be used when increasing in the sides. Work stockinette stitch with 5 band stitches in garter stitch on each side of the piece. When the piece measures 3 cm = 1⅛" from the division, increase 1 stitch on each side of both marker threads – read INCREASE TIP (= 4 stitches increased). Increase like this every 4 cm = 1½" a total of 6-4-5-5-5-5 times = 175-185-197-213-225-251 stitches. When the piece measures 29-29-30-30-30-30 cm = 11⅜"-11⅜"-11¾"-11¾"-11¾"-11¾" from the division, change to circular needle size 4.5 mm = US 9 and work rib as follows from the right side: 5 band stitches in garter stitch, * knit 1, purl 1 *, work from *-* until there are 6 stitches left, knit 1 and 5 band stitches in garter stitch. When the rib measures 4 cm = 1½" bind off with knit from the right side – read BINDING-OFF TIP. SLEEVE: Place the 48-52-58-64-68-70 stitches from the thread on the one side of the piece on short circular needle size 5.5 mm = US 9 and knit up 1 stitch in each of the 6 stitches cast on under the sleeve = 54-58-64-70-74-76 stitches. Insert a marker thread in the middle of the 6 stitches under the sleeve. Allow the thread to follow your work onwards; it will be used when decreasing under the sleeve. Start at the marker thread and knit in the round. When the sleeve measures 3 cm = 1⅛" from the division, decrease 2 stitches mid under the sleeve – read DECREASE TIP. Decrease like this every 6-3-2½-2-1½-1½ cm = 2⅜"-1⅛"-⅞"-¾"-½"-½" a total of 5-7-9-11-12-12 times = 44-44-46-48-50-52 stitches. Continue working until the sleeve measures 32-30-30-28-27-25 cm = 12½"-11¾"-11¾"-11"-10⅝"-9¾" from the division (there is approx. 7 cm = 2¾" left to finished length; you can try the jumper on and work to desired length). Change to double pointed needles size 4.5 mm = US 7 and work rib (= knit 1, purl 1). Bind off when the rib measures 7 cm = 2¾". The sleeve measures approx. 39-37-37-35-34-32 cm = 15¼"-14½"-14½"-13¾"-13⅜"-12½" from the division. Work the other sleeve in the same way. ASSEMBLY: Sew the buttons onto the left band. |
|||||||||||||||||||||||||||||||
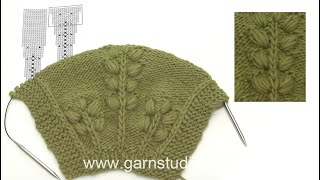
Diagram explanations |
|||||||||||||||||||||||||||||||
|
|||||||||||||||||||||||||||||||
|
|||||||||||||||||||||||||||||||
|
|||||||||||||||||||||||||||||||
|
|||||||||||||||||||||||||||||||
|
|||||||||||||||||||||||||||||||
Have you finished this pattern?Tag your pictures with #dropspattern #septemberstorycardigan or submit them to the #dropsfan gallery. Do you need help with this pattern?You'll find 27 tutorial videos, a Comments/Questions area and more by visiting the pattern on garnstudio.com. © 1982-2025 DROPS Design A/S. We reserve all rights. This document, including all its sub-sections, has copyrights. Read more about what you can do with our patterns at the bottom of each pattern on our site. |
|||||||||||||||||||||||||||||||


With over 40 years in knitting and crochet design, DROPS Design offers one of the most extensive collections of free patterns on the internet - translated to 17 languages. As of today we count 314 catalogs and 11822 patterns - 11812 of which are translated into English (US/in).
We work hard to bring you the best knitting and crochet have to offer, inspiration and advice as well as great quality yarns at incredible prices! Would you like to use our patterns for other than personal use? You can read what you are allowed to do in the Copyright text at the bottom of all our patterns. Happy crafting!
Post a comment to pattern DROPS 213-26
We would love to hear what you have to say about this pattern!
If you want to leave a question, please make sure you select the correct category in the form below, to speed up the answering process. Required fields are marked *.