
Popular categories
Looking for a yarn?


Comments / Questions (37)
![]() Annette Ekdala wrote:
Annette Ekdala wrote:
Jag är snart färdig med min tröja och är väldigt nöjd med resultatet.Jag valde ett vitt garn och nu tycker jag att det på vissa ställen ser lite smutsigt ut. Funderar på om jag ska tvätta tröjan innan jag ger bort den till den som ska ha den. Har ni något råd?
21.04.2024 - 22:06DROPS Design answered:
Hej Annette, Ja et vitt garn bliver jo let smutsigt. Gå ind på farvekortet her på hjemmesiden og læs Tvättråd noga til det garn du har valgt :)
23.04.2024 - 14:20
![]() Anja B wrote:
Anja B wrote:
Ik wil dit patroon met 1 draad Sky breien . Is dat mogelijk ?
26.02.2024 - 11:26DROPS Design answered:
Dag Anja,
Het gaat erom dat de stekenverhouding overeenkomt met de stekenverhouding in het patroon. Wellicht moet je dan dikkere naalden gebruiken als je met 1 draad Sky wilt breien.
28.02.2024 - 20:21
![]() Anette wrote:
Anette wrote:
Jeg forstår ikke, hvordan man skal tage ud til bærestykke/skuldre. Der står, at man skal tage ud i masken med mærket (vrangmaske), men også at der skal tages ud før 1. mærke, mellem 2. og 3. mærke og efter 4. mærke. Man kan jo ikke tage ud i masken før eller efter mærket - det er jo en retmaske m omslag?\r\nMvh\r\nAnette
16.01.2024 - 19:17DROPS Design answered:
Hej Anette, vi har lavet 2 rigtig tydelige videoer til denne model, du finder dem nederst i opskriften - husk at du kan spole, køre den langsomt og stoppe den helt :)
17.01.2024 - 13:21
![]() Hannelore wrote:
Hannelore wrote:
Ich möchte dieses Modell nach dieser Anleitung mit nur einer Garnsorte stricken. Welches Garn kann ich nehmen und welche Menge brauche ich?
11.09.2023 - 13:59DROPS Design answered:
Liebe Hannelore, vielleicht können Sie mit 1 Faden der Garngruppe C mal versuchen - stricken Sie im voraus Ihre Maschenprobe, so können Sie auch mal schauen, ob Ihnen die Textur gefällt. Gerne kann Ihnen damit Ihr DROPS Händler - auch per Telefon oder per E-Mail weiterhelfen. Viel Spaß beim stricken!
11.09.2023 - 16:08
![]() Sigrid Sørensen wrote:
Sigrid Sørensen wrote:
Veldig synd at det ikke er presisert hvor mange masker som skal være på ermene og for- og bakstykke etter hvert parti med øking. Jeg har 12 masker for lite på bakstykket, 1 maske for mye på hvert erme og 10 masker for mye på forstykket. Jeg kan ikke se på verken oppskriften eller videoen hvordan det har blitt så feil. Hva har skjedd?
06.01.2023 - 15:44DROPS Design answered:
Hej Sigrid, det er svært at gætte sig til hvad der er gået galt, prøv at få hjælp i butikken hvor du har købt garnet... Vi tager til os kritikken og prøver at lægge antal masker til for udtagninger fremover. :)
10.01.2023 - 11:58
![]() Merli wrote:
Merli wrote:
I have a question about the sleeve cap. I am making S size and after the 8 times increases my piece measures about 17 cm, whereas its should be 20 cm "The piece measures approx. 20-22-24-24-28-29 cm, measured from the marker mid-back." And after that it should be knitted to 24 cm. Can I just knit now to 24 cm or then everything will go out of porportion? I usually wear XS size clothes, so if the sweater would come out a little smaller, it shouldn´t be aproblem
28.10.2022 - 15:46DROPS Design answered:
Dear Merli, yes sure you can continue working until piece measures 24 cm - just be aware that you might require more yarn if your tension is not the same. Read more here. Happy knitting!
31.10.2022 - 07:54
![]() Kasia wrote:
Kasia wrote:
Witam, jak przerabiać oczka z narzutami na prawo ? Czy razem z oczkiem?
30.11.2021 - 17:35DROPS Design answered:
Witaj Kasiu, chodzi o przerobienie oczka i narzutu razem na prawo? Napisz o który fragment wzoru chodzi. Pozdrawiam!
01.12.2021 - 08:31
![]() Kasia wrote:
Kasia wrote:
Serdecznie dziękuję za pomoc w zrozumieniu opisu. Pozdrawiam
19.11.2021 - 14:44
![]() Kasia wrote:
Kasia wrote:
Witam, proszę jeszcze o radę co zrobić w przypadku , gdy wszystkich oczek mam 176 a nie 174 czyli o 2 za dużo w rozm. X . Podzieliłam na przód, tył i rękawy nie licząc narzutów, no i zostały mi dwa oczka. Bardzo nie chciałabym pruć robótki . Nie rozumiem również polecenia aby przerobić 6 dodanych oczek pod rękawem, nie przerabiając razem oczek i narzutów? Bardzo proszę o pomoc
18.11.2021 - 20:30DROPS Design answered:
Witaj Kasiu, 1. skoro musisz mieć parzystą liczbę oczek na ścieg angielski na okrągło, to podziel robótkę tak: przód i tył bez zmian, czyli po 53 oczka (106), a na rękawy zdejmij o 1 oczko (to nadplanowe) więcej. Później nabierz pod rękawem nie 6, ale 5 oczek. Nic nie będzie widać. 2. nabierasz oczka pod rękawem i przerabiasz je na prawo, dopiero od kolejnego okrążenia wykonuj ścieg angielski. Pozdrawiamy!
19.11.2021 - 08:55
![]() Kasia wrote:
Kasia wrote:
Dzień dobry, Jeśli chodzi o podział robótki na tył przód i rękawy , jak liczyć oczka , bez narzutów i jak te dwa ( w sumie trzy) oczka dodane do każdego markera?
18.11.2021 - 16:48DROPS Design answered:
Witaj Kasiu, jak dzielisz robótkę to liczysz oczka następująco: 1 oczko = oczko i narzut. Co do tych 2 dodanych oczek, to przerabiasz je w kolejnym okrążeniu następująco: 'W następnym okrążeniu przerobić te 3 oczka następująco: wykonać 1 narzut, zdjąć 1 oczko jak do przerobienia na lewo, przerobić narzut na prawo, wykonać 1 narzut, zdjąć 1 oczko jak do przerobienia na lewo'.> patrz DODAWANIE OCZEK. Koniecznie prześlij zdjęcia do naszej galerii :) Pozdrawiamy!
19.11.2021 - 09:03
|
||||
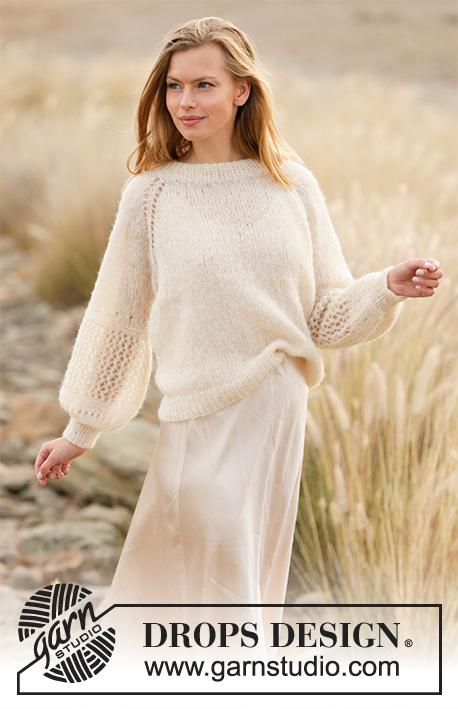
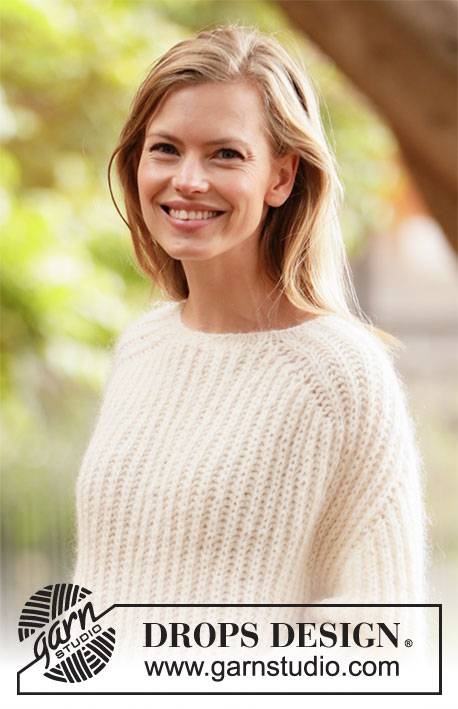
Cloud Fluff#cloudfluffsweater |
||||
 |
 |
|||
Knitted sweater with set-in sleeves without seams in DROPS Sky and DROPS Kid-Silk. The piece is worked top down in English rib. Sizes S - XXXL.
DROPS 212-14 |
||||
|
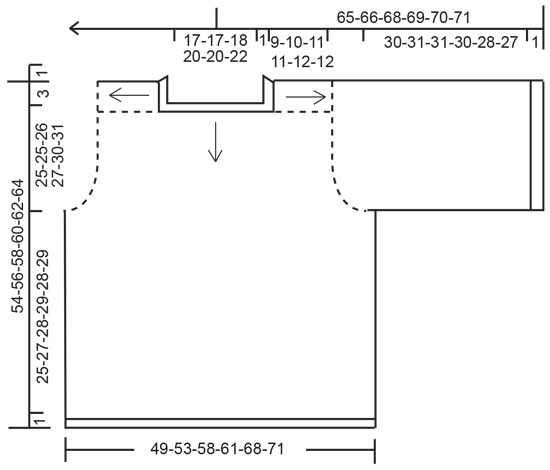
------------------------------------------------------- EXPLANATIONS FOR THE PATTERN: ------------------------------------------------------- DECREASE TIP-1 (evenly spaced): To work out how to decrease evenly, count the total number of stitches on needle (e.g. 66 stitches) and divide by number of decreases to be made (e.g. 8) = 8.25. In this example decrease by knitting approx. each 7th and 8th stitch together. ENGLISH RIB WITH YARN OVERS – in the round: ROUND 1: * Knit 1, make 1 yarn over, slip 1 stitch as if to purl *, work from *-* to end of round. ROUND 2: * Make 1 yarn over, slip 1 stitch as if to purl, purl the yarn over and slipped stitch together *, work from *-* to end of round. ROUND 3: * Knit the yarn over and slipped stitch together, make 1 yarn over, slip 1 stitch as if to purl *, work from *-* to end of round. Repeat rounds 2 and 3 onwards. INCREASE TIP-1: All increases are worked on a round where yarn overs and stitches are purled together. Work 3 stitches in the stitch and yarn-over with the markers as follows: Purl together the yarn over and stitch but do not slip the stitch and yarn-over off the left needle, make 1 yarn over the right needle and purl together the stitch and yarn-over 1 more time, slip the purled stitch and yarn over that was purled in off the left needle = 3 stitches (= 2 stitches increased = a total of 8 stitches increased). On the next round work the 3 stitches as follows: Make 1 yarn over, slip 1 stitch as if to purl, knit the yarn over, make 1 yarn over, slip 1 stitch as if to purl. Then continue these stitches in English rib. NOTE! These markers should not be moved, increase continues in the same stitch. i.e. the number of stitches between 1st and 2nd increase on each shoulder remains the same. INCREASE TIP-2: All increases are worked on a round where yarn overs and stitches are purled together. INCREASE 1 ON SLEEVE CAP IS WORKED AS FOLLOWS: Work 3 stitches in the stitch and yarn-over and move the marker as follows: Purl together the yarn-over and stitch, insert 1 marker in this stitch (i.e. stitch on right needle), but do not slip the stitch and yarn over off the left needle, make 1 yarn over the right needle and purl together the stitch and yarn-over 1 more time, slip the purled stitch and yarn over that was purled in off the left needle = 3 stitches (= 2 stitches increased). The marker sits in the first increased stitch (= purled stitch). The next increase is worked in the stitch with the marker. INCREASE 2 ON SLEEVE CAP WORKED AS FOLLOWS: Work 3 stitches in the stitch and yarn over and move the marker as follows: Purl together the yarn over and stitch, but wait with slipping the stitch and yarn over off the left needle, make 1 yarn over the right needle, purl together the stitch and yarn-over 1 more time and insert the marker in this stitch, slip the purled stitch and yarn over that was purled in off the left needle = 3 stitches (= 2 stitches increased). The marker sits in the last increased stitch (= purled stitch). The next increase is worked in the stitch with the marker. On the next round work the 3 stitches as follows: Make 1 yarn over, slip 1 stitch as if to purl, knit the yarn over, make 1 yarn over, slip 1 stitch as if to purl. Then continue these stitches in English rib. BINDING-OFF TIP: To avoid the bind-off edge being tight you can bind off with a larger size needle. If the edge is still tight, make 1 yarn over after approx. each 4th stitch at the same time as binding off; the yarn overs are bind off as normal stitches. ------------------------------------------------------- START THE PIECE HERE: ------------------------------------------------------- SWEATER – SHORT OVERVIEW OF THE PIECE: The sweater is worked in one piece from the top down. You increase for the shoulders and sleeve caps. The yoke is divided for body and sleeves and the body continued in the round with circular needle. The sleeves are worked in the round with double pointed needles/ short circular needle. NECK: Cast on 62-62-66-72-72-76 stitches with circular needle size 6 mm = US 10 and 1 strand Sky and 1 strand Kid-Silk. Knit 1 round. Knit 1 round and decrease 8-8-8-10-10-10 stitches evenly spaced – read DECREASE TIP = 54-54-58-62-62-66 stitches. On the next round insert 4 markers as follows (the markers are inserted in the stitches; round begins approx. mid-back): Knit 7-7-9-9-9-11, insert marker 1 in the next stitch and knit this stitch, knit 13, insert marker 2 in the next stitch and knit this stitch, knit 11-11-13-15-15-17, insert marker 3 in the next stitch and knit this stitch, knit 13, insert marker 4 in the next stitch and knit this stitch, knit the remaining 6-6-6-8-8-8 stitches. The stitches between markers 1 and 2 are the right shoulder, between markers 3 and 4 the left shoulder. You will increase in the stitches with markers later. Insert 1 marker at the beginning of the round; the yoke is measured from this marker! YOKE: Work ENGLISH RIB WITH YARN OVERS in the round – read description above, over all stitches and increase for the shoulders as follows: SHOULDER: The first increase is worked on round 2 in the English rib (the stitches with markers are purled stitches). Increase 2 stitches in each of the stitches with markers – read INCREASE TIP-1. Increase like this every 4th round a total of 6-7-8-8-9-9 times = 102-110-122-126-134-138 stitches. Increase in the same stitch, i.e. the number of stitches between markers 1 and 2, and between markers 3 and 4 remain the same; the increased stitches are worked before marker 1, between markers 2 and 3 and after marker 4. REMEMBER THE KNITTING GAUGE! The piece measures approx. 9-10-11-11-12-12 cm = 3½"-4"-4⅜"-4⅜"-4¾"-4¾" from the marker in the neck. Now increase for the sleeve caps as follows: SLEEVE CAP: Work 3 rounds after the final increase on the shoulder. On the next round with purl (i.e. yarn over and stitch are purled together) increase for the sleeve cap and the markers are moved as follows: HALF BACK PIECE: Work as before as far as the stitch with marker 1. RIGHT SLEEVE CAP: Increase-1 on the right sleeve cap is worked in the next stitch (= stitch with marker 1 = purled stitch) – read INCREASE TIP-2, knit 1, increase-2 on the right sleeve cap is worked in the next stitch (= purled stitch) (= 4 stitches increased). FRONT PIECE: Work as before until there are 2 stitches left before the stitch with marker 4, remove markers 2 and 3. LEFT SLEEVE CAP: Increase-1 on the left sleeve cap is worked in the next stitch (= purled stitch), knit 1, increase-2 on the left sleeve cap is worked in the next stitch (= stitch with marker 4 = purled stitch) (= 4 stitches increased). HALF BACK PIECE: Work as before to end of round. You have now inserted 4 new markers in the piece. Increase 2 stitches in each stitch with a marker and move the markers every 4th round a total of 8-9-10-10-12-13 times = 166-182-202-206-230-242 stitches. The markers are moved to the outermost stitch on each side of each sleeve cap each time you increase, i.e. there are 4 more new stitches between the markers on the sleeve caps each time you increase. The piece measures approx. 20-22-24-24-28-29 cm = 8"-8 3/42-9½"-9½"-11"-11⅜", measured from the marker mid-back. Continue in the round with English rib until the piece measures 24-24-25-26-29-30 cm = 9 1/2-9½"-9¾"-10¼"-11⅜"-11¾", measured from the marker mid-back. Now increase 2 stitches in each stitch with a marker (= 8 stitches increased) = 174-190-210-214-238-250 stitches. Work 1 round then divide for the body and sleeves as follows, working English rib as before: Work 27-29-31-33-37-39 stitches (= half back piece), place the next 34-38-42-42-46-48 stitches on a thread for sleeve and cast on 6-6-6-8-8-8 new stitches under the sleeve, work 53-57-63-65-73-77 stitches (= front piece), place the next 34-38-42-42-46-48 stitches on a thread for sleeve and cast on 6-6-6-8-8-8 new stitches under the sleeve and work the remaining 26-28-32-32-36-38 stitches (= half back piece). BODY: = 118-126-138-146-162-170 stitches. Continue in the round with English rib. On the first round work the 6-6-6-8-8-8 new stitches under each sleeve without working the stitches and yarn-overs together. When the piece measures 25-27-28-29-28-29 cm = 9¾"-10⅝"-11"-11⅜"-11"-11⅜" from where body and sleeves were divided, knit 3 rounds. Bind off with knit – read BINDING-OFF TIP. SLEEVES: Place the 34-38-42-42-46-48 stitches from the thread on the one side of the piece on double pointed needles/ short circular needle size 6 mm = US 10 and knit up 1 stitch in each of the 6-6-6-8-8-8 stitches cast on under the sleeve = 40-44-48-50-54-56 stitches. Continue in the round with English rib. On the first round work the 6-6-6-8-8-8 new stitches under the sleeve without working the stitches and yarn-overs together. When the piece measures 30-31-31-30-28-27 cm = 11⅜"-12¼"-12¼"-11⅜"-11"-10⅝" from where the sleeve was divided from the body, knit 3 rounds. Then bind off – remember BINDING-OFF TIP. Work the other sleeve in the same way. |
||||
Diagram explanations |
||||
|
||||
|
||||
Have you finished this pattern?Tag your pictures with #dropspattern #cloudfluffsweater or submit them to the #dropsfan gallery. Do you need help with this pattern?You'll find 14 tutorial videos, a Comments/Questions area and more by visiting the pattern on garnstudio.com. © 1982-2025 DROPS Design A/S. We reserve all rights. This document, including all its sub-sections, has copyrights. Read more about what you can do with our patterns at the bottom of each pattern on our site. |
||||


With over 40 years in knitting and crochet design, DROPS Design offers one of the most extensive collections of free patterns on the internet - translated to 17 languages. As of today we count 314 catalogs and 11822 patterns - 11812 of which are translated into English (US/in).
We work hard to bring you the best knitting and crochet have to offer, inspiration and advice as well as great quality yarns at incredible prices! Would you like to use our patterns for other than personal use? You can read what you are allowed to do in the Copyright text at the bottom of all our patterns. Happy crafting!
Post a comment to pattern DROPS 212-14
We would love to hear what you have to say about this pattern!
If you want to leave a question, please make sure you select the correct category in the form below, to speed up the answering process. Required fields are marked *.