
Popular categories
Looking for a yarn?


|
||||
Cloud Fluff |
||||
 |
 |
|||
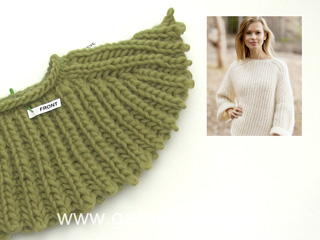
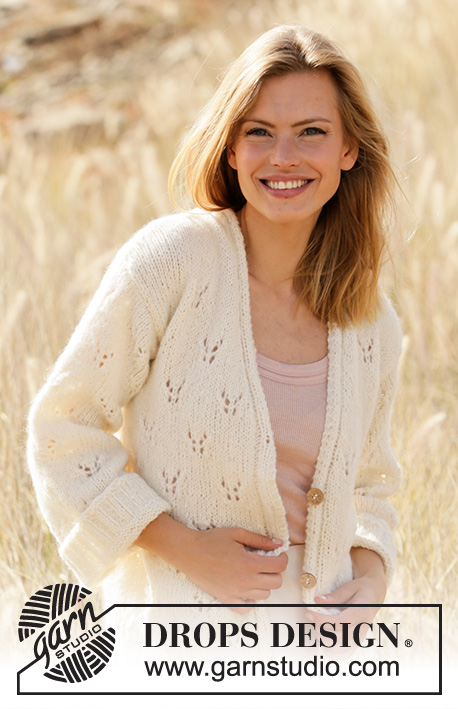
Knitted sweater with set-in sleeves without seams in DROPS Sky and DROPS Kid-Silk. The piece is worked top down in English rib. Sizes S - XXXL.
DROPS 212-14 |
||||
|
------------------------------------------------------- EXPLANATIONS FOR THE PATTERN: ------------------------------------------------------- DECREASE TIP-1 (evenly spaced): To work out how to decrease evenly, count the total number of stitches on needle (e.g. 66 stitches) and divide by number of decreases to be made (e.g. 8) = 8.25. In this example decrease by knitting approx. each 7th and 8th stitch together. ENGLISH RIB WITH YARN OVERS – in the round: ROUND 1: * Knit 1, make 1 yarn over, slip 1 stitch as if to purl *, work from *-* to end of round. ROUND 2: * Make 1 yarn over, slip 1 stitch as if to purl, purl the yarn over and slipped stitch together *, work from *-* to end of round. ROUND 3: * Knit the yarn over and slipped stitch together, make 1 yarn over, slip 1 stitch as if to purl *, work from *-* to end of round. Repeat rounds 2 and 3 onwards. INCREASE TIP-1: All increases are worked on a round where yarn overs and stitches are purled together. Work 3 stitches in the stitch and yarn-over with the markers as follows: Purl together the yarn over and stitch but do not slip the stitch and yarn-over off the left needle, make 1 yarn over the right needle and purl together the stitch and yarn-over 1 more time, slip the purled stitch and yarn over that was purled in off the left needle = 3 stitches (= 2 stitches increased = a total of 8 stitches increased). On the next round work the 3 stitches as follows: Make 1 yarn over, slip 1 stitch as if to purl, knit the yarn over, make 1 yarn over, slip 1 stitch as if to purl. Then continue these stitches in English rib. NOTE! These markers should not be moved, increase continues in the same stitch. i.e. the number of stitches between 1st and 2nd increase on each shoulder remains the same. INCREASE TIP-2: All increases are worked on a round where yarn overs and stitches are purled together. INCREASE 1 ON SLEEVE CAP IS WORKED AS FOLLOWS: Work 3 stitches in the stitch and yarn-over and move the marker as follows: Purl together the yarn-over and stitch, insert 1 marker in this stitch (i.e. stitch on right needle), but do not slip the stitch and yarn over off the left needle, make 1 yarn over the right needle and purl together the stitch and yarn-over 1 more time, slip the purled stitch and yarn over that was purled in off the left needle = 3 stitches (= 2 stitches increased). The marker sits in the first increased stitch (= purled stitch). The next increase is worked in the stitch with the marker. INCREASE 2 ON SLEEVE CAP WORKED AS FOLLOWS: Work 3 stitches in the stitch and yarn over and move the marker as follows: Purl together the yarn over and stitch, but wait with slipping the stitch and yarn over off the left needle, make 1 yarn over the right needle, purl together the stitch and yarn-over 1 more time and insert the marker in this stitch, slip the purled stitch and yarn over that was purled in off the left needle = 3 stitches (= 2 stitches increased). The marker sits in the last increased stitch (= purled stitch). The next increase is worked in the stitch with the marker. On the next round work the 3 stitches as follows: Make 1 yarn over, slip 1 stitch as if to purl, knit the yarn over, make 1 yarn over, slip 1 stitch as if to purl. Then continue these stitches in English rib. BINDING-OFF TIP: To avoid the bind-off edge being tight you can bind off with a larger size needle. If the edge is still tight, make 1 yarn over after approx. each 4th stitch at the same time as binding off; the yarn overs are bind off as normal stitches. ------------------------------------------------------- START THE PIECE HERE: ------------------------------------------------------- SWEATER – SHORT OVERVIEW OF THE PIECE: The sweater is worked in one piece from the top down. You increase for the shoulders and sleeve caps. The yoke is divided for body and sleeves and the body continued in the round with circular needle. The sleeves are worked in the round with double pointed needles/ short circular needle. NECK: Cast on 62-62-66-72-72-76 stitches with circular needle size 6 mm = US 10 and 1 strand Sky and 1 strand Kid-Silk. Knit 1 round. Knit 1 round and decrease 8-8-8-10-10-10 stitches evenly spaced – read DECREASE TIP = 54-54-58-62-62-66 stitches. On the next round insert 4 markers as follows (the markers are inserted in the stitches; round begins approx. mid-back): Knit 7-7-9-9-9-11, insert marker 1 in the next stitch and knit this stitch, knit 13, insert marker 2 in the next stitch and knit this stitch, knit 11-11-13-15-15-17, insert marker 3 in the next stitch and knit this stitch, knit 13, insert marker 4 in the next stitch and knit this stitch, knit the remaining 6-6-6-8-8-8 stitches. The stitches between markers 1 and 2 are the right shoulder, between markers 3 and 4 the left shoulder. You will increase in the stitches with markers later. Insert 1 marker at the beginning of the round; the yoke is measured from this marker! YOKE: Work ENGLISH RIB WITH YARN OVERS in the round – read description above, over all stitches and increase for the shoulders as follows: SHOULDER: The first increase is worked on round 2 in the English rib (the stitches with markers are purled stitches). Increase 2 stitches in each of the stitches with markers – read INCREASE TIP-1. Increase like this every 4th round a total of 6-7-8-8-9-9 times = 102-110-122-126-134-138 stitches. Increase in the same stitch, i.e. the number of stitches between markers 1 and 2, and between markers 3 and 4 remain the same; the increased stitches are worked before marker 1, between markers 2 and 3 and after marker 4. REMEMBER THE KNITTING GAUGE! The piece measures approx. 9-10-11-11-12-12 cm = 3½"-4"-4⅜"-4⅜"-4¾"-4¾" from the marker in the neck. Now increase for the sleeve caps as follows: SLEEVE CAP: Work 3 rounds after the final increase on the shoulder. On the next round with purl (i.e. yarn over and stitch are purled together) increase for the sleeve cap and the markers are moved as follows: HALF BACK PIECE: Work as before as far as the stitch with marker 1. RIGHT SLEEVE CAP: Increase-1 on the right sleeve cap is worked in the next stitch (= stitch with marker 1 = purled stitch) – read INCREASE TIP-2, knit 1, increase-2 on the right sleeve cap is worked in the next stitch (= purled stitch) (= 4 stitches increased). FRONT PIECE: Work as before until there are 2 stitches left before the stitch with marker 4, remove markers 2 and 3. LEFT SLEEVE CAP: Increase-1 on the left sleeve cap is worked in the next stitch (= purled stitch), knit 1, increase-2 on the left sleeve cap is worked in the next stitch (= stitch with marker 4 = purled stitch) (= 4 stitches increased). HALF BACK PIECE: Work as before to end of round. You have now inserted 4 new markers in the piece. Increase 2 stitches in each stitch with a marker and move the markers every 4th round a total of 8-9-10-10-12-13 times = 166-182-202-206-230-242 stitches. The markers are moved to the outermost stitch on each side of each sleeve cap each time you increase, i.e. there are 4 more new stitches between the markers on the sleeve caps each time you increase. The piece measures approx. 20-22-24-24-28-29 cm = 8"-8 3/42-9½"-9½"-11"-11⅜", measured from the marker mid-back. Continue in the round with English rib until the piece measures 24-24-25-26-29-30 cm = 9 1/2-9½"-9¾"-10¼"-11⅜"-11¾", measured from the marker mid-back. Now increase 2 stitches in each stitch with a marker (= 8 stitches increased) = 174-190-210-214-238-250 stitches. Work 1 round then divide for the body and sleeves as follows, working English rib as before: Work 27-29-31-33-37-39 stitches (= half back piece), place the next 34-38-42-42-46-48 stitches on a thread for sleeve and cast on 6-6-6-8-8-8 new stitches under the sleeve, work 53-57-63-65-73-77 stitches (= front piece), place the next 34-38-42-42-46-48 stitches on a thread for sleeve and cast on 6-6-6-8-8-8 new stitches under the sleeve and work the remaining 26-28-32-32-36-38 stitches (= half back piece). BODY: = 118-126-138-146-162-170 stitches. Continue in the round with English rib. On the first round work the 6-6-6-8-8-8 new stitches under each sleeve without working the stitches and yarn-overs together. When the piece measures 25-27-28-29-28-29 cm = 9¾"-10⅝"-11"-11⅜"-11"-11⅜" from where body and sleeves were divided, knit 3 rounds. Bind off with knit – read BINDING-OFF TIP. SLEEVES: Place the 34-38-42-42-46-48 stitches from the thread on the one side of the piece on double pointed needles/ short circular needle size 6 mm = US 10 and knit up 1 stitch in each of the 6-6-6-8-8-8 stitches cast on under the sleeve = 40-44-48-50-54-56 stitches. Continue in the round with English rib. On the first round work the 6-6-6-8-8-8 new stitches under the sleeve without working the stitches and yarn-overs together. When the piece measures 30-31-31-30-28-27 cm = 11⅜"-12¼"-12¼"-11⅜"-11"-10⅝" from where the sleeve was divided from the body, knit 3 rounds. Then bind off – remember BINDING-OFF TIP. Work the other sleeve in the same way. |
||||
Diagram explanations |
||||
|
||||

|
||||
|
Have you made this or any other of our designs? Tag your pictures in social media with #dropsdesign so we can see them! Do you need help with this pattern?You'll find tutorial videos, a Comments/Questions area and more by visiting the pattern on garnstudio.com. © 1982-2024 DROPS Design A/S. We reserve all rights. This document, including all its sub-sections, has copyrights. Read more about what you can do with our patterns at the bottom of each pattern on our site. |
||||


With over 40 years in knitting and crochet design, DROPS Design offers one of the most extensive collections of free patterns on the internet - translated to 17 languages. As of today we count 304 catalogs and 11422 patterns - 11417 of which are translated into English (US/in).
We work hard to bring you the best knitting and crochet have to offer, inspiration and advice as well as great quality yarns at incredible prices! Would you like to use our patterns for other than personal use? You can read what you are allowed to do in the Copyright text at the bottom of all our patterns. Happy crafting!
Comments / Questions (36)
Hej. Siffrorna går inte ihop i början av arbetet. Jag stickar den minsta storleken; har minskat till 54 maskor. Har satt ut markörerna enligt instruktioner; (7-13-11-13-6 ) men efter den fjärde markören återstår det mer än 6 maskor. Det ser ut som att markörerna är beräknade efter ett totalt masktal av 48, istället för 54.
14.05.2020 - 16:43DROPS Design answered:
Hej Du ska sticka 7 maskor och sedan sätta markören i nästa maska (dvs maska nr 8), sedan stickar du 13 maskor och sätter markören i nästa maska osv.. Du har alltså inte räknat med de maskor du sätter markören i och därför får du inte antalet att stämma. Lycka till!
18.05.2020 - 11:22Bonjour, Je vous propose une possibilité de traduire la description de vos modèles en langue russe. Bien à vous
23.02.2020 - 12:06Can you tell me which instructions to follow, in written pattern or video here,regarding increase 1 type as they differ? In pattern round 1 is knit 1,YO,slip 1 in video is YO,slip 1 knit 1.Round 2 in pattern is YO,slip 1,purl them together in video is purl together YO and slipped stitch ,YO,slip 1.Round 3 in pattern is knit YO and slipped stitch tog in video is YO,slip 1,knit them together.
11.02.2020 - 15:24DROPS Design answered:
Dear Dusica, The increase on shoulder is worked on round 2 in English rib - row 1 in English rib will be worked only one time, you then repeat row 2 and 3. You increase as explained under INCREASE TIP-1 working 3 stitches in the the Purl stitch + yarn over together -(= stitch in marker) as shown in the video. On next round, work the increased stitches in English rib (but without the yarn over). That's also what the video is showing. Happy knitting!
11.02.2020 - 15:45I just started this pattern in XL size and made round 1 in English rib pattern. Can you explain if I should continue English rib to stitch with marker,do incense 1 on that specific stitch and than continue rib?
11.02.2020 - 14:42DROPS Design answered:
Dear Dusica, yes correct you will start the increase now - increase as explained for your size, this video shows how to work the increases. Happy knitting!
11.02.2020 - 15:18See our both videos showing how to increase for shoulders and sleeves.
07.02.2020 - 14:06Découvrez nos vidéos montrant comment augmenter pour les épaules et les manches
Schauen Sie die beide Videos für die Zunahmen beim Schulter und Ärmel
Se begge våre video der vi viser økningene til skuldrene og ermtoppene.
Hello! I´m knitting this model, Cloud Fluff, and its a pleasure to knit following the instructions and to learn new. I've knitted only basic models earlier and had difficulties in figuring out how the shoulder part is to be knitted. But now I'm knitting the easy part of the blouse and when its ready I´ll share pictures of it in social media. Thank you for the great models and instructions!
29.01.2020 - 19:58Übersetzungsfehler in allen spanischen Anleitungen !Der deutsche Text ist wie folgt: Wenn für 10 cm mehr Maschen als in der Maschenprobe angegeben benötigt werden, zu einer dickeren Nadelstärke wechseln. In allen spanischen Anleitungen wird das falsch angegeben . Bitte um ein email um Ihnen die Erklärung senden zu können.
23.01.2020 - 20:43DROPS Design answered:
Liebe Frai Dawideit, könnten Sie bitte unter einem von diesen Anleitung schreiben? So kann der Text geprüft sein. Danke im voraus!
27.01.2020 - 07:52Kan jeg strikke denne model (212/14) i kid-silk i dobbeltgarn? Hilsen Anne-Dorte
22.01.2020 - 12:15DROPS Design answered:
Hej Anne-Dorte, ja men lav en strikkeprøve først så du er sikker på at du overholder strikkefastheden. Den vil blive lidt mere løs/luftig med 2 tråde fra garngruppe A. God fornøjelse!
30.01.2020 - 08:23Jeg har lyst til å strikke denne genseren i en annen farge enn hvit. F.eks mellomrosa Drops Sky. Hvilken farge kan dere anbefale å velge i den andre garntypen da?
21.01.2020 - 20:06DROPS Design answered:
Hei Rannveig. Farge er veldig personlig, slik at det beste for deg er å ta en titt på de kvalitetene som genseren kan strikkes i, og velge den fargen du mener vil passe deg best. God Fornøyelse!
27.01.2020 - 13:48Czy jest możliwe zamieszczenie wideoinstrukcji dotyczącej dodawania oczek na ramiona i zaokrąglenie rękawów ? Jest to całkowicie nowa metoda formowania rękawów/reglanu i myślę że więcej osób ma problem z prawidłowym zrozumieniem opisu. Będę bardzo wdzięczna za video bo wzór mi się bardzo podoba, jest nietuzinkowy. Z góry serdecznie dziękuję.
21.01.2020 - 14:40DROPS Design answered:
Witaj Ulu, już zgłosiłam taką prośbę. Sprawdzaj we wzorze czy video jest już dostępne. Dziękujemy za zainteresowanie naszymi wzorami i serdecznie pozdrawiamy!
21.01.2020 - 17:01